Are you looking for a better tool to improve the quality of your videos? When we need to fix our corrupted video file, we need a better tool to assist us. However, if the video clip is essential to you, it undoubtedly seems inconvenient. Knowing the causes of a terrible video is just as crucial as figuring out how to remedy a wrong video. However, discover the finest software to lessen your burden in this post to know how to fix a bad quality video.
Part 1. How to Fix a Bad Quality Video in AVAide Video Converter Effortlessly
When it comes to effortlessly fixing low-quality videos, AVAide Video Converter is your best choice. This outstanding software is powerful yet easy to use, effectively enhancing resolution and reducing video noise to improve overall quality. It also corrects video colors. Additionally, it comes equipped with a comprehensive toolkit for trimming, compressing videos, and performing other essential operations.
Unlike typical tools, this program operates without requiring an internet connection. Additionally, it features a clean, user-friendly interface with a modern design, delivering an optimal user experience. Its simplicity and ease of use have attracted numerous users to try it out. It supports both Windows and Mac systems. This allows you to edit videos multiple times as needed.
On the other hand, the conversion is speedy while maintaining the original file's quality. Each user may choose their own audio quality choices, changing the bitrate and sampling rate as they see suitable. Read the instructions below to discover how to use this fantastic tool.
- It can quickly improve the quality of all kinds of issue videos.
- It can convert MP4, MOV, MKV, FLV, SWF, and 300+ more formats.
- It is straightforward and enables you to utilize it without an internet connection.
- It has 30x faster conversion empowered with acceleration technology.

 Secure Download
Step 1Download Excellent Tool
First, download and install the tool by clicking the download button above. You can download this tool in a few minutes.
Step 2Go to Video Enhancer
After downloading the tool, navigate to the toolbox and select the Video Enhancer option. Then, you may upload your media file by clicking the (+) Plus button.

Step 3Upscale Resolution
After you've selected your video file, you may upscale it to high quality by clicking the Upscale Resolution button and then selecting your preferred resolution below, then clicking the Enhance button when finished.


Part 2. How to Fix a Bad Quality Video on iPhone
Do you have an issue because the video you captured is of terrible quality? A variety of circumstances might cause this difficulty. One of the most prevalent issues iOS users are unaware of is the quality set before the shot. If you want to take a high-resolution video, you may increase the video resolutions on your iPhone. In this guidepost, we'll teach you how to modify video resolution or size on iPhone by customizing the Camera Settings and utilizing an iPhone video editing software to enhance the resolutions of current films recorded on your iPhone effortlessly. The basic steps below will show you how to shoot a video with high-quality output and prevent low-quality video resolution the next time you capture a video at ease.
Step 1Open the Settings app on your iPhone.
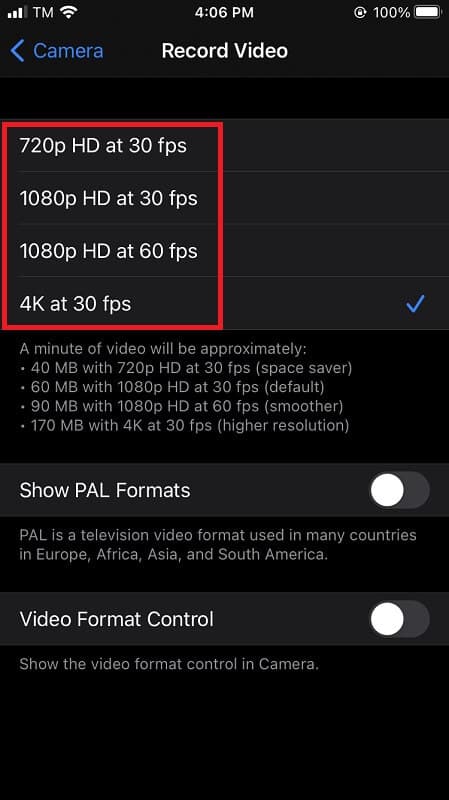
Step 2Scroll down and pick Camera, then Record Video, where you will see all of the various resolutions to choose from.
Step 3Choose a resolution: 720p HD at 30fps, 1080p HD at 60fps, 4K at 24fps, 4K at 30 fps, or 4K at 60fps.
Step 4Return to the Camera option and select Record Slo-mo to alter the resolution for slow-motion films shot on the iPhone.
Part 3. How to Fix Bad Quality Videos Using Avidemux
If you're seeking another tool to improve the quality of your videos, Avidemux is on the list. This useful app enables you to update your video in excellent quality. You may alter the resolution of your video straightforwardly. This program is available for Windows, macOS Sequoia, and Linux. On the other hand, Avidemux does not have a video timeline or creative effects; therefore, it may not be suitable for individuals looking for a video enhancer.
Suppose you are unhappy with the quality of the video. In that case, you can modify the resolution of the video using conventional display formats. This fantastic tool may quickly assist you in setting new video resolutions. Examine how to utilize this tool to improve the quality of your videos.
Step 1First, start Avidemux when the installation procedure is complete to download the utility.
Step 2After downloading the utility, click the Open button and use file explorer to upload your video file into the application.
Step 3Select the Video menu option. Select the codec for your video from the menu box.
Step 4In the Video Filter Manager menu, click the Filter button, then the Transform heading. Then, click the Resize option and the OK button in the Video File Manager.
Step 5You may now save your video by selecting it from the Avidemux toolbox. After that, save it to your files.
Part 4. Other Tips to Fix Bad Quality Video Before Shooting
Plan Your Footage in Advance
Pre-planning helps avoid random, awkward shots. Excessive editing disrupts the video's overall flow, resulting in lower quality. Post-production fixes may also be compromised.
Choose High-Definition Equipment
Opt for devices with sufficiently high resolution whenever possible. Uploading to media platforms may compress image quality. Using HD equipment minimizes the impact of compression.
Pay attention to lighting and ambient light
Lighting significantly impacts video quality, with natural light yielding the best results. However, if the environment is dim, supplemental lighting becomes essential. Choose either cool or warm light depending on the desired mood of your video.
Part 5. FAQs about Fixing Bad Quality Video
Does improving the video resolution affect the file size?
Yes, because you improve the resolution. Basically, the higher the resolution, the higher the file size. But, if you have a lower resolution, then the file size is also small.
What is the reason I do have bad quality video?
There are many reasons why you have a bad quality video. Mainly, most users experience this problem when they download the files on the internet and set the resolution lower than the HD. Next, if the file was recorded from a device and has a low-quality lens, then expect the video you've taken to be of low quality. Lastly, videos become bad quality, especially if that video is old. Although there are many more reasons why video quality turns bad, this is the main reason we found that every user encounters.
Why does quality change after posting it on social media?
Because when you upload the video on your social media, there are restrictions on the quality and resolution of every post that users do. So, keep in mind that you must follow the standard of the social media platform.
It is simple to apply such tools to improve the quality of your video. As a result, you must select a more effective instrument to enlighten your requirements. It is especially beneficial when using the best software for high-quality results. AVAide Video Converter is the most convenient and fantastic tool among the others. This amazing app enables you to alleviate tension and aid yourself in the simplest way imaginable.
ABOUT THE AUTHOR

Your complete video toolbox that supports 350+ formats for conversion in lossless quality.
Video Enhancement
- Upscale 1080p to 4K
- Upscale 480p to 1080p
- Downscale 4K to 1080p/720p
- Downscale 1080p to 480p
- Upscale DVD to 1080p/720p
- Fix Bad Quality Video
- AI Video Upscale
- Enhance Video Quality
- Improve TikTok Video Quality
- Best Video Enhancer
- Video Enhancer App for iPhone & Android
- Best 4K Video Enhancer
- AI Upscale Video
- Clean up Video Quality
- Make Video Higher Quality
- Make a Video Brighter
- Best Blur Video App
- Fix Blurry Videos
- Improve Zoom Video Quality
- Improve GoPro Video Quality
- Improve Instagram Video Quality
- Improve Facebook Video Quality
- Improve Video Quality on Anroid & iPhone
- Improve Video Quality in Windows Movie Maker
- Improve Video Quality in Premiere
- Restore Old Video Quality
- Sharpen Video Quality
- Make Video More Clearer
- What is 8K Resolution
- 4K Resolution: Everything Your Need To Know [Explained]
- 2 Amazing Ways to Increase Video Resolution Losslessly
- Video Resolution Converter: Things to Ponder in Getting One
- The Outstanding 5K to 8K Converter You Shouldn’t Miss!
- Remove Background Noise From Video: With Three Efficient Ways
- How to Remove Grain from Video Using the 3 Remarkable Ways