Instances may occur if you had a blurry, shaky, or dark video clips from unfocused camera, shaky handheld footage, poor lighting, or outdated recordings. Fortunately, modern AI-powered tools can sharpen video quality, improve video resolution, and reduce shakiness with remarkable precision. Using the best sharpening tools gives it a nice appearance and improves it by providing a good view range. This guide covers the best methods to sharpen video quality—from desktop software to mobile apps and online solutions—ensuring your clips look crisp and professional.
- Part 1. Why You Need to Sharpen Video Quality
- Part 2. Most Recommended Video Sharpener to Sharpen a Blurry Video
- Part 3. How to Sharpen Video Quality in iMovie on Mac
- Part 4. How to Sharpen Videos on iPhone/Android
- Part 5. How to Sharpen A Video Free Online
- Part 6. FAQs about Sharpening A Blurry Video
Part 1. Why You Need to Sharpen Video Quality
Sharpening the video quality is crucial, especially when your video has poor edge definition, low contrast & brightness, or blurry motion. Sharpening video will enhance clarity, contrast, and detail, making videos look more professional. Below are the key reasons to sharpen your video:
• Enhance video clarity - Fix blurry or soft footage for professional-looking results.
• Corrects focus issues – Sharpen edges and bring key details into view.
• Reduce compression artifacts – Remove pixelation from heavily shared videos.
• Improve resolution – Upscale low-quality footage for modern screens.
• Boost engagement – Crisper videos perform better on social media and platforms.
Part 2. Most Recommended Video Sharpener to Sharpen a Blurry Video
If you search for the most recommended and best video sharpener, AVAide Video Converter is the most fantastic tool for effortlessly sharpening your video. It provides a powerful video enhancer tool with AI technology to sharpen your video, upscale the resolution, optimize the brightness, and remove noise from videos. This excellent video quality sharpener also has more popular tools, including Video Merger, 3D Maker, Video Compressor, Video Trimmer, etc. With its up-to-date design interface for the best user experience possible, you can sharp your video quality most simply and quickly.
- Can sharp over 300+ video formats at ease, including MP4, MOV, MKV, AVI, etc.
- Sharp your video and fix blurry videos by upscaling resolution and enhance automatically.
- 30x faster conversion empowered with acceleration technology to handle batch videos.
- Provide many additional editing functions to trim, rotate, compress, add effects, etc.

 Secure Download
Option 1. Sharpen Videos by Adjusting Contrast & Brightness
Step 1Add Media File
Open AVAide Video Converter and click the Add (+) button to upload your media file. You can start sharpening your videos in a matter of seconds.

Step 2Adjust Contrast and Brightness
To sharpen your video quality, go to the Edit button, click the Effect & Filter menu, and adjust the Contrast and Brightness by adjusting the sliders.

Step 3Save Video with High Quality
After selection, you should click the OK button to sharpen your video without losing the quality. At last, click the Convert All to start applying the effect and save videos.

Option 2. Sharpen Videos Using Video Enhancer
Step 1Choose Video Enhancer
Go to the Toolbox tab and click the Video Enhancer tool. Then, you can add a media file by clicking the Add button before sharpening your video.

Step 2Sharpen Video Quality
Upscale Resolution, Optimize Brightness, Contrast, Remove Video Noise, and Reduce Video Shaking are the four options for sharpening video quality. Depending on your needs, you can check the box options.

Step 3Save and Export the Sharpen Video
If you're satisfied with that, you can now change the location of the file by clicking the Save to. If everything is fixed you may now start sharpening video quality by clicking the Enhance button.
Part 3. How to Sharpen Video Quality in iMovie on Mac
iMovie remains one of the best free options for Mac users to sharpen video quality with its intuitive editing tools. The software offers both automatic enhancement and manual adjustment options to improve video clarity. Beyond basic sharpening controls, iMovie's color correction panel lets you fine-tune contrast and brightness for optimal results. While it lacks AI-powered sharpening found in premium tools, its stabilization and noise reduction features complement the sharpening process well. Examine the straightforward step-by-step process for sharpening video quality in iMovie.
Step 1To begin, open the iMovie software on your Mac and add your videos to iMovie project. You can also drag and drop the videos easily.
Step 2After selecting your video clip from timeline, click the Enhance button in the upper right corner, and your video will be automatically enhanced in the quickest way possible.

Step 3You can also highlight the other buttons in the adjustment bar, such as Color Balance and Color Correction to sharpen video quality.
Part 4. How to Sharpen Videos on iPhone/Android
Do you want a video sharpener that works on both iPhone and Android? In today's generation, we have a plethora of video editors and enhancers applications. Let's say you want to improve the video quality on your smartphone. A built-in video editor can assist you in sharpening your video in the most straightforward way possible. Follow the steps below to sharpen video quality on your smartphones.
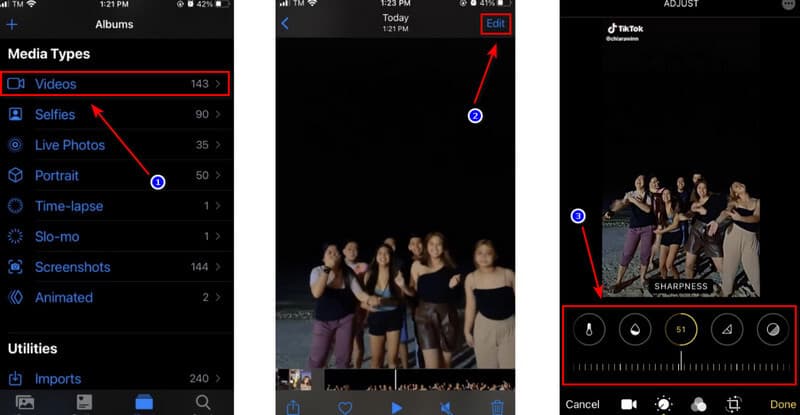
Steps for Sharpening Your iPhone Video
Step 1If you're using an iPhone, navigate through the videos and select the ones you want to sharpen.
Step 2Then, select the Edit button, adjust the icon, and finally, swipe right to find the Sharpness button.
Step 3You can now adjust the sharpness by swiping to the right, and that's it; you can quickly and easily sharpen your video.
Steps on How to Sharpen Your Video on Android
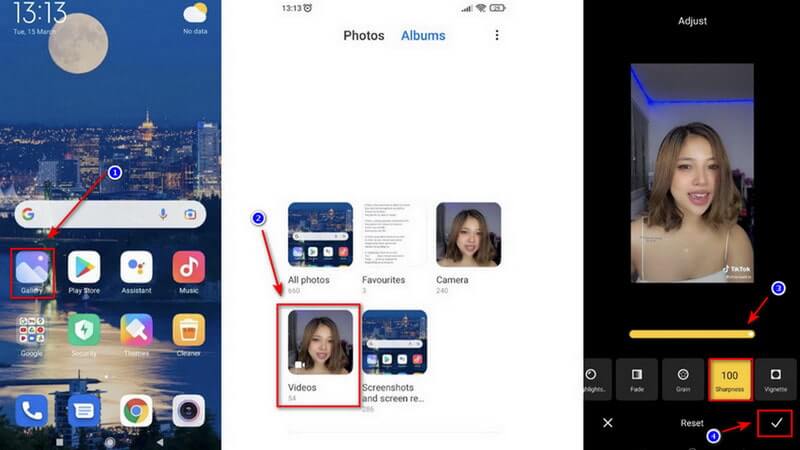
Step 1If you have an Android phone, navigate to the Gallery, select the Video folder, and decide which video you want to sharpen.
Step 2Then, go to the Edit button and swipe right to find the sharpness to adjust it.
Step 3You can now save the video after you have adjusted the sharpening button.
Part 5. How to Sharpen A Video Free Online
If you're seeking an online tool to sharpen video quality most simply, Flixier is one option. It is an online video enhancer that allows you to sharpen video quality for free in a matter of seconds. Merely dragging the sliders on this video sharpener tool will allow you to change the contrast, brightness, vignette, and saturation. This online video quality sharpener is compatible with various formats, including MP4, WMV, MOV, VOB, AVI, and others. Follow the fundamental steps below to sharp your video quality now.
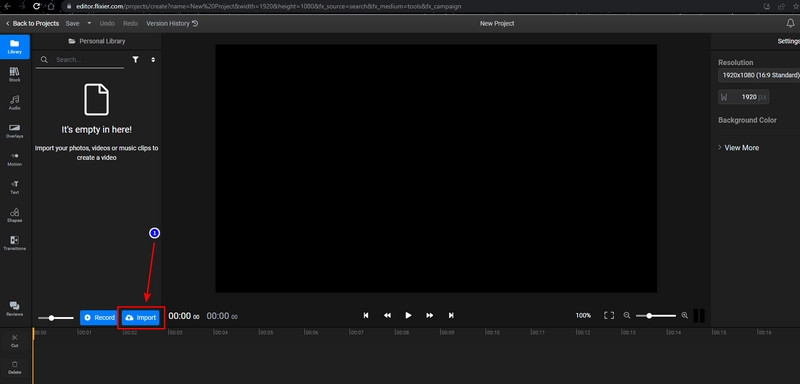
Step 1Import Video
You must first log in, click the Import button, and select the location you want to import your video. You can import videos from your computer.
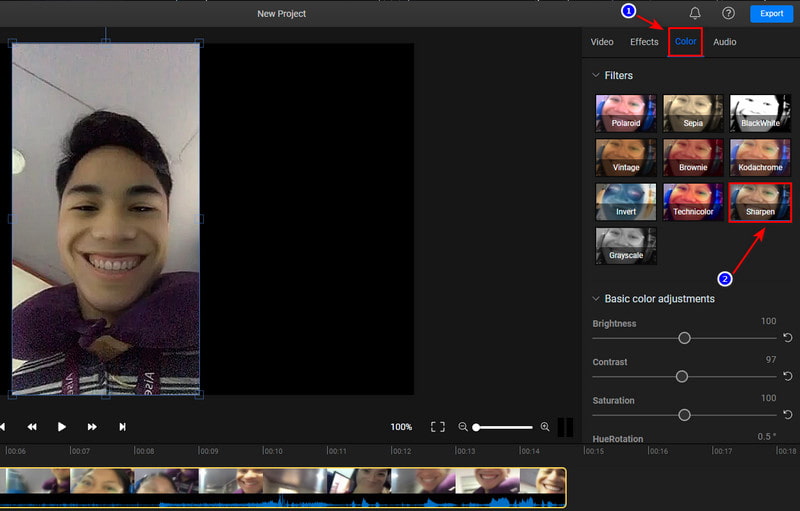
Step 2Sharpen Video Quality
Drag a video from your library to the bottom of the screen's Timeline. First, select the video, go to the Color tab, and select the Sharpen filter.
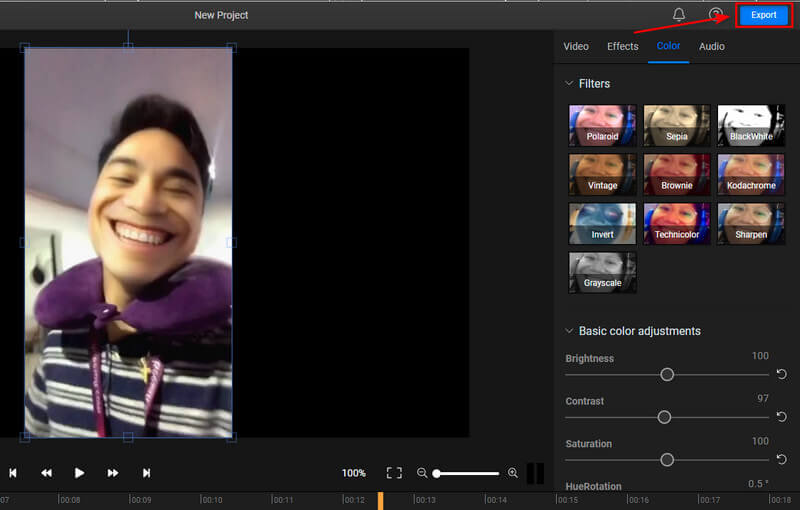
Step 3Export Video File
Finally, hit the blue Export button after you've applied your sharpen filter. Your video will be rendered in three minutes or less, and you will be able to download or publish it to up to seven different online destinations.
Part 6. FAQs about Sharpening A Blurry Video
Can you fix a shaky video?
Whatever the cause of the blurry video, you can use third-party software to fix it to clear and have a visually new look. You can unblur videos using software such as AVAide Video Converter or a downloadable product.
What AI video enhancer tools can help me sharpen videos?
Top recommended tools include Topaz Video AI, AVAide Video Converter, and VideoProc Convert AI. They can automatically upscale resolution, remove noise, and sharpen edges to enhance your video.
What is the difference between enhancing and sharpening video?
Sharpening video can increase edge-focused clarity while enhancing means overall quality improvement, sometimes including sharpening.
In conclusion, this article demonstrated various techniques for sharpening your video quality. AVAide Video Converter is the best video enhancer that has been proven to be the most effective tool to enhance your video quality with different ways. This fantastic software is intended to make any task as simple as possible. So, seize this opportunity now, and sharp your video quality easily.
ABOUT THE AUTHOR

Your complete video toolbox that supports 350+ formats for conversion in lossless quality.
Video Enhancement
- Upscale 1080p to 4K
- Upscale 480p to 1080p
- Downscale 4K to 1080p/720p
- Downscale 1080p to 480p
- Upscale DVD to 1080p/720p
- Fix Bad Quality Video
- AI Video Upscale
- Enhance Video Quality
- Improve TikTok Video Quality
- Best Video Enhancer
- Video Enhancer App for iPhone & Android
- Best 4K Video Enhancer
- AI Upscale Video
- Clean up Video Quality
- Make Video Higher Quality
- Make a Video Brighter
- Best Blur Video App
- Fix Blurry Videos
- Improve Zoom Video Quality
- Improve GoPro Video Quality
- Improve Instagram Video Quality
- Improve Facebook Video Quality
- Improve Video Quality on Anroid & iPhone
- Improve Video Quality in Windows Movie Maker
- Improve Video Quality in Premiere
- Restore Old Video Quality
- Sharpen Video Quality
- Make Video More Clearer
- What is 8K Resolution
- 4K Resolution: Everything Your Need To Know [Explained]
- 2 Amazing Ways to Increase Video Resolution Losslessly
- Video Resolution Converter: Things to Ponder in Getting One
- The Outstanding 5K to 8K Converter You Shouldn’t Miss!
- Remove Background Noise From Video: With Three Efficient Ways
- How to Remove Grain from Video Using the 3 Remarkable Ways