Brighten video projects with the right editing moves so visibility comes back, colors look steadier, and those hidden bits show up again. This kind of guide explains practical ways for Windows, mobile devices, and online editors to turn murky clips into clearer, more lively videos, really without extra hassle.
Part 1. Why Are My Videos Too Dark?
A dark video does not always mean the lighting was bad. Camera settings, intense light sources, and even file compression can cut the brightness down and bury the small details. If you figure out what caused it first, you can pick the proper correction without dragging the video quality down, you know.
Common Causes of Dark Videos
- 1.Low-Light Situations: When you record in dim spaces, less light hits the camera sensor, so the result is dark, a bit grainy footage with muted detail.
- 2.Backlighting: If the main light sits behind the subject, like sunlight, or a bright lamp, then the foreground can look way darker than you intended.
- 3.Device Limits: Smartphones, webcams, and budget cameras often have trouble in low light, and they may deliver underexposed video, pretty much every time.
- 4.Compression Effects: Exporting, uploading, or sharing can reduce image quality, so shadows seem darker, and the tiny textures become harder to notice.
- 5.Exposure Settings: Incorrect settings, like a low ISO or a too-fast shutter speed, can make footage appear dimmer than the scene truly was.
What Does Brightening a Video Actually Do?
People think it is just making things brighter, but it is a bit messier than that. In most cases, editors will make a few tweaks to get a clearer-looking frame and not some washed-out mess.
- Brightness lifts the overall light level so the scene feels less dim.
- Contrast works between the bright and the darker parts, helping details show up instead of blending.
- Exposure changes how much light hits the whole image, not just one section.
- Shadow recovery brings back hidden information from darker areas, so faces, objects, and textures don’t disappear.
- AI enhancement goes further, adjusting brightness, color, and fine details in a way that often feels more natural than manual sliders.
Part 2. How to Brighten a Video on Windows PC
1. AVAide Video Converter
AVAide Video Converter is a kind of video processing tool that helps lift dark footage while keeping it reasonably sharp. It has built-in editing options, AI enhancement, and it can handle high-resolution work, so your brighter result stays watchable. In other words, it helps with brightness, clarity, and the overall look of the video.
- Convert videos and audio into 1,000+ formats with little or no quality loss.
- Let you adjust brightness, contrast, saturation, and hue to improve dim videos.
- Support editing and exporting in 4K, 5K, and 8K.
- Use 120× GPU-accelerated processing, so the conversion feels quicker.

 Secure Download
Step 1Grab AVAide Video Converter, then install it on your Windows PC, go ahead and launch the app.
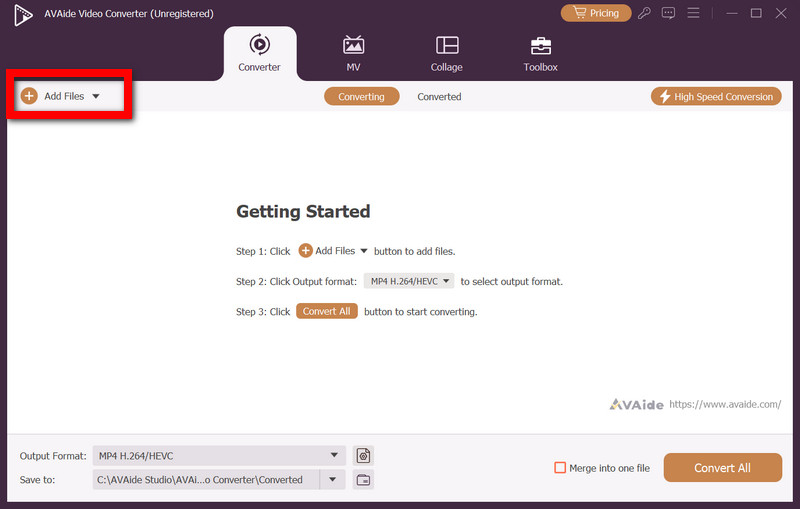
Step 2Hit Add Files, import the video that needs to be brightened a bit.
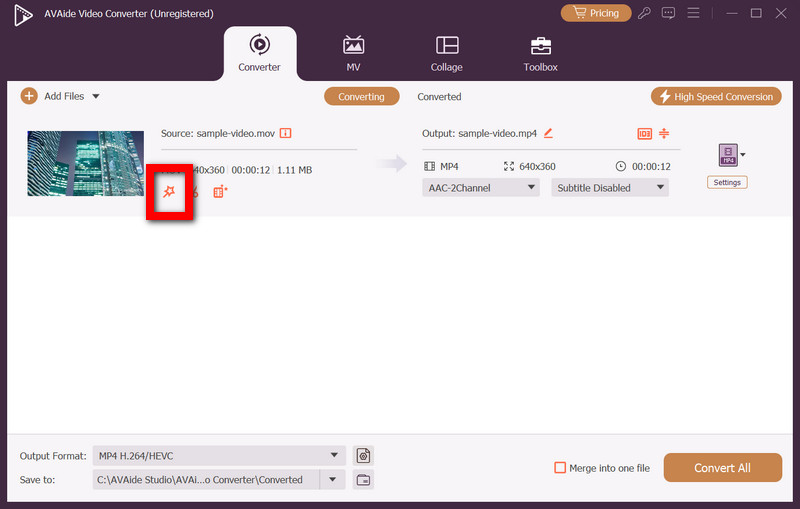
Step 3Press the Edit button that sits beside the imported file so that you can enter the editor.
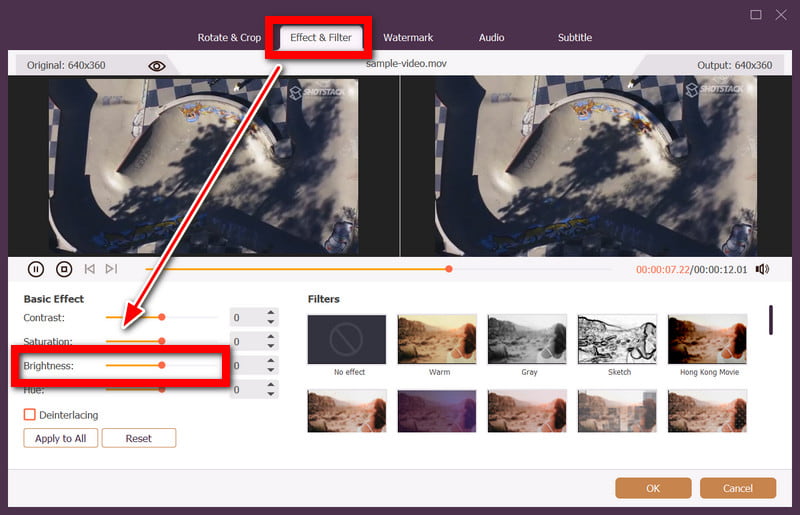
Step 4Go to the Effect & Filter section. Pull the Brightness slider until the scene looks crisper or at least clearer. If it still feels a little off, do small tweaks with Contrast, Saturation, and Hue sliders, just enough for a calmer overall vibe.
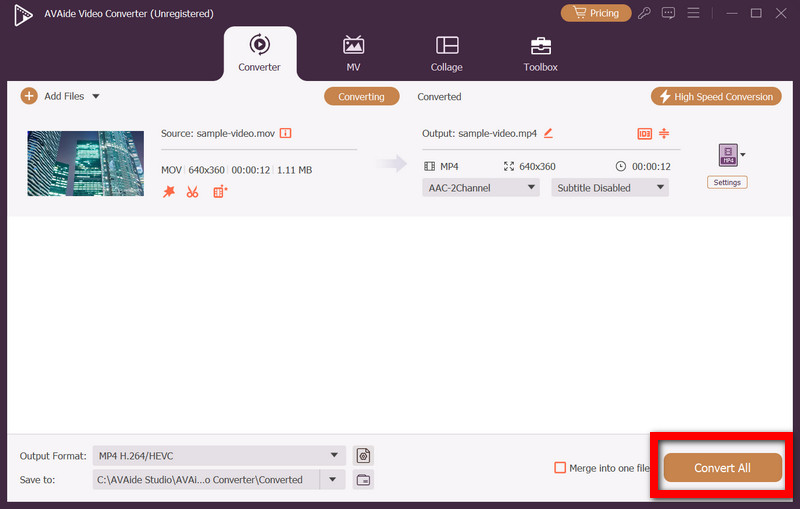
Step 5Step 5. Tap OK to keep the modifications, then pick your favorite output format and resolution, click Convert All to export the brighter version.
2. CapCut
CapCut is a beginner-friendly video editor with convenient color adjustments, and it works nicely for dark clips that need a glow. The interface is pretty straightforward, and the filters, plus enhancement tools, let casual creators fix a video quickly, while options like CapCut image upscaler also help improve visual quality through simple enhancement features.
Step 1Download and install CapCut for Windows, then open the application.
Step 2Create a new project and add the dark video to the timeline.
Step 3Select the clip and open the Adjust panel.
Step 4Increase Brightness and fine-tune Exposure, Contrast, Highlights, and Shadows for a natural look.
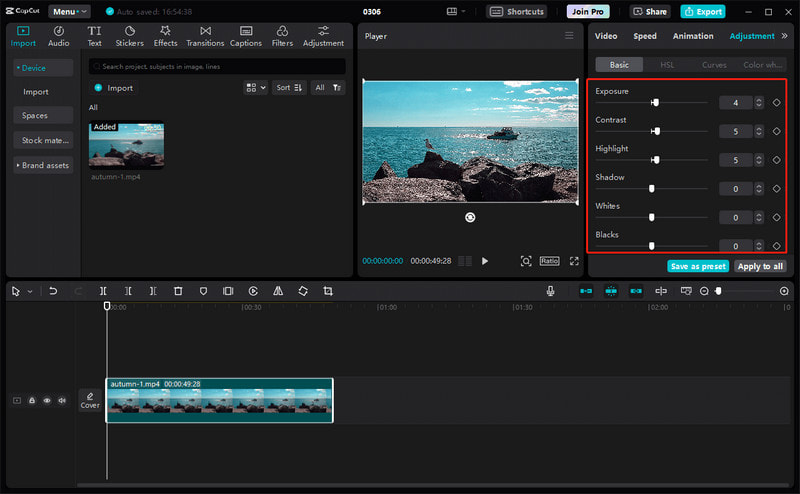
Step 5Preview the video, click Export, and choose the preferred resolution and format.
3. Adobe Premiere Pro
Adobe Premiere Pro is a professional editing solution. It gives you precise color correction via Lumetri Color, and honestly, the exposure, shadow, and highlight controls feel pretty advanced. By using them, you can end up with videos that look more balanced and of higher quality… especially when the footage is too dark.
Step 1Open Adobe Premiere Pro, make a new project, and bring in that dark video.
Step 2Pull the clip onto the timeline, then select it, just to be sure it is actually active.
Step 3Switch over to the Color workspace, and look for the Lumetri Color panel.
Step 4In Basic Correction, raise the Exposure, then adjust Shadows, Highlights, Whites, and Blacks so it looks brighter, but the details do not get washed out or overly soft.
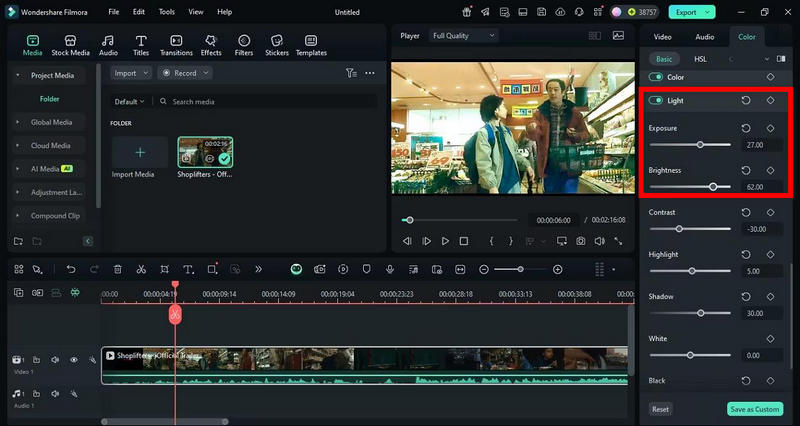
Step 5Do a quick preview after that, then go to File > Export > Media, pick your settings, and hit Export to save the last file.
Part 3. How to Brighten a Dark Video on Mobile Devices
1. VN Video Editor (iPhone & iPad)
VN Video Editor is a solid iOS editing app; it has simple controls, but you also get more advanced color adjustments. It helps you lift dim footage by changing brightness, exposure, contrast, highlights, and shadows, while keeping the quality stable, especially for high-quality exports.
Step 1Open VN Video Editor, start a new project, and tap through the menus.
Step 2Import the dark video, then place it onto the timeline.
Step 3Pick the clip, open the Adjust tool.
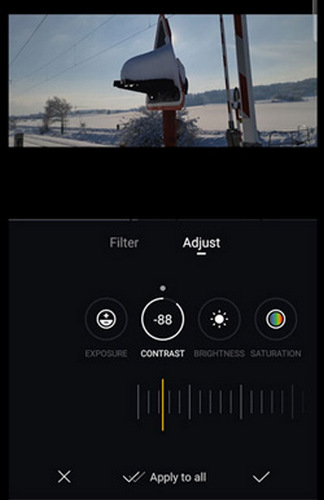
Step 4Turn up Brightness, and also fine-tune Exposure, Contrast, Highlights, and Shadows.
Step 5Preview what you did, then tap Export to save the video.
2. InShot (Android)
InShot is a popular Android video editor for quick improvements. It includes adjustment tools for making dark footage brighter, enhancing colors, and basically improving visibility, with straightforward controls and fast exports, so it doesn’t feel slow or annoying.
Step 1Launch InShot and choose Video to begin your project.
Step 2Import the dark video from the gallery.
Step 3Go to Filter > Adjust, and open the settings.
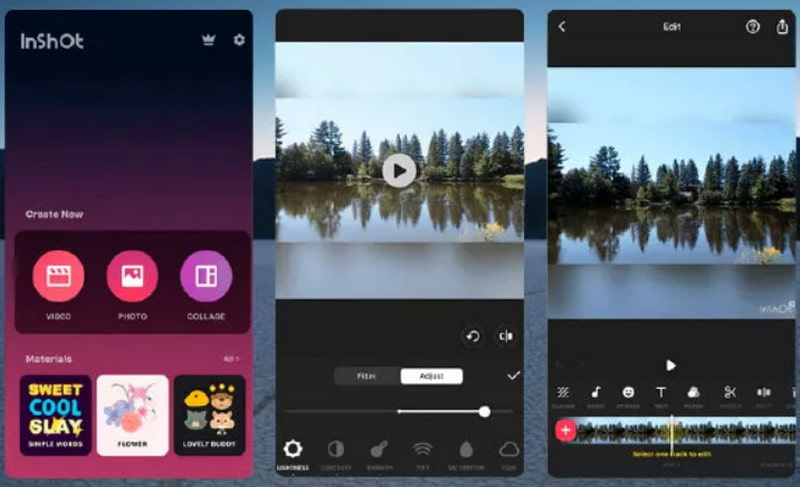
Step 4Increase Brightness, and adjust Contrast, Highlights, Shadows, plus Warmth (if needed).
Step 5Preview the final look, tap Save, and export using your preferred resolution.
Part 4. How to Brighten a Video Online Free (No Watermark)
1. Canva
Canva is a popular online design platform, and yes, it also includes built-in video editing tools. You can use it so dark footage looks a bit less gloomy by changing brightness, contrast, saturation, and a few other visuals that seem small but matter. The layout feels pretty direct, so it works for quick video improvements without a ton of fuss, while tools like Canva photo editor provide a familiar editing experience with simple adjustments and creative features.
Step 1Open Canva, then create a video project.
Step 2Upload the dark video, and set it on the timeline.
Step 3Click the video, choose Edit Video, then go to Adjust settings.
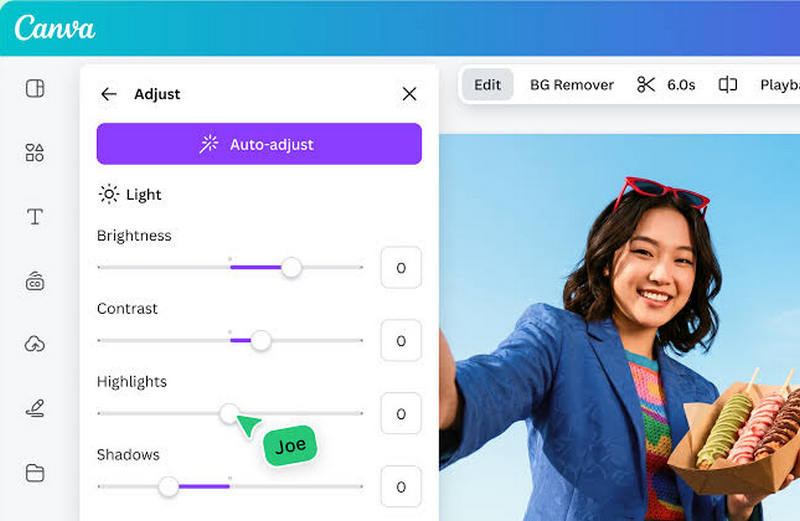
Step 4Increase Brightness, and afterward tweak Contrast, Saturation, plus Highlights.
Step 5Do a fast preview, then hit Download to save the clip.
2. Clideo
Clideo is an online video editor that gives you easy tools for improving darker scenes. The brightness adjustment feature is super handy; it helps visibility, it balances colors, and it can lift overall video quality, right from your browser.
Step 1Open the Clideo video editor, upload the dark video.
Step 2Go to the editing tools and choose video adjustments.
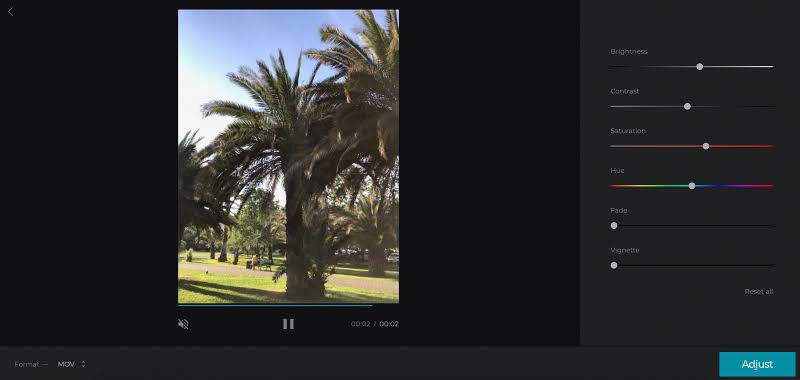
Step 3Increase Brightness, and then tune Contrast or Saturation depending on what you see.
Step 4Preview the changes, and keep refining the settings.
Step 5Export and save the brighter video.
Part 5. FAQs for Brightening Video
Can a dark video be brightened without losing the actual details?
Yes, mostly. When you brighten underexposed footage, you might get extra noise, or sometimes it reduces crispness. But with AI enhancement, you can do noise reduction, recover shadows, and then lift the dark tones so the key stuff stays, while the overall video quality remains in decent shape, even if it takes a bit of tweaking.
What is the difference between brightness adjustment and exposure correction?
Brightness basically makes everything lighter across the whole clip, with no subtle control. Exposure is more like a light-balance correction; it tends to respond to how much light the scene already has. With exposure fixes, you can often reveal buried dark detail while also preventing highlights from getting overexposed.
Why does my video stay dark after increasing brightness?
It may stay dark because the lighting was weak at capture time, or there are dense shadows, or the image simply has limited data to work with. Try adjusting contrast, highlights, shadows, and color, and you can usually get a cleaner, more balanced look.
When you understand how to make a dark video brighter, you can restore clarity and improve the overall viewing vibe. Pick the right editor, adjust lighting with care, and end up with brighter videos that look more polished, without too much effort.
ABOUT THE AUTHOR

Your complete video toolbox that supports 350+ formats for conversion in lossless quality.