Your phone's camera can't keep up with the rapidly changing light from a concert. The strobes, lasers, and sudden blackouts force your camera to refocus and readjust exposure mid-clip. By the end of the event, you have a long, shaky, over-zoomed, constantly refocusing footage. Sure, the memory was unforgettable. The video? It's unwatchable. But here's the good news. Most of what went wrong is actually fixable. With the right tools and knowledge about the common mistakes to avoid, you will know how to edit a video to make it clearer.
Part 1. How to Make a Video Clearer with the Best Tool
A steady footage in the middle of a jumping crowd can be very challenging to achieve. Your video still has a second chance with AVAide Video Converter - your best partner for powerful video enhancement. Under one roof, the tool brings everything from denoising, deblurring, deshaking, and resolution enhancement, jam-packed into a single tool. Genuinely, it only takes one click. As soon as you hit the export button, AVAide works its magic. Best of all, no one gets left out as the tool runs on both Windows and Mac.
Step 1First, download the program by clicking the Free Download button provided below. Open the app and navigate through it.

FREE DOWNLOAD For Windows 7 or later
 Secure Download
FREE DOWNLOAD For Mac OS X 10.13 or later
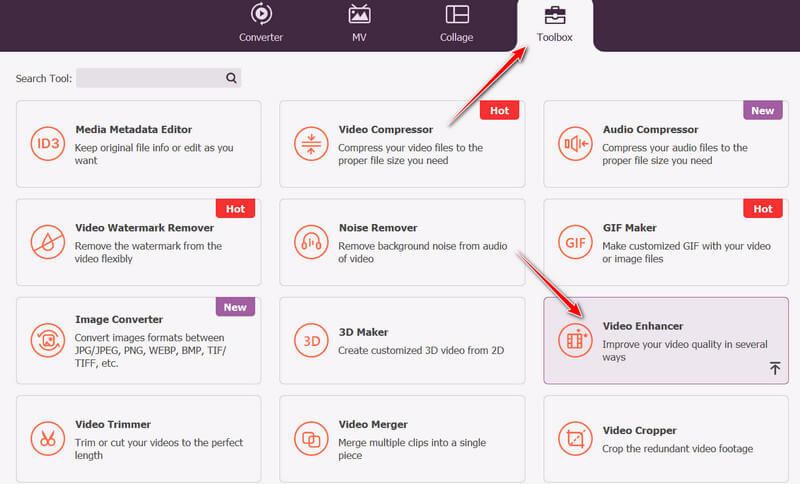
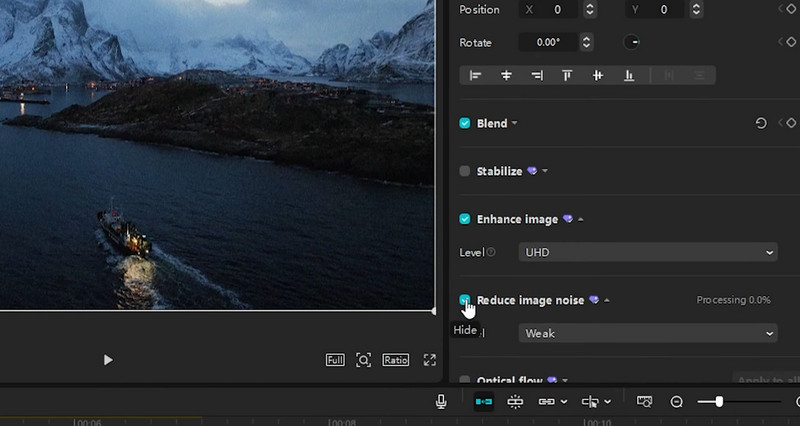
Secure DownloadStep 2After opening the program, head to the Toolbox tab to see a bunch of options, including those for enhancing videos. Now, select the Video Enhancer option. Alternatively, you can type in the search bar to find the tool.
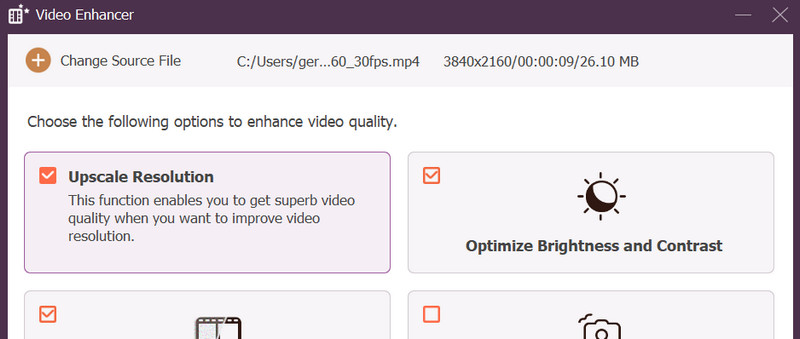
Step 3Once done, tap the plus (+) icon in the middle of the interface, then select the video you want to sharpen. After importing a video, tick the Upscale Resolution box. Additionally, you may do the same with other options.
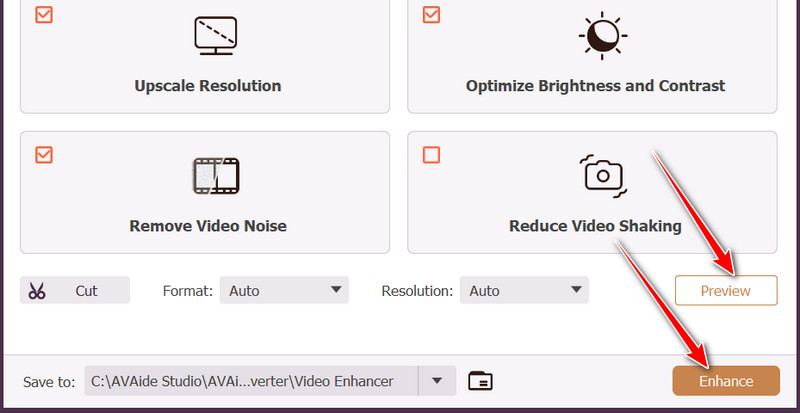
Step 4Click the Preview to see the changes after applying the enhancement tools. If you are happy with the results, click the Enhance button in the bottom-right corner.
Part 2. How to Make Videos Clearer in CapCut
CapCut is a popular video editing app. What users love about this tool is the interface. It's easy and beginner-friendly, which makes video editing efficient and hassle-free. In addition, its AI-powered features, like text-to-speech and background remover, give it an edge over the competition. More importantly, the app is free, with some premium features available via a subscription. If it's okay with you to add a watermark to your videos, CapCut can help you sharpen them. That said, here is a straightforward tutorial on how to make a blurry video clearer using this program:
Step 1Download and install CapCut on your device and start a new project. After that, import your chosen video and click on the clip to select it.
Step 2This time, go to the Adjustment in the toolbar, scroll through the options, and find the Sharpen option.
Step 3Next, drag the slider to increase the video's sharpness. You may achieve that crisp by adjusting the sharpness at a range between 10+ to +20. Going above +30 is not recommended to avoid artificial halos.
Part 3. How to Make a Video Clearer for Free
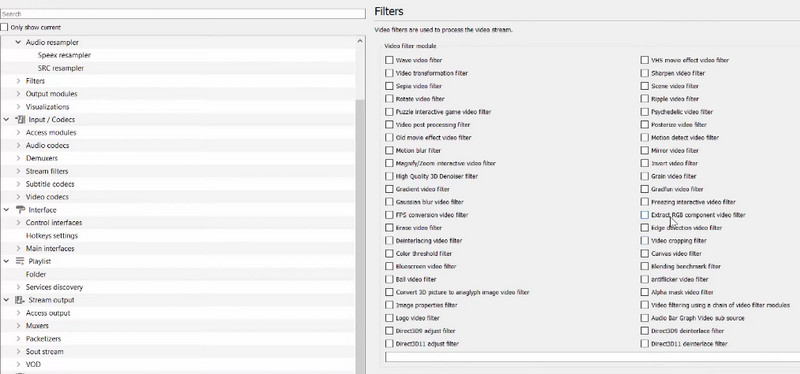
For a totally free way to make your videos clearer, you can use 100% free programs like VLC. There is no subscription or registration needed, yet it offers powerful options. This tool comes with built-in video filters that will work wonders for overall visual appearance, clarity, and sharpness. Plus, it includes a Sharpen filter that crisps up edges. You can also use the Denoise filter to reduce graininess while preserving detail. Now, here is how to make a video clearer for free:
Step 1Get the app installed on your computer and load your video. Next, go to Tools > Effects and Filters. From here, click the Video Effects tab.
Step 2You can adjust the brightness, contrast, hue, and sharpen sliders in the Essential tab to make your video look crisp.
Step 3Now, go to the Advanced tab and tick the Sharpen box to make videos clearer. Then adjust the Sigma value, keeping it between 0.05 and 0.15 for natural visual results. Finally, click Close.
Part 4. How to Make a Video Clearer on iPhone
Photo is Apple's free built-in photo and video editor. With this versatile app, users can enhance any video using a range of functions, including adding filters, cropping, audio mixing, and trimming. Best of all, it can remove noise and improve video resolution. Here is a straightforward guide on how to make a video clearer on an iPhone:
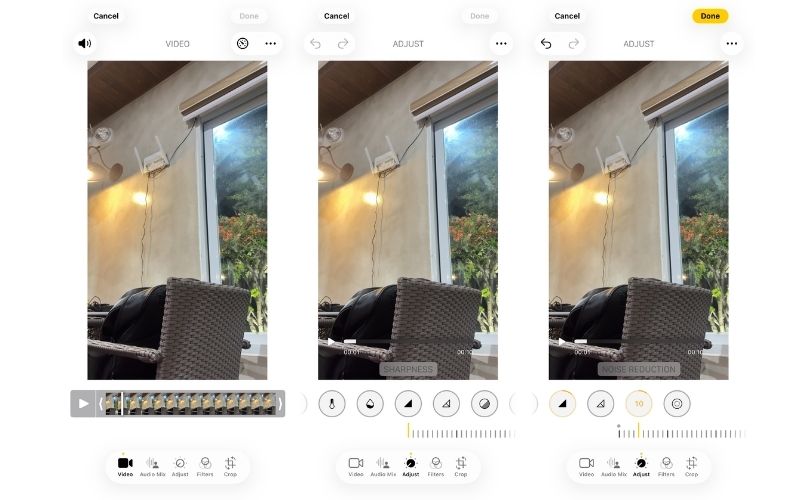
Step 1 Open the Photos app on your iPhone, then select the blurry video you want to sharpen.
Step 2Tap the Edit button at the bottom and choose the Adjust option.
Step 3Then, swipe left to find the Sharpness option and increase its strength. Also, you can find here the Noise Reduction option and increase its strength.
Step 4After all the changes, tap Done to save. In the same way, you can enhance videos from smartphones, like iPhones and Android devices.
Part 5. Common Mistakes to Avoid for Clearer Videos
Avoiding the habits that silently ruin your footage is one thing you should master if you want to create clear, sharp videos. No matter the device you're recording on, here are some common mistakes that lead to low-quality videos and how to make a video look clearer.
1. Recording Videos in Low Light
When there isn't enough light, your camera boosts the ISO, introducing noise and grain into your footage. Also, poor lighting is one of the biggest enemies of video clarity. Wherever feasible, use a right light or shoot near a window. To brighten the scene naturally when recording in a dark environment, consider using an external LED light or your phone's torch.
2. Digitally Zooming in While Recording
True enough, it's tempting to pinch-zoom on your phone's screen to get closer to your subject. While it is more convenient than physically doing the process, this technique doesn't actually magnify; it simply stretches and crops the existing pixels. That makes the video appear pixelated and soft. Whenever possible, physically move closer to your subject rather than relying on digital zoom.
3. Skipping with a Dirty Camera Lens
One of the overlooked yet simplest causes of blurry videos is a dirty lens. When the lens is full of smudges, fingerprints, and dust, it can scatter light and soften the entire frame. Before hitting the record button, wipe your lens gently with a microfiber cloth.
4. Ignoring the Stabilization Step
Many creators tend to forget about stabilization entirely and focus heavily on sharpness and color. No amount of sharpening will make a shaky video loop polished. Make it a habit to always apply a stabilization filter first before adjusting clarity and sharpness.
5. Exporting at the Wrong Settings
Your video may be perfectly edited and still end up blurry because of the wrong export settings. Many beginners tend to export with high compression or at low resolution, which strips away fine details. To address that, always export at the highest resolution available to make a video in higher quality. Also, choose a lower compression level to preserve sharpness.
Throughout this guide, we explored the best tools to use and how to make dark videos brighter and clearer on an iPhone. Beyond these tools, we also learned that the foundation of a clear video starts before you even hit record.
ABOUT THE AUTHOR

Your complete video toolbox that supports 350+ formats for conversion in lossless quality.