Key Takeaways
Video grain/noise is often caused by dim light, high ISO, heavy sharpening, etc. Choose the best solution for your grainy footage.
- Best for night screens & heavy grain: Adobe Premiere with Neat Video plugin
- Best for light-to-medium grain: AVAide Video Converter
- Best for high-ISO footage: Premiere connected to After Effects
- Best quick online solution: Kapwing AI
Sometimes you get grainy videos because of camera settings, lighting, or high ISO and low aperture. To help you fix it, we will show you how to remove grain from the video. The three easy methods will give you confidence in video optimization. Let’s get the ball rolling.
- Part 1. What is Grain and Why Does It Appear on Your Video
- Part 2. How to Remove Grain from Video on PC (Easy Starting Point)
- Part 3. How to Remove Grain from Video in Adobe Premiere Pro (3 Advanced Method)
- Part 4. How to Remove Grain from Video Online (AI Denoise)
- Part 5. FAQs on Removing Grain from Video
Part 1. What is Grain and Why Does It Appear on Your Video
What is grain?
The term "grain" comes from film photography. Film grain is described as a random physical texture caused by visible silver crystals in a film negative's emulsion. Grain is more noticeable in dark scenes because the exposed details on the film aren't enough to drown it out.
Although grain is originally on film, people often use this word to describe noise in digital footage too.
What's the difference with noise?
Noise is more about digital filming. It's random variations produced by the sensor and electronics. Like grain, noise is more visible in low-light conditions, but for a different reason: the camera captures less light, so random fluctuations become a larger part of the image signal.
What makes the video grainy?
The dim light is the main cause. High ISO and heavy sharpening are also common causes of grainy videos.
High-ISO films are often used in low-light conditions to artificially brighten the image. They have larger crystals and are therefore more responsive in dim light, producing clearer visuals. But the trade-off is that their physical structure (the grains) becomes more visible in the final footage.
Sharpening makes the edges harder and contrast stronger. On already grainy videos, the grains and noise can become even more apparent.
Part 2. How to Remove Grain from Video on PC (Easy Starting Point)
AVAide Video Converter is a great starting point for newcomers, requiring no learning curve. It lets you remove video grain with a simple click. With hardware acceleration powered by NVIDIA, AMD, and Intel, it finishes the task in seconds. Plus, you can also upscale, stabilize, and brighten the video to improve its quality.
- Customize your even the resolution while removing the grain.
- Let you cut, convert, and remove video grain simultaneously.
- Have a preview feature that will show your changes on the video.
- One-click to make blurry videos clearer.

 Secure Download
How to Remove Film Grain from Video With AVAide Video Converter
Step 1Launch the excellent software right after the installation. Then, upon reaching the main interface, go through the Toolbox, which is located at the top part together with the other features.

Step 2Next, you need to select the Video Enhancer feature among the multiple editing features you see in the window. Hit the Plus sign to upload the video with grain upon clicking the video enhancer option.

Step 3After that, you will see options from the video enhancer feature where you need to click the Remove Video Noise selection. However, you can also tick the other options to make your video exquisitely good.

Step 4This is just an additional step if you want to produce a different format and quality for your video. To do so, navigate on the Resolution and Format selections. Also, feel free to customize the file destination in the Save To portion.

Step 5Finally, hit the Enhance button to implement the changes.
By the way, you can also use this tool to improve Facebook video quality, increase video resolution, and fix blurry videos.

Part 3. How to Remove Grain from Video in Adobe Premiere Pro (Advanced Method)
Adobe Premiere Pro is another friendly and powerful video editing tool. This software contains tons of options such as effects, transitions, libraries, title maker, and more that help you create stunning videos.
Although Premiere doesn't have noise reduction for 2D videos, you can work around it using the native VR De-Noise. Or if you also have After Effects installed, you can send the footage smoothly to it, then use its Remove Grain effect. For more advanced controls and top quality, we recommend Neat Video, a Premiere plugin that has no equal in noise reduction.
Method 1. Use Premiere's Native VR De-Noise (No Extra Cost)
If you've already paid for a Premiere Pro subscription, you can use VR De-Noise with no extra payment.
Step 1Import and drag your video to the timeline.
Step 2Go directly to the Effects panel. There, search for VR De-Noise and drop it onto your video clip in the timeline.
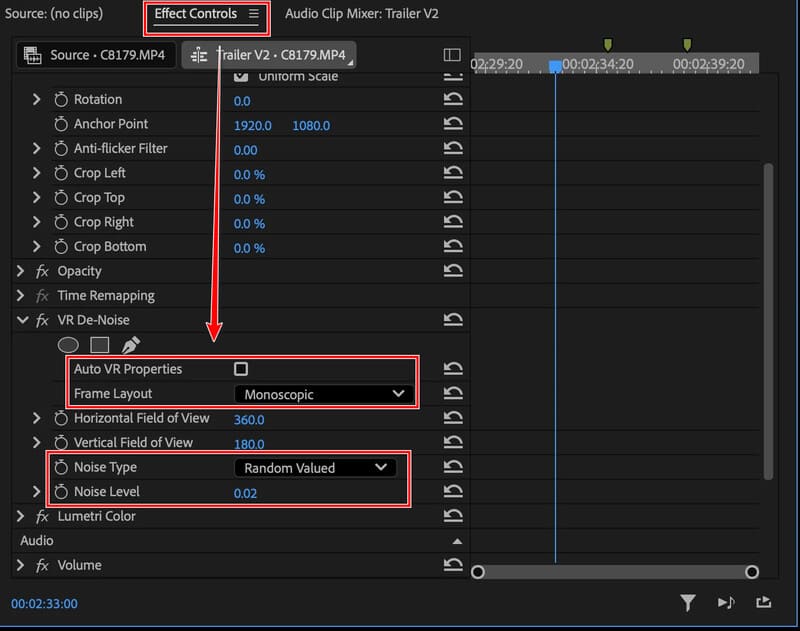
Step 3Select your clip and go to Effect Controls to find the VR De-Noise settings. Uncheck Auto VR Properties and change the Frame Layout to Monoscopic. In this way, Premiere will see your clip as a 2D video rather than a VR.
Step 4Select a Noise Type based on the grain size. Adjust the Noise Level slider until you see noise vanish.
Step 5Press Ctrl + M on Windows or Command + M on Mac to export the result.
Method 2. Connect to After Effects (If Installed)
After Effects has a pre-installed Remove Grain effect. The transfer from Premiere to After Effects is simple, with only a click.
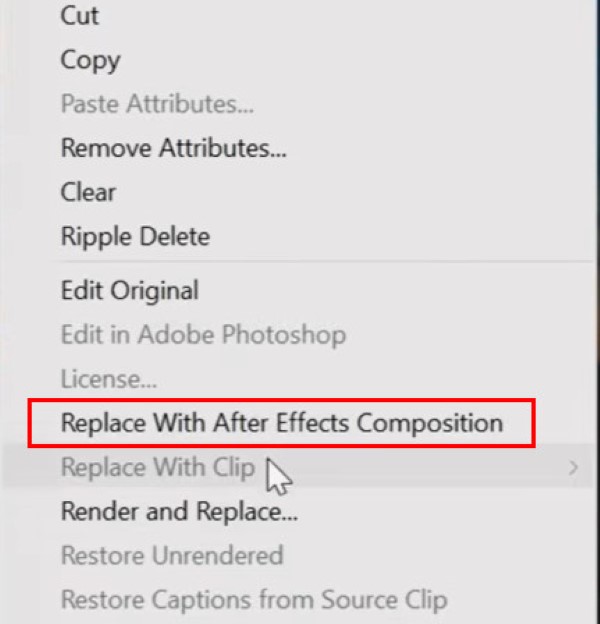
Step 1Select your clip in the Premiere timeline. Right-click it, and then in the pop-up menu, select Replace With After Effects Composition.
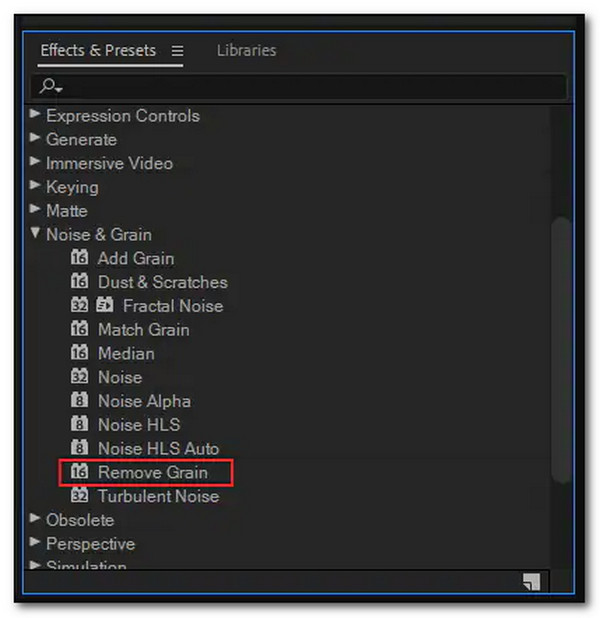
Step 2After Effects takes over your video in a new window. Go to the Effects & Presets panel and drag Remove Grain to your clip.
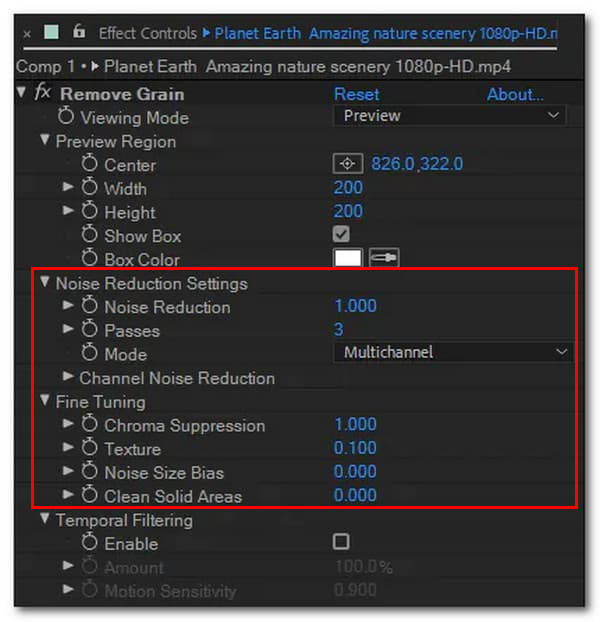
Step 3In the layer panel, fine-tune the Noise Reduction Settings based on the preview quality. You can start with about 0.3-0.5 and slowly increase the values to preview the effect. Here are some options you most likely need to adjust:
- Noise Reduction: It controls the overall denoising intensity. Increase it until detail just begins to look too smooth.
- Passes: This controls the maximum noise radius detected. Increase its value if your grain size is large.
- Chroma Suppression: This removes colored grains, particularly useful for high-ISO footage. But don't push it too far, or the actual color information can be removed.
Step 4When you feel like it's finished, save your comp and return to Premiere. Your adjustments are updated to your Premiere sequence.
Method 3. Use the Neat Video Plugin (Professional)
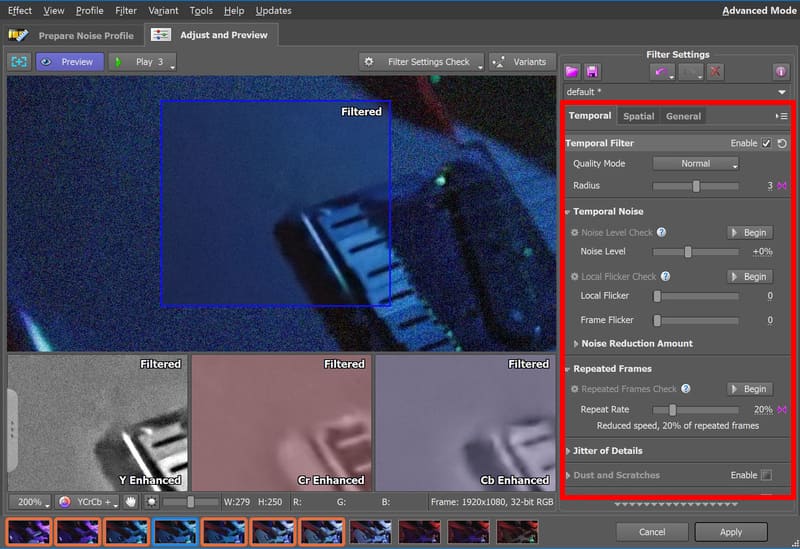
Besides the official Adobe tools, you can also use third-party plugins to denoise your video in Adobe Premiere. We recommend Neat Video, one of the best noise reduction tools in the industry. It cleans up your video without ruining any detail.
| Edition | Maximum Resolution | Use | Price (August 2026) |
| Demo | 1280×720 | Evaluation only | Free with watermark |
| Home | 1920×1080 | Non-commercial use | $79.90 |
| Pro | No limit | Commercial use | $149.90 |
Step 1Install the plugin and restart Premiere.
Step 2Create an adjustment layer on your grainy clip in the Premiere timeline.
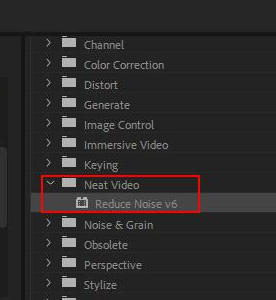
Step 3Go to Effects > Video Effects > Neat Video > Reduce Noise v(x). Drop the effect onto the layer.
Step 4In the Effects panel, click Prepare > Build > Auto Profile. Adjust the settings based on the preview.
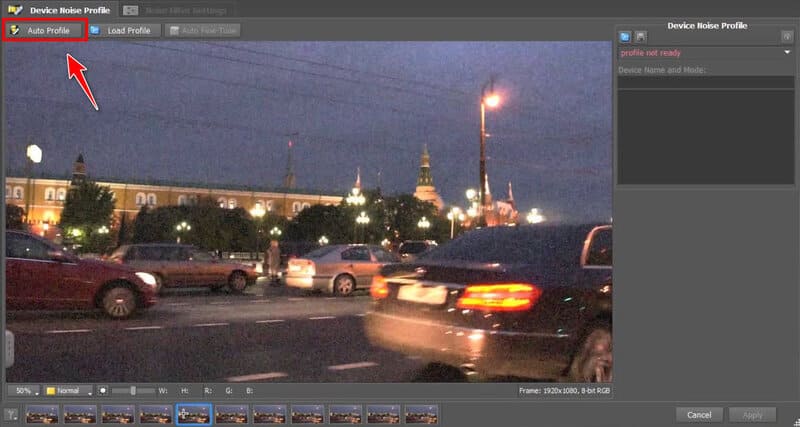
Step 5Click Apply to save the adjustments.
Part 4. How to Remove Grain from Video Online (AI Denoise)
If you want to try AI video grain removal, Kapwing is a good place to start. This online AI video editor lets you use prompts to denoise, resize, add subtitles, brighten the video, and more. Simply type "denoise this footage," and it will clean up your video within a few minutes.
Although it's a paid service, you get 10 lifetime credits upon sign-in to remove grain from video online for free, without watermark. The free version is limited to a 250MB maximum file size, 720p maximum resolution, and 1-minute duration.
| Version | Credits | Price | File Limit |
| Free | 10 for lifetime | Free | 250MB, 720p, 1 minute |
| Pro | 1000 per month | $24 monthly, $192 yearly | 6GB, 4K, 2 hours |
| Business | 4000 per month | $64 monthly, $600 yearly | Same as Pro |
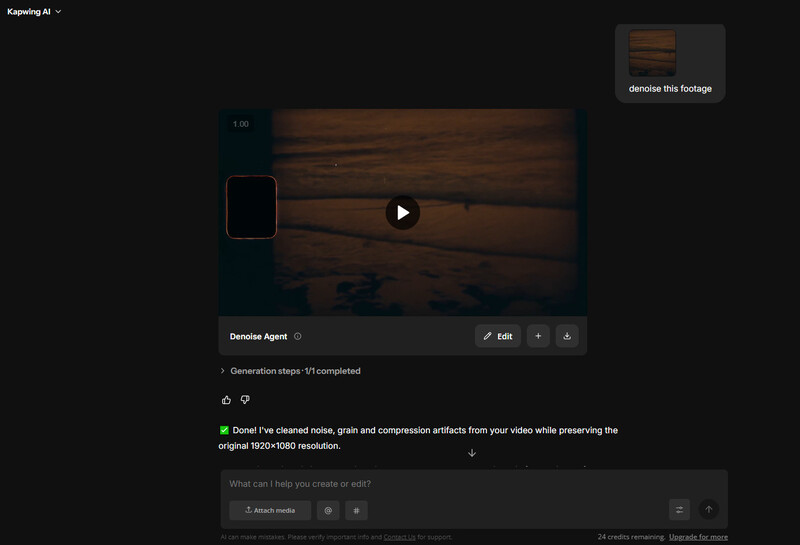
Step 1Go to kapwing.com/kai and drop your video file to the workboard.
Step 2Type "denoise this footage" in the box and click the arrow button to send the message.
Step 3Wait until it finishes the task. Then download the result.
Part 5. FAQs on Removing Grain from Video
Can I remove grain from my video for free?
Yes. Despite being paid services, AVAide Video Converter and Kapwing AI offer free trials so you can remove grain from short clips for free.
Why is my video still grainy when it looks bright in preview?
Your video looks bright probably because your camera artificially boosts the exposure with high ISO, or because your monitor brightness is high. But no light is truly added to the footage – it's still underexposed.
Where can I plug in Neat Video other than Premiere Pro?
Neat Video is compatible with 20+ popular video editors, including After Effects, DaVinci Resolve, Final Cut Pro, Fusion Studio, Natron, and more.
This article was written to mainly help you on removing the grain for your videos. We highly recommend that you use the presented tools, for they will really help you on your task. Especially, use the AVAide Video Converter, and you can set your expectations into having magically enhanced videos that others cannot do. So, what are you waiting for? Download the fantastic software now!
ABOUT THE AUTHOR

The most comprehensive media converter to convert video & audio without quality loss.
Video Enhancement
- Upscale 1080p to 4K
- Upscale 480p to 1080p
- Downscale 4K to 1080p/720p
- Downscale 1080p to 480p
- Upscale DVD to 1080p/720p
- Fix Bad Quality Video
- AI Video Upscale
- Enhance Video Quality
- Improve TikTok Video Quality
- Best Video Enhancer
- Video Enhancer App for iPhone & Android
- Best 4K Video Enhancer
- AI Upscale Video
- Clean up Video Quality
- Make Video Higher Quality
- Make a Video Brighter
- Best Blur Video App
- Fix Blurry Videos
- Improve Zoom Video Quality
- Improve GoPro Video Quality
- Improve Instagram Video Quality
- Improve Facebook Video Quality
- Improve Video Quality on Anroid &iPhone
- Improve Video Quality in Windows Movie Maker
- Improve Video Quality in Premiere
- Restore Old Video Quality
- Sharpen Video Quality
- Make Video More Clearer
- What is 8K Resolution
- 4K Resolution: Everything Your Need To Know [Explained]
- 2 Amazing Ways to Increase Video Resolution Losslessly
- Video Resolution Converter: Things to Ponder in Getting One
- The Outstanding 5K to 8K Converter You Shouldn’t Miss!
- Remove Background Noise From Video: With Three Efficient Ways
- How to Remove Grain from Video Using the 3 Remarkable Ways