When our videos were of bad quality, we became frustrated. There are times when you have no option but to discover a solution to make your films appear better. In that case, video quality enhancers are the tools you'll need to improve the resolution of a video. We require the ideal equipment to assist us in illuminating your loads. If you want to increase the quality of your video in Adobe Premiere Pro, read on to learn how to do so professionally.
Part 1. Why Is Video in Premiere Pro Blurry
Low Resolution in Playback Settings
This makes the preview blurry, but doesn't affect the final output. To check, export the video and see whether the output looks sharp. If so, go to Program Monitor > Select Playback Resolution and set it to Full.
Sequence Settings Do Not Match the Footage
When your timeline sequence settings are different from the added video resolution, the pixels get stretched or transformed, reducing the video's quality.
Footage Itself Is Soft
The original video might have an out-of-focus camera, a dirty lens, or a low resolution due to compression. If this is the case, you can sharpen and upscale the video before final export.
Part 2. The Professional Way to Improve Video Quality in Premiere Pro
Premiere Pro is a video editing application for professionals that you may totally and professionally alter your movies and apply various effects to make them appear lovely and respectable. In addition, Adobe Premiere Pro is a robust video editing program that may help you improve the quality of your video. It is commonly acknowledged as one of the most comprehensive software packages used by professional video editors, with built-in functions such as video enhancement.
Furthermore, you may start the free trial by installing it on your Mac and Windows. Let's say you want to improve the video quality in Premiere Pro. In that case, you must understand the technique step by step. As a result, you'll need this guidepost to know what to do, and it'll lead you through the complete procedure.
Step 1Launch the Adobe Premiere Pro
To begin, go to the Adobe Premiere Pro official website and download the tool.
Step 2Import File
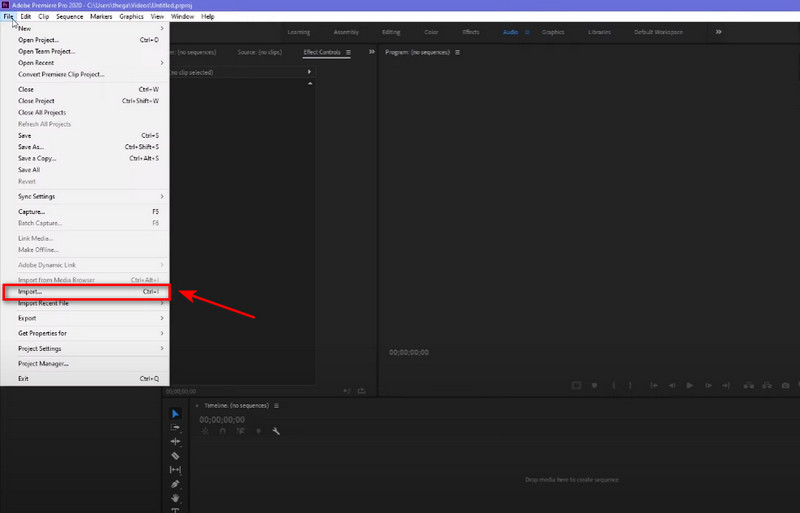
Next, go to the file in the upper left corner, pick Import, and select which films you want to improve. After that, drag your clip to the timeline. You may either construct a new Sequence or insert it into an existing high-resolution Sequence.
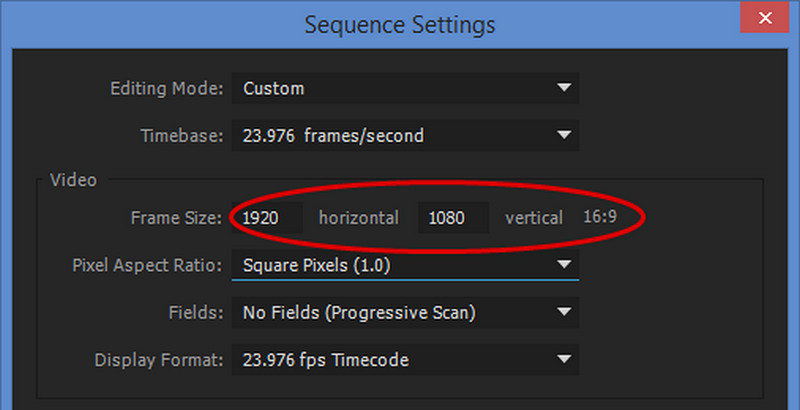
Step 3Go to Sequence Settings
This step ensures the sequence resolution fits your upscaled video. After uploading a file, go to the main menu and choose Sequence Settings to specify the appropriate resolution. After you've finished, you will see your original low-res clip in the master window, surrounded by black bars from the high-res sequence's blank area. It's time to take things up a notch.
Step 4Sharpen the Video
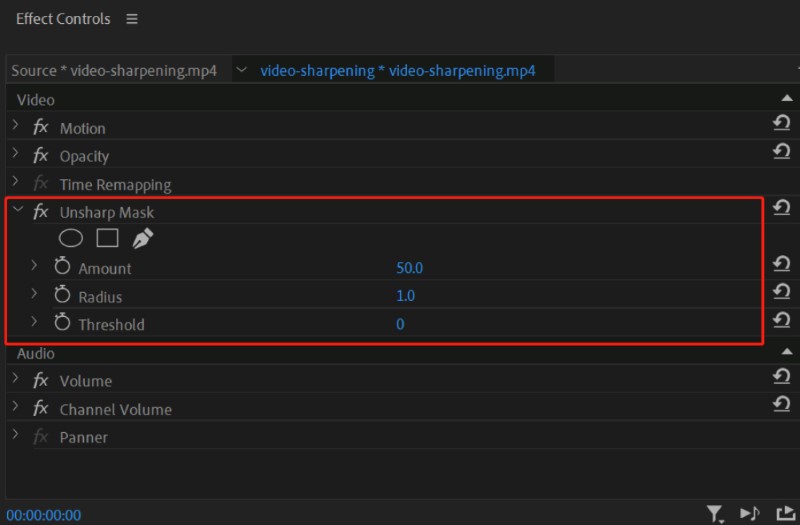
Go to the Effects tab and search for Unsharp Mask – it makes the video look sharper by increasing contrast and reducing noise. Drag-and-drop this effect onto your Adjustment Layer in the timeline. Then select the layer and go to the Effects Controls panel to customize the settings. You can try the following settings as a starting point:
- Amount: 100%
- Radius: 1.0
- Threshold: 3-5
Step 5Customize Export Settings
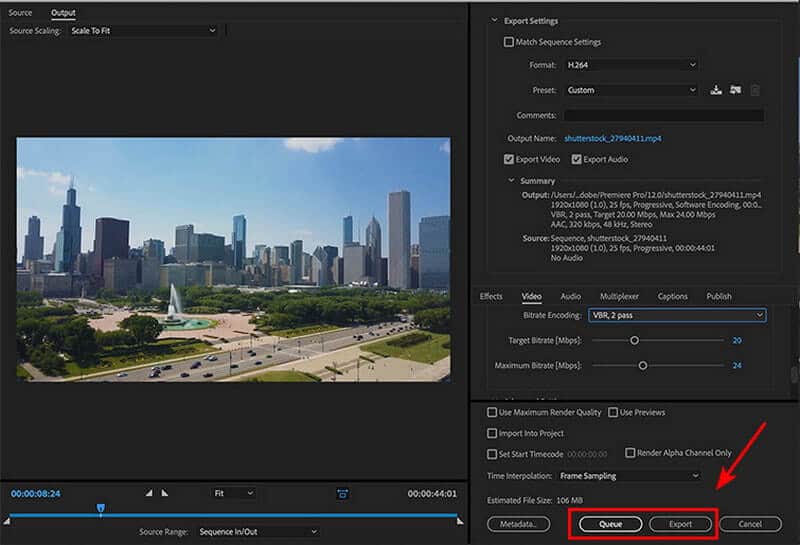
To export a video in Premiere, you can use the shortcut Cmd + M on Mac or Ctrl + M on Windows, or go to File Export, then click Media, and make sure the sequence you wish to export is selected. This will open the Export Options window.
To enhance the video quality, adjust the Export Settings based on your needs. For instance:
| YouTube/Vimeo | Local Archive | Client Delivery | |
| Match Sequence Settings | ON | ON | ON |
| Format | H.264 | ProRes or H.265 | H.264 or H.265 |
| Resolution | 1920×1080 | Match the sequence resolution set in the previous step | Match the sequence resolution set in the previous step |
| Frame Rate | Same as source | Same as source | Same as source |
| Field Order | Progressive | Progressive | Progressive |
| Performance | Hardware Encoding | Hardware Encoding | Hardware Encoding |
| Bitrate | VBR, 1Pass or 2 Pass | VBR, 2 Pass | VBR, 2 Pass |
| Target Bitrate | 10 Mbps | ProRes: No bitrate setting needed H.265: 40–80 Mbps for 4K | 10-16 Mbps for 1080p, or 35-45 Mbps for 4K |
| Key Frame Distance | 2 seconds | 2 seconds | 2 seconds |
| Render at Maximum Depth | ON | ON | ON |
| Use Maximum Render Quality | ON | ON | ON |
After you finish, click Export.
Tip: How Bitrate Affects Video Quality
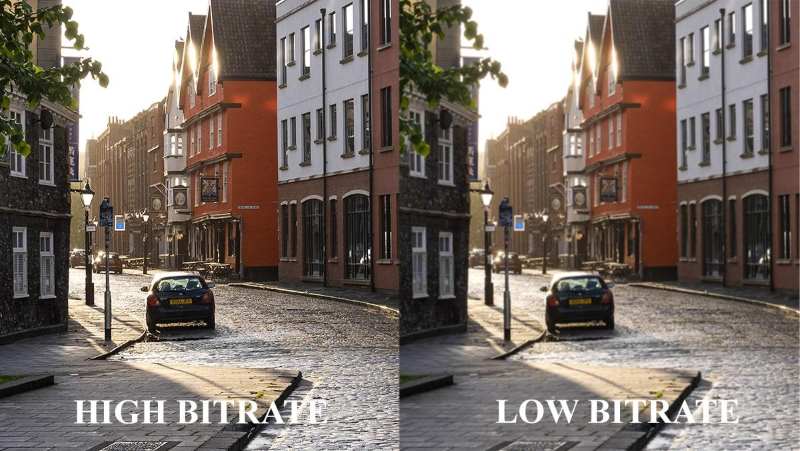
Bitrate is the amount of data transmitted per second, measured in Mbps (megabits per second). With a higher bitrate, more data is allocated to each second of the video; thus, the video has better detail.
Part 3. A Much Easier Way to Increase Video Quality
Premiere is a powerful and professional video editor. For beginners and casual users, it might feel overkill. If you prefer a quick video enhancement with only a click, AVAide Video Converter is the way to go. You don't have to adjust any parameters. Just select the aspects you want to enhance, and leave the rest to it. It automatically improves the video to the best quality.
- Performs and converts high-quality videos in 8K/5K/4K/1080p.
- Stabilize video, apply visual effects, color correction, and other automatic enhancements.
- It is a quick and effective tool for video improvement.
- It is convenient software available for free installation and download.

 Secure Download
Step 1Launch AVAide's Official Website
Run the AVAide Video Converter website to get the program. Or, click the download button above. After installation, you will be sent to the interface.
Step 2Navigate the Toolbox
Next, navigate to Toolbox, and select the Video Enhancer icon to improve video quality. It will take you a second to begin enhancing your film.

Step 3Add a Video
To import a media file, you can add a video file on the (+) Plus button by clicking it, then choose which video you want to enhance.

Step 4Enhance Video Quality
Here are four options for improving video quality: Upscale Resolution, Remove Video Noise, Optimize Brightness and Contrast, and Reduce Video Shaking. You can check the box ahead of the selection and choose depending on your preferences. Alternatively, open the Resolution menu and select your desired resolution from the list below.
Note: If you want to crop your video, you can use the Cut button by clicking it, and you can change the Format by choosing your desired format, including MP4, MOV, MKV, AVI, WMV, etc.

Step 5Export the Final Output
At last, you can click the Preview button to view the enhanced video. If you're satisfied with that, you can now change the file's location by going to Save To and start exporting the final output by clicking the Enhance button, which will save it automatically on the folder.

Part 4. FAQs about Improving Video Quality on Premiere
H.264 or H.265?
It depends on what you need. H.264 is highly compatible with almost any platform, a good option if you plan to share the video on social media. H.265 (HEVC) exports smaller files and slightly better quality, but encodes more slowly, suitable for archive use.
Can I upscale my video in Premiere using AI?
Yes. Premiere doesn't have a built-in AI video enhancer, but you can add a plugin like Topaz Labs or Super Resolution to upscale the video using AI.
How can I upscale my video to 4K using Premiere Pro?
Set the profile to High and level to 5.2. Then, ensure that the width is 3840 and the height is 2160. Next, you can select the frame rate to 23.976, and enable rendering at maximum depth.
To conclude, you can fix blurry videos in Adobe Premiere Pro. This application will undoubtedly teach you how to improve video resolution in various methods. Nonetheless, suppose you find Adobe Premiere Pro's learning curve to be too steep. In that case, AVAide Video Converter comes in useful. It is packed with several impressive features that will allow you to improve video quickly. Download it now and give it a shot; it will undoubtedly assist you in lightening your load.
ABOUT THE AUTHOR

Your complete video toolbox that supports 350+ formats for conversion in lossless quality.
Video Enhancement
- Upscale 1080p to 4K
- Upscale 480p to 1080p
- Downscale 4K to 1080p/720p
- Downscale 1080p to 480p
- Upscale DVD to 1080p/720p
- Fix Bad Quality Video
- AI Video Upscale
- Enhance Video Quality
- Improve TikTok Video Quality
- Best Video Enhancer
- Video Enhancer App for iPhone & Android
- Best 4K Video Enhancer
- AI Upscale Video
- Clean up Video Quality
- Make Video Higher Quality
- Make a Video Brighter
- Best Blur Video App
- Fix Blurry Videos
- Improve Zoom Video Quality
- Improve GoPro Video Quality
- Improve Instagram Video Quality
- Improve Facebook Video Quality
- Improve Video Quality on Anroid & iPhone
- Improve Video Quality in Windows Movie Maker
- Improve Video Quality in Premiere
- Restore Old Video Quality
- Sharpen Video Quality
- Make Video More Clearer
- What is 8K Resolution
- 4K Resolution: Everything Your Need To Know [Explained]
- 2 Amazing Ways to Increase Video Resolution Losslessly
- Video Resolution Converter: Things to Ponder in Getting One
- The Outstanding 5K to 8K Converter You Shouldn’t Miss!
- Remove Background Noise From Video: With Three Efficient Ways
- How to Remove Grain from Video Using the 3 Remarkable Ways