Need to remove unwanted edges or change the aspect ratio of your footage on macOS? While the standard QuickTime Player is a powerful tool for viewing media, many users are surprised to find that the basic version lacks a dedicated crop tool. To crop video, QuickTime Pro was historically the primary solution for Mac users.
In this guide, we will walk you through the precise steps to use the Pro version for trimming and framing. Furthermore, for those seeking a more modern, streamlined workflow, we will introduce a high-performance alternative that simplifies the QuickTime crop video process while maintaining lossless quality and professional-grade enhancements.
Part 1. How to Crop a Video Using QuickTime Pro
The QuickTime Pro is the premium version of the QuickTime player, with a prerequisite of QuickTime7 prior to upgrading. Furthermore, this software can also be enjoyed on Mac and Windows alike. With roughly $30, you will be able to obtain or upgrade your existing QuickTime to the pro version, wherein you can technically change the video aspect ratio using QuickTime.
However, to execute the task correctly, your device should also have Photoshop for you to be able to mask the file, which plays a crucial role in doing the task. Anyways, if you are ready to do it, see the guidelines below.
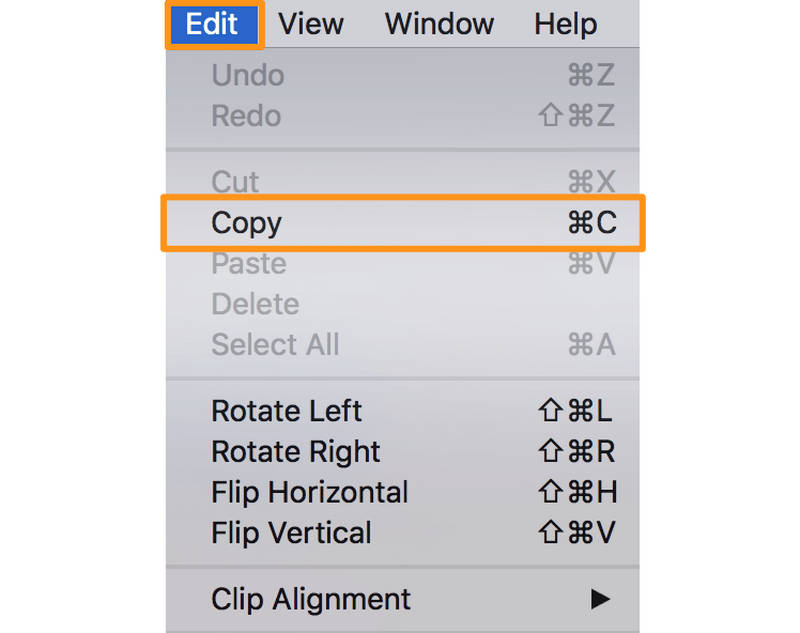
Step 1Get a Copy Frame of Your Video
Open your QuickTime Player on your Mac, and open the video file using it. Now, go and click the Edit and choose Copy. Then, export your particular frame in JPG format.
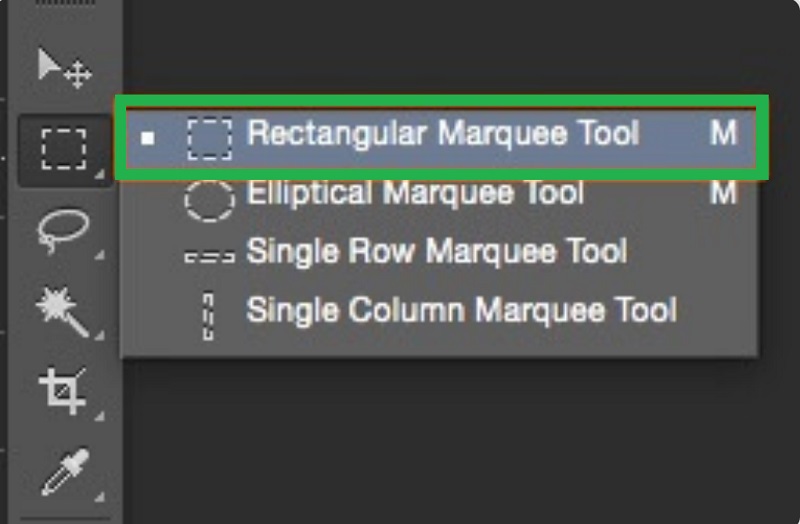
Step 2Make a File Mask Using Photoshop
Launch your Photoshop and start making a New Project as part of how to crop video on QuickTime Pro. Click the File and paste the image you captured previously. Click then among the Marquee tools to select the area you want to use. The best is always the Rectangular Marquee Tool. Once selected, fill the space with black and white for the rest, then save the file.
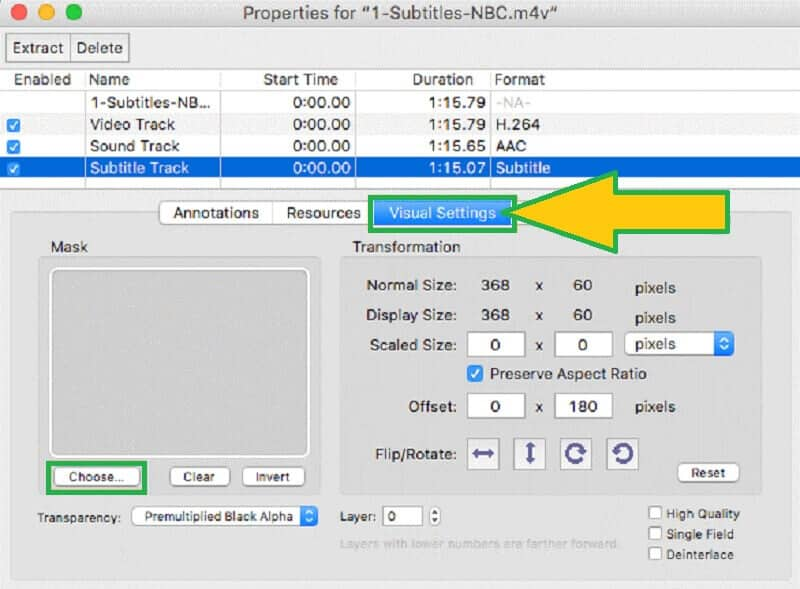
Step 3Put in the Mask in QuickTime Pro
On the QuickTime Pro, click the Windows and choose the Show Movie Properties. On the next window, hit the Visual Settings then the Choose button to import the mask and be applied to the video.
Step 4Export the Video
Finally, you can save the cropped video by hitting the File then choosing the Export. That is how to resize QuickTime video in the pro version.
Part 2. The Best Choice to Crop Video On Mac
If you are looking for the simplest yet great solution to crop your videos besides the previous one, the AVAide Video Converter is the best choice. Furthermore, this fantastic video cropper for Mac and an excellent choice for Windows and Linux-operated devices. It allows you to resize the video and achieve your target ratio in different ways with the most straightforward interface. Not just that, because you can adjust or enhance your file while aiming for its perfect angle.
Since it's a perfect video converter tool, you can export your cropped QuickTime video into various formats to fit your destination device. Moreover, security-wise the AVAide Video Converter is the safest for your hardware, for it has the hardware and security acceleration that your device needs.
- It is the easiest way to crop your videos.
- It offers numerous aspect ratios and zoom modes to choose from.
- It supports more than 300 video formats to crop.
- It comes with tons of effects and filters for your video while cropping.
- It offers powerful, powerful editing tools within the toolbox.

 Secure Download
- Pros
- 1. All-featured cropping tool.
- 2. Practical editing options.
- 3. Fast processing and exporting speed.
- Cons
- 1. It needs download.
- 2. Limited features for trail version.
How to Use AVAide Video Converter to Crop Video
Step 1Get the Software
Download and install the tool on your Mac once you get to its official website. And let us see other steps on how to resize QuickTime video files.
Step 2Upload the Video File(s)
Launch the tool and begin to upload the video files that you need to crop. You can hit the Add Files button or simply drag and drop the files at the center of the interface.

Step 3Predestine the Cropped File
You may choose to predestine the cropped file before customizing it. To do so, just go to the Save To portion located at the bottom, then click the Browse and Select Folder from the list to choose your personal folder from your device.

Step 4Crop the QuickTime Video
WHit the Star icon next to the scissors icon of the file. On the next window, within the Rotate & Crop, you can either adjust the handlebars to crop the video manually or do it automatically by setting in the Crop Area as well as the Aspect Ratio. This is also a perfect time for you to add effects, filters, watermarks, and subtitles to your video.

Step 5Save the Cropped Video
To apply the changes that you made to the file, hit the Convert All red button. Then, check your chosen folder to validate your cropped video.

Part 3. Why Standard QuickTime Doesn't Crop Videos
From a technical standpoint, QuickTime Player is designed as a native playback program. Cropping a video is not merely a visual adjustment; it requires modifying the pixel coordinates and re-encoding the video stream. To maintain macOS system stability and peak performance, Apple limits the basic player to Trimming (shortening duration) rather than cropping (changing frame dimensions). For the latter, a dedicated encoder or a Pro-tier license is required to handle the re-rendering of the video matrix.
Part 4. FAQs of QuickTime Crop Video
How to crop video in QuickTime Player on Windows?
The QuickTime Player on Windows can't crop the video just like on Mac. However, if you really want to do so, use the Windows version of the QuickTime Pro together with Photoshop. Otherwise, use the AVAide Video Converter for the simplest yet excellent experience.
Can I crop video using the VLC?
Yes. VLC is a media player that can also edit your video files.
How to resize a QuickTime video without having pixelated graphics?
As there may happen sometimes, but with the correct cropping tool to use, you can avoid that instance.
Conclusion
This article introduces how to crop a video in QuickTime. You can check the detailed guide to crop your videos on Mac. You can see that QuickTime Player cannot play your videos and QuickTime Pro is also very difficult to use. You can choose AVAide Video Converter to crop your video on Mac. Just easily draw a portion on your video and export the result. You can get the original video quality without flaw.
ABOUT THE AUTHOR

Your complete video toolbox that supports 350+ formats for conversion in lossless quality.
Crop & Resize Video
- Top 8 GIF Resizers for Windows and Mac
- How to Resize or Crop Videos For Instagram
- Knowledgeable on How to Change Video Aspect Ratio
- How to Crop and Resize Videos on Android
- How to Crop Videos in Premiere Pro
- How to Crop Videos on iMovie
- How to Crop Videos on Mac
- How to Crop a Video in QuickTime
- Top 5 Amazing Aspect Ratio Converters to Crop Your Videos Greatly
- How to Change Aspect Ratio in Windows Movie Maker
- How to Resize a Video in Photoshop
- How to Crop MP4 Video Superbly
- How to Use the Ffmpeg to Resize Your Videos
- How to Crop Video without Watermark
- How to Crop a Video on Windows
- How to Crop Videos in Windows Meida Player
- How to Crop Videos to Square
- How to Crop Videos in After Effects
- How to Crop Videos in DaVinci Resolve
- How to Crop Videos in OpenShot
- How to Crop Videos Using Kapwing
- How to Crop Snapchat Videos
- How to Use VLC Crop Videos
- How to Crop Camtasia Videos
- How to Use OBS Crop Videos
- How to Use Ezgif Resize Videos
- How to Change Aspect Ratio in Final Cut Pro