When you have an unsupported media file, VLC is one of the many things that can open it. The open-source multimedia player is, indeed, an amazing option for free video playing, supporting a wide range of video and audio formats. Surprisingly, this is not only the scope of its function, as it also offers screen recording. But how does VLC screen capture work? Do you need to install a plug-in to make it happen? With this article, you will be walked through the steps of screen recording using the video player on Windows and Mac. Moreover, anticipate the alternatives for recording for effective screen capturing on desktops.
Part 1. Can VLC Record Screen?
The Short Answer: Yes, VLC has a built-in screen recording feature via its "Open Capture Device" function
How It Works
VLC's offering of the screen recording feature comes from the fact that it treats your desktop as a live video stream. Meaning, it works by capturing raw images, then using its built-in transcoding engine to compile those images into one video file.
What VLC Can Do (and Can't Do)
Other than screen recording and being a multimedia player, it is worth noting that VLC offers more. It allows you to convert formats, stream content through devices, sync audio to video, and even edit videos. But even if it is good to be true, VLC also has limitations in its features, including being unable to stream DRM-protected media like Netflix. Moreover, the screen recorder cannot capture video with audio naturally. It will require additional setup or a plugin to record audio.
Why Use VLC for Screen Recording?
Using the VLC Media Player screen recorder is an advantage if you need a quick screen recording and a video player in one. It is lightweight compared to some heavy recording tools, and it can even convert videos with versatile formats like AVI and MKV.
Part 2. Setting Up the Record Button First
After learning the existence of the amazing screen recording feature within VLC, it is time to talk about how to activate the Record button first before initiating the recording. You will need to know where to find the REC button and confirm that it is enabled. To do this, you will have to follow the steps on how to set up the VLC Media Player to record the screen:
Step 1Download and install the video player and open it on your desktop.
Step 2From the View menu at the top part of the interface, locate the Advanced Controls option. If it has a check beside it, click the option to remove or toggle it off.
Step 3You will see buttons added at the bottom part of the interface. One of them is the Record button that you can use for recording.
Part 3. How to Record Screen with VLC
1. On Windows 10 & 11
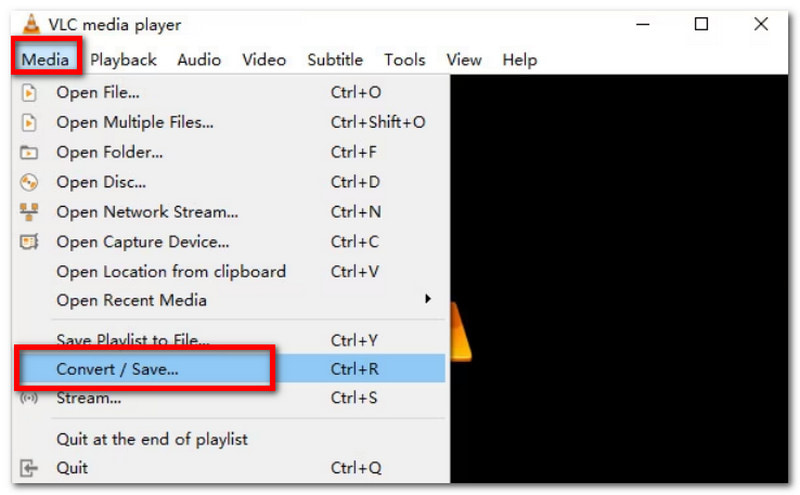
Step 1Open VLC on your Windows desktop, and navigate to the Media menu. Choose the Convert/Save option.
Step 2From the opened dialog, go to the Capture Device tab. You will have to tweak the settings, like the frame rate and location folder.
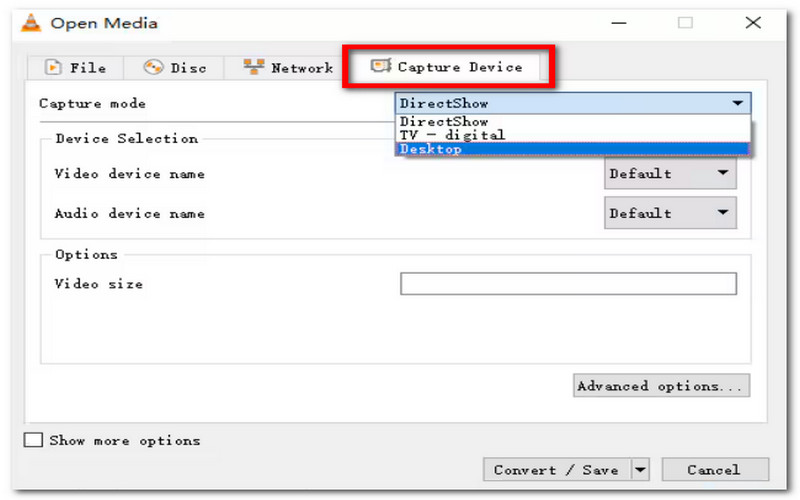
Step 3Once everything is set up, click the Start button to start screen recording in VLC. Click Stop once all is good.
2. On Mac
Step 1After downloading and installing VLC on Mac, go to the File menu and select Open Capture Device.
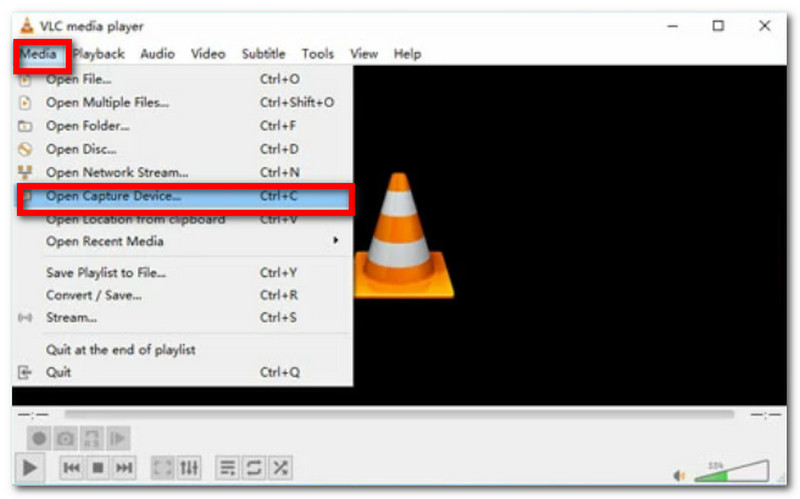
Step 2On the Input Devices dropdown menu, choose the Screen option. Input the desired frame rates. Apply changes by clicking the Open button. Then click the Record button to start recording.
3. Where Are VLC Screen Recordings Saved?
If you record the screen using VLC on Windows, you can find the recordings from File Explorer. Just navigate from the Local Disk (C:), open the Users folder, and go to the Videos folder where VLC recordings are stored. For Mac, the recordings are saved by default in the Movies folder of your local folder.
4. VLC Screen Record Shortcuts
VLC has a default shortcut key to easily activate screen recording on a video being played. You can press Shift+R to capture the screen effortlessly. However, keep in mind that this is the only thing the shortcut can do, and it won't be able to activate recording the screen generally.
Part 4. VLC Screen Grab / Snapshot Feature
It is no surprise that VLC also offers a built-in screenshot feature that can capture still images from a video being played. Ultimately, you can easily use VLC screen grab by following these steps:
Step 1Play the video, and when you are on the desired part, press Shift+S to take a screenshot.
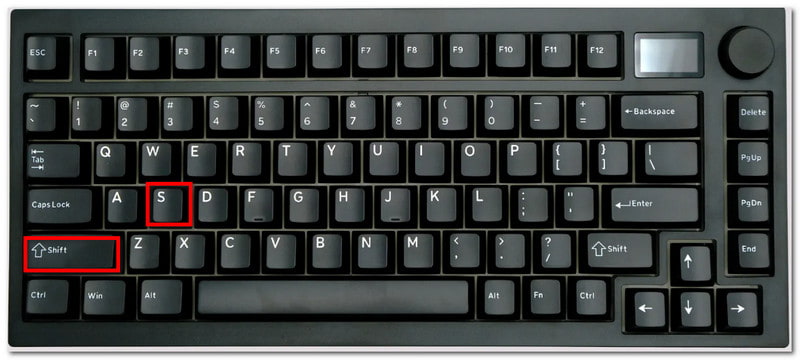
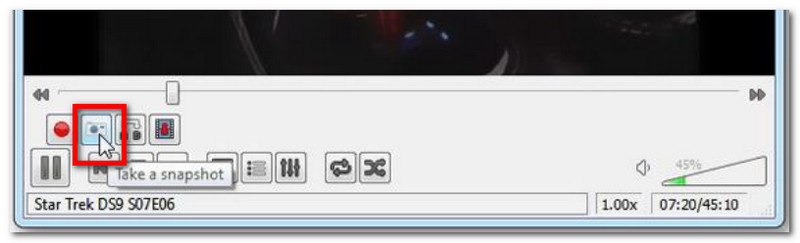
Step 2For Mac, press Cmd+Alt+S to activate the feature. Alternatively, if you have activated the REC button from the Advanced Controls, you can click the Snapshot button at the bottom.
Part 5. VLC Screen Record Not Working
If you find yourself in a pinch and VLC is unable to screen record, it can be solved simply by restarting your computer or updating the media player. If these methods are not working on your end, you can try the following:
- Disable the Hardware Acceleration within the player.
- Adjust the caching settings from the Input/Codecs tab.
- Disable Windows Defender from your desktop's Update & Security
- Check for ongoing issues from forums or if VLC is under maintenance
Part 6. VLC vs. Dedicated Screen Recorders
There is no doubt that VLC is more than a media player when it provides essentials like a video recorder. However, compared to dedicated screen recorders, VLC is miles away from achieving what OBS, Bandicam, and AVAide can do. To make it clear, here is a detailed comparison of the VLC alternatives.
VLC vs. OBS
Both of these tools are free and open-source, and you can screen record with no time limit. But VLC can only capture full screen, while OBS is flexible in recording in partial areas and with multiple sources like webcams.
VLC vs. Bandicam
Bandicam is a dedicated screen recorder that is available for Windows and Mac. It is superior to VLC as it can do heavy screen recording with higher video resolution up to 4K UHD. Bandicam is recommended for gameplay captures, as VLC will only struggle with high-motion games.
VLC vs. AVAide Screen Recorder
AVAide Screen Recorder is a multipurpose screen recorder that can capture not only the screen, but also audio, gameplay, webcam, and mobile. It is designed to record and save videos in popular formats like MP4 and MOV, but also allows you to tweak the output settings like the encoder, sample rate, frame rate, and resolution. Unlike VLC, AVAide allows you to customize shortcut keys to start, pause, or stop recording, as well as other functions like taking screenshots and showing or hiding the floating panels. It is also incomparable with VLC in installing additional plugins, as this alternative screen recorder captures video with audio naturally, and it can even include audio from your microphone in the recording. To use AVAide Screen Recorder, you can start by following the steps:
Step 1Download and install the screen recorder. Complete the installation and open the software.

FREE DOWNLOAD For Windows 7 or later
 Secure Download
FREE DOWNLOAD For Mac OS X 10.13 or later
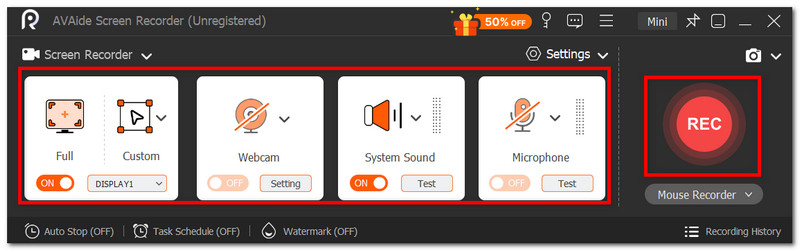
Secure DownloadStep 2Set up the general settings like the recording mode, system sound, and microphone. Click the REC button to start recording.
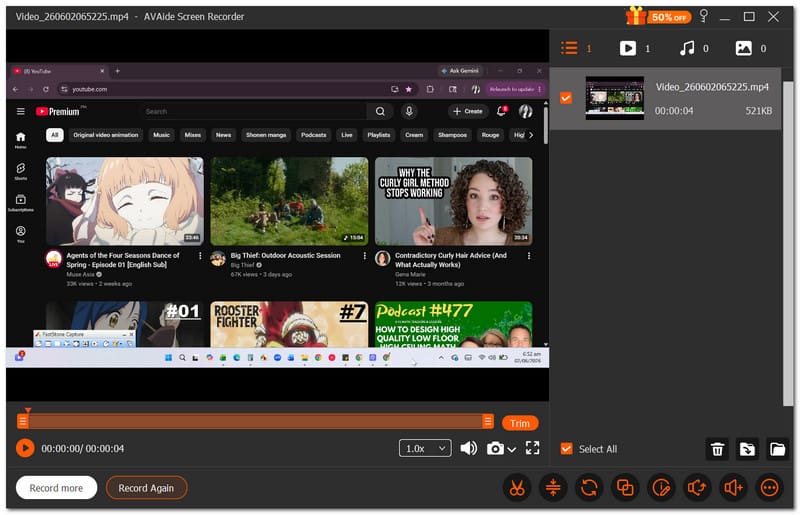
Step 3Once done recording, you can preview or trim the video in the Preview window. Then, save the video file on your computer.
You can indeed record screens using VLC, despite being mainly a media player. It is considered a generous advantage, especially if you only need a quick screen record. However, this article also shows you its limitations and how it is important to invest in a dedicated screen-capturing tool like AVAide Screen Recorder. It is efficient not only for high-quality screen recording, but also for other content like audio, online meetings, and gameplay. Grab the free version on Windows and Mac!
ABOUT THE AUTHOR

Capture the best moment with AVAide Screen Recorder. Screencast, customize, and share in seconds.