Many Mac users waste time redoing their recording due to audio errors or choppy video. Surely, you do not want to experience such a hassle for an easy recording task on a Mac. That is why this article showcases a well-rounded guide on how to screen record on Mac using the native toolbar, QuickTime, and six more alternatives you can choose from. Do you want to have a hassle-free screen recording on your Mac right now? If that is the case, you must read and follow the guide that we have here.
- Method 1: Using the Built-in Screenshot Toolbar (The Easiest Way)
- Method 2: Using QuickTime Player (The Classic Method)
- Method 3: Using AVAide Screen Recorder (The Wise Choice)
- Method 4: Using ScreenStudio
- Method 5: Using Loom
- Method 6: Using Clean Shot X
- Method 7: Using OBS Studio
- Method 8: Using TechSmith Camtasia
- Where Do Screen Recordings Go on Mac? (Finding Your Files)
- How to Stop Screen Recording on Mac
- How to Edit Screen Recordings on Mac (Basic & Advanced)
Method 1: Using the Built-in Screenshot Toolbar (The Easiest Way)
The native screen recorder on Mac that you can use to screenshot and record your screen is the Screenshot Toolbar. It can be accessed by pressing certain keys on your keyboard, and no installation is needed, since it is already pre-installed. For a quick screen recording, this could be your option. If you want to know how to record a screen on a Mac, because it requires no setup, then follow the tutorial that we have here.
Step 1Simultaneously press the Shift + Command + 5 to open the Screenshot Toolbar on Mac.
Step 2Set the recording area by clicking one of the video buttons available. These options allow you to record the entire screen or record an area of your screen. Then, tick the Record button on the toolbar to start it.

Step 3Tick the Stop button on the menu bar to end the recording, or you can press Command + Control + Escape.
Method 2: Using QuickTime Player (The Classic Method)
Another Apple-built-in tool that is currently used to play media also has a screen recording feature, namely QuickTime Player. It is the go-to choice of users who want to record a computer screen on a Mac without installing another app to get a new feature. As of today, it is currently supported on all macOS versions. To teach you how QuickTime screen recording works, you can follow the steps that we have here.
Step 1Open the QuickTime Player, choose File, and go to New Screen Recording.
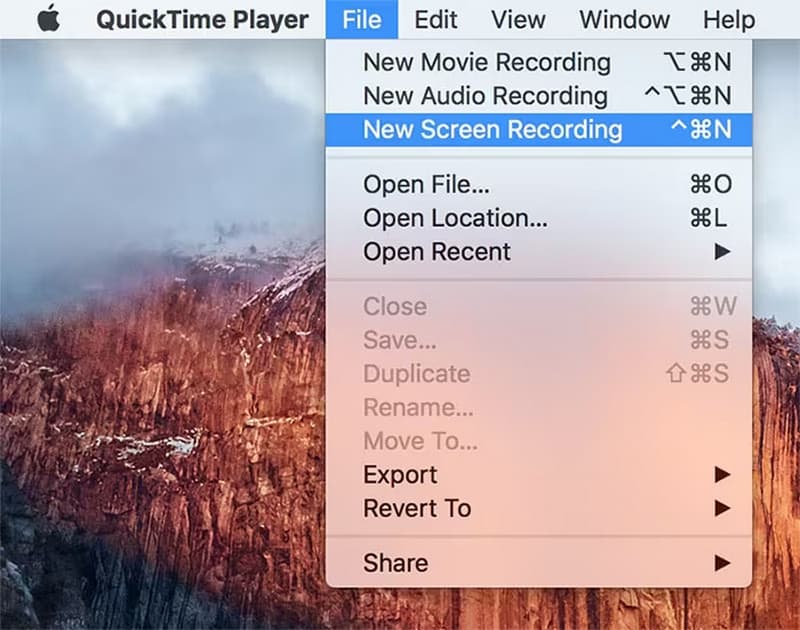
Step 2Set your microphone source, then click the Record button to set the recording area proximity.
Step 3After recording what you want with QuickTime, click the Stop button. More to it, you can also trim the video you have recorded with QuickTime.
Method 3: Using AVAide Screen Recorder (The Wise Choice)
First on the list of the best screen recording apps on Mac is the AVAide Screen Recorder because it is designed for high-quality recording and audio capture. It supports lossless 1080p to 4K recording with 60 FPS. Plus, you can also record your system and microphone audio with screen recording, adding an overlay of webcam with it, schedule a recording, annotate, and a bunch of editing features. This screen recorder is well-suited for all users who want to have advanced features of screen recording on their Mac system without going through technicalities. Want to try using it?
Step 1First off, you need to download the latest version of this software on your Mac by ticking the download button that we have here. Follow the instructions for installation; it needs to be followed before you can launch it.

FREE DOWNLOAD For Windows 7 or later
 Secure Download
FREE DOWNLOAD For Mac OS X 10.13 or later
Secure DownloadStep 2After that, the floating toolbar will appear, and click the Screen Recorder. From here, do the setup of your recording based on your needs by setting up the recording area, microphone, system sound, and webcam. Then, click the REC button to initiate.
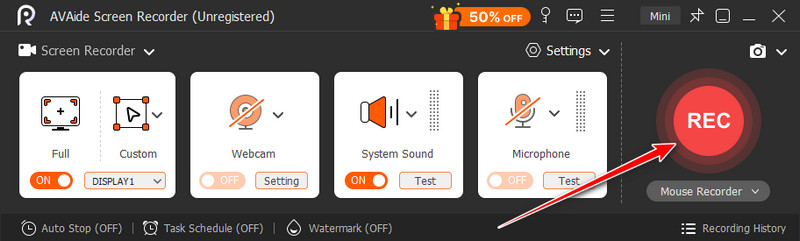
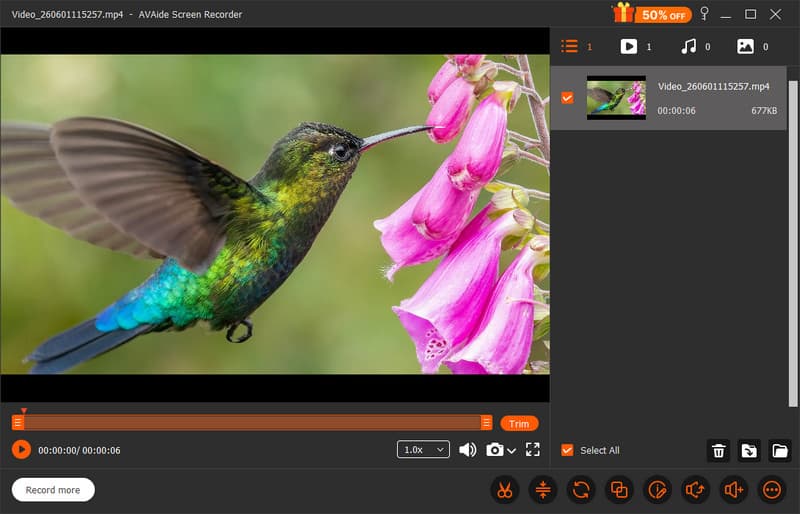
Step 3A three-second countdown before recording will appear on your screen, and once you are done recording, click the Stop button. Edit the length of the video with its trim feature and other available features here.
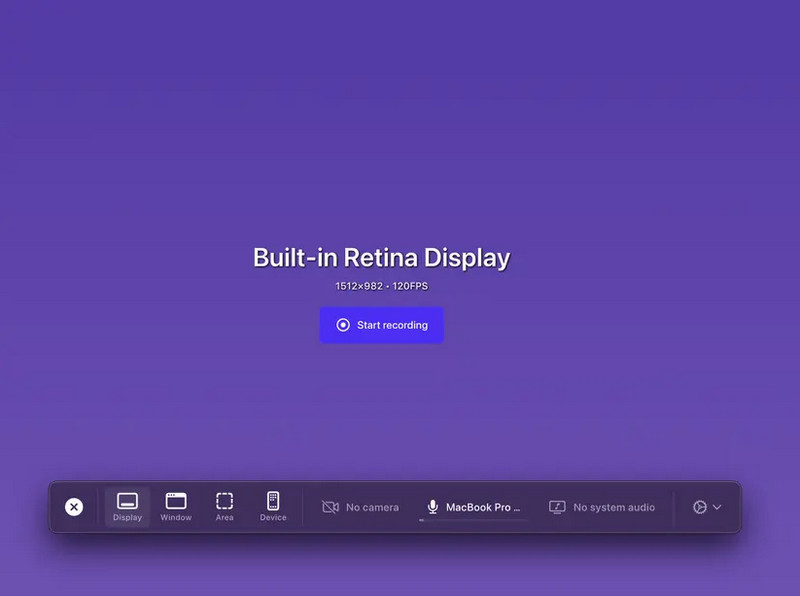
Method 4: Using ScreenStudio
If you are utilizng an Apple Silicon M-Series, then the ScreenStudio could be a great choice to record your screen on a Mac. Just like the built-in recorders, it does its job, but the app offers more, such as automatically zooming in on mouse activity with a 4K quality of recording. You can also activate its audio options and overlay your face to the recording with the webcam. Simple but effective screen recorder. Can you screen record on a Mac? Yes, you can, and here is the tutorial you needed to follow.
Step 1Open the ScreenStudio to access its pop-up modal, and set the recording area based on what you want.
Step 2Now that you have chosen the recording area, a Start Recording button will appear on your screen. Click it to proceed.
Step 3In the control widget, click the square button to stop.
Method 5: Using Loom
Everyone might know Loom, which is why we consider it in this list. How to record video on Mac? Well, this app lets you quickly do it with the addition of a webcam, then share the video instantly via link. This is a good pick for those who prioritize speed and easy distribution because of its practical way of handling the recording. However, its recording quality is limited compared to the options that we have here. If you are still interested in using it, here is a quick tutorial on how to.
Step 1Download it on its official download page and log in to your account. Grant permission to access your camera, microphone, and others before you start recording.
Step 2 Choose the recording mode you want to use that is available here, and you can click the camera and microphone to activate them while recording. After that, tick the Start Recording button to start the countdown for recording.
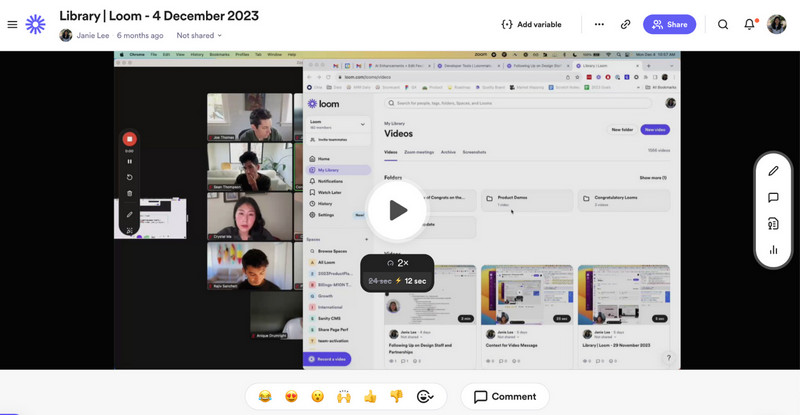
Step 3When finished, tick the stop button, and your video will be processed to open in the browser.
Method 6: Using Clean Shot X
How to screen record on Mac with audio? Clean Shot X provides a premium design for capturing and recording with a polished output, making it creator-friendly. Compared to the built-in on Mac, this app has a sleek floating toolbar with audio support, giving you a chance to record not only the screen but the sound as well. Plus, it has mouse-click highlights and additional video trimming after you stop the recording. Thus, the learning curve is steep, and you need to pay a certain amount to continuously use it per Mac device. Learn how to use it with the steps below.
Step 1Now that you have opened the app, tick the Record Screen option, then select the area you want to include in your recording.
Step 2Activate the Microphone and System Sound recording if it is necessary for your screen recording, before you click the Record Video.
Step 3Finally, tick the stop button to end the recording.
Method 7: Using OBS Studio
OBS Studio became a popular Windows screen recorder due to all of its premium features for recording without costing you a dime, and now it is available on Mac. Known for being an open source for screen recording and live streaming, the app lets you take control over scenes, audio mixing, bitrate, resolution, and output format. If you are an experienced creator who prioritizes customization, then this is for you, but if not, and you only want a simple recorder, then choose the other options in here. Learn how to record a screen on a Mac with sound using the tutorial below.
Step 1After downloading OBS, go to the Source dock, click the + button, select Display Capture, name it, and click OK. Then, choose your monitor since you want to do a screen recording.
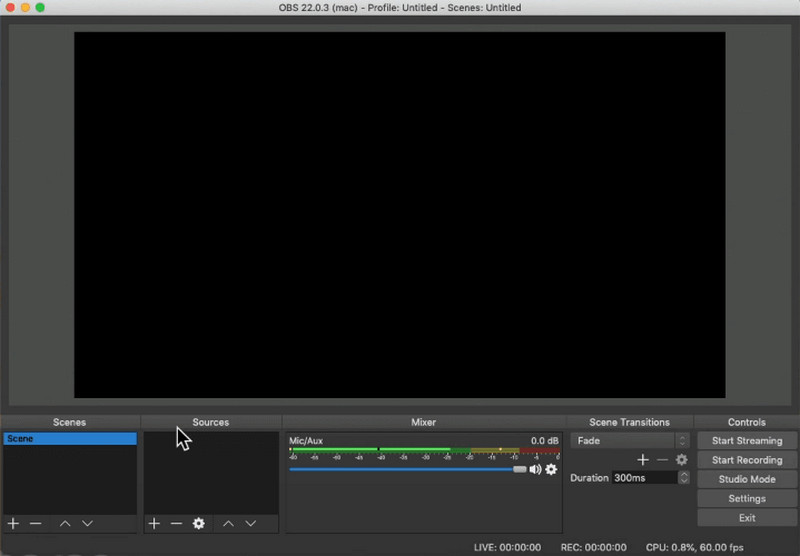
Step 2Go to the Audio Mixer, select Desktop Audio and Mic/Aux to capture the sound of your computer and your voice. Then, click the Start Recording under the controls dock.
Step 3Finally, click the Stop Recording when you are done.
Method 8: Using TechSmith Camtasia
Known for being a professional screen recorder, TechSmith Camtasia is built differently from the others because you can polish all recordings with it. It can do your screen, webcam, and audio simultaneously, then add annotations to them during the recording. It has built-in editing tools like trimming, zooming, callouts, transitions, and effects, which are beneficial to those who need quick editing. When you need to know how to record a computer screen on a Mac, follow the steps we have here.
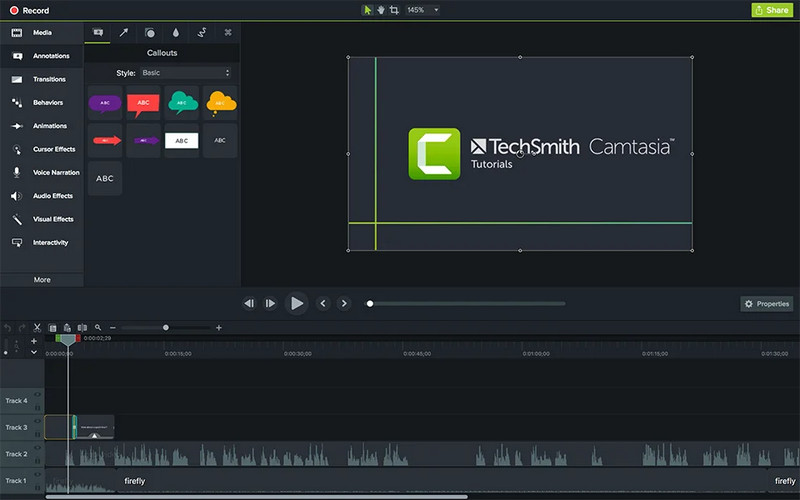
Step 1From the home screen, tick the New Recording and click Record from the open project.
Step 2Adjust the region, webcam, microphone, and system audio by toggling the button to turn them on. After that, click the REC button to start.
Step 3Once you are done recording, click the Stop button and edit it with the available editing tools.
Where Do Screen Recordings Go on Mac? (Finding Your Files)
Where do screen recordings go on a Mac? By default, you can view them on your Desktop with a filename and formatted to .mov. If the file is not saved on your Desktop, you can find it by going to the Finder > Go > hold the Option key to reveal the hidden Library folder. Inside it, you can find them in the directory: ~/Library/ScreenRecordings.
How to Stop Screen Recording on Mac
The easiest way to stop recording on a Mac is by clicking the red stop button that appears on the toolbar while you are recording. Aside from that, you can use the keyboard shortcut, such as Command + Control + Escape for the default recorder on Mac or the dedicated shortcut depending on the tool you are using.
How to Edit Screen Recordings on Mac (Basic & Advanced)
How to edit screen recording on Mac? Since you are done with screen recording, finishing it strongly with editing is a must. By default, you can use the QuickTime Player for a quick, basic editing of the video and the iMovie for a more professional stance in retouching it. Want to know how it is done? Read the succeeding tutorials that we have here.
QuickTime Player - Basic Video Editor
Step 1Open the screen recording on your QuickTime by clicking the Finder > screen recording file > Open With > QuickTime Player.
Step 2To edit the video, you can tick the Edit button at the top bar and choose the options that are available here.
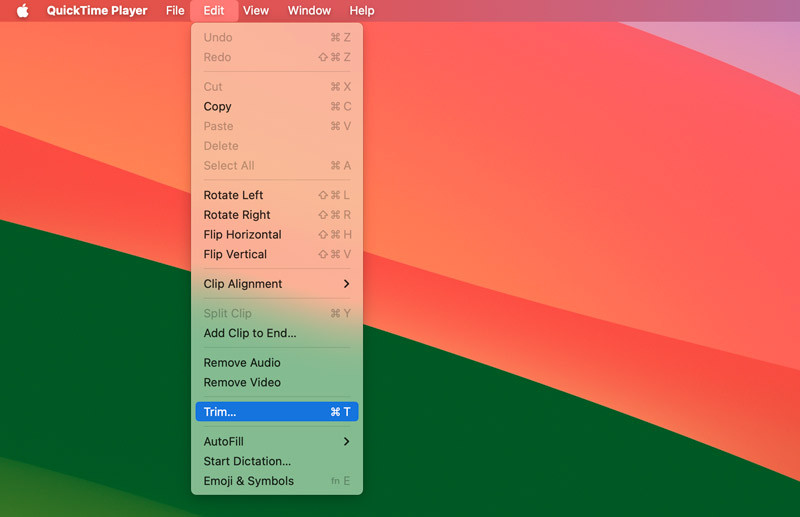
Such as:
- Trimming
- Splitting and Rearranging
- Merging
- Merging
Step 3Once you are done, click the File > Export As > select quality > Save.
iMovie - Advanced Video Editor
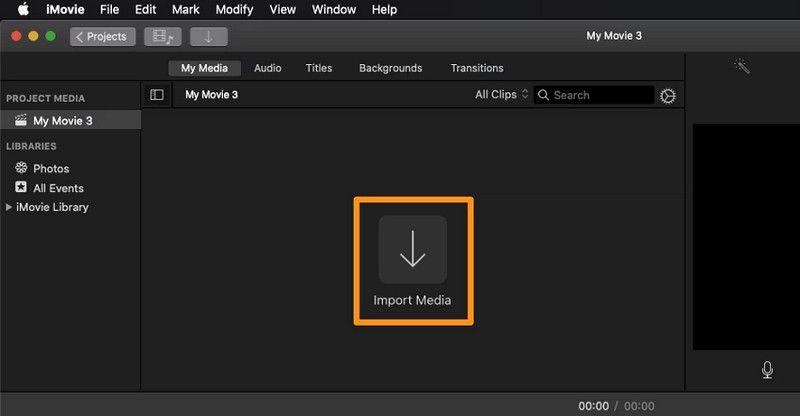
Step 1Go to the iMovie app, choose Projects, select Create a New Project, then select Movie to open a new workspace here.
Step 2Tick the Import Media to upload the screen recording video you have done earlier here. Then, drag that file into the Timeline to start editing it.
Step 3With it, you can see various editing features that are available here, such as the functions mentioned earlier, transitions, adding text, adding background music or audio, and many more. If you are done editing, click the Share button, Export File, select resolution, and Next. Finally, click the Save button.
Is there a way to screen record on a Mac? Definitely, as you can see, all the tools and steps we have included here are all working on Mac. If you want a simplified tool for a quick recording,g a default screen recorder can do the job. But, if you prefer to have more than a simple screen recording and expect to have an extensive feature for your recording needs, then the AVAide Screen Recorder and the other tools can fill in that for you.
ABOUT THE AUTHOR

Record screen, audio, webcam, gameplay, online meetings, as well as iPhone/Android screen on your computer.