Recording your screen is one of the most useful features on an iPhone, whether you're creating a professional app tutorial, saving a memorable video call, or troubleshooting a technical issue for a friend. While the process might seem as simple as a single tap, many users struggle to find the hidden settings that control audio inputs, notification privacy, and output quality. In this comprehensive guide, we will show you exactly how to screen record on iPhone using the latest iOS 26 and iOS 27 Beta features to ensure your videos are crisp, clear, and perfectly timed.
Beyond the basic Record button, mastering your iPhone's screen recording capabilities involves optimizing your Control Center, managing internal vs. external audio, and preparing your device to avoid interrupted recordings. We'll walk you through the essential shortcuts and hidden configurations that help you achieve professional-grade results directly from your mobile device.
Part 1. How to Screen Record on iPhone: Full Guide
Step 1Ensure That Screen Recorder is in Control Center
Although the screen recorder feature is in the Control Center by default, you can add it if needed.
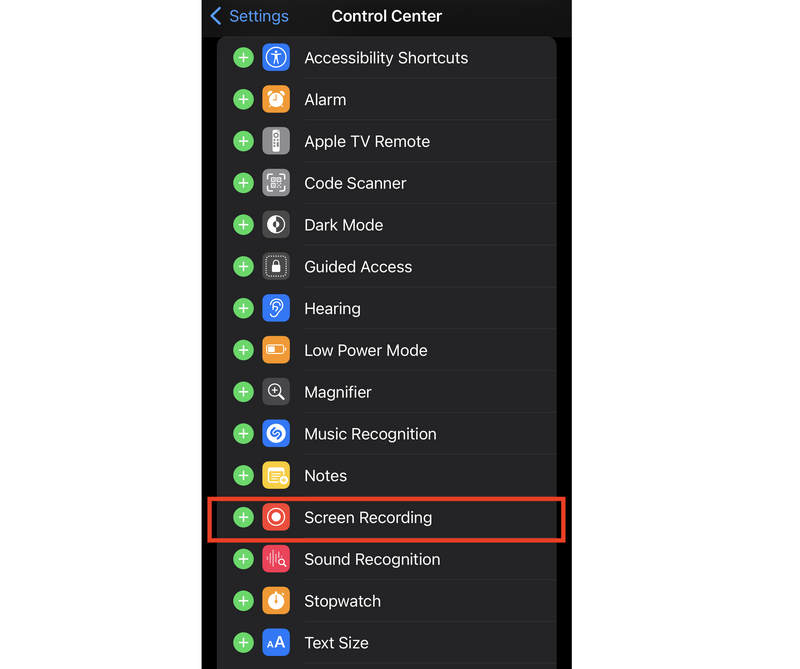
Go to Settings, and select Control Center. Then, scroll down to find MORE CONTROLS. Then, tap the Add button next to add Screen Recording to the Control Center.
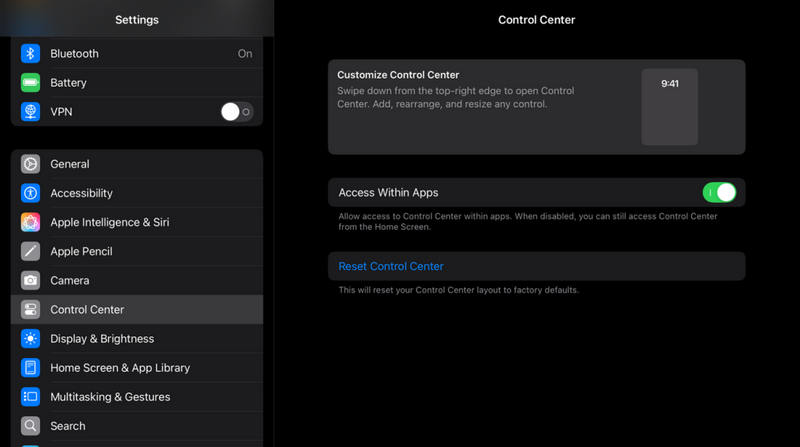
Also, you need to ensure that Access Within Apps is turned on. This feature can help you record only a specific app on your iPhone.
Step 2Start Recording Screen on iPhone
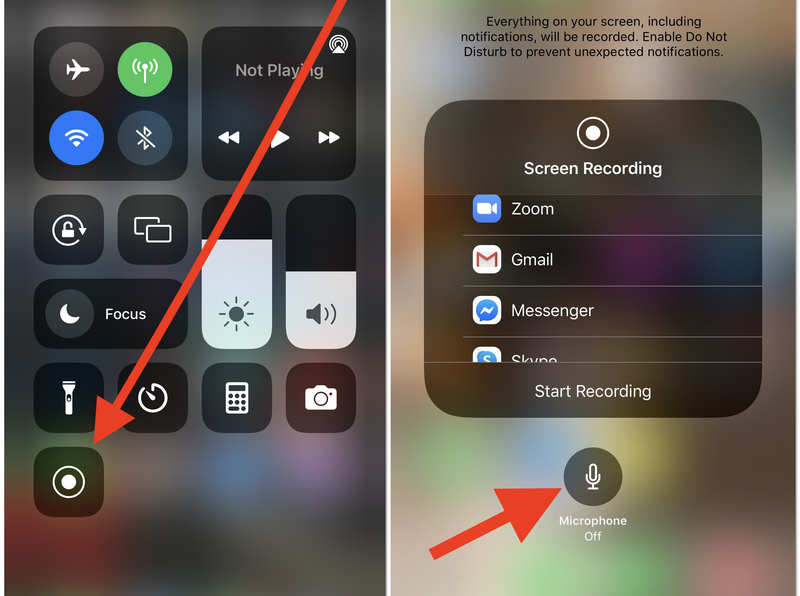
Swipe down from the top right corner of your iPhone screen to open the Control Center. Then, tap Screen Recording to start screen recording your iPhone.
Tap it and suddenly release to directly record the full screen.
Hold on to it to select a specific app you want to record. You can also turn on or off the microphone. Then, tap the Start Recording button to record screen on iPhone with or without external sound.
When you want to stop the screen recording, just open the Control Center again and tap the Screen Recording button.
Part 2: Helpful Tips for Mastering Screen Recording on iPhone
1. How to Screen Record on iPhone with a Voice Over
iPhone's built-in screen recorder allows users to add a voice-over while recording their screen. Yes, by using your Device's mic, you can record your voice while capturing your screen. See the quick steps below to learn.
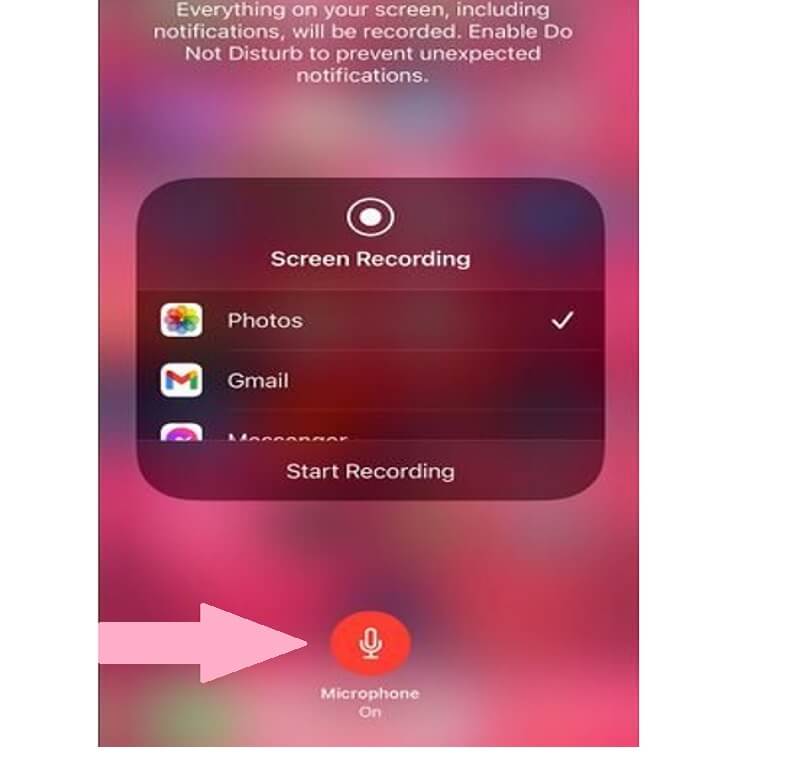
Step 1Launch the Control Center to see the screen recorder app. Then, tap and grip the Record button until a pop-up window appears.
Step 2On the new window, tap the Mic icon to turn it on. Then, tap the Start Recording to begin the recording.
Step 3Make a double tap for you to exit from the popped-up window. The same procedure mentioned above will follow when you need to stop the recording.
2. How to Edit the Recordings on iPhone
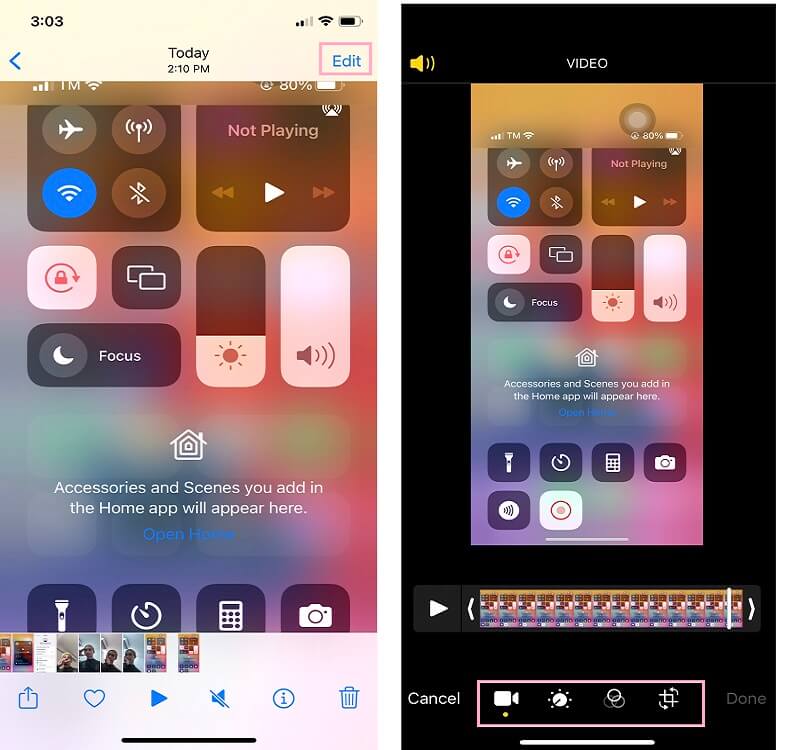
You can always edit the recorded video you just made. How? By navigating to the Photo Gallery, where your recorded file is saved. To know more about it, see the steps below.
Step 1Tap the recorded file from your gallery, and tap next to the Edit tab located at the right uppermost part of the screen.
Step 2Then, it will bring you to the editing tools that you can use to enhance the recorded file. Feel free to trim, rotate, and improve it. After that, tap the Done button to apply the changes.
3. Pay Attention to the System Audio
One of the most common mistakes users make when learning how to screen record on iPhone is neglecting the playback volume. Unlike a computer, where the system audio is captured at a constant internal level, the iPhone’s screen recorder is sensitive to your device’s volume output.
If your phone is muted or set to a very low volume, the resulting video may have faint or virtually silent audio. To ensure your viewers can hear the game sound or video playback clearly, remember to adjust the system volume.
4. Enable Focus Mode to Block Notifications
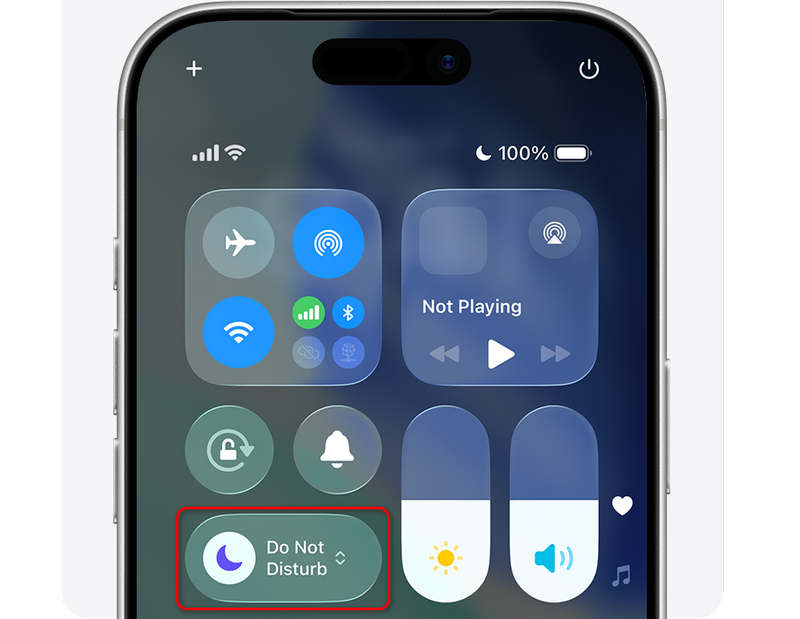
There is nothing more frustrating than recording a perfect take only to have a private text message or a low-battery alert pop up in the middle of the screen. Since the iPhone captures everything visible on your display, these interruptions are permanently burned into your video.
So, you can turn on a Focus Mode, like Do Not Disturb, before you start screen recording on your iPhone.
Part 3. Reasons Why You Can't Record Screen on iPhone
There will be a time when you just can't use the screen recorder iOS 15, 16, 17, 18 and others. There may be some reasons why, but mostly it is the built-in program itself. Sometimes, it just doesn't work fine due to the following reasons:
1. Sudden Termination of the Program - This usually happens when some bugs and glitches get in the way. Users are often advised to restart their iOS devices to resolve this issue
2. Outdated Device - this is also one of the common problems why most of the mobile apps aren't working fine, including the screen recorder. Make sure to always have the new updates of iOS to prevent this circumstance.
3. Insufficient Phone Storage - This is probably the very reason why you can't screen record on your iPhone. Because how will a program run if poor storage hinders it in producing files, right?
Part 4. Suggested Way to Record Screen on iPhone Using a Screen Recorder
Upon learning the reasons that hinder you in screen recording, you might now think about how to get this thing done smoothly. Well, we have the best solution prepared only for you. We know how delicate it is to acquire a new app on your iPhone. Not just that, another reason that we see is that installing an app will eat up space on your precious mobile.
Actually, the phone screen recorder is only one of the multiple features of this excellent software because it also offers a game recorder, audio recorder, and webcam recorder, along with its Snapchat feature that can capture even while the recording is ongoing. Therefore, let's quickly proceed with its procedure on how to screen record your iPhone, with the detailed steps below.
- Allow you to record your iPhone screen in HD quality.
- Provide various output formats, including AVI, MP4, etc.
- It best suits the WIndows and Mac OS.
- No watermark on the outputs!

 Secure Download
How to Use the AVAide Screen Recorder in Recording Screen on iPhone
Step 1Launch the Software
Make sure that this software is installed on your computer device. Launch it on your computer and go directly to its Phone recorder located in the fourth box of features.

Step 2Link it to Your iPhone
Select the iOS Recorder option from the new window. Then, follow the simple procedure given on the new window on how to link your devices together. But, you have to make sure that you are on Screen Mirroring, not the audio.

Step 3Record Screen on iPhone
A new window showing your iPhone screen will appear once the devices are linked. This is the perfect time to adjust the presets for the Resolution and Content. If you want to include the audio in your recording, operate on the Recording Content and toggle the Phone Speaker. Also, to add voice overs toggle the PC Microphone. Then, click the Record button after.

Step 4Stop and Export
Before ending the recording, you may want to screenshot the screen record on your iPhone. How? Click on the Camera icon. Otherwise, hit the Stop button, and proceed to the next window where you can export the recording.

Part 5. FAQs About Screen Recording on iPhone
Why can't I find the default screen recorder on my iPhone?
You can't find it because it's probably not enabled in your control center. Go to your settings and see if it's included in the controls from the control center.
Can I screen record using the iMovie on my iPhone?
No. iMovie is exclusive to editing videos and doesn't have the ability to record screens.
How to record a phone call on iPhone without a third-party app?
You need to click the Add Call while the phone call is ongoing to record the phone call. Then, dial your own number to direct you to the voicemail. Once you hear the greeting message, tap on the Merge Calls. The voicemail will be sent after you finish your phone call.
The article tells you how to record screen on iPhone with a full guide. You should know that iPhone Screen Recording can record both the full screen and a specific window as long as you correctly adjust the related settings.
If you want more powerful and versatile screen recording features not only on your mobile phone, but also on your Windows or Mac computer, you can consider AVAide Screen Recorder. It has strong capabilities and a lightweight size. You can capture the original image quality of your screen or enhance it to 4K. The supported HEVC and AV1 codecs can help you record long and large videos with small file sizes.
ABOUT THE AUTHOR

Capture screen activities with audio, online meetings, gameplay videos, music, webcam, etc.
Record Screen & Video
- Screen Record on Mac
- Screen Record on Windows
- Screen Record on iPhone
- Record Audio on iPhone
- Record TV Shows without DVR
- Screen Record Snapchat on iPhone and Android
- Record a FaceTime Call
- How to Use the VLC to Record Screen
- Fix Amazon Error Code 1060
- Fix OBS Window Capture Black
- How to Make a PowerPoint Into a Video [Complete Tutorial]
- How to Make Tutorial Videos: Preparations and Guidelines
- How to Screen Record with Sound on iOS 15 and Later
- How to Screen Record on TikTok: Desktop and Mobile Solutions
- How to Screen Record on Samsung in 2 Proven Ways [Solved]
- How to Record Gameplay on PS4 without a Capture Card
- How to Record Gameplay on Xbox One [Full Tutorial]