For anyone who is a gamer, a visualization tutorial or demonstration of any activity you wish to record your iPhone screen with sound will be a piece of cake. This e-guide explains how to set up for audio recording and how to sort through issues to help solve common problems in recording audio, and offers some helpful audio recording tips.
Part 1. How to Enable Screen Recording with Sound
Recording of iPhone and iPad screens is an inherent capability that allows recording of your display and sound. You do not need to fear enabling the feature or microphone for the addition of sound to your project.
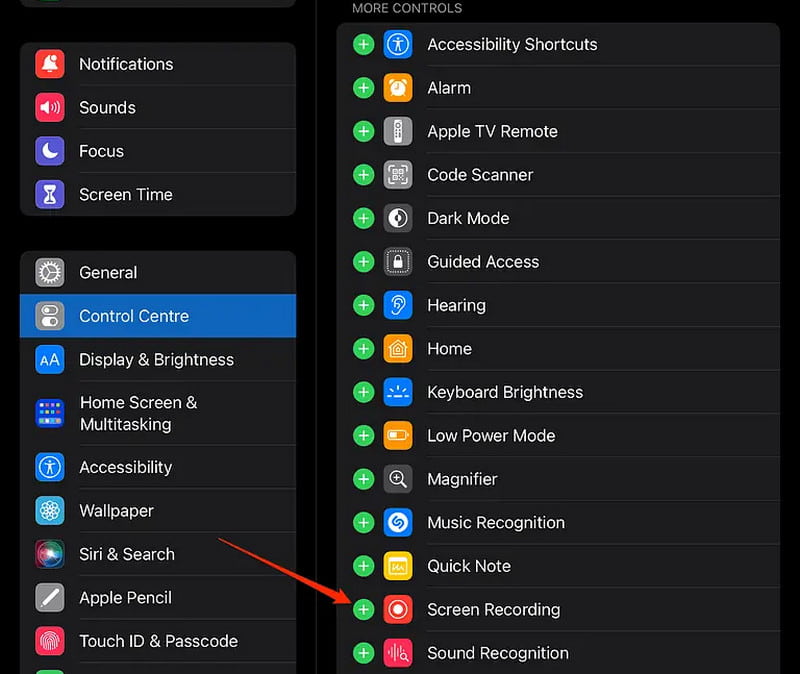
Step 1Access the Settings and then the Control Center. Click Screen Recording from the list on the left side and then click the Add (+) button in order to add the feature to the control center.
Step 2On the latest devices, press the top right-hand corner of the screen to open the Control Center, and on the older ones, swipe up to open it. You will see the button for Screen Recording.
Step 3Hold down the Screen Recording button and click the Menu that appears. Click the Microphone button to activate the microphone. If it turns red, then auditing is activated.
Step 4Press Start Recording and hold until the countdown time is done. Your screen recording will start as soon as possible!
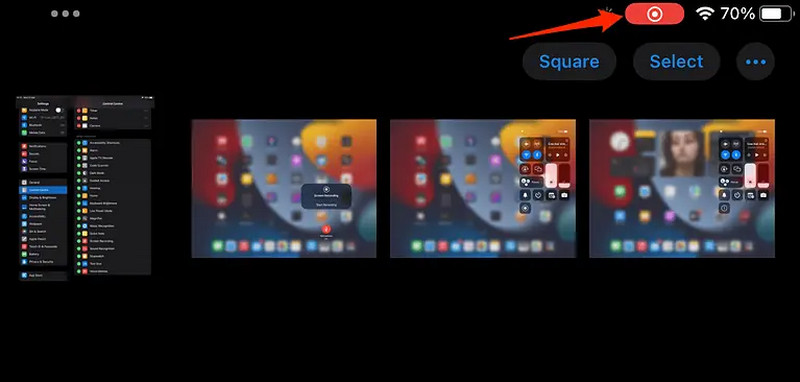
Step 5To stop a recording, tap the red status bar or recording indicator, then confirm that you want to stop the recording. The video will be automatically placed inside the Photos app.
Part 2. Understanding the Two Types of Audio Recording
If audio is turned on for a screen recording on an iPhone or iPad, the audio will be as usual. If the microphone is turned off, there will be no audio recorded.
Microphone OFF
If the microphone is not working, the recording will only include sounds from the device. That means app sound, videos, and any sound for gameplay of the app (depending on the sound function of the app). It will not film the sound of your voice or background noises.
Ideal for video gaming, app demos, and capturing video with internal sound only.
Microphone ON
This feature is enabled if your device supports it. When the microphone is turned ON, it records the audio and voices along with the background noise as you talk.
This feature is the best for recording tutorials, walkthroughs, and online classes as it describes what is happening on your device screen.
Part 3. Troubleshooting Screen Recording No Sound
There are many reasons why iPhone and iPad screen recordings that should capture audio do not. It is common for recordings to look normal and later have no audio. These issues can usually be fixed by checking basic microphone and sound settings, as these issues are usually simple settings, audio routing, or app restrictions.
1. The Silent Switch is ON
When your device is operating in silence mode, the activity might influence sound recording while capturing the screen, and this could cause you to miss out on or muffle audio from your screen recording.
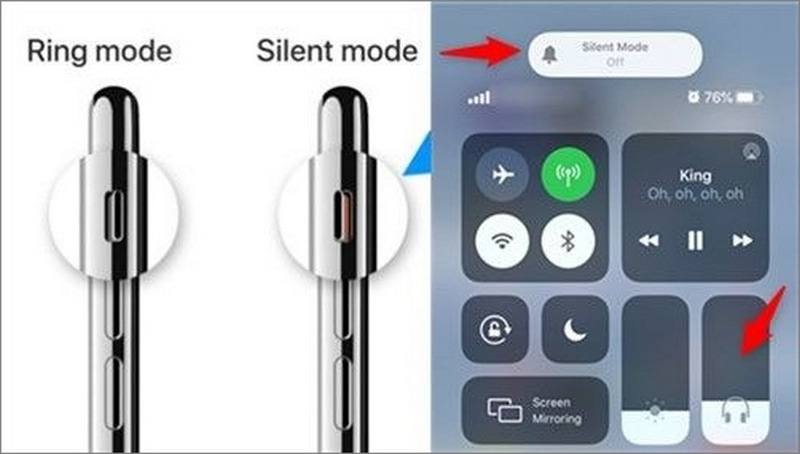
Fix:
Please ensure that the physical switch on the right-hand side of the iPhone is switched off when in silent mode (it is switched on when Ring mode is on). Turn back to the recorder, and by the end of the process, record another session to see if the problem is solved.
2. Microphone Was Not Enabled
If the microphone is turned off, your video on the desktop will not include your voice or other sounds, but just what you are seeing on the screen.
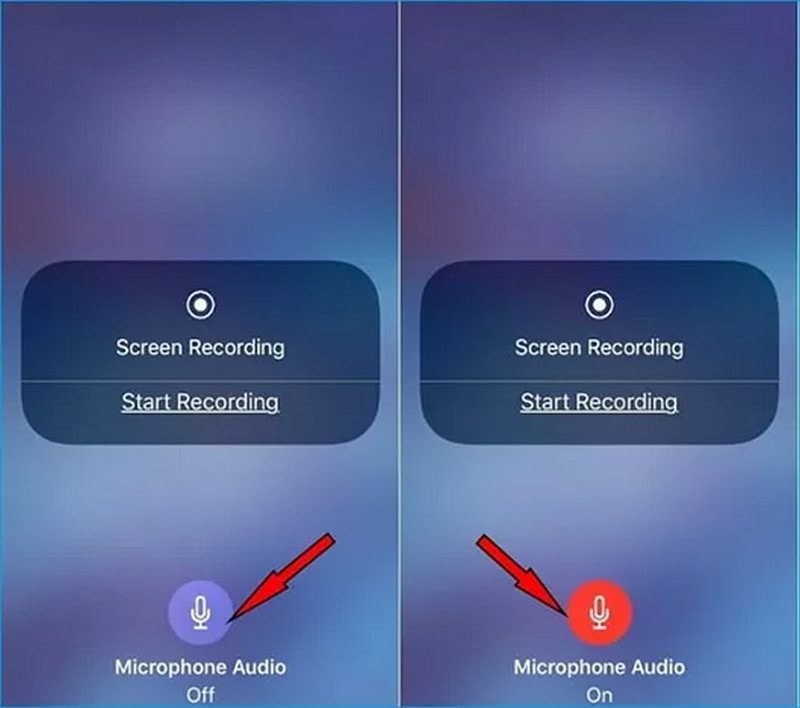
Fix:
Open the Control Center, press and hold the Screen Recording button, and ensure the Microphone option is enabled (it should light up in red). Instruct to start a new recording and add audio.
3. Your iPhone/iPad is in Do Not Disturb or Focus Mode
Certain focus modes, such as the Do Not Disturb mode, could affect the operation of the device to control background activity, and could affect audio when recording the screen.
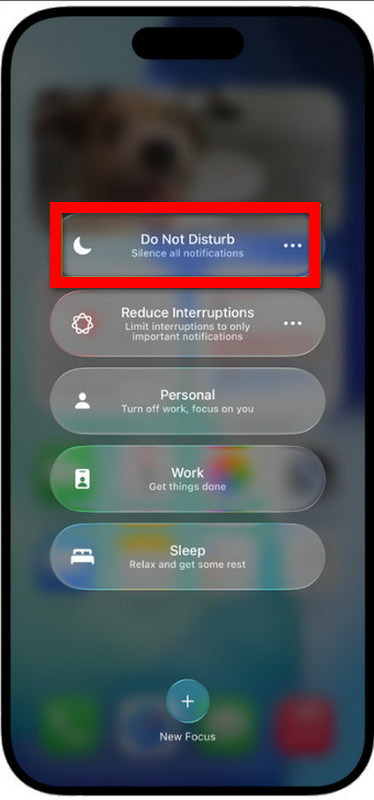
Fix:
Turn Focus/Do Not Disturb OFF in the Control Center. Repeat the second step and start screen recording again to ensure that you'll be able to record audio normally.
4. Bluetooth Audio Devices Interfering
To avoid audio being bounced away from the phone, if your iPhone is connected to Bluetooth headphones, speakers, etc., you may want to disconnect them.
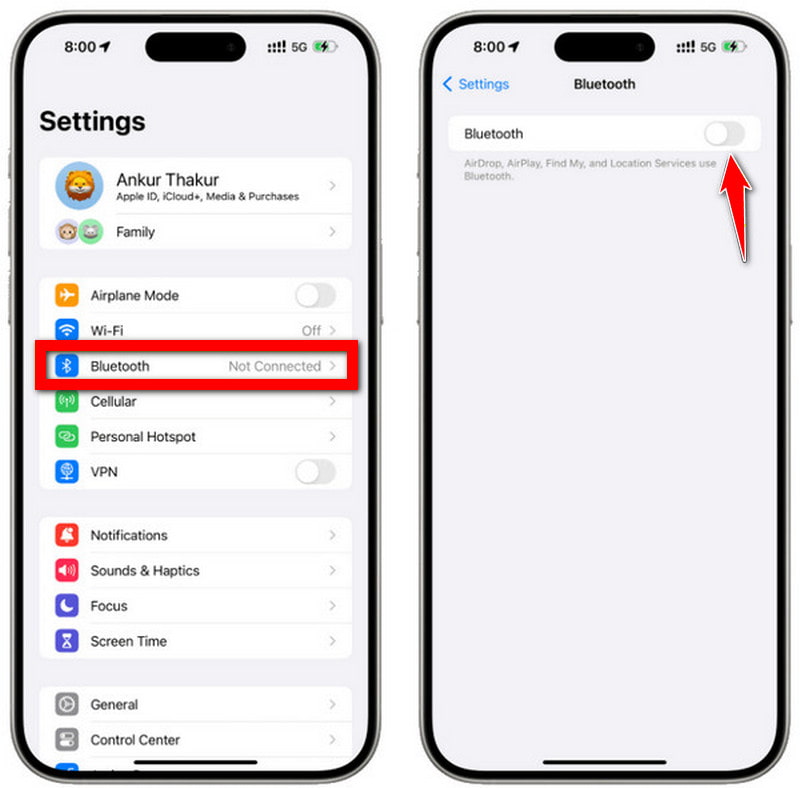
Fix:
On the Settings > Bluetooth screen, disable any devices that are connected. Additionally, it is possible to switch air connectivity to the shut off setting and therefore record with no sound coming via Bluetooth.
5. The App Does not Allow Audio Recording
Depending on privacy protection and copyright laws, some apps only allow video recording without sound. In such cases, an MP3 recorder may help capture audio separately.
Fix:
Now try recording another app, e.g., Safari and Photos. If sound works, then this is a problem of the original application and will not be solved by restrictions.
6. Software Glitches
Sometimes, the stoppage of screen recording audio is attributed to system bugs or out-of-date software.
Fix:
Turn on the device again to remove temporary glitches. If the issue continues to exist, you can update to the latest iOS or iPadOS by going to Settings > General > Software Update.
Part 4. Advanced Tips & Tricks
1. How to Record Internal Audio Only (No Microphone)
It can come in handy when you just want to listen to apps, games, and videos while eliminating background noise and voice.
Step 1On the iPhone or iPad, touch the Open Control Center button.
Step 2Hold down the Screen Recording button.
Step 3Ensure the microphone is turned OFF (not red).
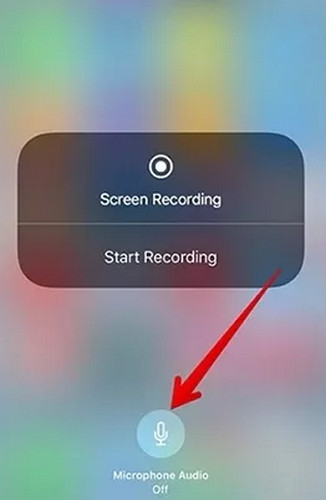
Step 4Record only internal or system sounds by pressing the button to start the recording.
2. How to Record Your Voice Only (No Internal Audio)
How to distinguish the parts of your voice from those of other people when speaking with them. Useful for when you need to convey something clearly without an app or app sounds.
Step 1Open Control Center.
Step 2Tap and hold on Screen Recording.
Step 3To get the Microphone ON (red indicator is lit), press the button of the microphone.
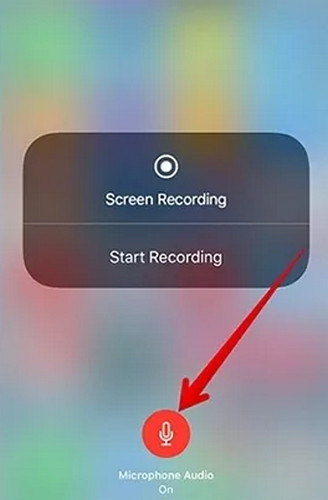
Step 4Reduce or dial back the device to get a vocoded or lower volume of sound.
3. Where to Find Your Screen Recordings
Find your screen recordings with a single click. Single-click solution to locate your screen recordings. All recordings are saved automatically after you stop recording, similar to Windows record screen and audio tools. No manual saving is required.
Step 1Tap the Photos app.
Step 2Go to Albums.
Step 3Click to View on Recents or Scroll to View Screen Recordings.
Step 4To view, share, or edit its video, tap it.
4. How to Edit or Trim a Screen Recording
Unwanted elements such as delays or errors can be easily removed, as can excess footage.
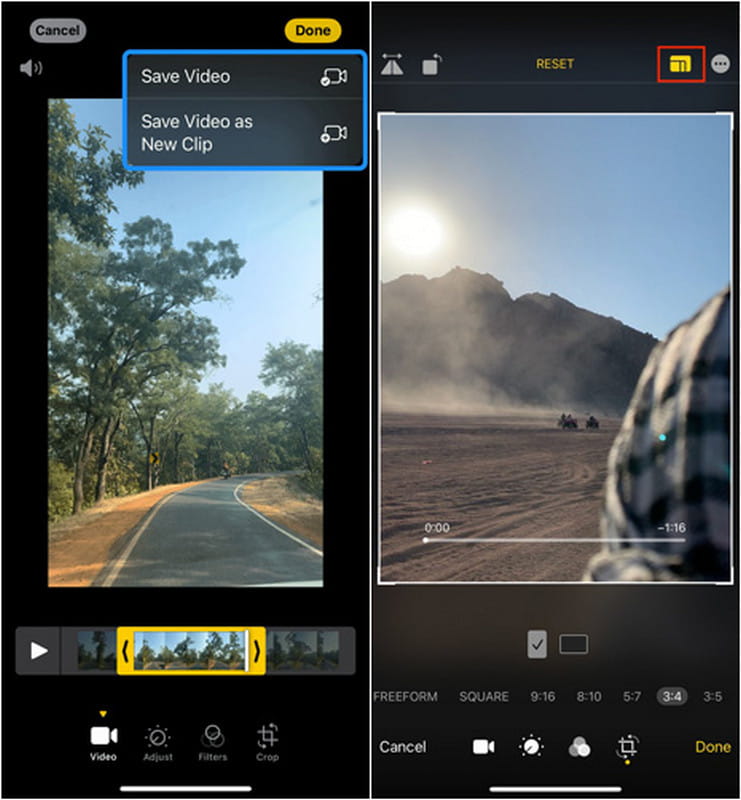
Step 1Click on playback in the Photos app to open it.
Step 2Click on Edit in the top right corner.
Step 3To cut off the beginning and/or end, drag the trim handles.
Step 4Click Done, and then select Save Video or Save as New Clip.
AVAide Screen Recorder (Advanced Recording & Editing Tool)
If one requires higher-quality screen recordings and more control over the editing, then iPhone and iPad screen recording tools come with drawbacks: AVAide Screen Recorder is a more robust and professional alternative. It has some powerful screen capture and audio recording capabilities that are all rolled into one simple tool, making it the perfect choice for tutorials, gaming, and maybe your meetings and content creation.
- Records in HD and 4K/1080p without lag, without compromising the capture quality.
- Records both system sound and microphone.
- Records System sound & Microphone at the same time.
- Can handle webcam overlay and recording via webcam FaceCam
- Supports full, window, or area recording to the custom dimensions

 Secure Download
Step 1Downloading and Installing the Tool
Visit the AVAide official web page and download AVAide Screen Recorder for Windows or a Mac computer. Install the program according to the instructions given and choose Phone Recorder.
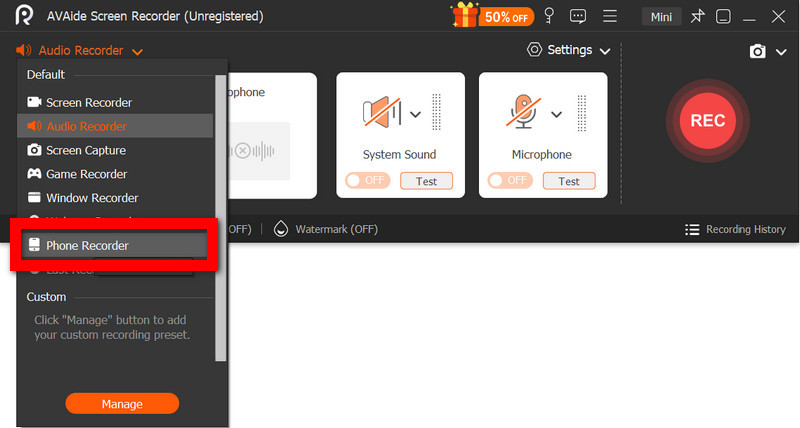
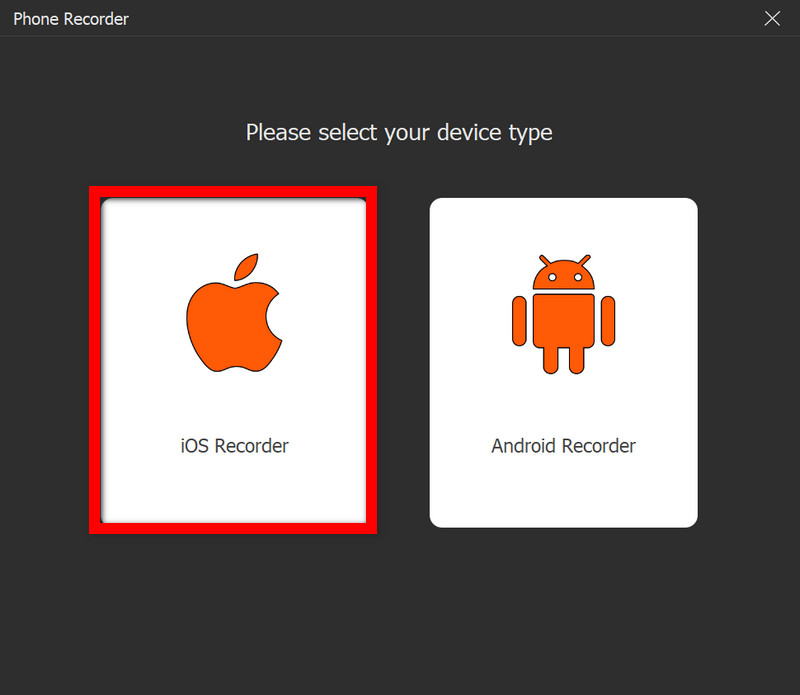
Step 2Select Mode
Run the software and choose the mode of work, iOS Recorder.
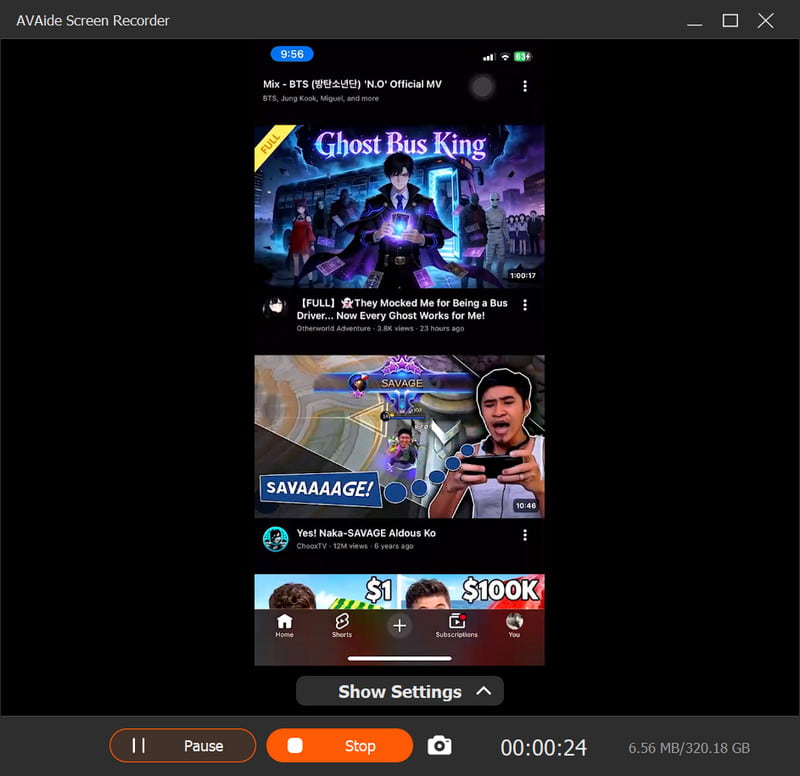
Step 3Begin Recording
Press the REC button in order to begin recording. While recording, you have an opportunity to pause or to continue the process.
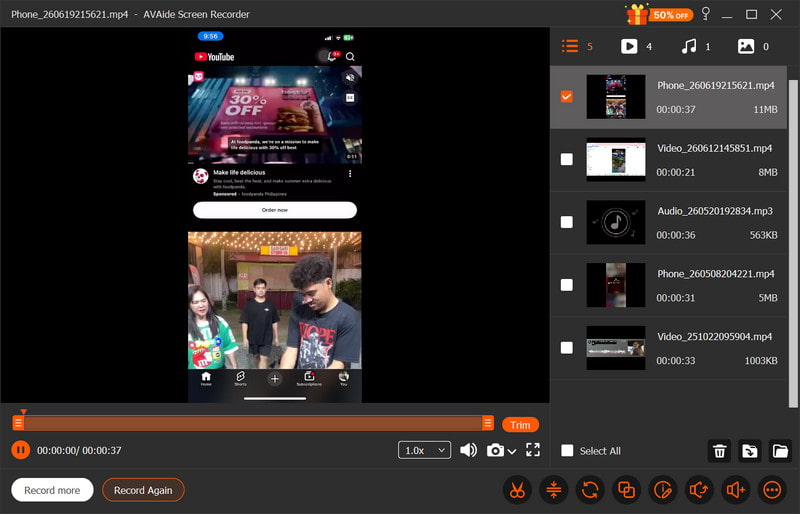
Step 4Edit Recorded File
To edit and save your speech. Record and see your video immediately after recording. Edit, improve, and convert audio files with the help of editing tools before saving the output file.
Once you know what causes the screen recording no sound iPhone problem, it becomes easier to rectify the missing audio and boost the quality of the screenshots recording. If you take the time to get your audio configuration correct, follow a few helpful recording tips, and troubleshoot some common problems, you will be making clear and complete screen recordings every time.
ABOUT THE AUTHOR

Record screen, audio, webcam, gameplay, online meetings, as well as iPhone/Android screen on your computer.
Record Screen & Video
- Screen Record on Mac
- Screen Record on Windows
- Screen Record on iPhone
- Record Audio on iPhone
- Record TV Shows without DVR
- Screen Record Snapchat on iPhone and Android
- Record a FaceTime Call
- How to Use the VLC to Record Screen
- Fix Amazon Error Code 1060
- Fix OBS Window Capture Black
- How to Make a PowerPoint Into a Video [Complete Tutorial]
- How to Make Tutorial Videos: Preparations and Guidelines
- How to Screen Record with Sound on iOS 15 and Later
- How to Screen Record on TikTok: Desktop and Mobile Solutions
- How to Screen Record on Samsung in 2 Proven Ways [Solved]
- How to Record Gameplay on PS4 without a Capture Card
- How to Record Gameplay on Xbox One [Full Tutorial]