Have you seen old movies and wondered why the movie itself gives a classic or nostalgic vibe? This is because of the film grain overlay. The reason many classic or cult-classic movies use grain overlay on the output source is to set the tone of the movie. This technique was popular around the 80s and 90s films, and it is today within certain genres. Filmmakers often use grain to reference specific genres, such as horror, documentary, and indie films, typically employing these filters or video effects. In addition, Film grain remains a versatile tool for video editors and filmmakers aiming to enhance their visuals creatively and purposefully. If you need to learn more about this video editing technique, you can continue reading through this article. We have added some reliable applications and software that can help you achieve a grain filter within your project video.
Part 1. What Is Film Grain Overlay Used for
A film grain effect is used to add a textured, vintage appearance to video clips and images, simulating the appearance of traditional analog film. This overlay is especially popular when you want to evoke nostalgia, create a cinematic setting for your films, or give your digital footage a more organic and artistic feel. As we have mentioned, film grain overlays are ideal for storytelling video projects, short films, music videos, and social media content where you want to convey emotion or authenticity. The effect can also help unify footage shot on different cameras or hide digital imperfections like noise or compression defects. Use film grain overlays in videos that reference a specific era, such as retro or documentary-style videos. In addition, you can use it when you want to soften harsh digital images and add subtle depth. Lastly, grain film effect is a creative function to enhance mood, visual interest, and storytelling, making your content stand out with a professional, polished finish.
Part 2. How to Add Film Grain Overlay on a Video Editor
When it comes to adding an old film grain overlay, one of the most reliable tools to use is AVAide Video Converter. This computer application is a top-notch tool when it comes to professionally editing project videos. One of its features is applying filters and effects that can provide a grain effect on your clips and films. There are a plethora of video filters that you can use to achieve this effect, which are already added within the tool after you install it. In addition, it has other useful functions for your project video. It contains features such as video upscaling, a converter, adding a watermark, tweaking audio settings, and more built-in tools that can enhance your output video. To learn more about how this tool can add film grain video overlay, read through the steps provided below.
Step 1Install AVAide Video Converter
The first step to utilize AVAide Video Converter is to obviously get the app. You can click on the download button provided below this step to acquire its file installer. This application can be downloaded and installed on Windows and Mac devices. Run through its installation prompts to fully access its main interface.

FREE DOWNLOAD For Windows 7 or later
 Secure Download
FREE DOWNLOAD For Mac OS X 10.13 or later
Secure Download
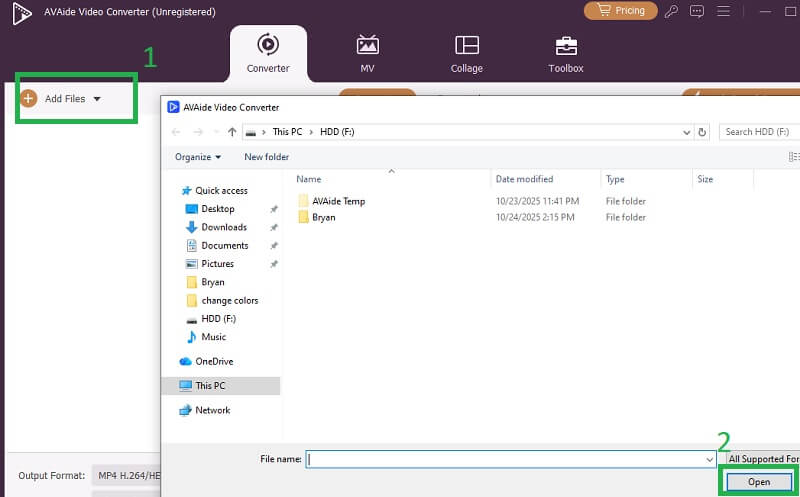
Step 2Add Video Source
Next, on the main interface of AVAide Video Converter, click the Add files. This will help you access your device's folder and browse to your project video. Click the video file you want to work with and select Open to complete the import process. The video will be listed on the main interface of the app.
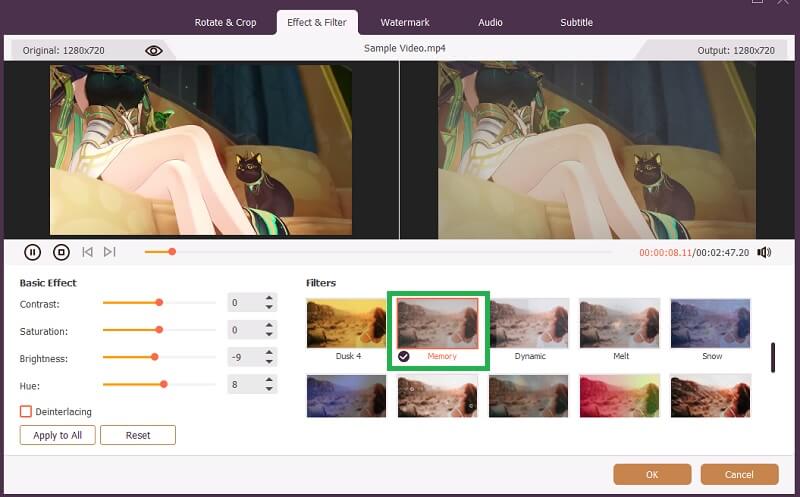
Step 3Apply Grain Effects
Finally, click on the Edit button or the Wand button to access the editing tools of AVAide Video Converter. A new window will appear, which holds the list of tabs to edit the video. Access the Effect & Filter tab, which contains a set of filters that you can use to add a grain film effect to your video. You can use the Memory and Draft effect to achieve a nostalgic feel for your project video. Click OK and hit Convert All to save the changes.
Part 3. Other Solutions to Add Old Film Grain Overlay on a Video
In this section, we provided other alternative tools that you can use to achieve a film grain effect on your project videos.
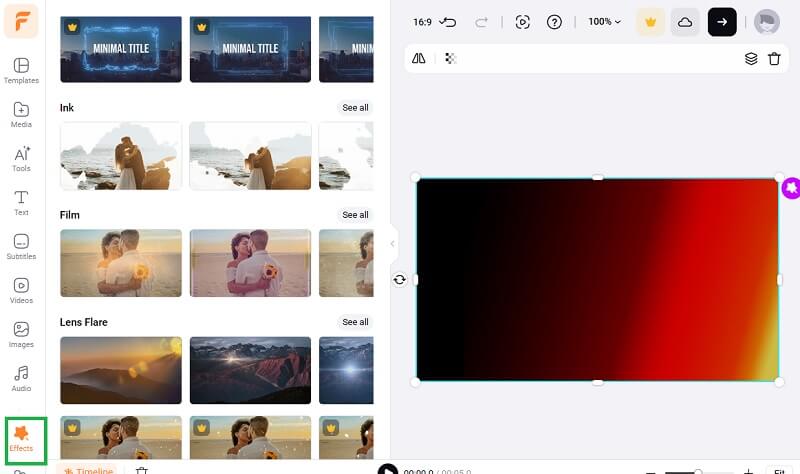
1. Flexclip
Flexclip is an online editing tool that works within the comfort of your web browser. This lightweight and easy-access editing tool can do any editing functions you need. One of the reliable features of this online tool is its ability to apply effects to your project clips. Due to its accessibility, it is a friendly user for professional and novice users to apply an old grain effect on the output video. In addition, this tool contains different functions suitable for enhancing your videos. These features are video templates, built-in video effects, applying AI images, sharpening video quality, adding subtitles, and more. If you want to learn more about Flexclip, applying old grain effects or filters, follow the steps below.
Step 1Access the online tool using your Chrome or Safari browser. Access its main interface and sign up for an account to enjoy its features.
Step 2Click on the Upload Media button to access your device's files. Look for the project video you wanted to apply grain effects to and hit the Open button to add the video within the online tool.
Step 3Afterwards, on the leftmost part of the tool, select the Effects button to access the list of filters provided by the online editor. You can use Texture effects, Ink, and Film filters to apply grain and a nostalgic vibe to your project video. Once completed, hit the Export button to save it.
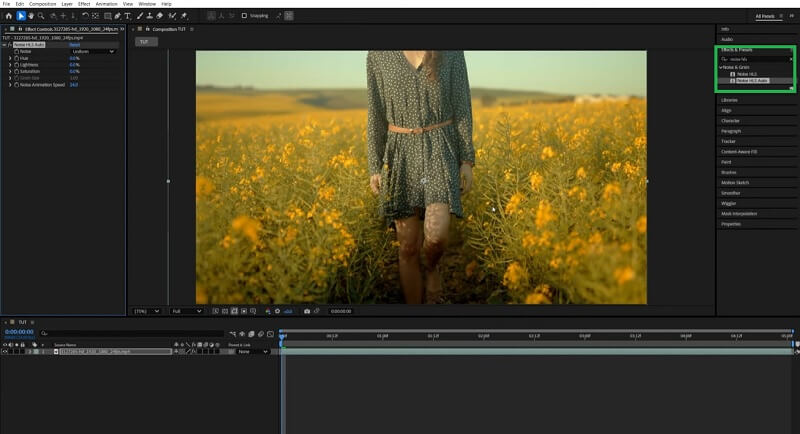
2. Adobe After Effects
Another solution that you can use to apply a grain film effect is to use Adobe After Effects. This application is a well-known tool to apply different post-production effect filters and parameters on the project videos, such as brighten video, AI-generated effects, and more. Among other things, this application is used to create animations and provide computer-generated effects, such as a nostalgic vibe on your clips. Just to give you a heads up as well, compared to other tools we have provided above, this application can be confusing to use, as it is intended for more technical editing features and functionalities. Nevertheless, the step provided below is the most flexible way to use Adobe After Effects for applying grain filters to your videos.
Step 1Install Adobe After Effects on your Mac and Windows devices. Ensure that you have completed the installation process to access its main interface.
Step 2Drag and drop the video clip you want to edit on its main interface to import. You will be able to access its editing features and editing panels.
Step 3At the upper right corner of the app, look for the All Controls panel. Select the Effects and Presets option to access different filters. Search for Noise HLS, which will automatically apply to your video. Finally, edit the grain size, hue, noise animation effect, and more. Once done, click on the Export button to save the output file.
To summarize, adding a film grain effect is an extensive and versatile technique for giving your films a classic, cinematic, or nostalgic feel. Whether you're aiming to elevate storytelling, unify footage, or hide digital imperfections, film grain can empower the overall visual quality of your project. Modern video editors and online tools, such as AVAide Video Converter, Flexclip, and Adobe After Effects, make it accessible for both novices and professionals to apply this effect with ease. By incorporating old film grain overlays, you can add depth, mood, and authenticity that resonate with your audiences and distinguish your video content in a crowded digital landscape.
Your complete video toolbox that supports 350+ formats for conversion in lossless quality.