M4V files often come with DRM and are not supported by many devices outside Apple's system. This is why converting M4V to MKV is important if you want to play your videos anywhere without limits. MKV is more flexible and works on most players. In this guide, you will learn basic and fast ways to change M4V to MKV so your videos can be enjoyed on any device.
Part 1: What is M4V & MKV
When we watch or save videos, the file format matters. The format decides how the video is stored, shared, and played. Two common ones you may see are M4V and MKV. They are both video containers, but they work in different ways, so in this section, we will present a M4V vs. MKV, so that you will learn their primary usage.
1. M4V
M4V is a video format made by Apple. It looks a lot like MP4, but Apple designed it for iTunes. Many movies, TV shows, and music videos from iTunes use this type. One key thing about M4V is DRM protection. DRM is a lock that keeps people from copying or sharing videos without permission.
If an M4V has DRM, it can only be played on Apple devices or in iTunes. Without DRM, you can watch it on most players that support MP4. Because of this, M4V is mostly tied to Apple's system. It is common for people who buy or rent digital movies from Apple.
2. MKV
MKV stands for Matroska Video. It is an open-source format, which means anyone can use it for free. Unlike M4V, MKV is not owned by one company. It is more flexible. MKV can hold video, many audio tracks, subtitles, and even chapters in one file.
It makes MKV popular for movies, shows, and anime. People like it because it supports high quality and multiple languages. The downside is that not all media players can open MKV by default. You may need special players like VLC or programs that support it.
Part 2: How to Convert M4V to MKV Losslessly
Keeping the original quality of your videos is important, and that is why converting M4V to MKV losslessly is the best choice. With this, you get clear sound and sharp pictures without any drop in quality. A great converter for this job is AVAide MKV Converter.
It is easy to use, so even beginners will not have a hard time. If you have many M4V files, it supports batch conversion to save you time. Additionally, it has built-in editing tools that let you trim, crop, or even add effects before you convert your videos.
Let us show you the steps on how to use it:
Step 1Get the AVAide MKV Converter on your Windows or Mac computer. You can click Download below and follow the setup. It only takes a minute, and once installed, the program will be ready to run.

FREE DOWNLOAD For Windows 7 or later
 Secure Download
FREE DOWNLOAD For Mac OS X 10.13 or later
Secure DownloadStep 2It is time to load your M4V files. The fastest way is to drag and drop them onto the screen. If you prefer, you can also click the Add Files button on the top left. From there, choose single files or even a whole folder at once.
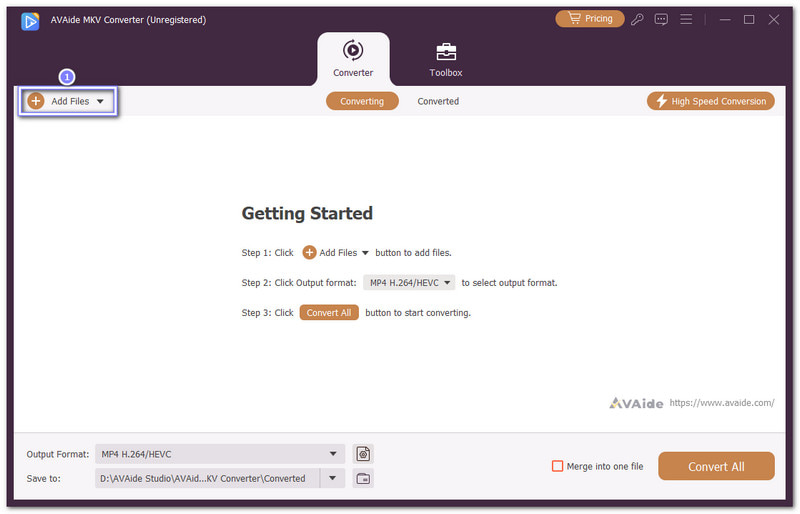
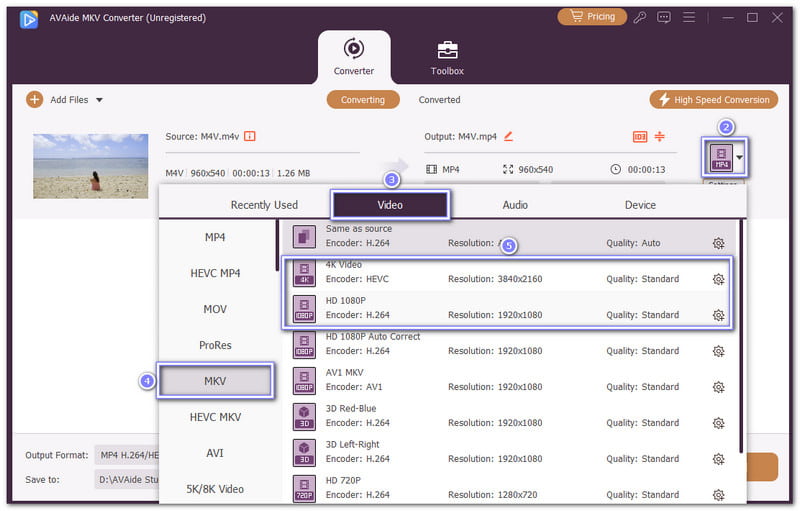
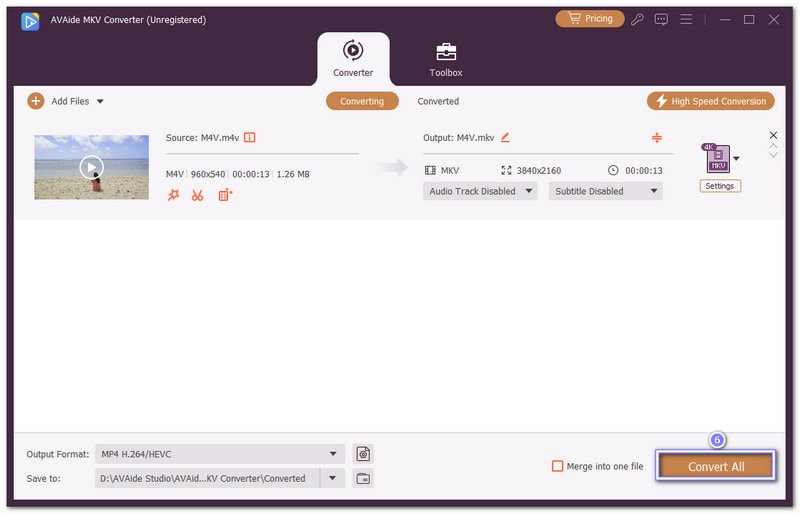
Step 3Head to the Format drop-down menu, pick MKV from the list, and then set the resolution you want. AVAide MKV Converter supports HD and even 4K, so you can keep the video sharp without losing clarity.
Step 4It is time to let the program do its work. Hit the big Convert All button, and the process will start right away. Once the conversion ends, go to the Converted tab, and all your MKV files will be neatly listed there.
Tip: Besides M4V, you can also use AVAide MKV Converter to convert MP4, FLV, MOV, AVI to MKV.
Part 3: How to Remux M4V to MKV Using MKVToolNix
If you want to convert M4V into MKV without losing quality, MKVToolNix is a good program to use. This process is called remuxing, which means you only change the container, not the video itself. So, the file keeps the same quality and speed, but it moves into a new format.
Here is how you can do it:
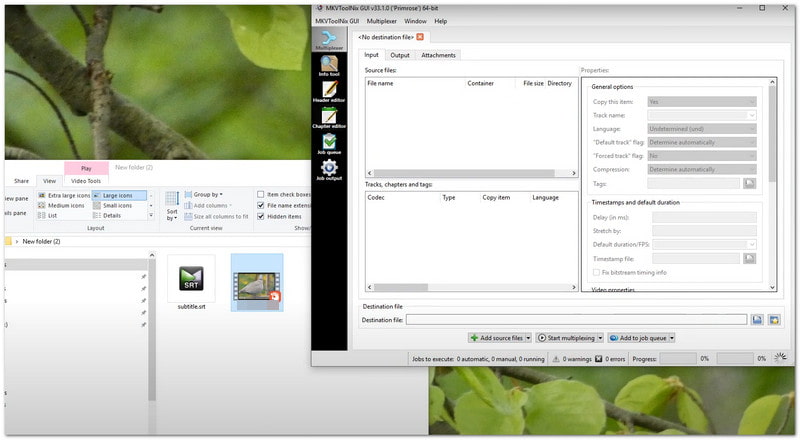
Step 1Launch MKVToolNix on your computer. Inside the program, look for the tool called mkvmerge GUI, as this is where you will be working.
Step 2Go to the Add source files option and select your M4V video. Once you add it, the program will load the video, audio, and subtitles if they are included.
Step 3After that, choose where you want to save the finished file. In the output section, please type the name you want and make sure it ends with .mkv. You can also select a folder so you know where the file will be saved.
Step 4Finally, click the button that says Start Remuxing. The program will begin the remuxing process; it usually takes a short time since it does not re-encode the video. Once it is done, you will have a new MKV file that has the same clarity as your original M4V.
Part 4: How to Use FFmpeg to Turn M4V to MKV
FFmpeg is a trusted program for working with video files. It can turn an M4V file into an MKV without losing clarity. The process uses stream copy, which keeps both audio and video the same while only changing the container, making the task fast and efficient.
It is how FFmpeg M4V to MKV conversion works:
Step 1Ensure FFmpeg is installed on your computer. If yes, proceed to open Command Prompt if you use Windows, or Terminal if you use Mac or Linux. Move into the folder where your M4V file is saved. You can also skip moving folders and instead type the full file path in the command later.
Step 2Now, it is time to run the command. Type:
ffmpeg -i input.m4v -c:v copy -c:a copy output.mkv
Step 3Replace input.m4v with the name of your M4V file, and replace output.mkv with the name you want for the new file.
• -c:v copy tells FFmpeg to copy the video stream without re-encoding.
• -c:a copy tells FFmpeg to copy the audio stream without re-encoding.
Step 4Once you press Enter, FFmpeg will process the file. The process is usually fast since no re-encoding is happening. After it finishes, you will find your new MKV file in the location you picked.
Part 5: Converting MKV to M4V for iTunes/iPhone Compatibility
HandBrake is a free video converter that works on Windows, Mac, and Linux. It supports both reading and writing M4V files. By default, it saves videos as MP4, but you can switch the extension to .m4v. Since M4V is almost the same as MP4, it makes it a good option for iTunes and iPhone.
Let us go through the process of how to convert MKV to M4V:
Step 1Start by launching the HandBrake program on your computer.
Step 2Drag and drop your MKV video into HandBrake, or click Open Source and choose it from your folders.
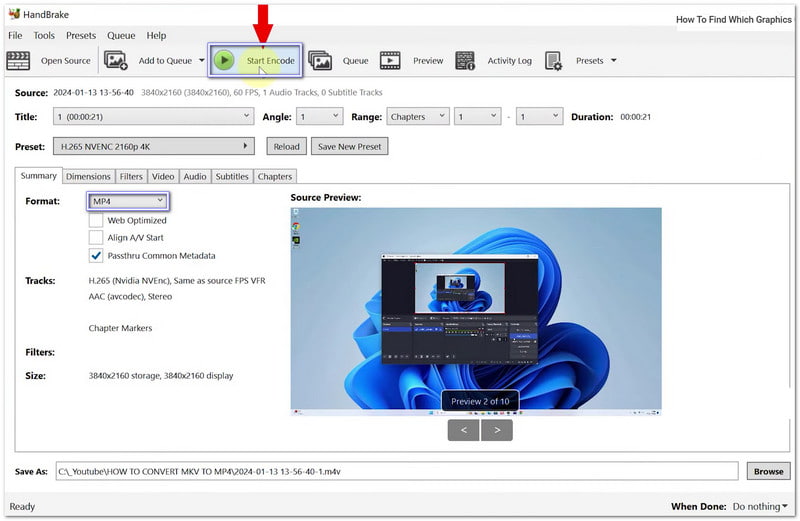
Step 3Go to the Summary tab and set the container to MP4. In the save location field, replace .mp4 with .m4v so the file will be saved as an M4V.
Step 4You can change video quality, codecs, audio options, or subtitles in the other tabs. This step is optional, but it helps if you want more control.
Step 5Press Start Encode to begin. HandBrake will now convert your MKV into an M4V file. Once it finishes, search in the folder you picked earlier.
Playing M4V files is not always simple, but using an M4V to MKV converter makes it easier. With the right converter, you can turn your videos into a format that works on more devices without losing clarity. The methods shared here can guide you well, but many users find that AVAide MKV Converter gives the smoothest and most reliable results. So, what are you waiting for? Experience it yourself!
A powerful MKV video converter to convert MKV files to video & audio formats in one go.