Aspect ratio is the shape of your video – width versus height. Getting it right makes a huge difference in how people watch your work. If you've ever finished a video only to realize it needs to fit TikTok, Instagram Reels, or a square feed post, you know the struggle. Here's a practical rundown of the common ratios, how to use Final Cut Pro to change aspect ratios, and a couple of solid alternatives if FCP isn't your daily driver.
- Part 1. Common Aspect Ratios of Everyday Videos
- Part 2. How to Crop the Aspect Ratio of a Clip in Final Cut Pro
- Part 3. How to Change the Project Aspect Ratio in Final Cut Pro
- Part 4. How to Quickly Create a 1:1 or 9:16 Video Using Smart Conform
- Part 5. Best Alternatives to Final Cut Pro for Changing Aspect Ratio
Part 1. Common Aspect Ratios of Everyday Videos
Most of the videos you see day to day stick to a handful of shapes.
16:9 is still the king for YouTube, TV, and regular web videos. That's the wide rectangle you're used to on your laptop or living-room screen. High resolutions like 1920×1080 (Full HD) and 3840×2160 (4K) sit in this ratio.
Then there's 9:16, basically 16:9 flipped on its side. This is the vertical format that fills a phone screen for TikTok, Instagram Reels, YouTube Shorts, and Stories.
1:1 is the classic square, still useful for some Instagram feed posts and certain ads.
Older stuff sometimes uses 4:3, the near-square shape from old TVs, and you'll occasionally run into wider cinematic ratios like 21:9 for that ultra-wide movie feel.
Pick the ratio based on where the video will live. Long-form YouTube? Stick with 16:9. Short mobile content? Go vertical. Square can work when you want something that looks decent both on phones and in feeds without too much cropping.
Part 2. How to Crop the Aspect Ratio of a Clip in Final Cut Pro
Sometimes you just need to reframe one clip without touching the whole project. Final Cut Pro makes this pretty straightforward with the Crop tool.
Step 1Select the Clip
Select the clip in the timeline and park the playhead over it so you can see the image in the Viewer.
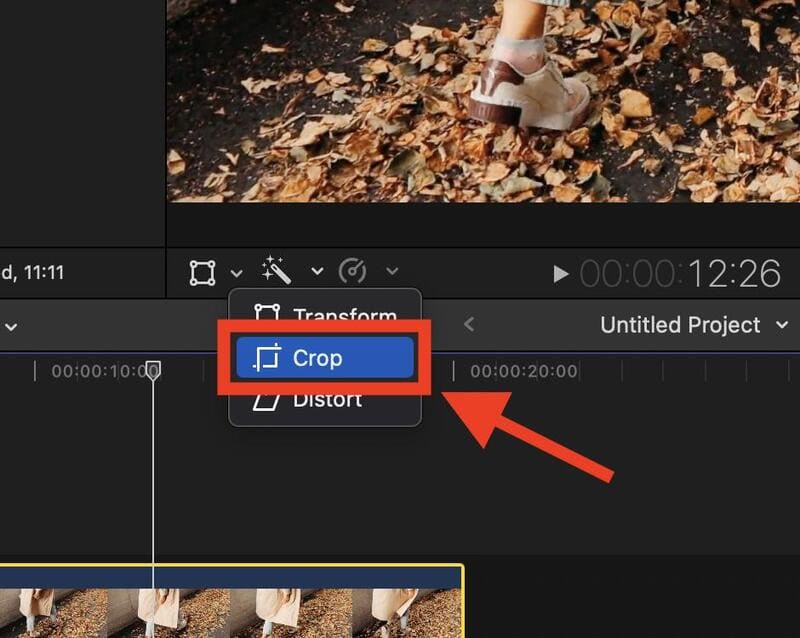
Step 2Choose the Crop Tool
In the lower-left corner of the Viewer, click the wand button and choose Crop. You can also press Shift-C or Control-click inside the Viewer and pick Crop. Blue handles that appear on the corners and sides.
Step 3Adjust the Crop
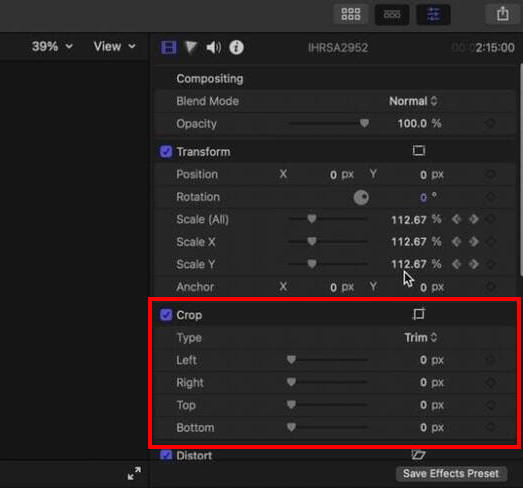
Drag a corner handle to crop while keeping the original proportions, or drag the edges for individual control. You can also drag inside the crop window to reposition the frame. For more precise numbers, go to Window > Show in Workspace > Inspector and adjust the Left, Right, Top, and Bottom values under the Crop section.
Step 4Save the Changes
Click Done when you're happy. The cropped image expands to fill the frame. If you want the clip to fill the project frame instead of letterboxing, switch Spatial Conform in the Video Inspector to Fill.
Part 3. How to Change the Project Aspect Ratio in Final Cut Pro
Changing the whole project's shape is best done by duplicating it so you keep the original intact.
Step 1Duplicate a Project
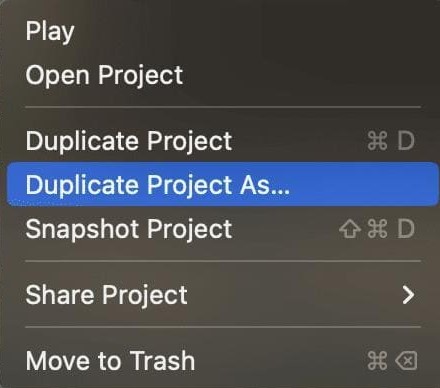
In the Browser, select your project. Then either go to Edit > Duplicate Project As, or just right-click the project and choose Duplicate Project As.
Step 2Set an Aspect Ratio
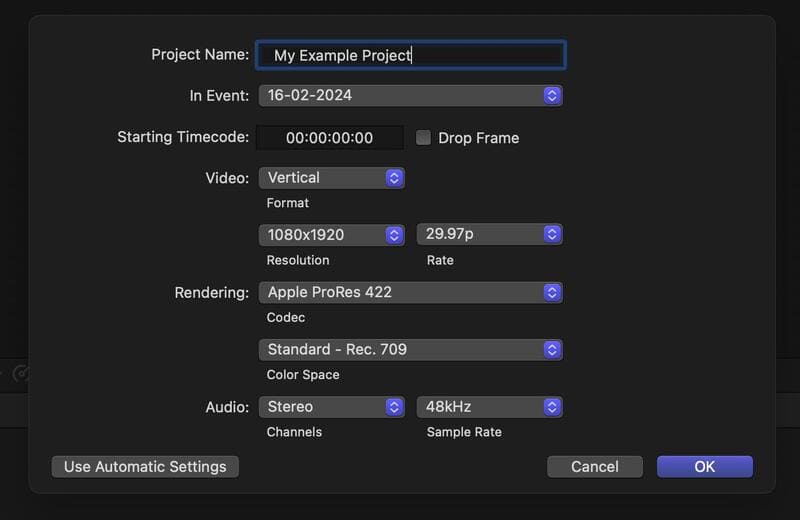
In the dialog that pops up, give the new project a name. From the Video Format menu, pick Custom and type in the exact width and height you need. Hit OK.
Step 3Fit the Clips to the New Project Ratio
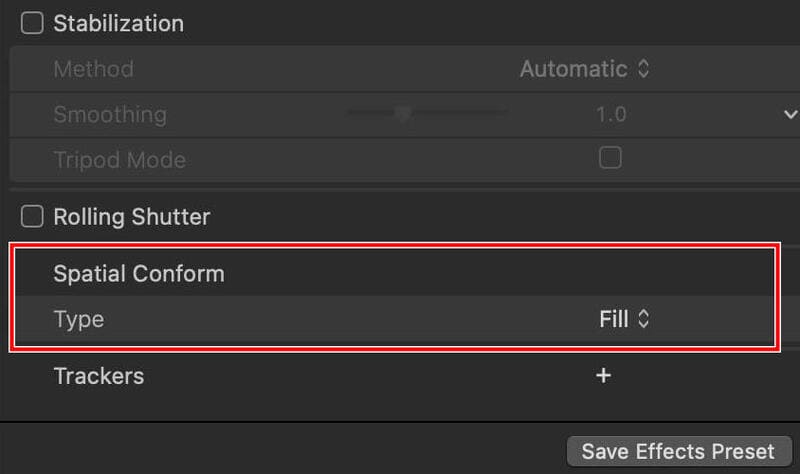
You might need to tweak Spatial Conform on individual clips: Fit scales things and keeps everything visible with possible black bars; Fill crops to fill the frame. If you want to do so, open the Video Inspector and change the Type under Spatial Conform.
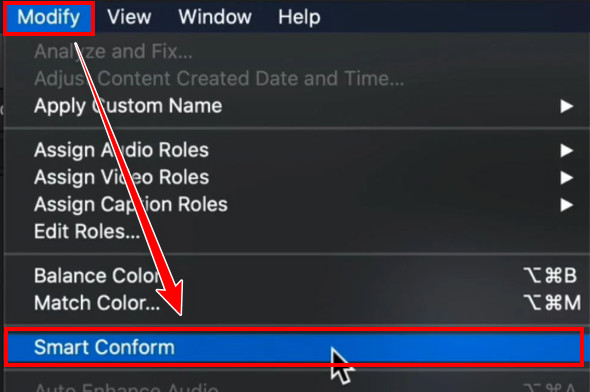
You can also let FCP auto-crop the clips to fit the project ratio with its smart AI engine. Select the clips you want to adjust, click Modify in the top bar, then select Smart Conform. It analyzes important stuff, like faces, then reframes clips while keeping those important areas in the right place.
Part 4. How to Quickly Create a 1:1 or 9:16 Video Using Smart Conform
Smart Conform is the real time-saver when you need a vertical or square version of an existing widescreen project. With this tool, you can create a nice 1:1 or 9:16 aspect ratio in Final Cut Pro with no effort.
Step 1Select a Landscape Project
Open or select your horizontal project in the Browser.
Step 2Duplicate the Project
Choose Edit > Duplicate Project As, or right-click before choosing Duplicate Project As.
Step 3Choose a Preset and Resolution
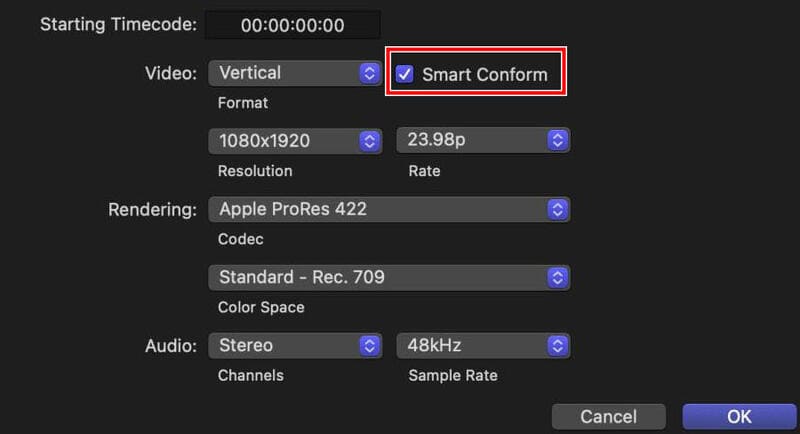
Name the new project. In the Video Format menu, pick Vertical or Square and choose a matching resolution, for instance, 1080×1920 for vertical HD, or 1080×1080 for square.
Step 4Use Smart Conform
Check the Smart Conform box that appears when you change the aspect ratio. Click OK.
Part 5. Best Alternatives to Final Cut Pro for Changing Aspect Ratio
Not everyone lives in Final Cut Pro, especially those who work on a Windows PC or a phone. Here are two solid and accessible options that can change video aspect ratio easily on different platforms.
AVAide Video Converter (Windows/Mac)
AVAide Video Converter is a straightforward desktop tool if you mainly need to change aspect ratio without a full editing timeline. You can not only crop the video freely, but also customize the output resolution. Even if your target dimensions are bigger than the original, AVAide still ensures high quality with its AI upscaling and enhancement tools.
- Change aspect ratio and resolution of videos freely.
- Support 1000+ video and audio formats, including MP4, MOV, MKV, and AVI.
- Choose from common aspect ratio presets like 16:9, 21:9, 4:3, 9:16, and more.
- Resize your videos for Instagram, YouTube, Facebook, etc.

 Secure Download
Step 1Install the Software
Download and install AVAide Video Converter on Windows or Mac.
Step 2Import a Video File
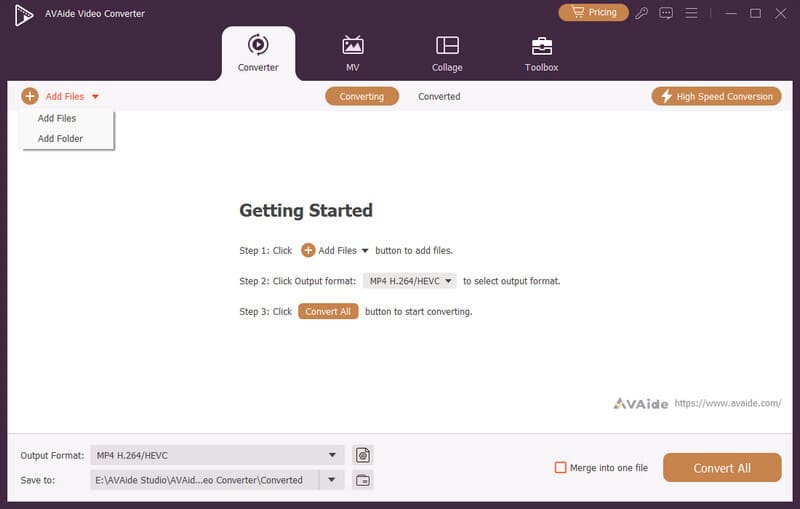
Launch the program and click the Add File button in the top-left corner to import your video.
Step 3Open Edit Window
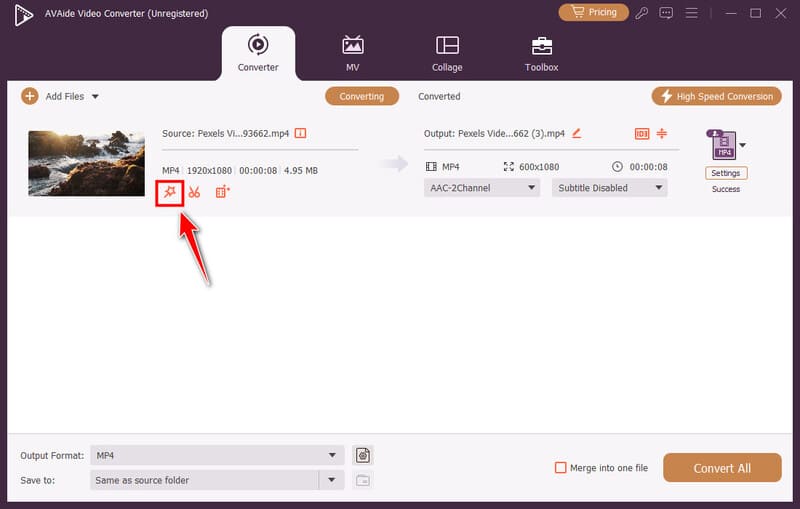
Click the wand button next to the video thumbnail to open the Edit window.
Step 4Crop the Video
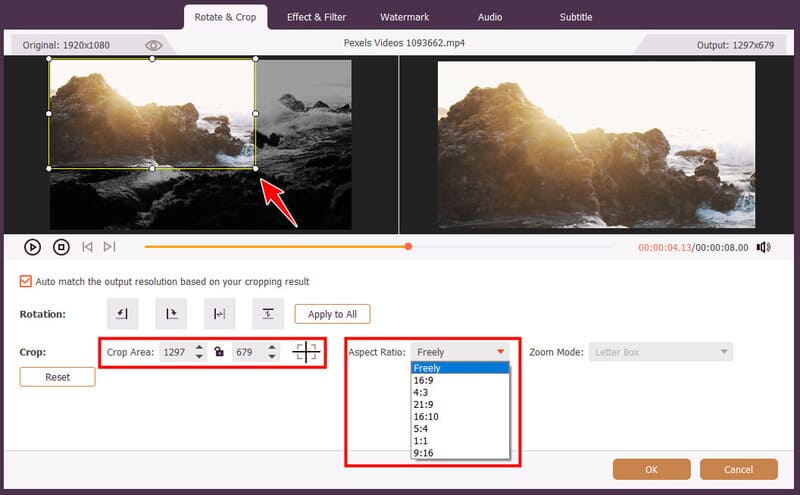
Drag the frame around the video to crop it. You can also set an exact width and height, or choose an aspect ratio preset. Click OK to save the adjustments.
Step 5Enhance Video Quality (Optional)
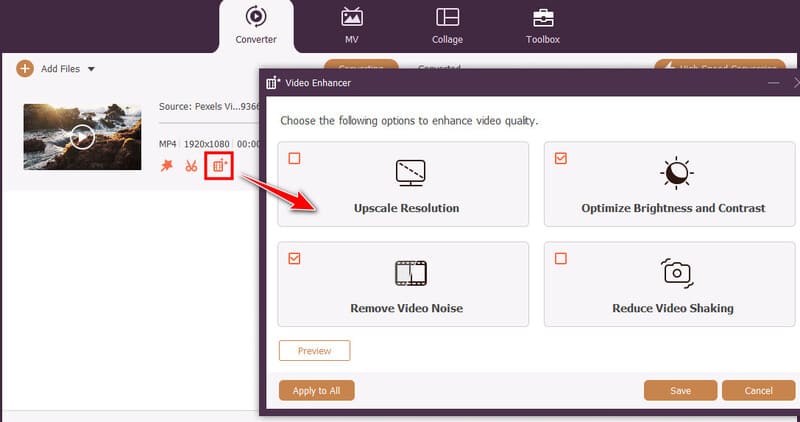
Click the Enhance button next to the scissor button and check the enhancement tools you want to use.
Step 6Convert the Video
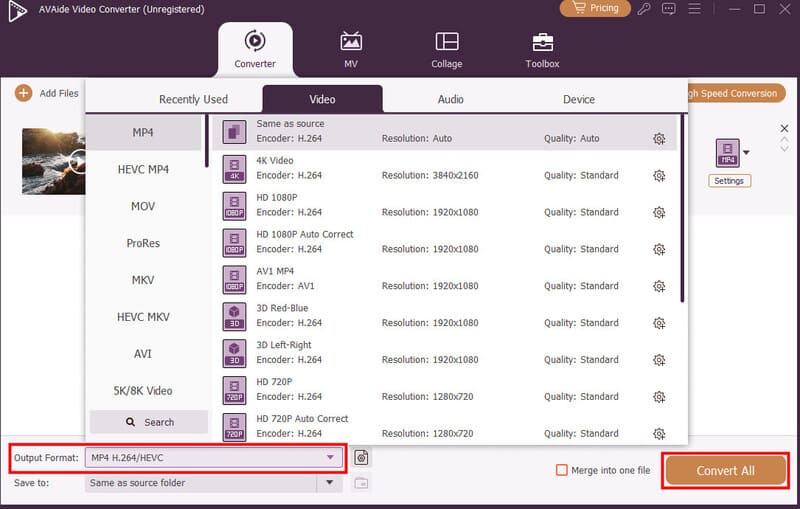
After you've finished your video, set an output format and resolution at the bottom, then click the Convert All button to convert it.
CapCut (iPhone/Android)
CapCut is a beginner-friendly video editor primarily designed for mobile-first vertical or square videos. It has some advanced features that require an in-app purchase, but the video aspect ratio feature, luckily, is free. It's fast and touch-friendly, perfect when you're already editing on your phone.
Step 1Start a New Project
Open the CapCut mobile app and tap New Project. Select the video you want to resize and tap Add.
Step 2Change Aspect Ratio
At the bottom of the screen, tap Ratio. Then select an aspect ratio preset and tap the checkmark button. You can also go into Edit > Transform > Resize for more manual control.
Now you know how to use FCP to change aspect ratio. Whether you're staying inside Final Cut Pro or grabbing a quick alternative like AVAide Video Converter and CapCut, matching the aspect ratio to the platform is half the battle. Once the shape is right, the rest of the edit falls into place a lot more easily.
ABOUT THE AUTHOR

Your complete video toolbox that supports 350+ formats for conversion in lossless quality.