You might be having problems with your large video files taking up too much space on your device. Well, you have stumbled upon the right place. Instead of buying additional storage, replacing your drive, or deleting your precious videos permanently, you can actually shrink them. VLC does not only serve as a video player. It comes with a built-in video compression feature that allows users to reduce video file sizes without the need to undergo a complicated process. Regardless of the video formats you are working with, VLC can help you shrink videos while maintaining decent quality for sharing files faster, as well as for saving storage. Check out the best methods to compress VLC videos in no time.
Part 1: Compress Video with VLC by Adjusting Video Settings
One of the ways to compress videos in VLC is by fine-tuning the balance between file size and visual quality. By adjusting the video bitrate, you can directly control how much data is used per second of footage. Say from 8000 kbps to 2500 kbps for a 1080p video. This method dramatically reduces file size while retaining decent clarity. However, you may see some extremely low bitrates introduce visible artifacts or pixelation. Another setting of the video that helps in decreasing the file size is the resolution. Downscaling from 4K to 1080p or from 1080p to 720p can significantly reduce file dimensions with minimal quality loss on smaller screens. Therefore, if you don't really need those high-quality videos and just want to save file size, it's better to downscale the resolution.
For additional compression potential, one may check the frame rate of the footage. VLC lets you convert 60fps footage to 30fps and cuts the frame data in half while keeping the smooth viewing experience. Nevertheless, here is how to reduce video size with VLC and implement these changes:
Step 1First, launch VLC on your computer and access the conversion tool of the program. To do it, click Media in the top menu and choose Convert/Save. Alternatively, you can press Ctrl/Cmd + R key combinations.
Step 2Next, add your video by clicking Add from the Open Media window. Then, browse and select your target large video to compress. Click Open to confirm the video.
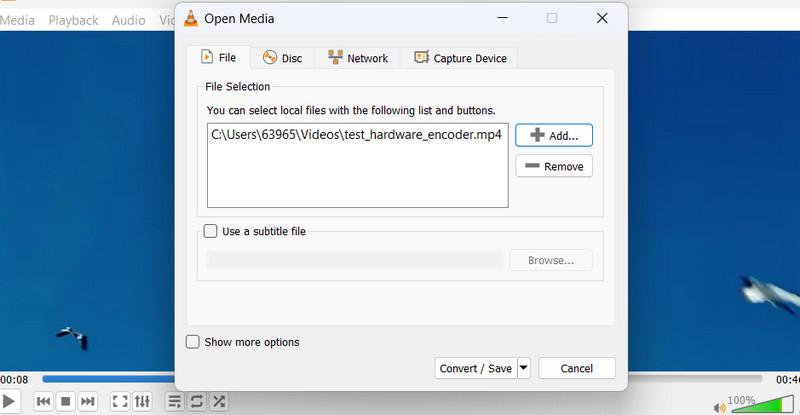
Step 3Under the Profile menu, click the dropdown and choose H.264 + MP3 (MP4) to get a good balance of quality and compression.
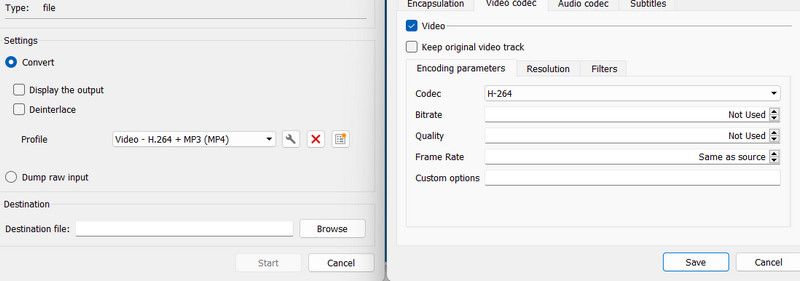
Step 4This time, open the video settings by clicking the Wrench/Settings button next to the profile dropdown and go to the Video Codec tab. Now you can tweak the video compression settings, including Bitrate, Resolution, Frame Rate, Codec, and Constant Bitrate (CBR).
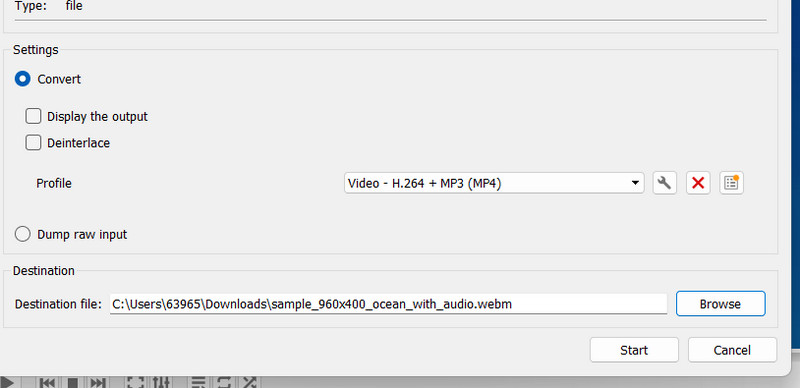
Step 5Lower the bitrate value between 1500 and 2500 kbps for HD videos. Reduce the dimensions of 1280x720 for 720p, and the frame rate to 30fps or 24fps. Next, keep the codec as H.264 for compatibility.
Step 6Hit the Save button to confirm settings and choose an output location under Destination File. Lastly, click the Start button to begin the compression.
Part 2. Compress Video with VLC by Adjusting Audio Settings
Another setting to consider is the audio from the footage. While video settings have a significant impact on file size, audio parameters may further shrink the video's overall footprint. That is especially true for videos where pristine sound quality isn't essential. Nonetheless, VLC lets you lower the audio bitrate, switch from multichannel to stereo output, and opt for more efficient audio codecs like AAC compared to uncompressed PCM. In other words, you can tweak audio codecs, bitrates, and channels, often resulting in 10-30% additional file size with minimal visible difference in casual listening. Follow the guide on how to compress a video with VLC and apply these changes.
Step 1After opening VLC, go to Media > Convert/Save and click the Add button to select the video with a large file size. Next, click Open and select Convert/Save at the bottom of the interface.
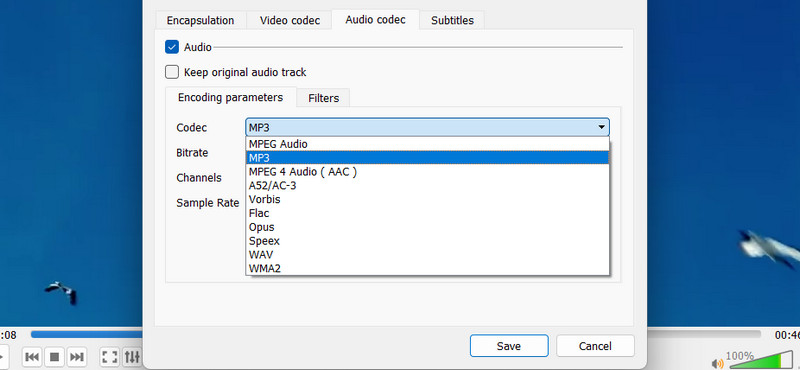
Step 2Under the Profile dropdown, select HEVC + AAC (MP4) for better compression and to configure the audio settings, click the Settings button next to the profile menu. Then, open the Audio Codec tab.
Step 3In this tab, select AAC or MP3 and lower the bitrate. Here are some of the advisable bitrates depending on your needs: 192-256 kbps for high quality, 128-192 kbps for general music, and 64-128 kbps for podcasts.
Step 4This time, start the conversion process. Hit the Save button to confirm the settings and click the Start button to initiate the compression process.
Part 3: Compress Video with VLC by Removing Unwanted Clips
We cannot deny that one of the effective approaches to shrinking video file size is removing or cutting unnecessary clips from the video. That includes mistakes, pauses, intros, and outros that don't have a bearing on the overall impact of the video. Moreover, this method is helpful for long recordings, such as gameplay footage, lectures, and meetings, where there are only specific portions that you need. Therefore, removing excess content before applying compression settings will help you achieve smaller files while preserving the crucial parts of your video at higher quality. In fact, you may consider VLC the best video compressor as it allows you to enjoy the best of both worlds. While you can access compression settings, you may also edit videos by cutting or trimming unwanted clips.
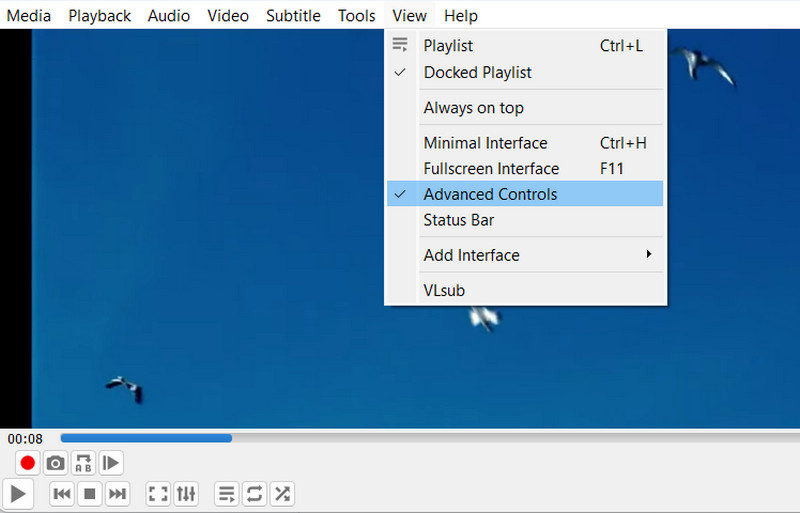
Step 1Same drill, launch VLC on your computer. Then, go to View > Advanced Controls in the top menu.
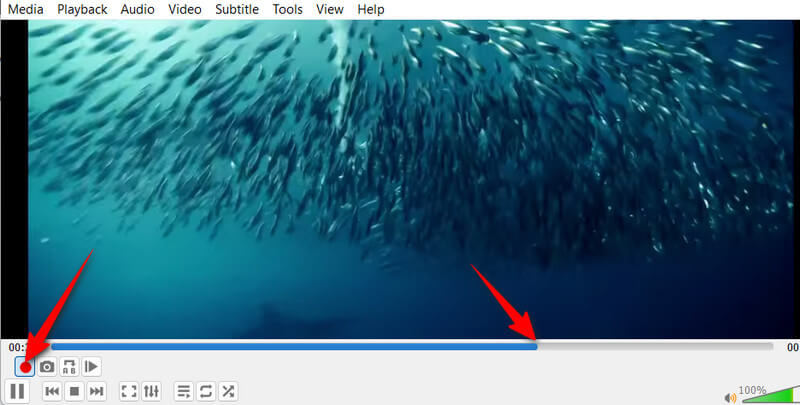
Step 2This time, play your video and note timestamps for sections you wish to keep. Next, use the Record button that looks like a red dot to click at the desired starting point. Click again at the ending point. That segment, where the timestamps are, will be saved as another video.
Step 3If you wish to extract multiple segments from the video, use the Record button multiple times. The tool will combine them all into one.
Step 4You will see the trimmed clip in your Videos folder by default. Also, the file will be saved as MP4 in original quality. Additionally, you could apply the first and second methods above to reduce the file size significantly.
Part 4: An Easier VLC Alternative to Compress Video
The process with the built-in video compression in VLC requires manual adjustments, which can be inconvenient for many. Also, it won't be easy when you need to process multiple files simultaneously. Therefore, for those seeking a simple, yet powerful solution with one-click optimization, AVAide Video Converter is a reliable alternative. Compressing video files is just a click away while keeping the excellent video quality. Additionally, it supports batch video conversion, allowing you to change the format for all videos at once and convert them to reduce file size. On top of that, the program supports nearly all video formats there are. Here are the steps to compress videos using an intuitive alternative.
Step 1Download and click the Free Download button provided here. Ensure that you select the right installer for the computer's operating system.

FREE DOWNLOAD For Windows 7 or later
 Secure Download
FREE DOWNLOAD For Mac OS X 10.13 or later
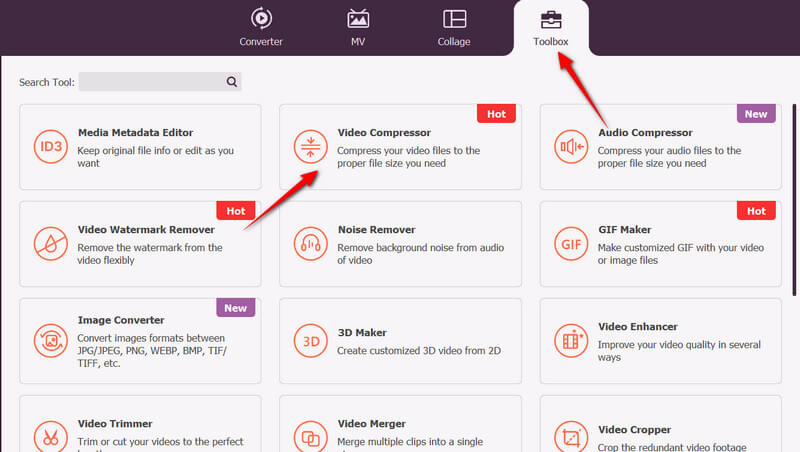
Secure DownloadStep 2Next, access the Toolbox tab. Under this tab, select the Video Compressor option to access it.
Step 3Then, load your video file to compress by clicking the Plus icon in the video compressor window.
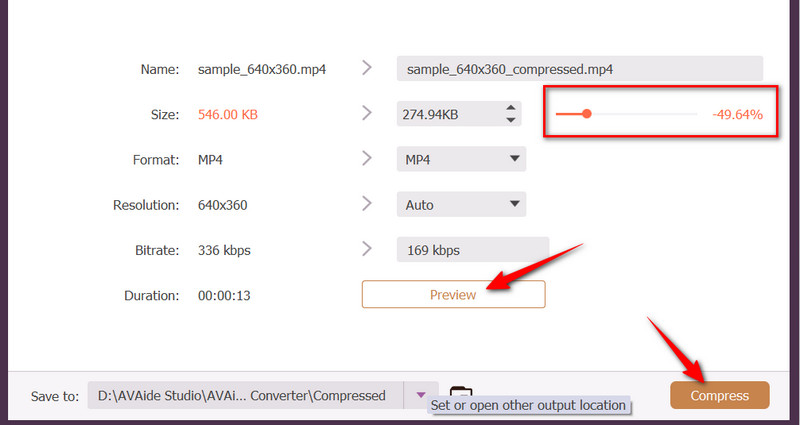
Step 4After that, use the slider to change the video's file size. Also, you may change the format, resolution, and bitrate under the same window. To see the changes, click the Preview button. Finally, commence the process of reducing file size by clicking the Compress button at the bottom. You may do the same to compress videos for Instagram.
That is how to compress a VLC video. True enough, VLC is not just a multimedia player. This program is more capable than you think. It comes with every method that you need to shrink a video file. On the other hand, it can be tricky for others due to the manual process. Nevertheless, you can consider using AVAide Video Converter, which makes the process of compression simpler and better.
Your complete video toolbox that supports 350+ formats for conversion in lossless quality.