Convert MP4 to MOV when Apple compatibility, editing workflows, or certain software requirements push you in that direction. This guide walks through practical ways to switch formats across Windows, Mac, browser tools, and even mobile devices without turning it into a whole science project.
Part 1. MP4 vs MOV
MP4 and MOV are popular video wrapper formats, but they are built around different ecosystems and typical real-world uses. MP4 is often the safer bet, since it has broad compatibility and tends to handle compression pretty efficiently. MOV feels more connected to Apple devices and to more polished, professional video workflows, so it can feel like it fits better when your tools prefer that container or you are working within that kind of toolchain.
| Category | Category | MOV |
| Full Name & Developer | MPEG-4 Part 14, MPEG | QuickTime Movie, Apple |
| Compatibility | Windows, Mac, Android, iOS, TVs, browsers | Best on Apple devices |
| Compression & Size | Smaller, efficient files | Often larger files |
| Quality & Editing | High quality, easy to edit | High quality, pro editing |
| Best Uses | Streaming, sharing, storage | Apple workflows, editing |
When Should You Convert MP4 to MOV? And When Should You Stay?
Go ahead and convert MP4 to MOV for Apple devices, certain editing apps, or professional pipelines that expect MOV. Just remember: conversion does not improve quality, and it can actually increase the file size, which sometimes surprises people.
If your goal is simple playback, sharing, streaming, or cross-platform use, then stay with MP4. It delivers good quality, solid compression, and fewer headaches across devices.
In short, pick MOV for specific Apple and professional workflows, and pick MP4 for broader compatibility and smaller files.
Part 2. How to Convert MP4 to MOV on Windows
1. Using VLC Media Player (Free, Open-Source)
VLC Media Player is a solid free option for converting a basic MP4 to MOV. It can play, like, almost any mainstream video format, and it also has a built-in conversion part, so you do not really need extra tools. Its conversion options can feel less clear than those in converters designed solely for this, especially when you try to choose codecs or an output profile.
Step 1Open VLC and head to Media > Convert/Save.
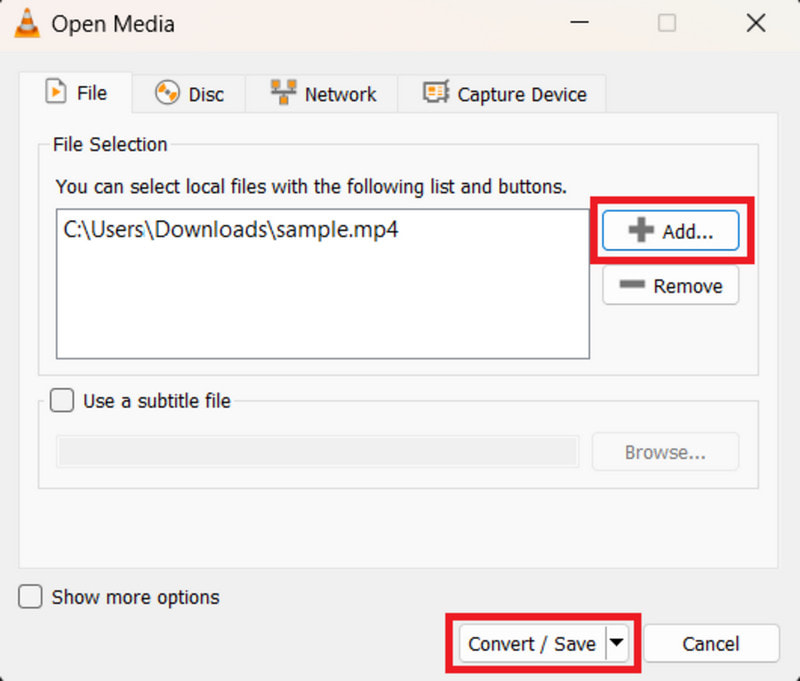
Step 2Hit Add and import the MP4 file.
Step 3Choose Convert/Save, then look for a profile that matches MOV.
Step 4 Decide where it should land, and confirm the output truly ends with .mov; it might not be recognized correctly.
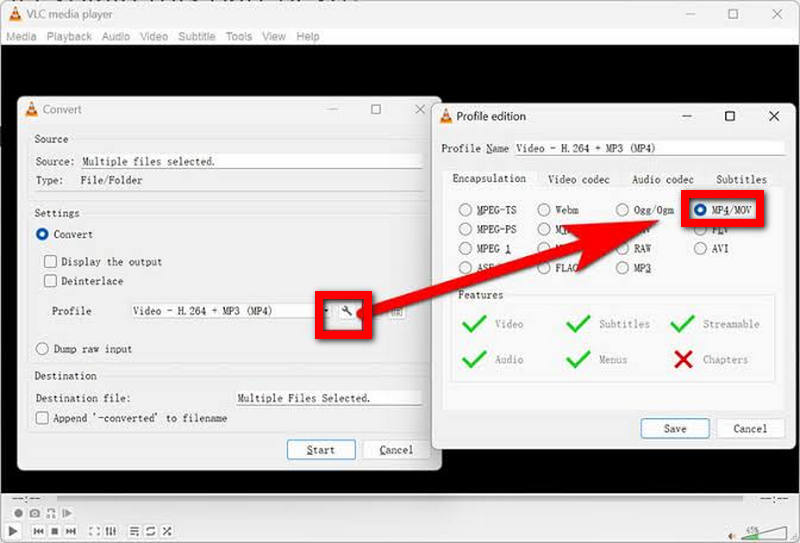
Step 5Tap Start to kick off the conversion process.
2. Using HandBrake (Free, Open-Source)
HandBrake is a well-known open-source converter, with very detailed options for video quality, codecs, frame rates, and compression settings. It is great for re-encoding and helps tune videos, but it is not super comfy for MP4-to-MOV conversion since MOV is not typically a standard output container in HandBrake.
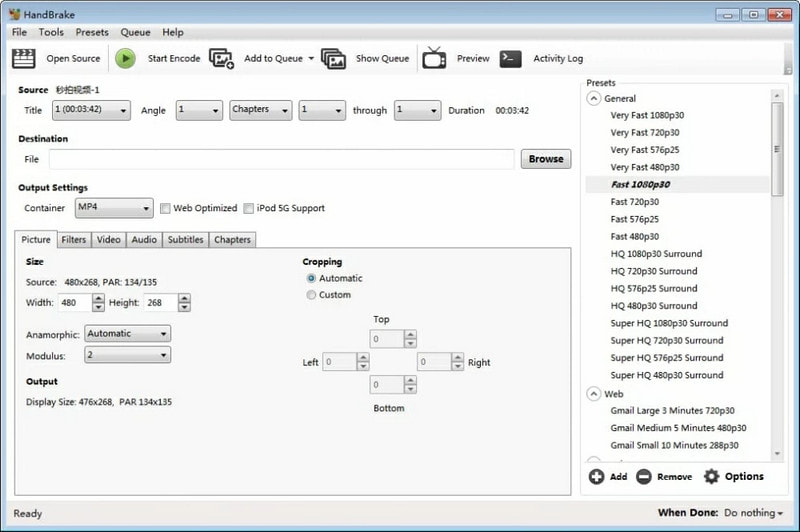
Step 1Open HandBrake and bring in the MP4 file.
Step 2Pick a preset that matches what you need, mostly resolution and quality.
Step 3Adjust the audio and quality settings as you like.
Step 4Choose the destination path and type in the filename.
Step 5Click Start Encode.
Note: since HandBrake does not really provide a direct MOV output, it might not be the best option if MOV is exactly what you need
3. Using AVAide Video Converter (Professional)
AVAide Video Converter feels more practical if your goal is direct MP4-to-MOV conversion. It supports 1,000+ formats, can output up to 8K resolution, supports batch converting, and includes hardware acceleration. There are also small editing features that let you trim or fine-tune clips before converting, which is pretty handy.
- Supports MP4, MOV, AVI, MP3, and more.
- Supports high-resolution output.
- Converts more than one file at a time.
- Uses NVIDIA, AMD, and Intel hardware.
- Trim, crop, rotate, merge, and adjust videos.

 Secure Download
Step 1Download and Install AVAide
Grab AVAide Video Converter from the official website, then click Launch to access the video conversion tools.
Step 2Add the MP4 File
Under Converter, click the Add Files button, then select the MP4 video you want converted. You can also add multiple files for bulk conversion if needed.
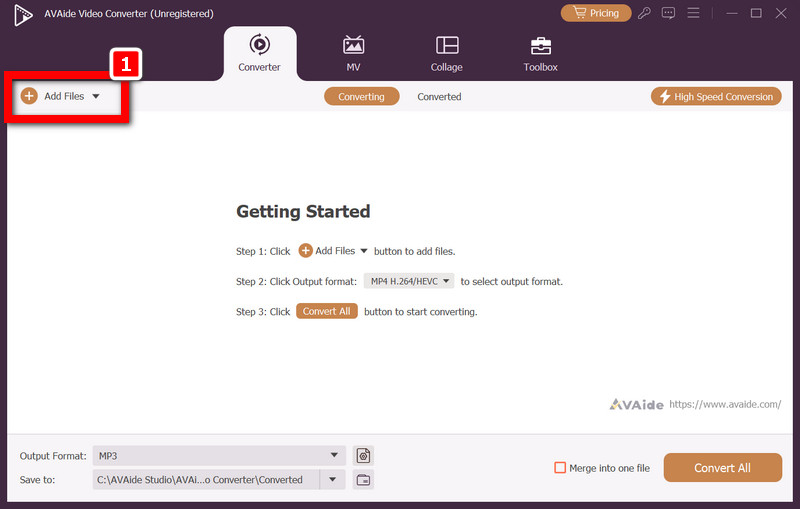
Step 3Choose MOV
Open the Output Format list next to the imported video and set the target format to MOV.
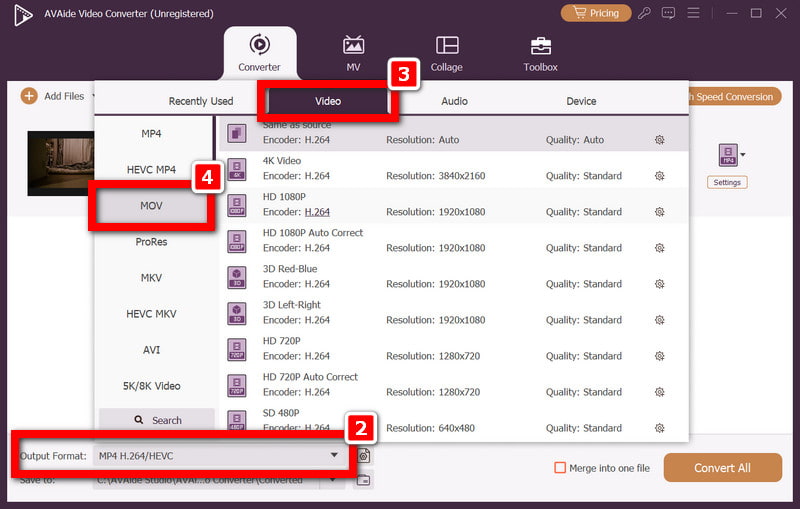
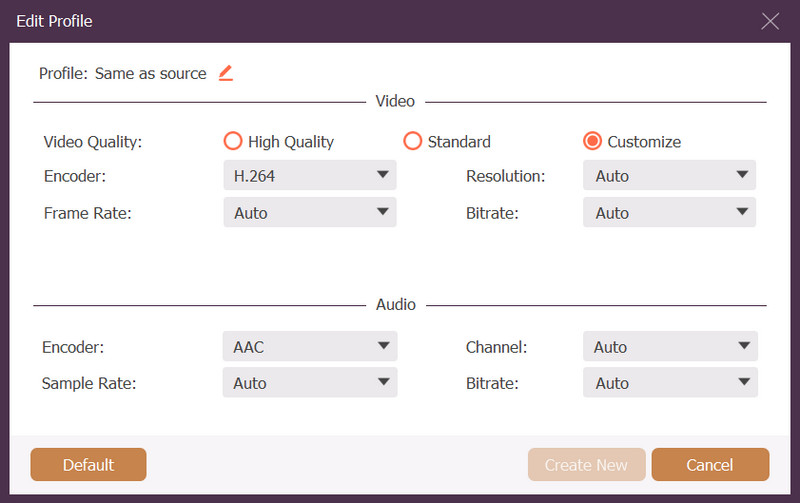
Step 4Adjust the Settings
Tweak the resolution you want, dial in video quality, choose the frame rate, and adjust other available parameters so the final file matches what you intended.
Step 5Click on Output Folder.
Select a conversion output folder, where the converted MOV file will be saved, and the directory will be easily accessible.
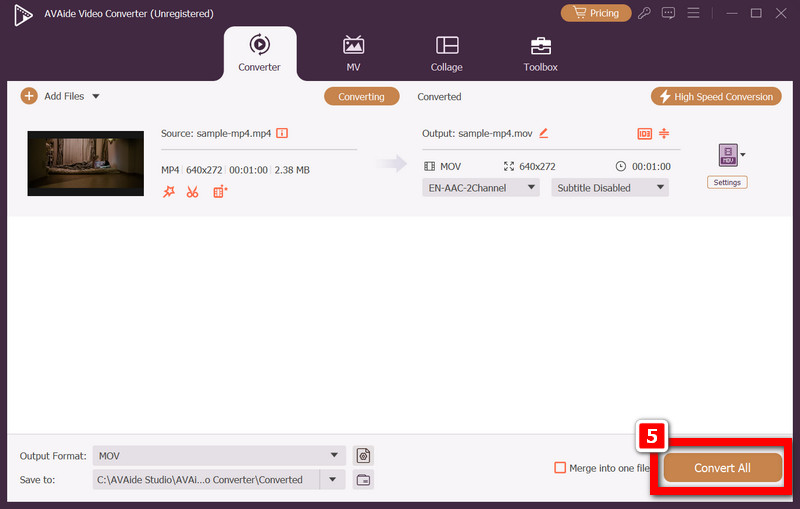
Step 6Start Conversion
You will find the Convert All option, which will help you start converting MP4 to MOV. After the conversion, you can open the selected output folder to view the converted video.
Part 3. How to Convert MP4 to MOV on Mac
1. Using QuickTime Player (Built-in, Free)
Mac users who need a fast, pretty, painless way to export video files that actually work can use QuickTime Player, the built-in app you already have. It is not an extra app, and it is not as bulky or complicated as some dedicated converter tools, making it a convenient option when a video is not compatible with QuickTime Player.
Step 1Open QuickTime Player on your Mac. Launch QuickTime Player on the Mac.
Step 2Tap File > Open File, then select the MP4 video file you want.
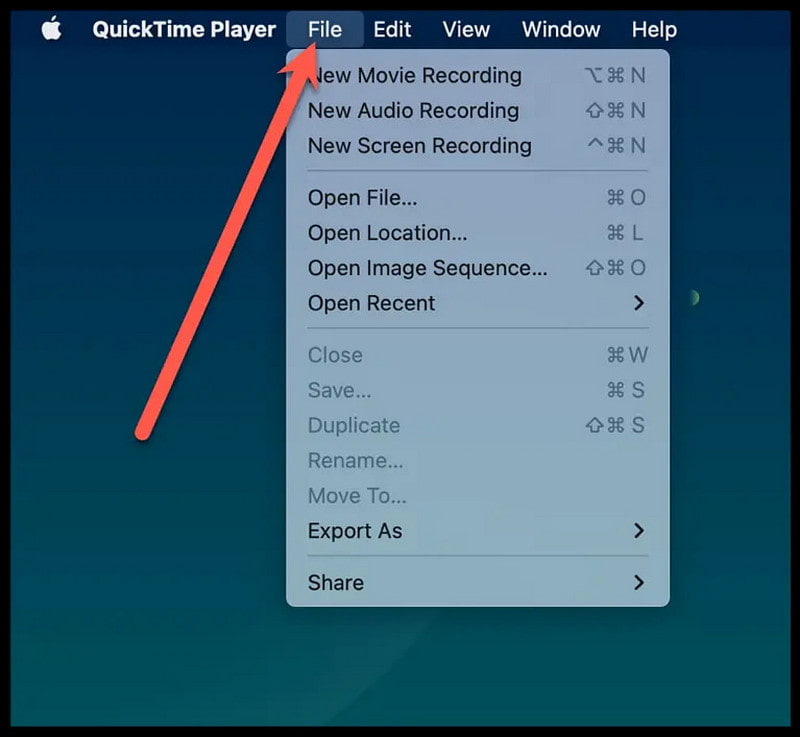
Step 3Once the video shows up, head to File > Export As.
Step 4Pick your preferred resolution, like 1080p or 4K, depending on the original video.
Step 5Select the destination folder and press Save to finish the export.
Important: The items shown below are the export options available in QuickTime Player. They might look different depending on your macOS version and also the source file you start with.
2. Using iMovie (Built-in, Free)
iMovie is also free and comes built in on many Mac computers, so you do not have to think too hard about it. For quick video finishing before export, it tends to feel smoother for tasks like cropping a video in iMovie, trimming clips, adding transitions, or tweaking the overall project, rather than using QuickTime.
Step 1Open iMovie, and start a new Movie Project.
Step 2Hit Import Media, then choose the MP4 video.
Step 3Just drag that video over to the timeline space.
Step 4Make whatever tweaks you need, like trimming or shifting the clip sequence around, ya know.
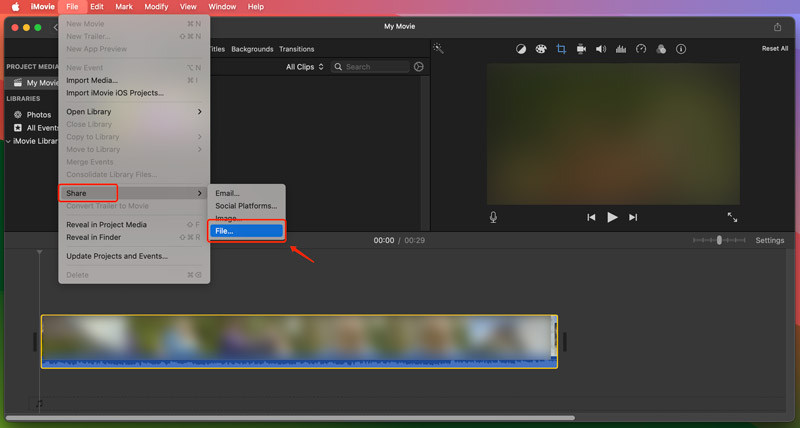
Step 5Press the Share button, then afterward select File.
Step 6Pick the resolution and quality level you want, then tap Next.
Step 7Choose a place to put it, and click Save to export the video.
3. Using FFmpeg (Command Line, Free, Open-Source)
To use too many Filled Flipper devices concurrently, FFmpeg needs to be used. FFmpeg is a great command-line tool that provides precise control over video transformations. It also supports a wide range of codecs and containers and is therefore well-suited to users who prefer more control than they can get from graphical Mac apps.
Step 1Use a package manager, such as Homebrew, to install FFmpeg on the Mac.
Step 2Open Terminal, and go into the folder that contains the MP4 file.
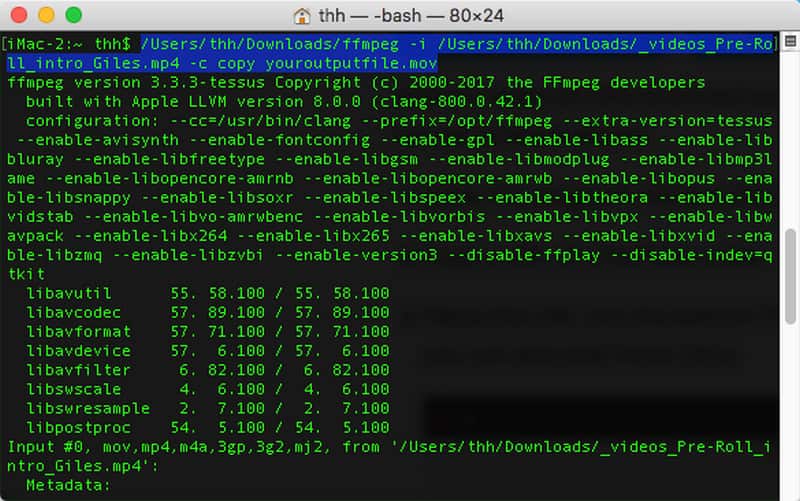
Step 3Type this command: ffmpeg -i input.mp4 output.mov
Step 4Swap input.mp4 with the real MP4 filename, and replace output.mov with the MOV name you actually want.
Step 5Just hit Enter, and wait until FFmpeg has done the conversion.
Part 4. How to Convert MP4 to MOV Online
CloudConvert is an easy and popular online conversion service that supports many formats, including MP4 and MOV. There is no software to install; it can be run straight with your web browser. Honestly, the interface feels pretty simple, and the knobs for resolution, codec, frame rate, and overall file size give you more control when converting.
Step 1Press Select File in the Open the MP4 to MOV converter. From your computer, pick the video (MP4).
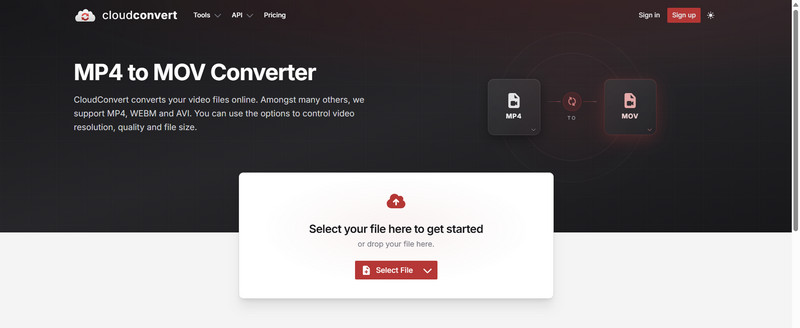
Step 2Make sure the output is set to MOV. After all, conversion settings can be modified while it is running.
Step 3If needed, tune the video codec, resolution, FPS, and other settings from the options list.
Step 4To upload and process the MP4, click Convert. CloudConvert will handle the processing; wait until it finishes.
Step 5When you receive the converted MOV file, click Download to save it to your computer.
Part 5. How to Convert MP4 to MOV on Mobile
1. Using the Files App (iPhone/iPad, Built-in, Free)
On iPhone and iPad, iMovie is a free Apple app for working with MP4 videos and converting them to Apple-friendly formats. It clicks with Photos and Files for basic trimming, organizing, and that little stuff.
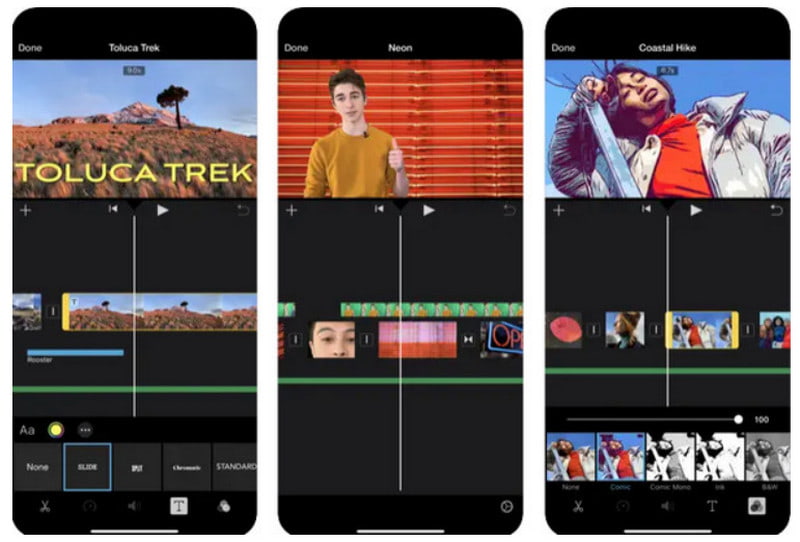
Step 1Open iMovie and start a fresh movie project.
Step 2Choose Movie, pick the MP4 video, then tap Create Movie.
Step 3Hit Share, then select Share Video or Save Video.
Step 4Pick the resolution you want, like 1080p or 4K.
Step 5Wait for the export to finish, then look for it in the Files app.
Note: iMovie does not always spit out a MOV file straight away. If you want MOV with less uncertainty, use a dedicated converter tool.
2. Using a Dedicated App (iPhone/iPad, Android)
The Video Converter & Compressor app makes MP4-to-MOV conversion way less annoying on mobile devices. Most of the time, it supports multiple file formats and gives you clearer output rules. It is useful when you want more control than the default options allow.
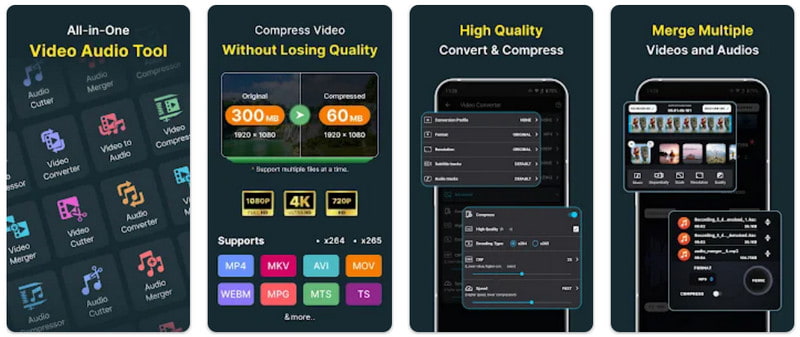
Step 1Grab the Video Converter and Compressor app from the App Store or Google Play.
Step 2Open it, then pick the MP4 video that is already sitting on your device, no hunting around.
Step 3Choose MOV as the output format, not close enough or something similar.
Step 4Fine-tune the resolution, the overall quality, or even the frame rate if you feel like it.
Step 5Press Convert, and wait for the clip to finish processing. It can take a little bit.
Step 6Keep the new MOV file, or send it to another app afterward.
Part 6. Best MP4 to MOV Converters - Comparison
| Converter | MOV Output | Batch Conversion | Quality Control | Codec Control | Editing Tools | Fast Conversion |
| AVAide Video Converter | ✓ | ✓ | ✓ | ✓ | ✓ | ✓ |
| VLC Media Player | ✓ | ✗ | ✓ | ✓ | ✗ | ✓ |
| HandBrake | ✗ | ✓ | ✓ | ✓ | ✓ | ✓ |
| QuickTime Player | ✓ | ✗ | ✓ | ✗ | ✗ | ✓ |
| iMovie | ✓ | ✗ | ✓ | ✗ | ✓ | ✓ |
| FFmpeg | ✓ | ✓ | ✓ | ✓ | ✗ | ✓ |
| CloudConvert | ✓ | ✓ | ✓ | ✓ | ✗ | ✓ |
| Files App | ✗ | ✗ | ✗ | ✗ | ✗ | ✓ |
| Video Converter & Compressor | ✓ | ✓ | ✓ | ✓ | ✓ | ✓ |
Figuring out how to change MP4 into MOV helps you get videos ready for Apple devices, editing apps, and other everyday workflows. Just use the converter you feel safest with, based on compatibility, the overall quality, how fast it converts, and those extra settings it offers.
ABOUT THE AUTHOR

Your complete video toolbox that supports 350+ formats for conversion in lossless quality.