The message The file is not compatible with QuickTime Player can pop up when you are trying to open an important video right before a presentation or during a movie night. I mean, it really throws you off. This write-up kinda breaks down why it happens and gives practical ways to get it working again, so you are not stuck staring at that screen.
Part 1. Why Does QuickTime Say This File Is Not Compatible?
The Core Issue
QuickTime sometimes shows that this file is incompatible when the video or audio uses a format, codec, or encoding setup that the player does not support. And yeah, the file extension by itself does not really determine compatibility, because two files can share the same extension but use totally different codecs, which is the tricky part.
Common Causes & Explanation
- 1.Unsupported Video or Audio Codec: The media might be using a codec that QuickTime cannot decode, even though the extension looks sorta normal.
- 2.Unsupported Encoding Settings: Some resolution, bitrate, or encoding settings can cause QuickTime to stumble, not play properly, or not play at all.
- 3.Corrupted or Incomplete File: If the file was damaged during download, transfer, or export, you may see a compatibility error, and QuickTime may give up.
- 4.Outdated QuickTime Version: An older QuickTime build may not handle newer media types, or the codecs those types rely on.
- 5.Incorrect File Extension: Sometimes it is really the name, like when the .mp4 part does not match the actual structure, so QuickTime cannot figure out what it should be playing.
Part 2. File Types and Codecs Are Compatible
QuickTime Player can handle a bunch of media types, but the real situation depends on more than just the extension. It is mostly about the video and audio codecs packed inside the file.So yes, two MOV or two MP4 files may look the same on the outside, yet still behave differently when using QuickTime crop video.
- 1.MOV: Native format, yet compatibility changes depending on the codec that is used.
- 2.MP4, M4V: Typically good with some codecs like H.264, HEVC, AAC.
- 3.AVI: Limited support, due to some codecs that may not work with QuickTime.
- 4.MPEG Files: It depends on how they are encoded and which Mac OS you have.
- 5.Common Video Codecs: These are typically H.264 and HEVC (H.265), but as with most system aspects, that too depends.
- 6.Common Audio Codecs: AAC, MP3, Apple Lossless, PCM.
Part 3. Quick Fixes to Try First
Do not dive right into more advanced material. These can resolve day-to-day issues and common compatibility problems without conversion.
Fix 1: Dismiss the Error and Restart QuickTime
These are minor problems while loading media files in QuickTime. It sometimes cures minor playback issues, and turning off the app can fix it.
Step 1Close that compatibility error notice, then just quit QuickTime Player.
Step 2Reopen QuickTime Player from the Applications folder or from Launchpad.
Step 3Try opening the file again to check if it is actually solved now.
Fix 2: Restart Your Mac
A full restart wipes those temporary processes and refreshes system resources, so yeah, it can sort out annoying, unexpected problems that mess with QuickTime and media playback, too.
Step 1Click the Apple menu up in the upper-left corner of the screen.
Step 2Select Restart, then wait until the Mac begins to boot again.
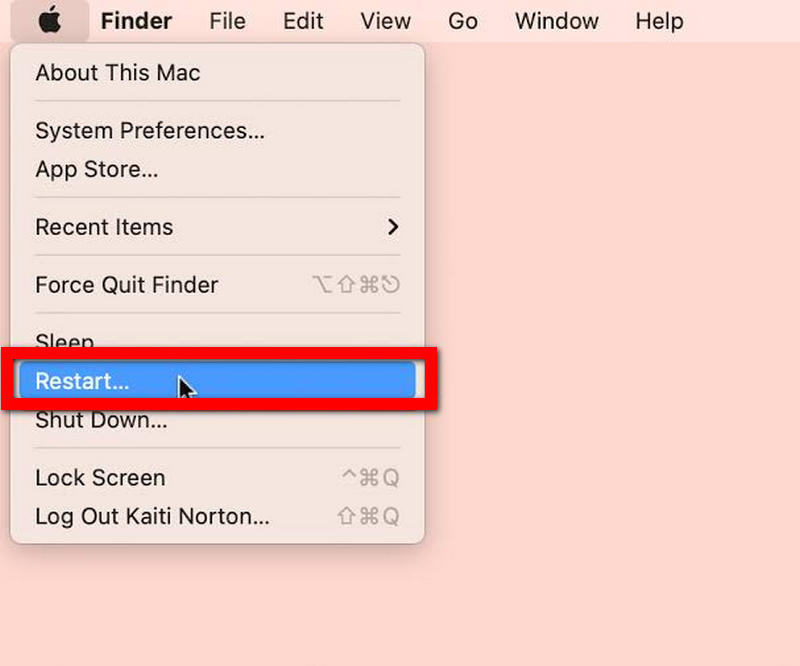
Step 3Open QuickTime Player, then immediately hit the Play button on the file.
Fix 3: Update macOS and QuickTime Player
You might end up with an outdated system software installation that does not support the required patches or media, and QuickTime might misbehave. It is possible to update it to improve performance and support new video and file formats.
Step 1Click on the Apple menu and select System Settings.
Step 2Select General, and tap Software Update.
Step 3Install any available updates; upon request, restart the Mac.
Step 4Test again on a different file using QuickTime Player.
Fix 4: Try Playing the File in Another Player
What would you like to do now? What now - try playing the file in another player? You will know whether the fault lies with QuickTime or with a media problem you encounter while trying to play an item.
Step 1Open another media player running on your Mac.
Step 2Click Import the video file.
Step 3Determine its play from a soundness perspective. Yes, it is reasonable to assume the snag is due to the QuickTime film format.
Fix 5: Check the File Extension
If the file contains an incorrect or missing file extension, then QuickTime might not be able to identify the media type precisely and open the file accurately.
Step 1Locate the media file that you sent using Finder.
Step 2Then do this: Right-click the file and choose Get Info.
Step 3Check the name's ending and look at Name & Extension.
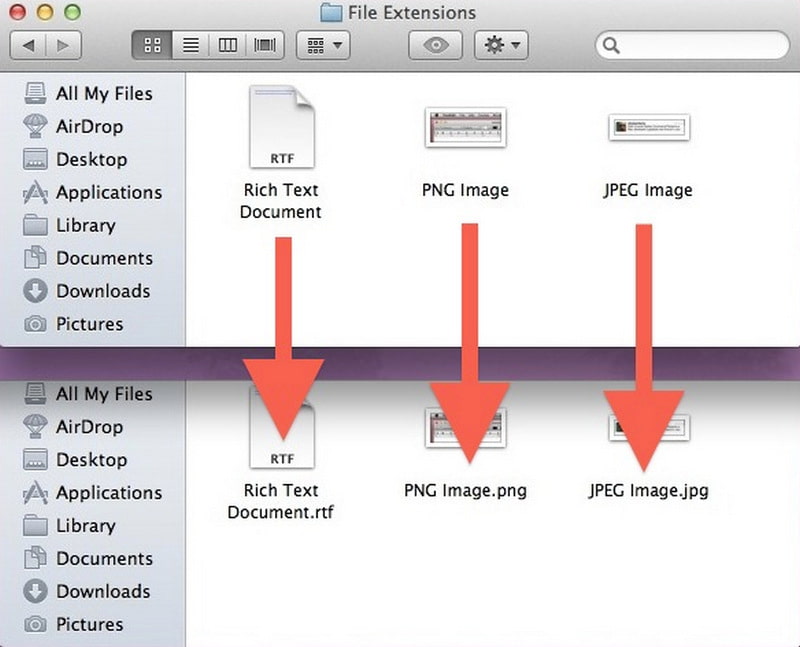
Step 4Note that the file extension indicates the actual video format, so ensure the name matches the correct format; it will not automatically change the format.
Fix 6: Using the Mac OS X built-in Encoder
Most of the methods given are more applicable to macOS than to QuickTime and are provided here to reencode a video that might otherwise be unsupported.
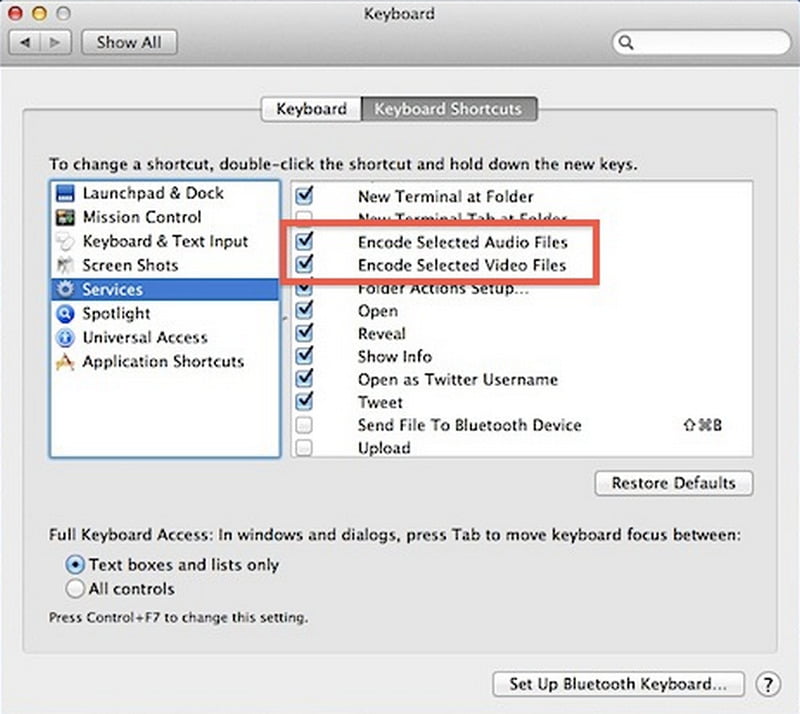
Step 1 Open the file with a Mac app that supports export or encoding options.
Step 2Pick the export options you need, and decide which file format meets the usual standards.
Step 3Save the newly encoded copy to the place you want.
Step 4Play this exported file in QuickTime Player and verify that it plays correctly.
Part 4. How to Convert a File to QuickTime-Compatible Formats
1. AVAide Video Converter
AVAide Video Converter can handle files that QuickTime refuses to recognize or play. It supports more than 1,000 formats, so switching between video types stays pretty easy, plus hardware acceleration speeds things up. You also get output controls and editing tools, which make prep for QuickTime playback much more flexible.
- Converts videos to MOV, MP4, AVI, and lots of other formats.
- Provides high-resolution output while still keeping a sharp look.
- Processes multiple videos simultaneously, saving time.
- Uses NVIDIA, AMD, and Intel hardware to boost conversion speed in practice.
- Also includes trimming, cropping, rotating, merging, and other editing functions, as needed.

 Secure Download
Step 1Download and install AVAide Video Converter from its official website. Then launch it right after you install, no waiting.
Step 2Tap Add Files and import the video that QuickTime cannot open.
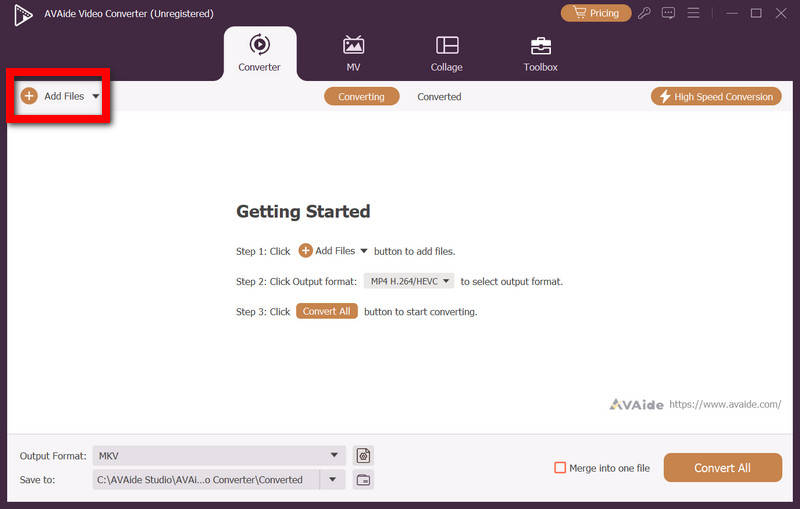
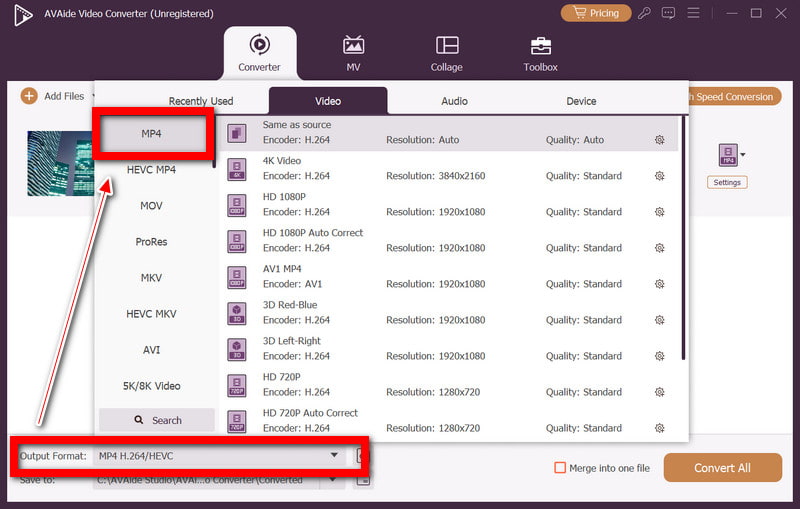
Step 3Look through the list of Output Format, then choose MOV or MP4 under the Video tab. If something like a compatible codec shows up, pick H.264 or HEVC.
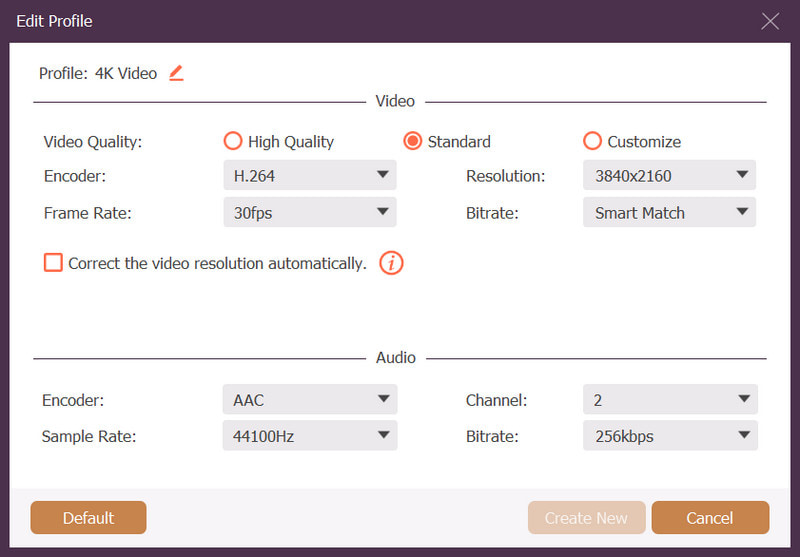
Step 4Adjust settings such as resolution, frame rate, bitrate, and other related options, then pick the destination folder as well.
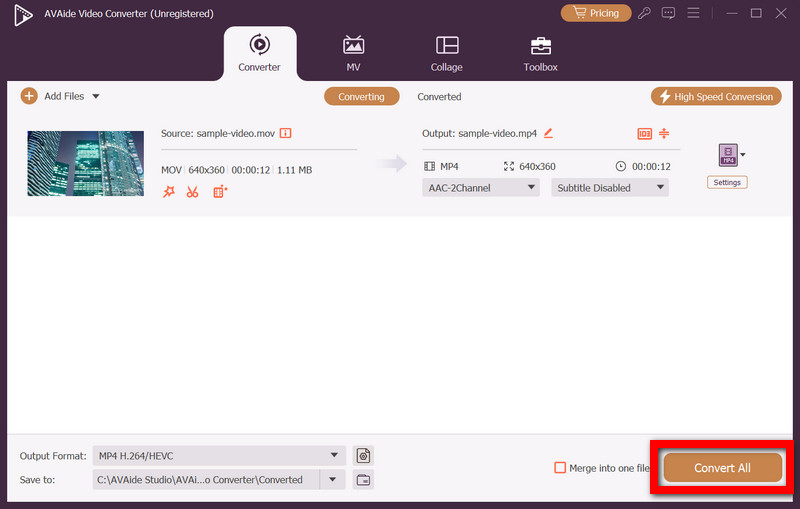
Step 5Hit Convert All and let it run. When it’s done, open the converted output in QuickTime Player.
2. VLC Media Player
VLC Media Player is pretty famous for covering a ton of media types, but sometimes that built-in conversion mode can still be useful, if QuickTime gets stubborn or just refuses. Honestly, it is a simple and solid option, especially for checking iPhone-supported video formats or getting a fast re-encode with minimal extra trimming or editing.
Step 1Download and install VLC Media Player, then launch it.
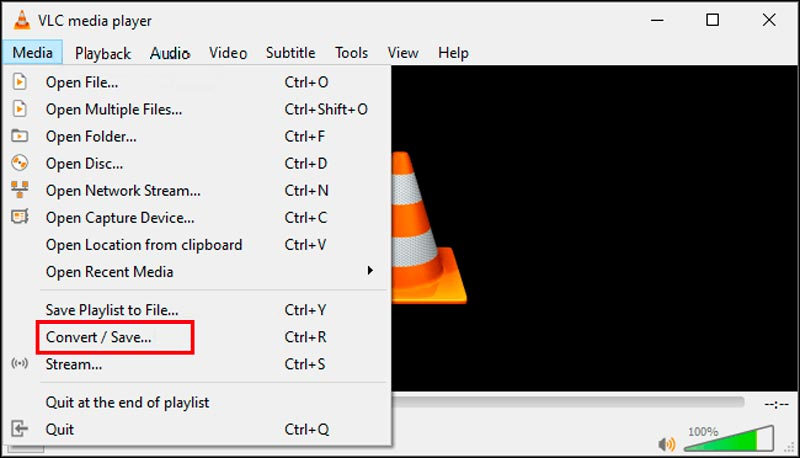
Step 2In VLC, go to Media > Convert/Save, press Add, and import the file, then you are basically set.
Step 3Tap Convert/Save and pick an MP4 profile that uses H.264.
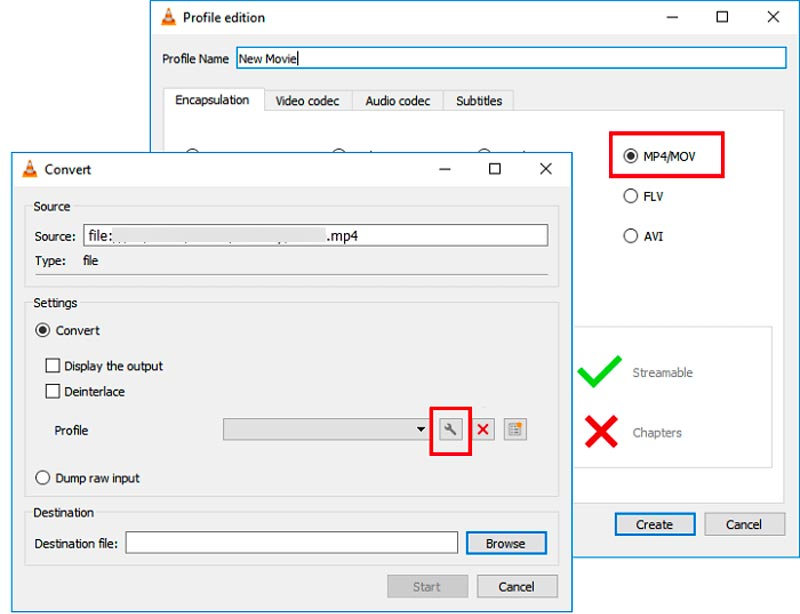
Step 4Pick an output place and click Start.
Step 5Now open the converted video in QuickTime Player for a quick playback check.
3. HandBrake
HandBrake is a free video transcoder. The encoding settings you can tune here tend to help a lot if QuickTime is being stubborn and rejects a file due to codec-related stuff or other video configuration quirks.
Step 1Download and install HandBrake, then open it and import the video.
Step 2Set the Output Format to MP4, then open the Video tab if it is not already open.
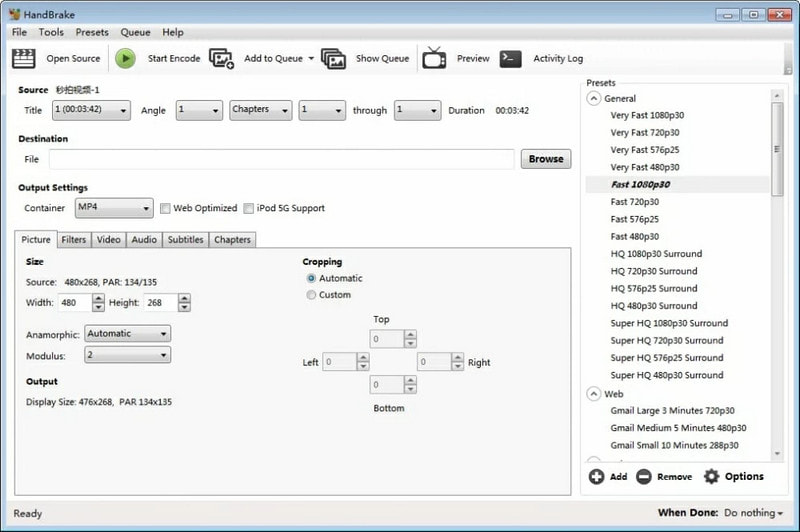
Step 3Choose H.264 (x264) as the video encoder.
Step 4Select an output directory and click Start Encode.
Step 5Open the resulting MP4 in QuickTime Player to test it.
Bonus: How to Fix Trimmed Files Not Compatible with QuickTime
Trimmed videos sometimes end up weird, like suddenly not playing in QuickTime, even though they were fine before. Usually, it happens because editing changed how the video is encoded, altered the metadata, or even slightly changed the file structure. Anyway, try these steps and see what brings it back:
1. Re-encode the Trimmed File
Take the trimmed video and convert it again into MOV or MP4. Pick a codec QuickTime likes, for example, H.264. This step can fix most encoding issues.
2. Export the Video Again
Open the trimmed clip in your editor, then export it a second time. Use MP4 or MOV, and choose a supported codec. If there is any small mismatch after trimming, exporting again usually cleans it up.
3. Check the File Extension
Right-click the file, then choose Get Info and verify that the extension matches the file type. Just renaming the extension would not convert anything on its own, so do not rely on that alone.
4. Try a Video Converter
If QuickTime keeps refusing to open it, convert it using something like AVAide Video Converter, VLC, or HandBrake. Once it is converted, QuickTime will often accept the fresh format, and then there is less drama, you know.
5. Check it With Another Player
Now, play the trimmed copy in a different media player. If it works there but still not in QuickTime, then the issue is probably QuickTime compatibility, not the clip itself, so do not blame the editing too fast.
It is important to know what file type is compatible with QuickTime, but what really matters is the codec and how it was encoded. If you re-encode, export the file properly, confirm the format, or use a reliable conversion app, playback can usually be repaired, and you can watch it smoothly again.
ABOUT THE AUTHOR

Your complete video toolbox that supports 350+ formats for conversion in lossless quality.