The background is an integral part of any image. However, it is not always pleasant to see, especially when it’s a total mess if you’d like to post it through your social media. So, how do we make it transparent? This article will reveal the answer. In this article, we’ll take you on a step-by-step guide on how to successfully make image backgrounds transparent with different tools. Plus, you will also get to know the individual features of each background remover.
- Part 1. Why Do We Need to Make Background Transparent
- Part 2. How to Make Background Transparent Online
- Part 3. Make Background Transparent in Photoshop
- Part 4. Make Background Transparent in Illustrator
- Part 5. Make Background Transparent in Paint
- Part 6. Make Background Transparent in PowerPoint
- Part 7. Make Background Transparent in Canva
- Part 8. FAQs about Make Image Background Transparent
Part 1. Why Do We Need to Make Background Transparent
Generally speaking, there are 2 different scenarios where you would want to make the background of an image transparent. Either when you’re designing something, and perhaps you wish to refine your work by concentrating the viewer’s perspective on a certain part of a picture. So you'd like its background transparent.
Or when you are layering an image over the original one to conjure up a new design, you need the original picture's background to appear transparent so that the blending of the two images can be smooth enough.
For example, the cases when you want transparency for photo backgrounds may include (but are not limited to) printing images over jackets, T-shirts, flags, banners, etc. Or, you won’t need a big travel budget anymore to give your photo beautiful scenery as its background. By removing the original messy or plain background, you can have a new background or change the background color for your photos.
Whatever your purpose, knowing how to use a transparency tool is essential if you want to create a transparent background for your photographs while keeping their overall quality intact. Here are several effective methods for creating a background-transparent photo.
Part 2. How to Make Background Transparent Online
AVAide Background Eraser
AVAide Background Eraser provides powerful AI technology to make the image background transparent. With this tool, you won’t waste time anymore in manually processing the complex backgrounds of images. The backgrounds would be erased and made transparent immediately with a few clicks.
As a user-friendly and free online tool, AVAide Background Eraser excels among multiple photo editing tools for its diverse features.
◆ Automatically remove image backgrounds.
◆ Support various image formats: JPG, JPEG, PNG, GIF, etc.
◆ Offer a cropping tool after removing the background.
◆ Preview the result in real-time once the background.
Following these step-by-step instructions will give you a photo with a transparent background.
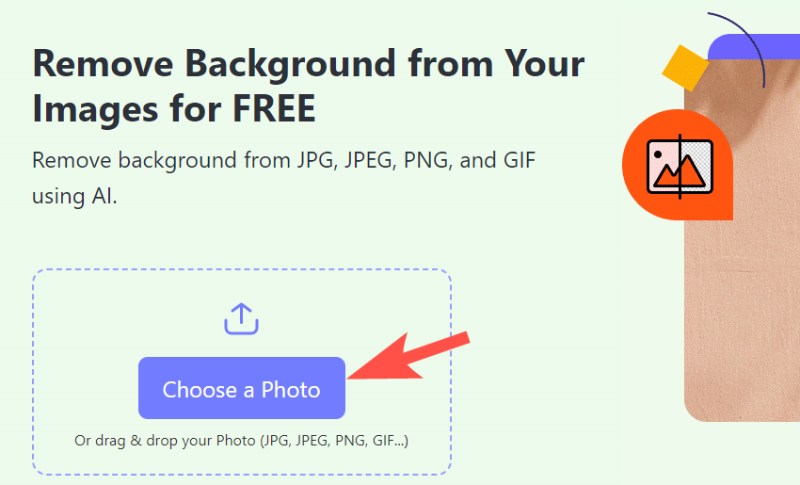
Step 1You can access this background removal tool on desktop and mobile. Go to AVAide’s official site, find Background Eraser, and click the Choose a Photo button to upload your image.
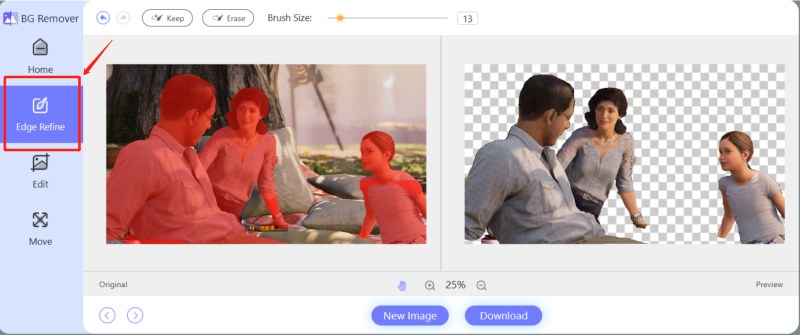
Step 2Refine the edge and erase the background, and then it will be removed automatically.
Step 3If you are satisfied with the result, click the Download button to save the new image with a transparent background.

GIMP
Another choice is the free tool GIMP, which enables you to create a transparent background. It also offers many other functions, including removing shadow from a photo. Unlike AVAide Background Eraser, you need to get used to isolating different images as layers with GIMP. GIMP contains a Fuzzy Select tool. This tool is designed to select areas of the current layer based on color similarity. It will help you to clear the unwanted parts of backgrounds with just one click.
Now follow the steps below to finish your GIMP tutorial.
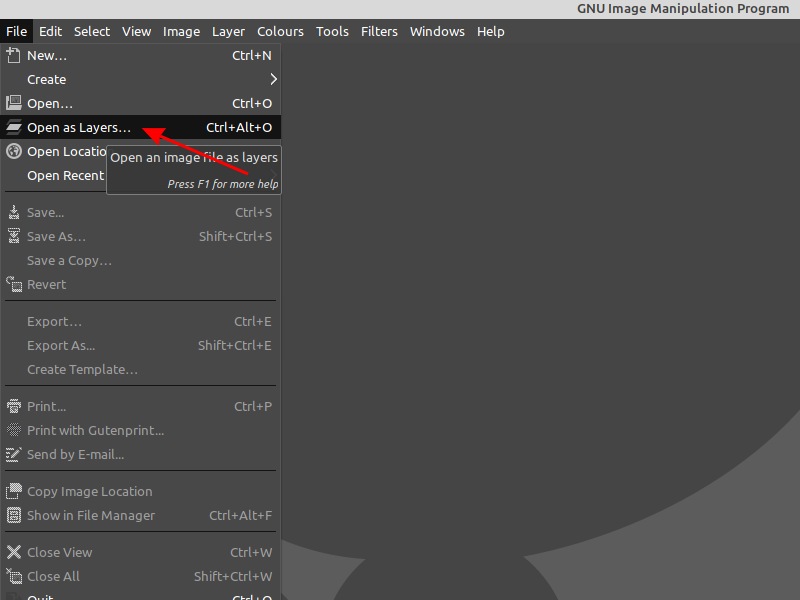
Step 1Launch the GIMP software on your desktop. Then, import an image to it by clicking the Open as Layers button in the File drop-down menu.
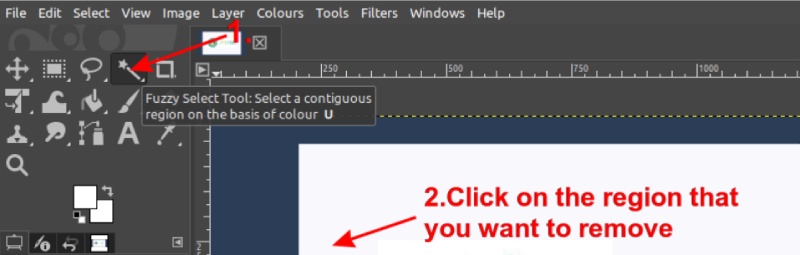
Step 2Next, find Fuzzy Select from the Selection Tools. Then, use this tool to select the parts you want to remove in the background. A dotted outline will appear in the background once the selection is finished.
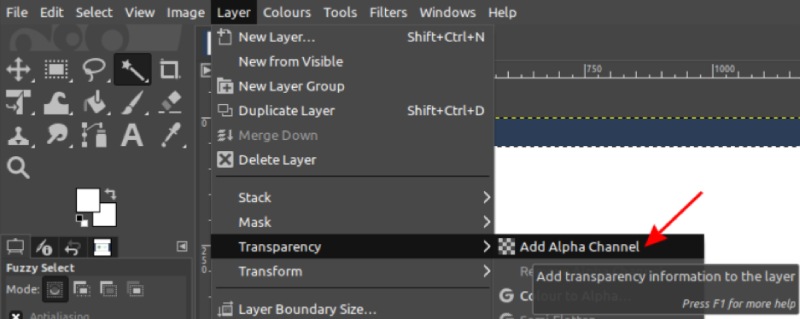
Step 3Choose Transparency from the Layer drop-down menu. Then, in the pop-up menu on the right, click the Add Alpha Channel button.
Step 4Now, click the Delete button to remove the image background in GIMP. Your image background will be transparent.
Part 3. Make Background Transparent in Photoshop3
You can also remove the image background automatically with the AI-powered Photoshop tool. The AI technology will help determine which parts to keep/remove. Though the automatic removal might not be enough for your desired effect, you can still do edge refining manually with a range of selection tools in Photoshop. Besides, Photoshop offers various image editing tools as a professional editing tool. You can make your image bigger, retouch your photos, improve your image quality, etc.
Follow the step-by-step instructions to isolate your subjects from the distracting backgrounds.
Step 1Click Window, and then select Layers. Open your image in the Layers panel and unlock the layer.
Step 2Press Ctrl+A to select the entire image, then Ctrl+C to make a copy of the original image, and finally Ctrl+V to paste it on a new layer.
Step 3There’s a Layers panel on the right side of your image. Click the eye icon in it to hide the background layer.
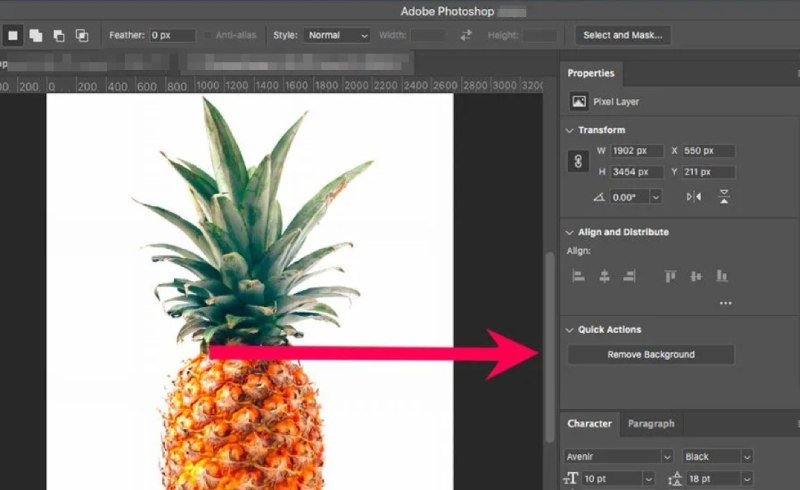
Step 4In the Properties panel, click Quick Actions. In the drop-down menu, select Remove Background.
Step 5Refine your edges. Use the Brush tool to further clean up the small missing details.
Step 6Save it. After the AI technology technology removes the background, save your image as a PSD (Photoshop) or PNG file format to keep it transparent.
Moreover, you can further edit your image by replacing your background. Drag and drop a new image onto the canvas and press Enter/Return to realize it. Afterward, move it to the back by dragging the new image under the original layer in the Layers panel. There you have it!
Part 4. Make Background Transparent in Illustrator
As a user-friendly platform, Illustrator provides users with many easily accessible features. Illustrator usually creates a solid white artboard in the background. Still, you might want to remove it when saving the picture file. This guide will walk you through the steps to create a transparent background in Illustrator.
Step 1Launch Illustrator on your desktop and click the Create new button to start with a new file. If it’s an existing file, press File, find the desired pic, and click Open.
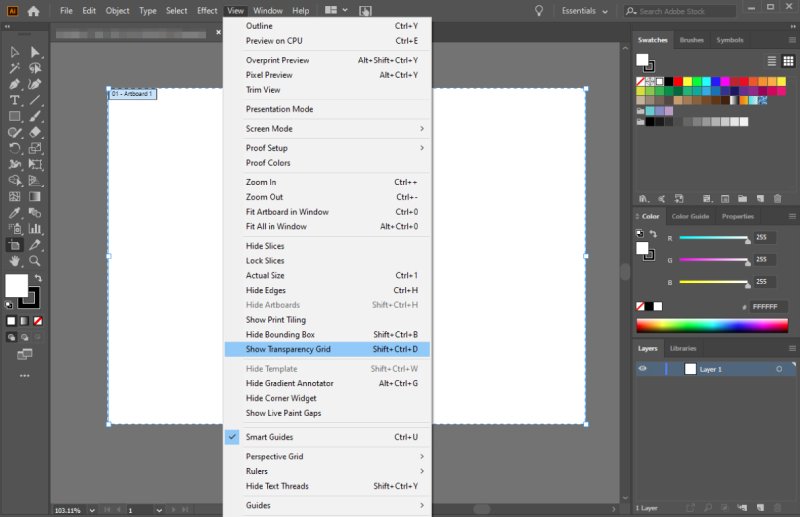
Step 2To enable a transparent background, select Show Transparency Grid under the View tab at the top. Navigate to the upper part of the screen, click View, and then scroll down to find the option Show Transparency Grid. If it works normally, the background will transform into a white-and-gray grid. You can further edit your pic, such as adding new elements if you’d like to.
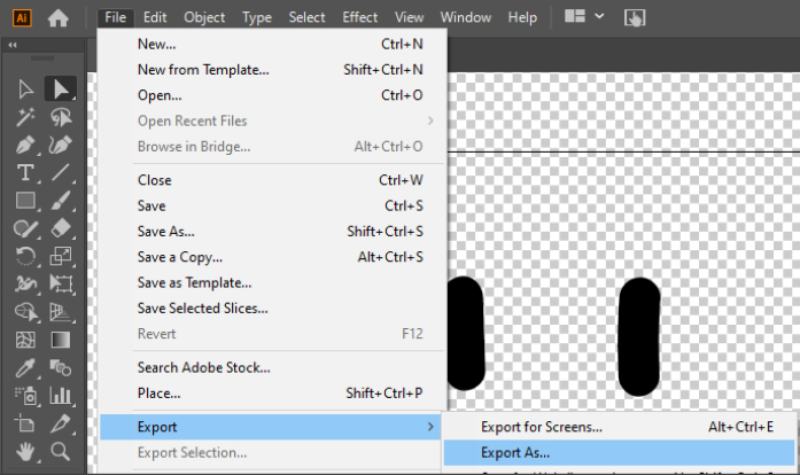
Step 3Save the file. Now, a transparent background is successfully created. Save the final result with an appropriate file format to retain transparency. Click File, and then select Export As in the drop-down menu.
- the formats available in Illustrator that keep transparency include PNG, SVG, and TIFF.
Part 5. Make Background Transparent in Paint
Besides many simple image modifications, Microsoft Paint has a unique feature, Transparent selection, that can be turned on or off depending on what users like. Many users think that toggling on this feature will make their photos transparent. Indeed, the background will turn transparent, but you won’t be allowed to save the transparency.
Here are the steps to make the photo background transparent in Paint.
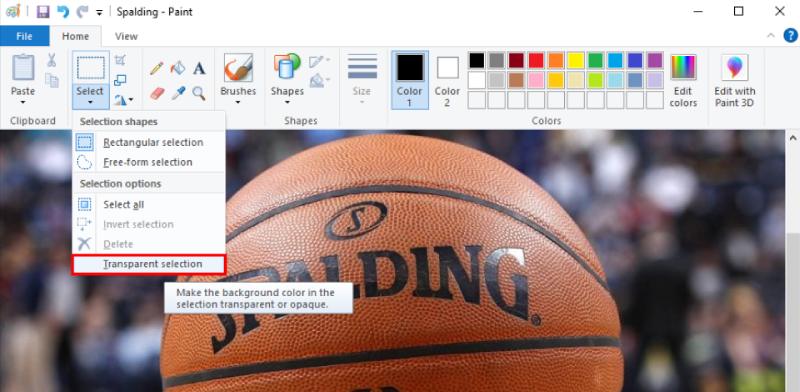
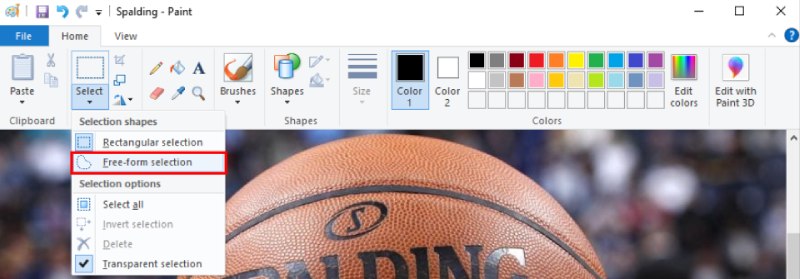
Step 1Open the image you wish to process in Paint. Click Select on the left side of the bar at the top of the page.

Step 2Select the Transparent Selection option from the available list.
Step 3Click Free-form from the Select drop-down menu.
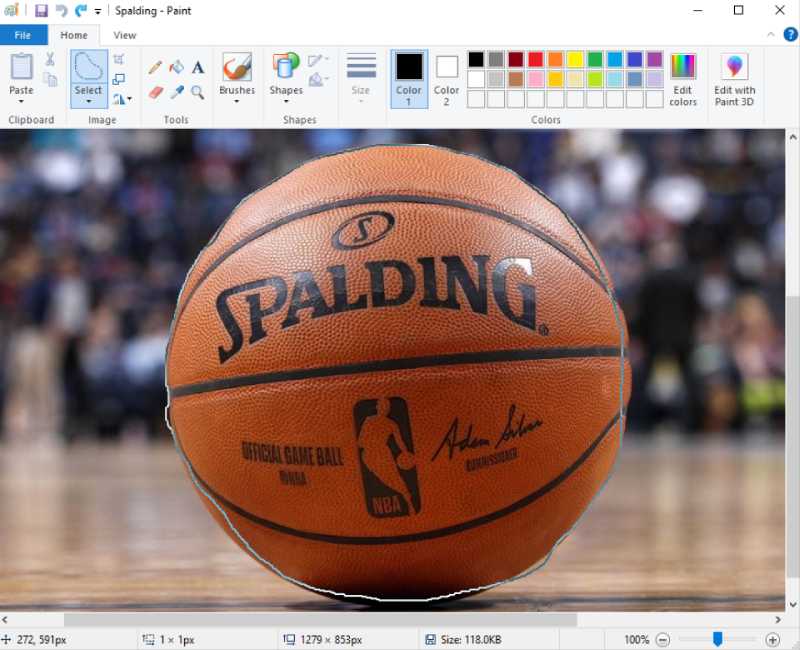
Step 4Trace around the area you’d like to keep by holding on to the left mouse button and dragging.
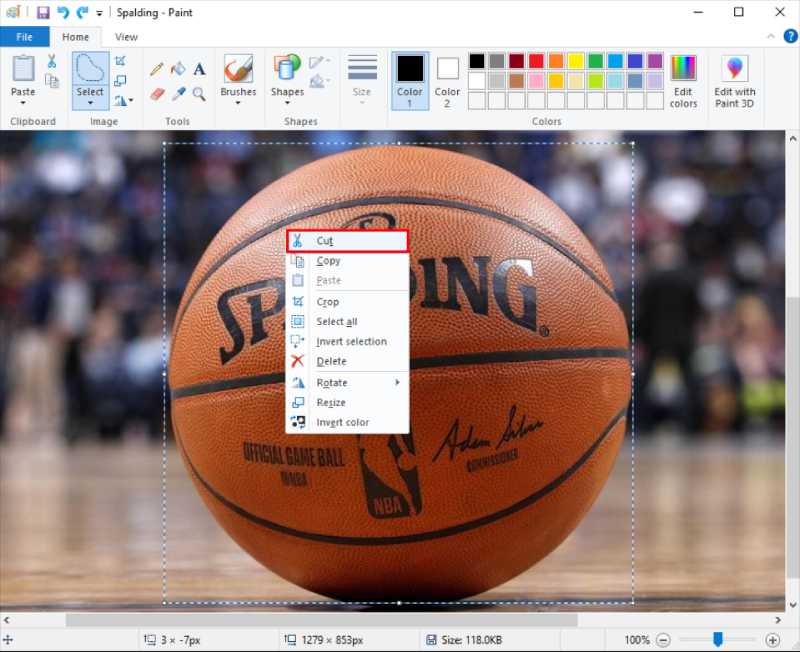
Step 5Right-click the rectangle that appears around the traced area and click Cut.
Step 6Open a new page on Paint and press Ctrl + V to paste your image. Now, you have a photo with a transparent background.
Part 6. Make Background Transparent in PowerPoint
Although it is an Office tool for presentation or slideshow creation, PowerPoint works surprisingly well in processing image backgrounds. You can use PowerPoint's built-in background remover to make the jpg background transparent in PowerPoint. Now, follow the steps below to conjure up a picture with a transparent background.
Step 1Open the PowerPoint presentation and switch to the slide with the picture you’d like to apply a transparent background.
Step 2Select the image, and then go to Picture Tools Format and click Remove Background.
Step 4Mark Areas to Keep or Mark Areas to Remove to designate the parts that should be kept or deleted. Then, draw a line around the area on the picture.
Step 4Right-click the image and click Save as Picture to keep the changes.
- When there are too many images on a single slide to accurately select the one you want to process, right-click any of them, then click Send to Back to temporarily move them out of the way. Sometimes, the degree of transparency might fail to comply with your expectations. In this case, you need to repeat the steps.
Part 7. Make Background Transparent in Canva
Offering various editing features, Canva is an outstanding online tool for designers. Removing a photo background is the most useful and simple option among the multiple features. However, the feature is only available to Canva Pro users, which costs around $12.99/month or $9.99/month when you order a yearly service.
If you own a Canva Pro account, here’s how to create designs with transparent backgrounds in Canva.
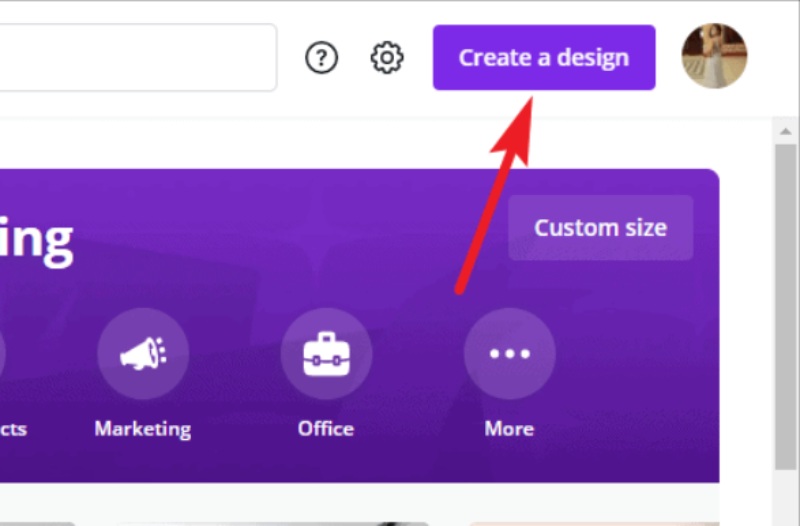
Step 1Click Create a Design on the top-right corner, then choose any size from the available templates since transparent backgrounds are compatible with all types.
Step 2Now, please take care not to adopt any solid elements as the background of the picture when designing your image. Because besides the background, all such elements will turn out visible at the finished stage. So it’s recommended that you keep the background white, for it’ll be transformed into a transparent one anyway.
Step 3After you complete the graphic design, click Download at the top-right corner. There, you’ll have the Download pull-down menu. Now select PNG under File Type.

Step 4Click the checkbox next to Transparent Background and select Download. Now, the image will be downloaded with its background transparent.
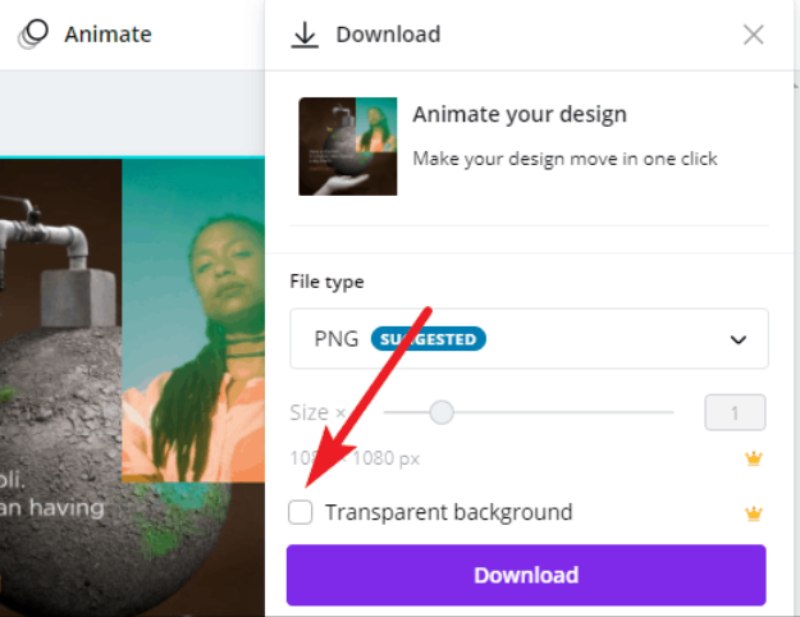
- PNG is the file format needed to create pictures with a transparent background.
Part 8. FAQs about Make Image Background Transparent
Do I need to clear the photo background manually with the photo background clearer?
No. A few clicks can suffice your desired result for normal needs like a transparent photo background. Online sources like AVAide Background Eraser are great choices that are worth trying.
Can a JPG be made transparent?
Yes. You can do it with many online tools. Launching quick image editors like AVAide can quickly convert your photo into a transparent one. But please also notice that the image format will be changed, usually into a PNG.
Does the iPhone have any built-in tool to create transparent backgrounds for images?
In iOS 16 and higher, users can extract the main body in the image very conveniently. Open a photo in the album, and then long press the main body of the image. Click Copy. Then, you can paste it into other applications. It equals a new photo with a transparent background.
Does converting JPEG to PNG make the background transparent?
The format converting itself won’t automatically turn the background transparent. Joint Photographic Experts Group (JPEG) files can greatly reduce the file size of an image through a compression process. PNG, short for Portable Network Graphics, also supports lossless data compression. But different from the former, the PNG format also supports transparency. After converting JPEG to PNG, you can easily make the image's background transparent.
In this article, we have thoroughly introduced the 6 best ways to make the image background transparent with detailed instructions. With these different online tools and professional software, you can get rid of the unwanted things you dislike in your image background. So the main subjects can really stand out. Or you could replace the original background with a new, inspiring one to suit your personal or business needs in photo editing. If you do not know how to choose among all these options, why not have a try with our first pick, AVAide Background Remover? Then, you will get the chance to enjoy the convenient background erasing feature for free.
ABOUT THE AUTHOR

Photo Editing Solutions

Uses AI and automated background removal technology to capture complex backgrounds from JPG, JPEG, PNG, and GIF.
PROCESS NOW