Are you looking for the best method on how to remove video shakes? This article is the post you need to read. Yet, what makes this problem exist in the first place? Several factors, including camera movement, poor stabilization, and low frame rate, can cause shakiness in video footage. Camera movement is the most common cause of shaking in video. When a camera is not held steady while filming, the resulting footage can appear shaky and unstable. This problem is especially true when filming handheld or without a tripod. Another cause of shaking in the video is poor stabilization. Some cameras have built-in stabilization features, but they may only be effective in some situations. In these cases, additional stabilization equipment, such as a gimbal or steadicam, can be used to help reduce shake.
Part 1. How to Remove Shake from Videos on Windows/Mac
When it comes to fixing shaky videos on your Windows and Mac devices, AVAide Video Converter is what you need. It is developed to focus on converting videos to different formats. Yet, this application comes with a plethora of advanced features that can enhance the entire video file. Its Video Enhancer tool can provide a better option to remove shaky videos. It automatically edits the videos into a better-looking output and stabilizes it effectively. You can check the detailed guide below on how to remove shake on a video file using this app.
Step 1Download AVAide Video Converter
First, click the download button below this step to install the entire application.

FREE DOWNLOAD For Windows 7 or later
 Secure Download
FREE DOWNLOAD For Mac OS X 10.13 or later
Secure DownloadStep 2Launch the App
What you need to do next is to launch the app once the video converter is installed. You can check its navigation and interface and prepare the app in the process.

Step 3Import Shaky Video
Next, import the video by going to the Tool option and scrolling until you reach the Enhance Video. A new page will prompt; hit the + icon to check the video you need to download.

Step 4Complete the Process
Finally, you can click the Reduce Video Shaking option. You can select the Preview option to double-check the output. Tap the Enhance option to save the file.


Part 2. Remove Shaky Video With Premiere Pro
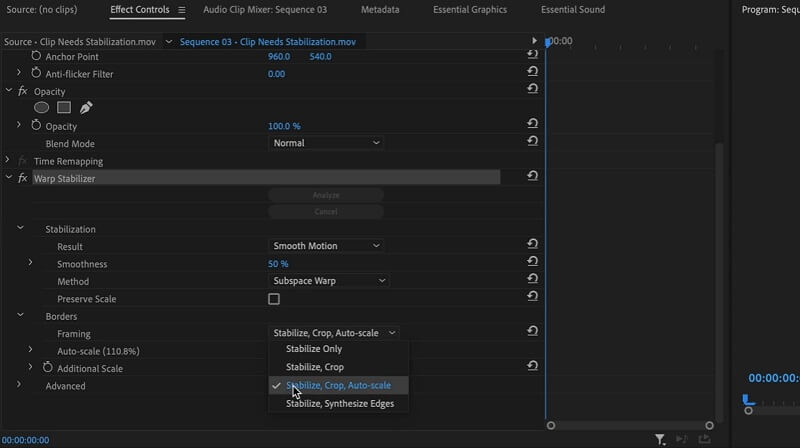
Adobe Premiere is one of the most widespread video editing software available in the market. It is an ideal tool for reducing shake in a video. The Warp Stabilizer feature in Adobe Premiere is specifically designed to stabilize shaky footage and produce a smoother, more professional-looking final product. The Warp Stabilizer effect is a popular tool for reducing camera shake and motion blur in video footage. It analyzes the video and automatically applies stabilization to each frame, resulting in smoother, steadier footage. The Smoothness slider allows you to adjust the level of stabilization applied to the footage, from subtle to more dramatic. Find out the list of steps on how to use this app to reduce the shake of your project video.
Step 1To use the Warp Stabilizer, drag and drop your shaky footage into the Timeline panel of Adobe Premiere. Then, select the clip and go to the Effects Control panel.
Step 2From there, find the Warp Stabilizer effect and apply it to the clip. The Warp Stabilizer will start analyzing the footage and apply stabilization to it. Once the analysis is complete, you can adjust the settings to fine-tune the stabilization effect to your liking.
Step 3You can choose between different stabilization modes, such as smooth motion or no motion, and adjust the amount of stabilization applied.
Part 3. Online Tool to Fix Video Shake
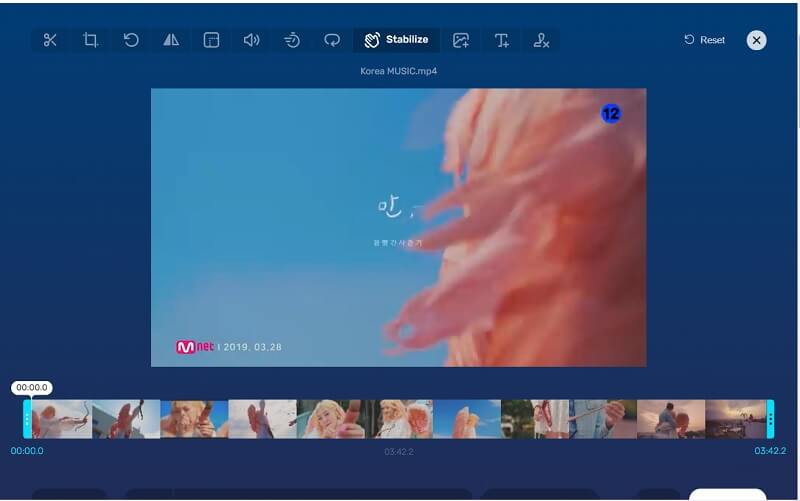
The 123Apps Online Video Stabilizer is a powerful video stabilization tool that helps users fix shaky footage and create smooth, professional-looking videos. This web-based tool is easy to use and doesn't require any software installation, making it accessible to anyone with an internet connection. With its advanced algorithms, the Online Video Stabilizer can analyze and correct shaky footage in a matter of seconds. Users can upload their video files to the website, and the tool will automatically stabilize the video, removing any unwanted camera movements or vibrations. Check the guide below to learn how to use this app.
Step 1Access the application on your web browser. On its main interface, click the Open File option to import your files. Select the video you want to enhance and hit Open to upload it on the web tool successfully.
Step 2Next, its timeline editing function will be prompted on your screen, allowing you to check the entire file. Enable the button for Video Stabilizer and drag its slider to adjust the percentage of its stabilization process.
Step 3Lastly, you can check the preview to check the enhanced file for five seconds. To export the file, click the Save button. The tool will then analyze and stabilize the file according to your preferred percentage.
Part 4. FAQs About Fixing Shaky Video
What causes video shake?
Video shake is usually caused by shaky hands, movement from walking or running, or an unstable camera setup.
What are the tips to prevent having shaky videos?
To prevent unwanted movement on your videos, there are a few tips you can follow. Firstly, make sure to hold your camera or phone with both hands and keep your elbows close to your body to stabilize the shot. Secondly, try to keep your movements smooth and gentle, avoiding any sudden jerks or movements. You can also utilize a tripod or a stabilizer to maintain your camera stable. Lastly, if you're filming while walking or moving, try to use a steadicam or a gimbal to reduce any unwanted movements. By following these tips, you can capture smooth and steady footage for your videos.
What is image stabilization?
The image stabilization process is a feature that aids users in reducing camera shake by compensating for the movements of the camera while recording. This process is usually done or performed by professional videographers to capture stable videos.
What if I can't use a tripod or stabilizer?
If you can't use a tripod or stabilizer, try to steady your camera by leaning against a solid object, using a camera with in-body stabilization, or using a broader lens to capture more of the scene with less camera movement.
Finally, we got to the last part of the article. Now, we already know the entire process and methods to prevent the video from shaking by using the three video shake removal software that we have analyzed in this post. If you are looking for a professional who can handle new users who want to stabilize shaky videos, then AVAide Video Converter is recommended. Yet, if you are a professional video enthusiast and want to learn multiple techniques to fix your video steadiness, then Premiere Pro is a must-have. In addition, if you need a quick stabilization process without installing software on your PC, 123Apps Online Video Stabilizer is what we recommend for you to use.
ABOUT THE AUTHOR

Your complete video toolbox that supports 350+ formats for conversion in lossless quality.