Photos are a powerful way to reminisce about memories. They make us recall precious memories, such as someone's journey, milestones, achievements, and adventures. While you can tell it verbally but there is something with photos that makes viewers get emotional or relate to them. However, when there is a huge number of photos, the listeners might get bored when discussing them one by one. Luckily, slideshows were invented, allowing you to stitch photos and add additional elements to turn photos into an engaging video. With it, you may share it online through social media platforms. In this guide, we will cover the tutorial on how to make a photo a video, including the preparations and editing skills you need.
Part 1. Preparation for Making a Video from Photos
The preparation part includes all the initial steps and materials you will need to set up before the actual process of creating or editing the video. Here are some of the preparations you should do:
1. Select and Collect Photos
First things first, you need to choose the photos you want to include in the video. By choosing, we mean those that bring precious moments or are relevant to the theme or story. Let's say an 18th birthday event will oblige you to get photos from your childhood up to your latest photos. Equally important, you need to select photos that are high in quality. Then, you may arrange the sequence in a chronological or thematic order. The arrangement will help you tell your story best.
2. Enhance Photos
After selecting and collecting photos, you may enhance them to fit a specific theme. Use a photo editor that will enable you to adjust colors, brightness, and style. Also, try cropping or resizing the photos for consistency. Choose only one orientation and adjust your photos accordingly. Moreover, you could add filters or corrections when necessary for the cohesiveness of photos.
3. Organize Photos
After the collection and adjustments, put them all in one folder for easy access. You may rename each photo to maintain order. This time, search and prepare the background music or sound effects if you plan to use one.
4. Plan the Video Structure
This time, decide the duration of each photo, like 3 seconds as minimum exposure or a maximum of 5 seconds. Also, select the style of transitions to highlight some photos properly. Furthermore, you can create a short storyboard to help you visualize how the video's flow will work best.
5. Choosing the Video Editor
For the exciting part, select your video editing software and try to look for features that will let you create slideshows, arrange photos, add effects, and more. Also, the export settings, like video resolution, will be a crucial feature.
Part 2. How to Auto-Create a Video from Photos
Sure enough, there is a lot of advanced video editing software on the internet. Yet, one factor to look for is the usability of the program. It determines how easy to understand and navigate the program even for first-time users. AVAide Video Converter is a user-friendly program that lets you choose and apply various templates to your slideshow. It can cater to every mood, style, or purpose to make your video stunning and engaging.
You may choose from themes like birthday celebration, graduation, family memories, travel adventure, educational, portfolio, motivational story, and many more. On top of that, it lets you create slideshows in no time due to its user-friendly interface. There are no complicated steps at all. Here are the steps to learn how to make a photo a video or a slideshow:
Step 1Download and install the App
To begin, download the program by clicking the Free Download button below. You may install this on your Windows and Mac computer. Just make sure to get the right installer for your computer's OS. Then, launch it afterward.

FREE DOWNLOAD For Windows 7 or later
 Secure Download
FREE DOWNLOAD For Mac OS X 10.13 or later
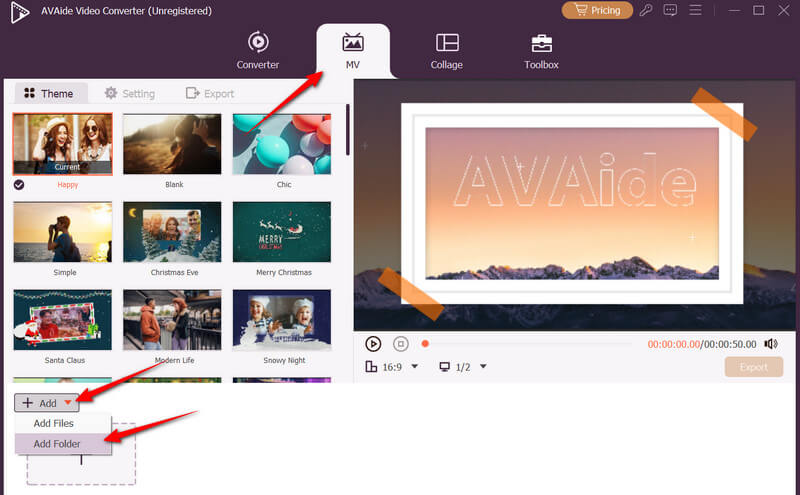
Secure DownloadStep 2Access the MV Tab and Upload Photos
From the main interface, you will see four major tabs, including Converter, MV, Collage, and Toolbox. This time, select MV to head to the interface of the slideshow or music video editor. Next, upload your collection of photos by clicking the Add dropdown menu and selecting Add Folder. All the photos in the selected folder will be loaded into the program. If you wish to add another photo, click the Plus button after the last photo in the timeline.
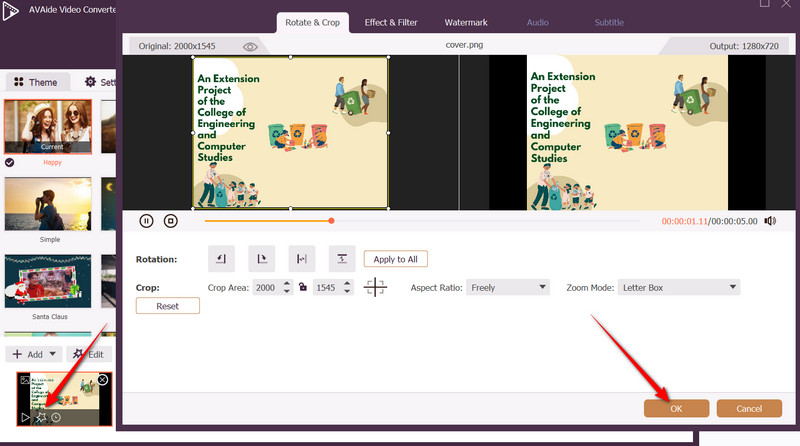
Step 3Adjust or Enhance Photos
As you hover over each photo, you will notice buttons. Click the Edit button represented as a magic wand and start enhancing photos by cropping, rotating, adding effects or filters to each photo. You may also add a watermark to insert your name or logo in it. Hit OK to apply the changes.
Step 4Select a Theme and Tweak Video Settings
At this point, browse through the list of themes offered by the program and select the theme that fits your desired mood or style. Check the preview to see how it looks and feels upon applying the theme.
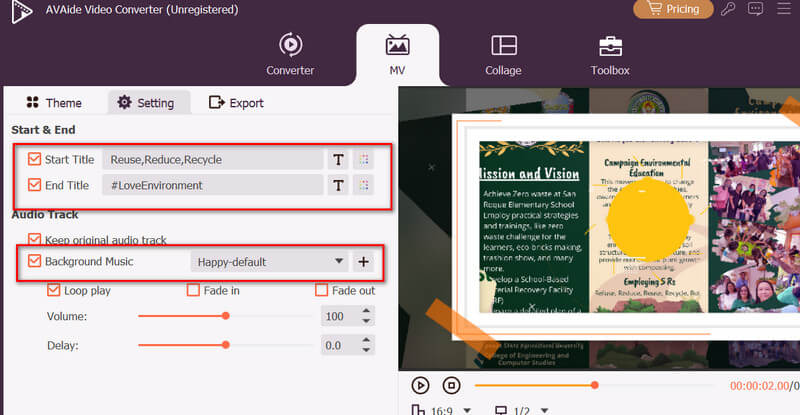
This time, go to the Settings menu and type in your Start Title in the textbox. Same with the End Title, a text field is provided for you to type in. For the Audio Track, you can add background music to your slideshow by ticking the box that says Background Music. Press the (+) button to import a song from your local folder. Aside from adding music, you may fine-tune its Volume or Delay if the music is too loud or out of sync.
Step 5Export the Slideshow
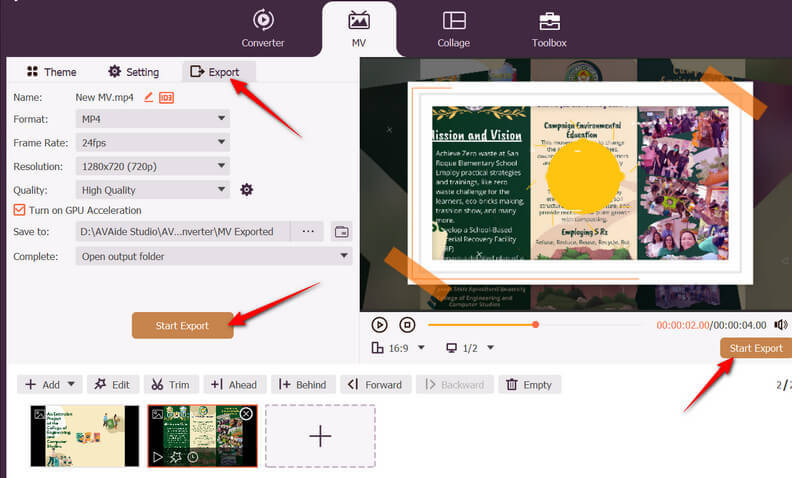
Navigate to the Export menu and select a format for your final slideshow. From here, you can choose between MP4, MOV, MKV, etc. For Instagram or TikTok, MP4 files with portrait or square orientation work best. You may also adjust the Frame Rate, Quality, and Resolution. When everything is set, click the Start Export button underneath the preview portion. Allow the tool to process it and produce the slideshow for you.
Once it is ready, you may upload it to your social media accounts. That said, you can make a slideshow on Instagram effortlessly.
Part 3. Make a Video from Photos Online
Likewise, you can create a slideshow with music using online slideshow makers, such as Clideo Slideshow Maker. This tool enables users to upload from different sources, including Google Drive, Dropbox, and local files. As mentioned, you can add music, choose a video orientation, and select an image duration. Additionally, you can choose the format for the final output of the video. However, this program does not offer a variety of themes and transitions. It is also important to edit the photos before even uploading them, as Clideo does not allow you to edit photos directly from it. Nevertheless, to answer the question "how can I make a video from photos online?", you can do as follows:
Step 1Launch your preferred browser available on your computer. Visit the official page of Clideo and select the Slideshow Maker option.
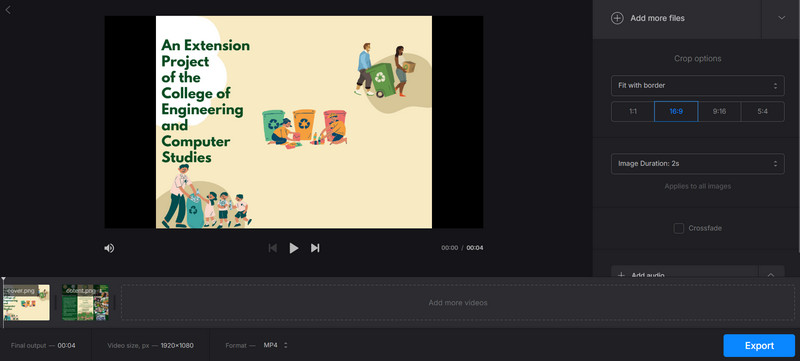
Step 2After accessing its slideshow maker, click the Choose Files button and upload from your local drive. Alternatively, you can click the dropdown arrow and choose from Google Drive or Dropbox if your photos are from these cloud storage platforms. Wait for the photos to be uploaded completely.
Step 3Click the Add audio button underneath the video preview and choose the music you wish to add to your slideshow. This time, decide the duration of each photo as it applies to all images in the slideshow.
Step 4Check the Crossfade box for the animation. Now, choose an output format. Once ready, click the Export button at the bottom of the interface and wait for the export process to finish.
Step 5If you happen to forget editing or adjusting something, click the Edit button. If changes are not necessary and the video is final, hit the Download button. You might notice the Clideo watermark, but you can remove the watermark from a video with simple steps.
Part 4. Tips for Making a Video from Photos
Tips and tricks may be good practices you can apply when creating slideshows. These tips will help you broaden the influence of your slideshow or videos in general. Check them out for your perusal.
• Include text captions wisely by keeping them short, readable, and catchy. Use good contrast and large fonts.
• Adjust the timing and flow of the photo changes or animations to the beat of your music.
• For emotional highlights of the slideshow, you may add pauses or slow motion.
• Always test-watch your video and adjust any photo that stays too long or too short.
• Export in high resolution for best results.
• Play it on multiple devices, such as a phone, a laptop, and a TV, to check the quality.
• End the slideshow with a closing slide, including Thank You, logo, message, or credits.
Your images don't have to stay static, still, and boring. Just imagine the impact your photos would create when turned into slideshows, making it engaging, fun, playful, and full of life. You can bring them to life by learning how to make a video out of photos. With the right tools, you can spark creativity and tell the story of every picture effectively.
Your complete video toolbox that supports 350+ formats for conversion in lossless quality.