Video has become a cornerstone of digital entertainment, evolving into a primary medium for sharing information, expanding knowledge, and providing leisure. Throughout the development of the digital era, video has become a prevalent medium. Yet this digital file comes with inevitable drawbacks. As we all know, as video quality improves, file sizes also increase, creating challenges for storage and sharing. While there are many online methods to address this issue, many users or video enthusiasts still find the results unsatisfactory. Therefore, this article presents clear and effective ways to compress videos and other alternatives, tailored for Mac users. Read on to discover the best tools for compressing a video on Mac.
Part 1. Compress Video on Mac Using QuickTime
The first free method to compress a video file on Mac is using QuickTime. This pre-installed app is a multimedia platform and player developed by Apple Inc. Although its primary function is video playback, QuickTime also offers an option to reduce video file sizes. The video player also comes with features to enhance the appearance of your compressed videos. It is equipped with simple video editing functions like trimming, cropping, and more. Since it is intended to preview video, audio, and images within its settings, the app can directly preview the video you have compressed. Below, you'll find step-by-step instructions for compressing videos using QuickTime.
Step 1Open the QuickTime app on your Mac device. Since this is a pre-installed app on macOS, this tool has no need for a download or install process.
Step 2Import your video file by clicking the File menu button, then selecting Open File. Browse on your device folder to locate and select your preferred media file. Once done, it will automatically be imported into the QuickTime player.
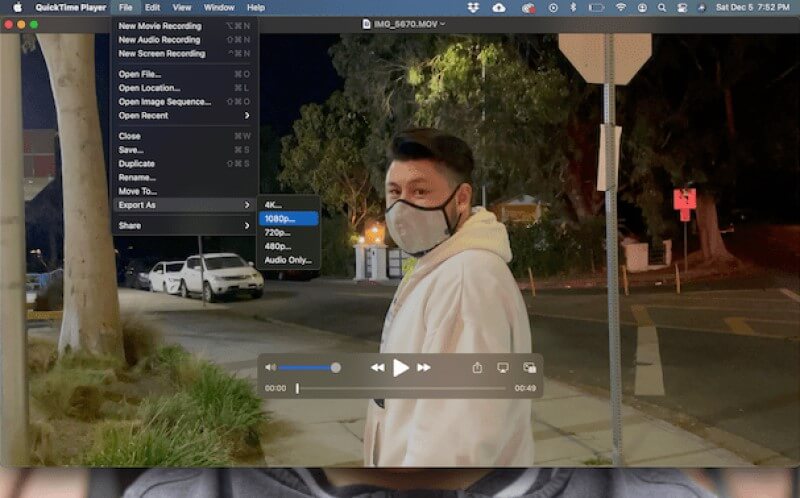
Step 3Finally, to make the video file smaller, go to the File button once more, choose the Export As option to access the list of video qualities. Pick your preferred output quality from the dropdown list. And a dialogue will appear that will indicate the compressing and exporting process.
Part 2. Compress Any Format of Video on Mac
The easiest way to compress videos on your Mac is by utilizing a real converter/compressor. AVAide Video Converter can provide you with a plethora of video processing tools. One of its major features is compressing videos. From its name itself, this tool provides a detailed and effective way to compress or convert videos into a smaller file size. It provides different means to compress or reduce the file size of your videos. It comes with cut and trim features, where you can trim your videos to delete unnecessary frames to reduce your file size. In addition, its main tool to compress videos provides different approaches to reduce or compress video files. This includes directly editing the file size, using the slider to have a certain percentage reduced on your videos, resolution, and format. You can check the detailed walkthrough below on how you compress videos on a Mac.

FREE DOWNLOAD For Windows 7 or later
 Secure Download
FREE DOWNLOAD For Mac OS X 10.13 or later
Secure DownloadStep 1Get AVAide Video Converter
How do you compress a video on a Mac? First, you need to install and download AVAide Video Converter on your device. Hit the Free Download button dedicated to Mac devices and proceed with its file installer to get the tool. Once installed and completed, its interface will appear on your screen.

Step 2Add Your Video File
Next, access the main interface of the app and click on the Toolbox tab to access different video editing functions of the app. Select the Video Compressor tool and access a new window where you can import your video.
Step 3Compress and Reduce File Size
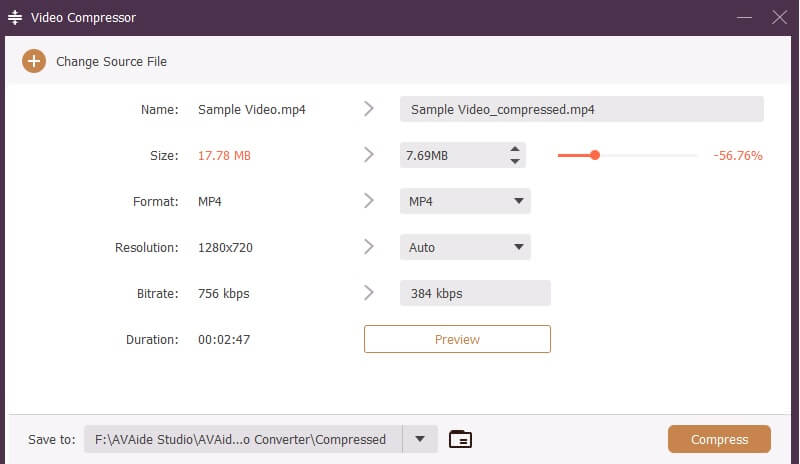
Lastly, click on the (+) button to import your video file. Once completed, you will be able to access different options to reduce or compress the video file size. You can modify the size, format, resolution, bitrate, and duration. Click the Compress button to save or complete the changes you made.
Part 3. Compress Video on Mac With VLC
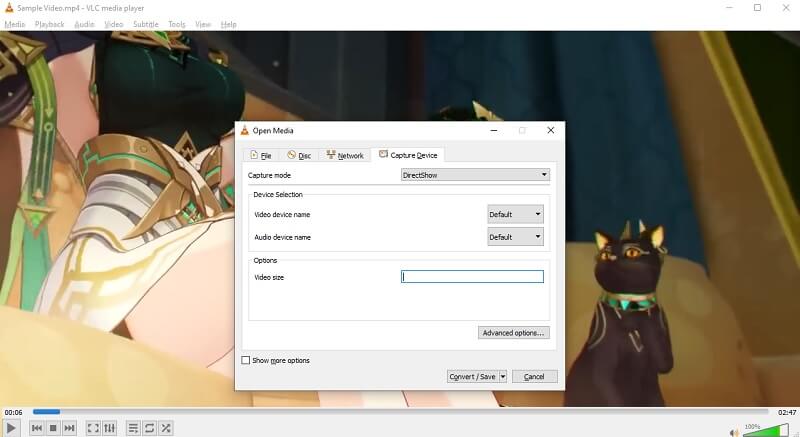
VLC is another universal media player that contains different functions and features to compress video for free on Mac and reduce video files on your Mac devices. The media player can play and is compatible with 4K, 1080p, and HD videos, which can be converted and compressed into smaller sizes. This method is downscaling, wherein the video resolution is reduced for its file size to get a smaller file. It also comes with different video codecs, which you can select to reduce your video file size without damaging the output quality of your video clips. Learn the steps below to compress videos with VLC on your Mac.
Step 1Install VLC media player on your Mac device, as it is not a pre-installed app. Search its web product page on Safari and click the Download button dedicated to Mac.
Step 2Once completely installed, access the main interface of the app. Afterward, click on Media, and select Open File to import your video.
Step 3To convert or compress the file size, click on Media and select Convert/Save. Select the Capture Device. Input the Video Size and choose the Convert/Save button to complete the process.
Part 4. Compress Video on Mac With Handbrake
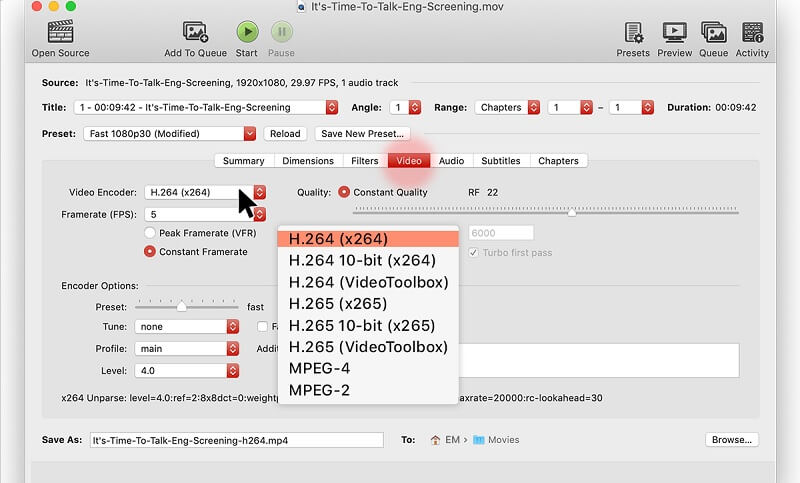
HandBrake is the last on our list of solutions for compressing videos on Mac. It is an open-source video compressing tool that provides a plethora of video processing features. Handbrake compresses video with both manual and automatic cropping options. This functionality and feature can further reduce the file size of your video by deleting or removing unnecessary parts of the video frame. You can also use different functions, such as deinterlacing, the Detelecine process, and scaling, to trim the file size of your project video. While the tool is an editing software for those who are experienced or professionals with video compression and editing, its extensive settings and technical options can be daunting for novice users. That is the main reason it is recommended for video enthusiasts with a solid understanding of video encoding. Nevertheless, the steps below can greatly help you navigate and use this video compressing tool even if you are new to this app.
Step 1Get the Handbrake app on your macOS. Access its main product page and install the software on your device.
Step 2Launch Handbrake's interface and click Open Source to import your file. In the preset menu, you can change the video resolution to reduce file size. In addition, go to the Video Encoder option and select different video codecs to compress the video.
Step 3Finally, click on the Start button at the uppermost part of the tool to complete the compression process.
Compressing video files on a Mac device doesn't have to be complicated or time-consuming. As explored in this guide, you have several reliable options. Whether you prefer the simplicity of QuickTime, the universality of AVAide Video Converter, the flexibility of VLC, or the advanced features of HandBrake, you always make your choice for which tools you want to use. Each software provides unique benefits, allowing you to balance file size reduction with better video quality. By following the step-by-step methods outlined above, any Mac user can efficiently manage large video files and learn how to compress a video on a Mac.
Your complete video toolbox that supports 350+ formats for conversion in lossless quality.