Do you often find that your iPhone gives you a message saying you are short on space because of massive video files? Video compression is an effective way to reclaim lost space and share it more easily. This comprehensive guide explains how to compress an iPhone video without losing quality. From built-in tools from your iPhone to third-party applications, this article will provide tutorials on utilizing them efficiently to achieve small and lossless files. Now, say bye to Free-up space notifications, share easily across devices, and enjoy a trouble-free video management experience on your iPhone.
Part 1: Compress a Video on iPhone Directly
A direct compression in your iPhone is a perfect service for anyone who struggles in insufficient storage because this process doesn't need any third-party tools. All you need to do is to open your iMovie application on your iPhone, read this guide, and execute the stated procedures.
Compressing video on an iPhone in iMovie is an easy way to reduce its file size, thus facilitating the option to share it easily or take less space on your device. iMovie is a pre-installed app created by Apple for iOS devices. Therefore, it is hassle-free and an access tool for iOS users who require editing and conversion processes. Whether trimming, adding some sweet effects, or just resizing the video, it does it all conveniently for a quick adjustment. Follow this guide below, hit a few buttons, and enjoy your newly compressed video.
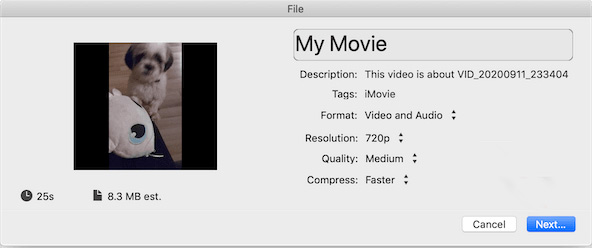
Step 1Open the iMovie app from your iPhone and tap on Create Project. Then select the video that you want to compress from your images and tap Create Movie.
Step 2Now, the video is open in the editing timeline. Tap Done at the upper left to return to the project screen. Then tap Share on the lower part of the display, marked by a square with an arrow pointing up.
Step 3To choose the resolution and quality, tap Save Video and the resolution option, such as 1080p, 720p, or 540p. The smaller the resolution, the less the video's file size will consume.
Step 4Finally, iMovie will compress the video and keep it in Photos so you can share it easily or store it more manageably.
Part 2: Compress iPhone Video While Maintaining High Quality
This typically consists of compressing video files on your iPhone to an extremely compact size without losing quality. Sometimes, compressing will reduce the video's sharpness or clearness, and that's the compromise: size vs. quality. Better results can be achieved using a dedicated tool to compress videos, such as AVAide Video Converter. With AVAide, you can compress video files so they can fit into your storage or allow you to share them before a real loss in quality.
The AVAide Video Converter is a useful app for people who want to compress video from an iPhone without sacrificing quality. It uses customized compression settings to support various video formats like MP4, MOV, and AVI. However, this software is not readily available on mobile devices, so you must use a laptop or PC. But if that's not a problem, continue reading the steps below.
Step 1Download AVAide Video Converter
Hit the Download button below that matches your operating system. Afterward, run the installer to launch the tool on your screen.

FREE DOWNLOAD For Windows 7 or later
 Secure Download
FREE DOWNLOAD For Mac OS X 10.13 or later
Secure DownloadStep 2Choose Your Video
Open the AVAide Video Converter, and go to the Toolbox section. Find Video Compressor. Then, select Add File to import iPhone videos. Alternatively, you can drag or drop the file you wish to compress or use the file selection dialog.

Step 3Select Compression Settings
Next, go to the Custom Profile, which allows you to set the Resolution, Format, and Bitrate for the desired video quality. For instance, reducing the resolution from 1080p to 720p will decrease the file size. However, finding a balance between a smaller file and maintaining video quality should be in your best interest.

Step 4Start Compression
After adjusting the settings, click Compress to initiate the process. AVAide uses advanced algorithms to maintain the video's visual quality even at smaller file sizes. After compression, transfer the video to your iPhone using iTunes or a file-sharing app.
Part 3: Compress a Video on iPhone with Third-Party Apps
If you've reached this part of the article, we can assume that the built-in application of an iPhone doesn't meet your requirements, or perhaps you're still looking for more flexible options. In that case, a third-party app might be the one for you. These apps typically come with additional functionality besides compression. In this section, we'll explore some of the best apps available for efficiently and conveniently compressing videos on your iPhone.
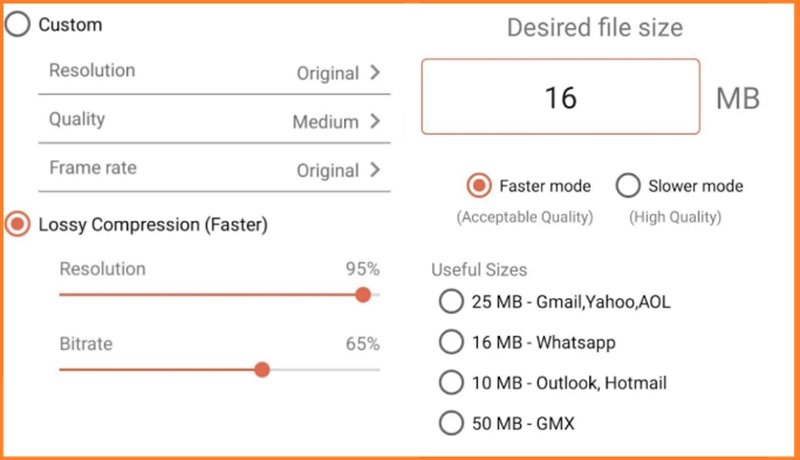
1. Compress Video Size Compressor
Compress Videos & Resize Video is an effortless app that allows you to compress iPhone videos easily. It does offer you a variety of video size reduction options that do not involve complicated editing processes. Therefore, it is the best solution for those requiring a simple, no-fuss solution for compressing their videos.
It provides effortless resolution, bitrate, and frame rate adjustments to facilitate a video's size reduction. With such an intuitive user interface without the necessity of knowledge about sophisticated editing, one can easily upload the video and adjust it according to his needs.
The app further supports multiple formats, making it versatile in compressing various videos. Additionally, you can preview the compressed video before saving it, ensuring you're satisfied with the result before finalizing the process.
Step 1Open the software on your device and grant Access to your files.
Step 2Select the file you want to compress and modify the settings to your liking.
Step 3Lastly, hit the Compress button and then Save the output.
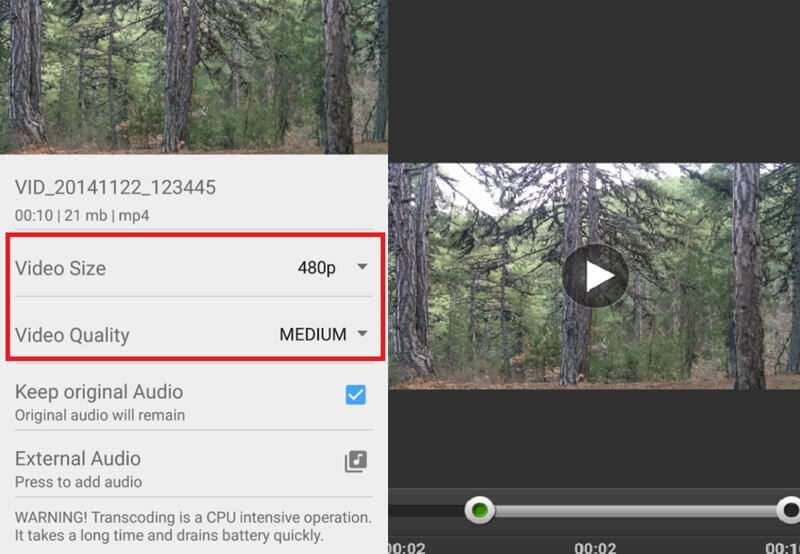
2. VidTrim - Video Trimmer & Editor
VidTrim provides an excellent platform to compress iPhone video as it is so light and powerful. This application is primarily meant for video trimming, and it has useful features that allow you to compress with control over resolution and bitrate to give smaller files, which makes it valuable for cutting and compressing in one action. It also compresses files by reducing resolution or bitrate to minimize size without significant quality loss. It maintains high-definition format support, all while allowing easy sharing of edited and compressed videos directly with friends or family.
Step 1Launch the software on your device and allow it to access your computer.
Step 2Choose your target file to compress and adjust the settings according to your preferences.
Step 3Finally, hit the Compress button and wait to download the output file.
This article covered ways of compressing video on iPhone and using various techniques and tools. It covers everything from built-in tools like iMovie to third-party apps such as Compress Videos & Resize Videos (by Bizo Mobile) and VidTrim, as well as all-in-one solutions like AVAide Video Converter. These options allow you to achieve high-quality videos with significantly smaller file sizes.
ABOUT THE AUTHOR

Your complete video toolbox that supports 350+ formats for conversion in lossless quality.