Ever wanted to capture a single perfect moment from your video? Converting AVI to JPG lets you turn moving scenes into still images in just a few steps. Imagine needing a thumbnail, presentation slide, or snapshot of a favorite video frame. Extracting JPGs from your AVI file makes that easy. Whether you are editing, sharing highlights, or analyzing footage frame by frame, this guide will show you the best and simplest ways to do it efficiently.
Part 1. Why You Need to Convert AVI to JPG
There are many reasons why converting AVI files to JPG files makes sense, particularly for capturing a particular moment in a video. An AVI file video contains a stream of continuously moving images, and a series of JPG files contains separate still images. Capturing a few video frames and turning them into JPG images gives you much more versatility in how you want to use or share your content. Here are a few of the reasons:
1. Make Thumbnails or Previews: Capture key frames of your AVI videos and use them as thumbnails for other online content, video previews, or galleries.
2. Document Important Scenes: You can convert video frames to JPG and save certain scenes for video reference, tutorials, or reports.
3. Use for Presentations and Social Media: Clips are more difficult to embed in slides and infographics, unlike more socially accessible JPG images, so tech presents and socials use clips.
4. Frame-by-Frame Analysis: Editors, animators, and researchers can benefit from screen detailing by converting AVI files to JPG files.
5. Save Storage Space: To avoid hassle from managing huge files, sharing and storing a large AVI file as a single JPG image will simplify the process.
Part 2. The Best Way to Convert AVI to JPG
AVAide Video Converter is one of the most powerful and user-friendly media converters, which can turn your AVI videos into high-quality JPG images. This all-in-one video tool offers fast conversions, superb image output and total control over every frame you choose to capture. Whether it is a video project, thumbnails, or specific video scenes documentation, it definitely streamlines the process for AVI to JPG conversions.
- It keeps every frame clear, sharp, and color-accurate during conversion.
- Automatically extract multiple stills from your AVI video for complete frame coverage.
- Convert several AVI files to JPGs at once to save time and effort.
- Preview frames, crop, or enhance visuals before exporting your images.
- Convert videos to images in seconds with no quality loss.

 Secure Download
Throughout the AVAide Video Converter, the AVI videos and JPG images exports directly; however, snapshots of the video frames in JPG format AVI can be captured using the built-in Video Player feature. Here's how:
Step 1Download and Install AVAide Video Converter
You can install the program on your Windows or macOS after visiting the AVAide official website and clicking on Free Download. After that, open the software to be able to access the tools available.
Step 2Set the Snapshot Format to JPG
You can change the Snapshot Format to JPG by clicking on the Menu button and clicking on the Preferences. You can find the Snapshot Format under the General or Snapshot section, and after that, select JPG. Click OK after the changes.

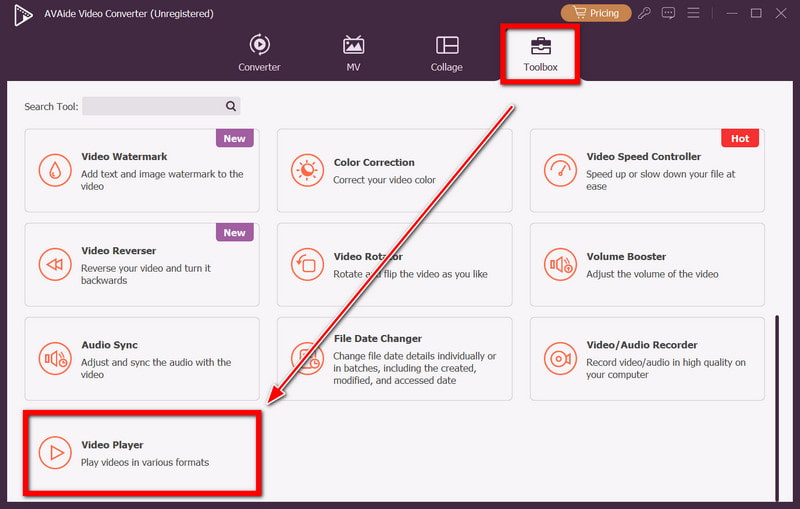
Step 3Open the Video Player Tool
After the tool opens, navigate to the Toolbox tab to access the Video Player. You can open and play video files directly within AVAide using this feature.
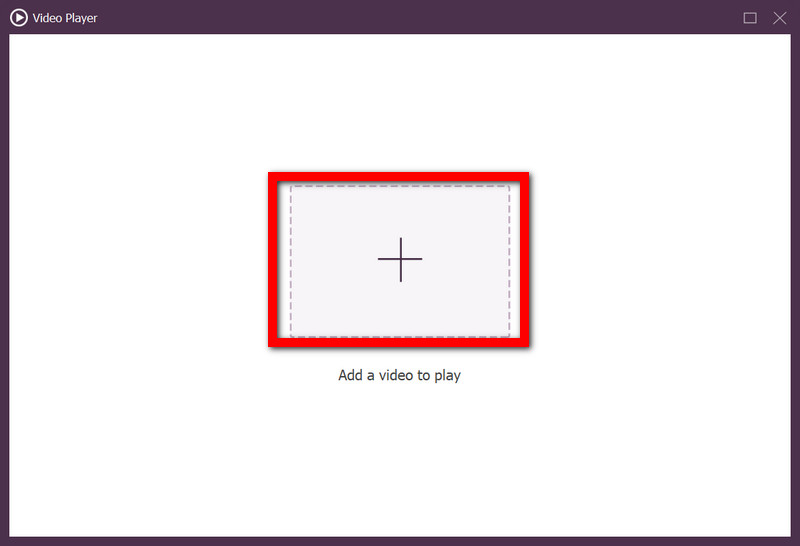
Step 4Import Your AVI Video
To import your AVI video, click the + sign in the middle of the Video Player window. Then, search your computer for the AVI file you wish to extract the frames from, and open it.
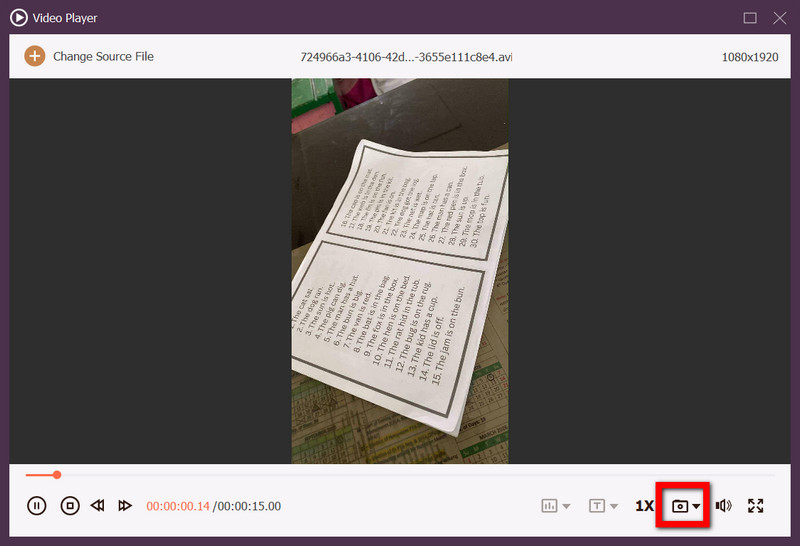
Step 5Play and Capture Snapshots
Click Play to start watching your video. When you reach the frame or moment you would like to save, click the Snapshot button below the playback screen. Each click will capture the current frame and save it as a JPG image automatically.
Part 3. How to Convert AVI to JPG with Photoshop
Adobe Photoshop can also freeze frames from video files stored as AVI files and save them as JPG images. This technique is perfect for individuals wanting to capture specific frames in high resolution, merge AVI files for a continuous sequence, and perform advanced edits prior to exporting.
Step 1Launch Photoshop. Select File and then Import Video to Layers. Locate the AVI File and select it, and click Open.
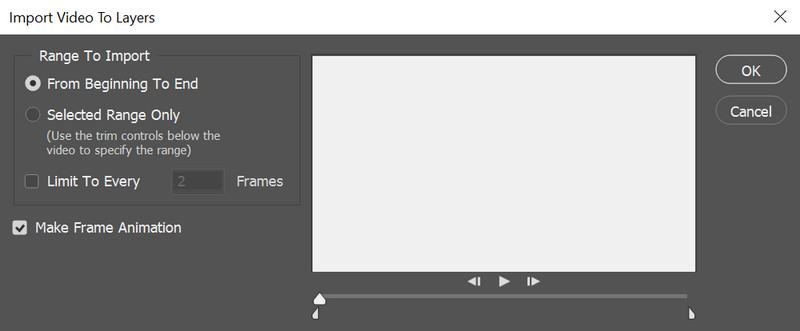
Step 2A dialog box will appear. Choose From Beginning To End to import the entire video otherwise select Selected Range Only to capture a specific segment. You may also check Limit To Every 2 Frames in case you want to skip frames to decrease the images.
Step 3Upon confirming your selection, Photoshop will convert every frame into editable layers. You can edit the brightness and contrast or crop certain layers, and do further edits before exporting.
Step 4To export your work, click File, then Save as. Select the export format to JPEG, choose the desired output folder, and adjust the desired quality to your preference.

Step 5Exporting the images is the next step. To do this, press the Run button. After the process is complete, navigate to the specified folder to access the JPG images from the AVI video.
Part 4. How to Convert AVI to JPG Free Online
For a quicker method that does not involve any software downloads, consider using an online AVI to JPG converter. Web-based tools like ASPOSE enable you to extract still images from AVI videos hassle-free, without any installations. It is easy to use, and you can even convert AVI to MKV or other formats directly from your browser using both computers and mobile devices.
Step 1Use any browser to access the ASPOSE AVI to JPG Converter.
Step 2To add your AVI file, you may click Upload your file, or you can simply drag your file into the designated box for uploading. Additionally, you can specify the start and end times if you wish to pull frames from a certain area in the video.

Step 3To choose your output format, click the downward arrow next to the output options, then select JPG.
Step 4To start the conversion and automatic extraction of frames, click the Convert button.
Step 5After conversion, the JPG images are ready for you to download. Click DOWNLOAD NOW to get the images, which you can edit and share.

The total conversion time is the same as converting the AVI file to JPG images, as the AVI file is processed. Whether you are using Photoshop, AVAide Video Converter, or an online tool, you are able to save and capture vital moments from your video. Begin converting your AVI video clips to high-quality JPG images.
Your complete video toolbox that supports 350+ formats for conversion in lossless quality.