Struggling to play your PowerDirector project file? The best solution is to convert the PDS file to MP4. A PDS file only contains project details, not the actual video, so converting it to MP4 lets you watch, upload, and share your finished project easily on any device or platform.
Part 1. What Is a PDS File
A PDS file is a project file created by CyberLink PowerDirector. PowerDirector is a video editing software that is user-friendly and powerful. It is used by beginners and professionals. PDS files are different from other video files, for example, MP4 or AVI, in that PDS files do not contain video or audio. PDS files contain information that PowerDirector needs in order to recreate the entire editing session exactly how you left it.
To help you understand what is inside a PDS file, here is a quick overview:
| Component | Description |
| Timeline Data | Stores the sequence and duration of video clips, images, audio tracks, and effects placed on the editing timeline. |
| Applied Effects & Transitions | Keeps a record of visual effects, filters, text overlays, and transitions you applied between clips. |
| Media File References | Contains links to the actual media files (videos, images, and audio) saved on your computer or external drive. |
| Project Settings | Saves essential details such as video resolution, frame rate, aspect ratio, and output preferences. |
| Editing Metadata | Includes markers, subtitles, volume adjustments, color corrections, and other fine-tuning details. |
Important Reminder:
A PDS file is not a video file. It is only used in CyberLink PowerDirector and requires the original video files to be on your device. If you delete or move these files, the project may not load. To view or share your project, you will export it as a video in a standard file format, for example, MP4, the most commonly used format.
Part 2. How to Convert PDS to MP4 in PowerDirector
After you complete the video editing project, you will most likely want to export the video in a format that is easily shareable, viewable, or uploadable. With an excellent balance of compression and quality, MP4 is the best and most commonly used format. Luckily, you can also convert MKV to MP4 easily and directly in CyberLink PowerDirector.
To help you create an MP4 video, here are the steps you need to follow to convert your PowerDirector project.
Step 1Start CyberLink PowerDirector on your machine. For the best compatibility, use the same version that created the PDS file.
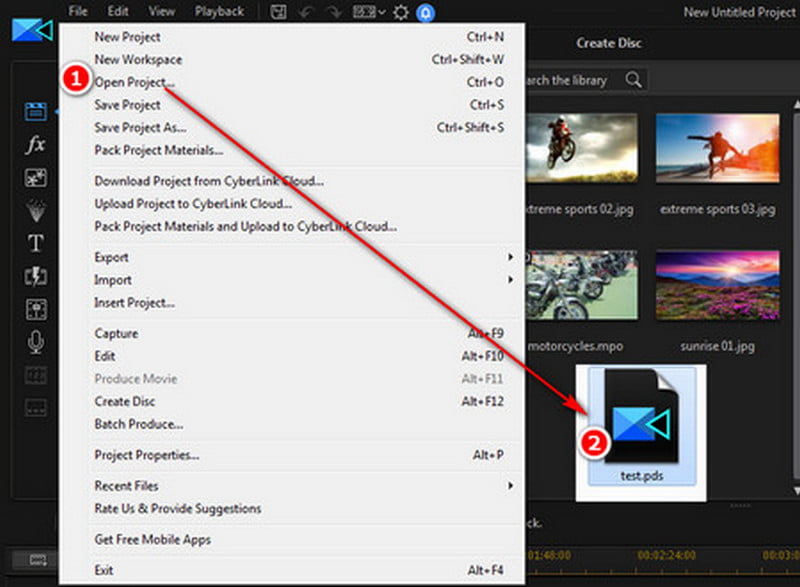
Step 2Locate the top menu, click on File, then choose Open Project. Search your folders for the PDS file and open it. PowerDirector will open the entire timeline with all clips, effects, and transitions.
Step 3Check that all media files are linked properly. If any files are showing missing file messages, locate and relink them. Also, check the resolution, frame rate, and aspect ratio to make sure they are set to your project settings.
Step 4When everything is set, click on the Produce tab on the top menu, which is for setting your output format and export settings.
Step 5Under Standard 2D, choose H.264 AVC and then MP4, which is the most universally compatible format across phones, computers, and TVs.
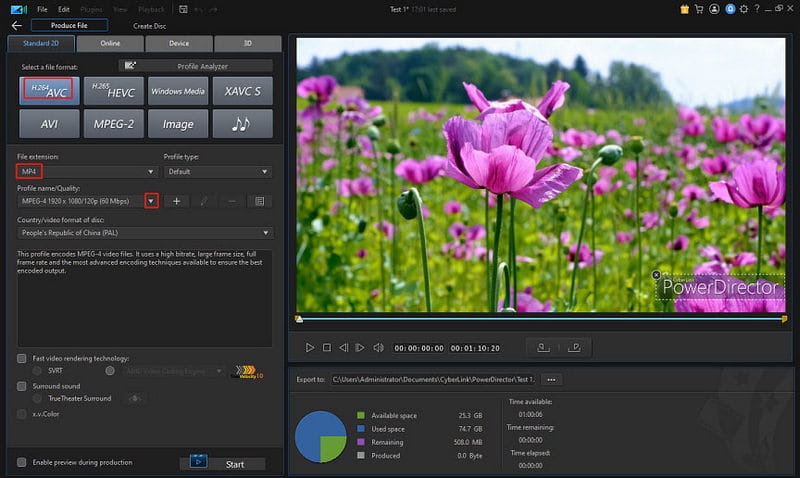
Step 6To set a specific export size for your preferred quality, you can change the resolution, frame rate, and bitrate, or enable hardware acceleration, which is the best option for quicker releases.
Step 7For easy access, set a folder for your finished MP4 video. It is best to set a folder titled Exports or Rendered Videos.
Step 8Click Start to convert your PDS project to MP4. The time it takes to render your project depends on how long it is, the effects, and the complexity of your project. All files will be compiled into one MP4 document by PowerDirector.
Step 9Once completed, your output folder will automatically open. You can now play, edit, upload, or share your MP4 video on YouTube, Facebook, Instagram, or any other desired platform.
Part 3. The Best Way to Convert Any Video to MP4
AVAide Video Converter is another option, and it possesses new features and functions as an all-in-one video converter, which retains the original quality of your videos. It also supports over 300 other formats. It also offers conversions of all standards, be it HD, 4K, or 8K resolution. In addition to conversions, it is equipped with video editing and enhancement tools, which make it ideal for almost any user, be it a beginner or a professional, to output videos efficiently.
- Converts videos and audio like MP4, MOV, MKV, AVI, and MP3 with ease.
- Includes MP4 profiles in 1080p, 4K, and 8K for top-quality playback on any device.
- Handles multiple videos at once with up to 120× faster speed and no quality loss.
- Trim, crop, merge, or add filters, subtitles, and watermarks in just a few clicks.
- Boosts brightness, sharpness, and resolution automatically for a professional look.

 Secure Download
Follow these simple steps to transform your videos into MP4 format effortlessly:
Step 1Download and Install
You can get the software for either Windows or Mac by heading to the official AVAide website. After the download, just follow the given instructions to install the software.
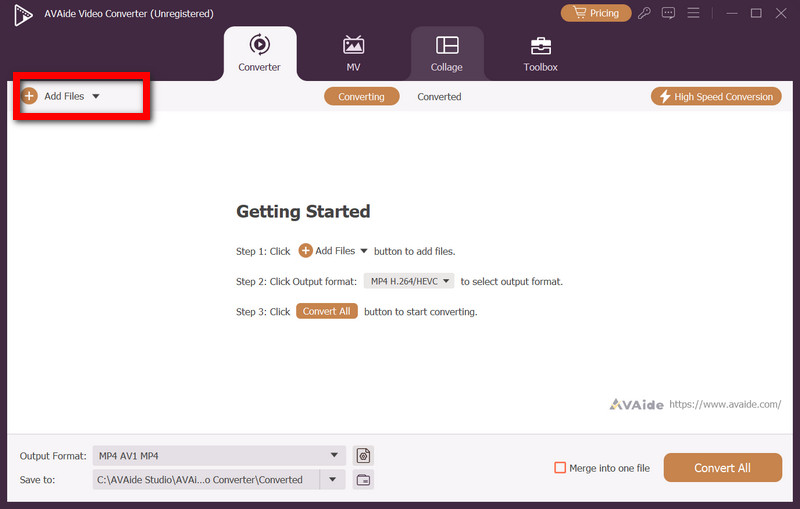
Step 2Launch the Program and Upload Your Videos
Once you have opened the software, you will want to click the Add Files button on the top left, where you will choose a few videos you want to convert. There is also an option for you to drag and drop the videos, which some users may find easier.
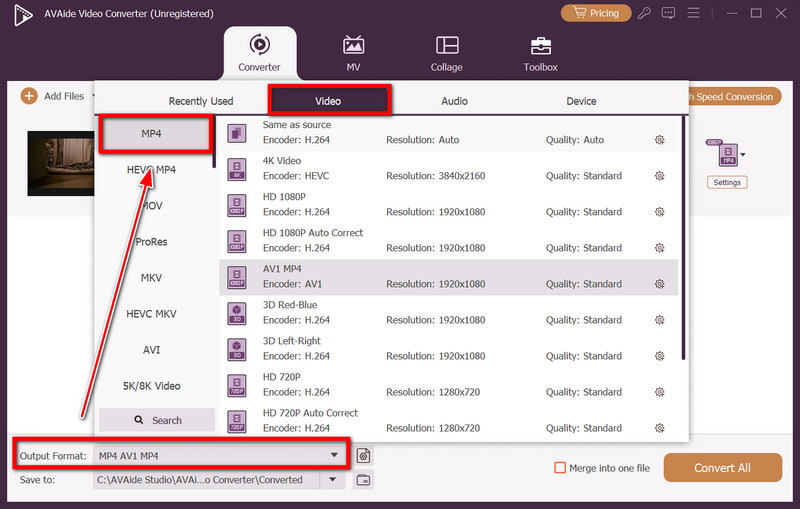
Step 3Set MP4 as Your Output Format
Look for the Output Format dropdown found next to your uploaded files. Under the Video section, find and select MP4. You also have the option to choose an MP4 preset according to your device or the desired resolution, such as 1080p or 4K.
Step 4Customize Output Settings If You Want
To change or adjust video settings, click the Edit button where you can adjust resolution, frame rate, bitrate, and encoder. You may also tweak your video by trimming, cropping, adding filters, and enhancing it using the editing tools before you convert it.

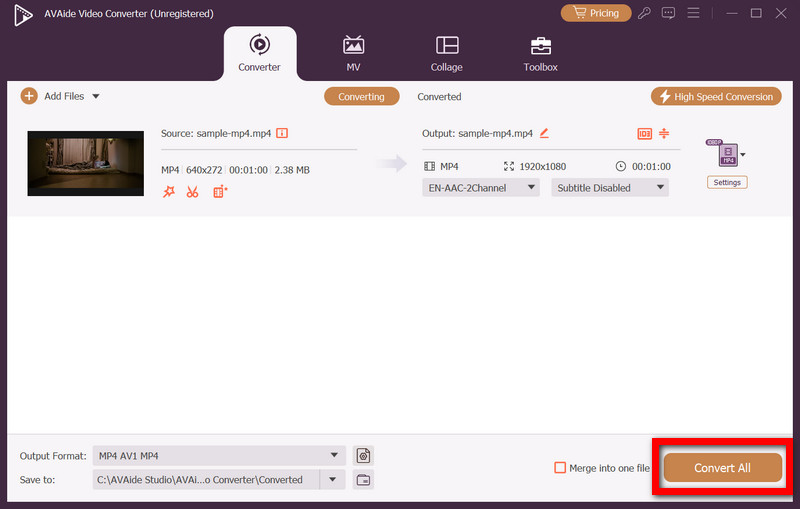
Step 5Start the Conversion Process
To start the process, click the Convert All button on the bottom right. It will convert your files promptly while maintaining top quality. You can also use it to convert MOV to MP4 or other formats just as easily.
You can now convert a PDS file to MP4, and can transform your PowerDirector projects into video files that can be played on any device. You have high-quality results whether using PowerDirector or AVAide Video Converter, making your edited projects ready to be viewed, shared, or uploaded anywhere.
Your complete video toolbox that supports 350+ formats for conversion in lossless quality.