As a very reliable device for saving videos, DVD is widely used. And it can save videos of high quality, suitable for collection and watching with family. However, given its relatively fragile surface and the need for specific external devices to play, it is difficult for people to watch DVD movies whenever they want. Moreover, DVD videos are inconvenient to share and distribute compared to online videos.
In this case, you can choose to convert DVDs to Cloud, which adds another layer of protection for your files and makes it more convenient to share the movie with your friends. To help you, we will offer the best DVD ripper with detailed instructions. Try and make your conversion process smoother!
Part 1. Format Requirement of Different Cloud Service
Before you start converting DVDs to Cloud, you must understand the file formats currently supported by several major Cloud storage devices to better decide which of them to convert your files to. We will present these formats in table form below.
| Cloud | Supported Audio Formats | Supported Video Formats |
| Microsoft OneDrive | MP3, M4A, WAV, WMA | 3G2, 3GP, 3GPP, ASF, AVI, M2TS, M4V, MKV, MOV, MP4, MP4V, MTS, TS, WEBM, WMV |
| iCloud | AAC, MP3, FLAC, AC3 | HEIF, JPEG, RAW, PNG, GIF, TIFF, HEVC, MP4 |
| Google Drive | MP3, MPEG, WAV, OGG, OPUS | WebM, MPEG-4, 3GPP, MOV, AVI, MPEG-PS, WMV, FLV, MTS, OGG |
| Amazon Photos | / | MP4, QuickTime, AVI, MTS, MPG, ASF, WMV, Flash, HEIF, HEVC, OGG |
| Dropbox | AAC, AIF, AIFF, FLAC, M4A, MP3, OGA, WAV, WMA | 3GP, 3GPP, 3GPP2, ASF, AVI, DV, FLV, M2T, M4V, MKV, MOV, MP4, MPEG, MPG, MTS, OGG/OGV, RM, TS, VOB, WEBM, WMV |
You can choose the target format for conversion according to the Cloud service provider you want to use.
Part 2. Convert DVD to Digital for Cloud
Rip DVD with AVAide DVD Ripper
AVAide DVD Ripper is a full-featured software that ensures you convert any DVD Disc, Folder, or ISO files to more than 300 digital audio and video formats, including MP4 MKV, AVI, VOB, M4V, MOV, WMV, FLV, WebM, TS, MPG, etc. efficiently. Moreover, you can rip your DVDs to any format available for various popular multimedia devices like iPhone, Android phone, PS3, PS4, Xbox, Wii, TV, etc. During the conversion process, you can modify your video's resolution, bitrate, frame rate, and encoder type.

FREE DOWNLOAD For Windows 7 or later
 Secure Download
FREE DOWNLOAD For Mac OS X 10.13 or later
Secure DownloadStep 1Launch DVD Ripper on your computer.
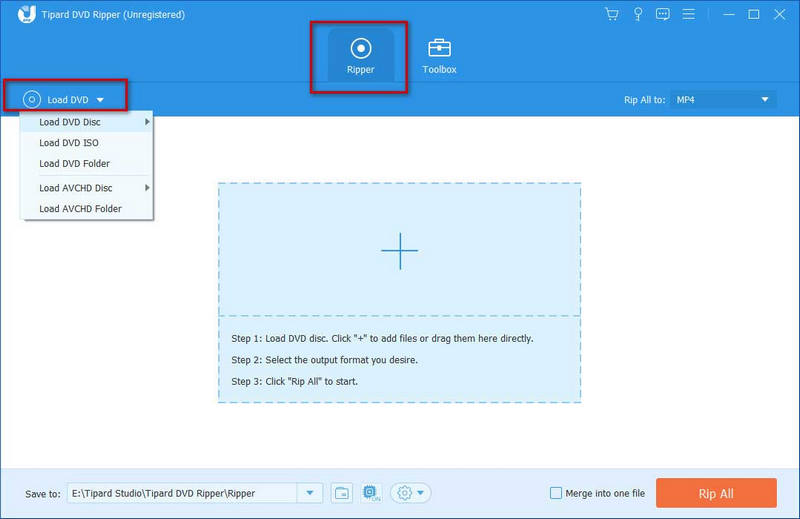
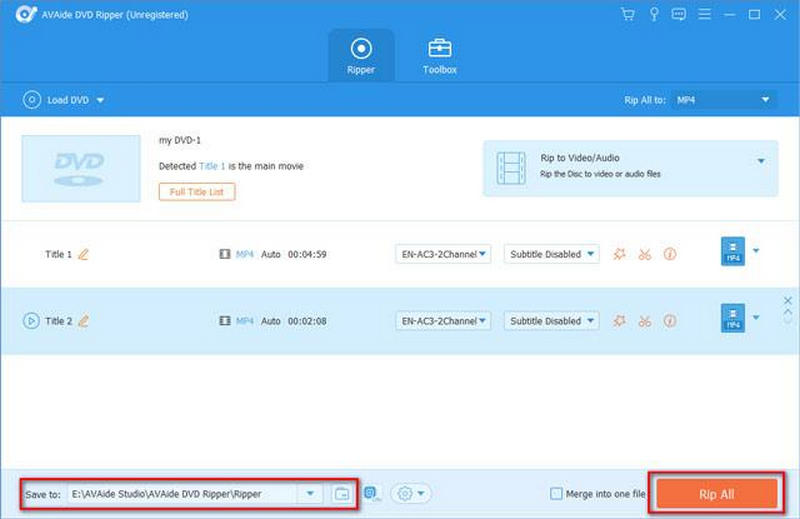
Download and install AVAide DVD Ripper on your computer, then open it. Choose Ripper on the interface.
Step 2Load your DVD
Insert your DVD into the DVD drive of your computer, and click Load DVD to import.
Step 3Select a format
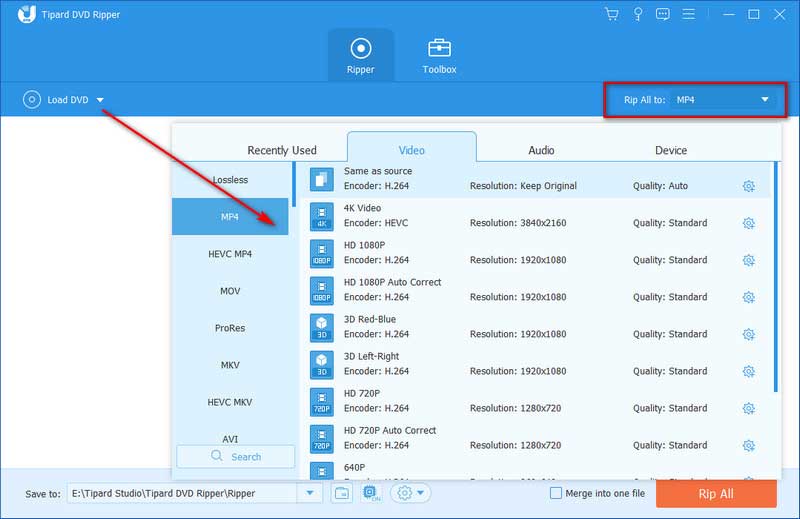
Click Rip All to to drop down the format list and find your target format. You can choose what resolution and quality to convert your video to on this page.
| Setting | Recommended Customization |
| Container | MP4 |
| Video codec | H.264/AVC |
| Resolution | Same as source |
| Frame rate | Same as source |
| Video bitrate | 3 – 6 Mbps |
| Audio codec | AAC |
| Audio bitrate | 160–192 kbps |
| Audio channels | Stereo, unless you need surround sound |
To modify your video, click the small icons for Edit and Trim. You can split your long video into several clips or combine several clips into one with the Trim and Merge feature. This tool also enables you to crop the edges to your desired size. Dozens of filters guarantee you to adjust the video's brightness, contrast, and saturation freely.
Step 4Rip your DVD to digital file
After modifying your video, drop down the list next to Save to. Then choose a folder to store your converted files. Click Rip All to start the conversion.
Rip DVD with MakeMKV
MakeMKV is a good free alternative when you need to preserve the DVD's original quality. Unlike many conventional video converters, MakeMKV does not re-encode the video; rather, it copies the original video and audio 1:1 into an MKV container.
But since MKV is not so widely accepted as MP4, you might find it incompatible with certain cloud storage, like Amazon Photos, iCloud, and Google Drive. So, AVAide DVD Ripper is still the top go-to because it can directly convert DVD to MP4.
Step 1Open MakeMKV
Install and launch MakeMKV, then insert your DVD.
Step 2Scan the DVD
Click the big DVD button on the left and let MakeMKV scan the disc.
Step 3Select the main title
You might be presented with multiple titles. Select the main movie title, which is usually the longest.
Step 4Rip to MKV
Click the Folder button to select a saving destination with enough free space. Then click Make MKV.

The process will be fairly quick. After the conversion, you can start copying DVD files to the Cloud.
- It depends on where you live and what you plan to do with the copy.
- In the US, the DMCA claims that bypassing region code and copyright protection is illegal. But in real life, you’re very unlikely to be sued if you rip DVDs you legally own for personal use. Ripping rented or borrowed discs and sharing copies, on the other hand, is definitely risky.
- For more precise information, check the copyright laws in your area.
Part 3. Put Your DVD Library in the Cloud
After preparing the file, we can proceed to the final step. Select your storage device and start uploading DVD files to the Cloud drive.
Microsoft OneDrive
Step 1Open onedrive.com and sign in with your Microsoft OneDrive account.
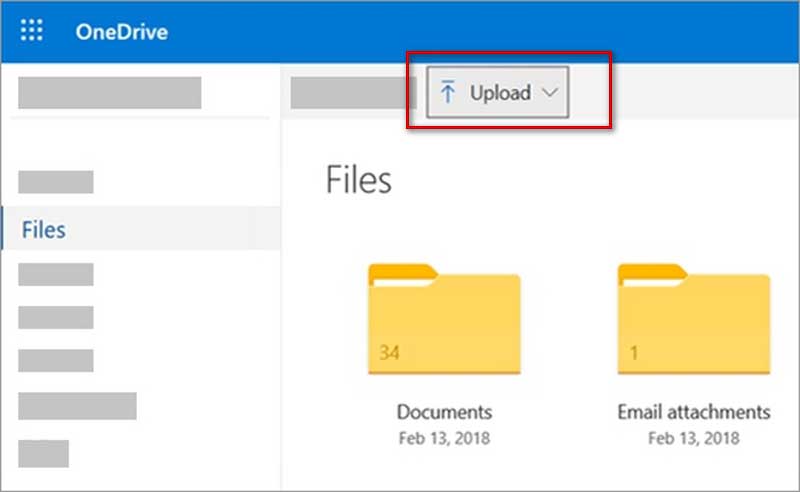
Step 2In OneDrive, go to the folder where your ripped video is stored. Click Upload, then Files.
Step 3Select the video and click Open. You can also drag and drop the video file to upload.
iCloud
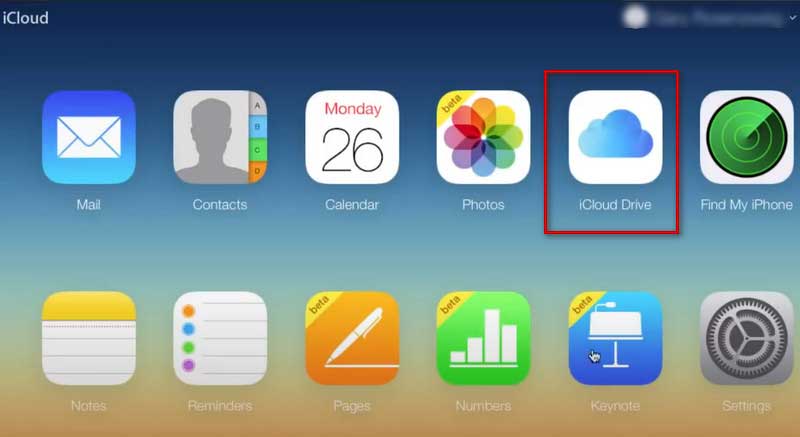
Step 1Go to icloud.com, and log in with your account and password. Choose iCloud Drive.
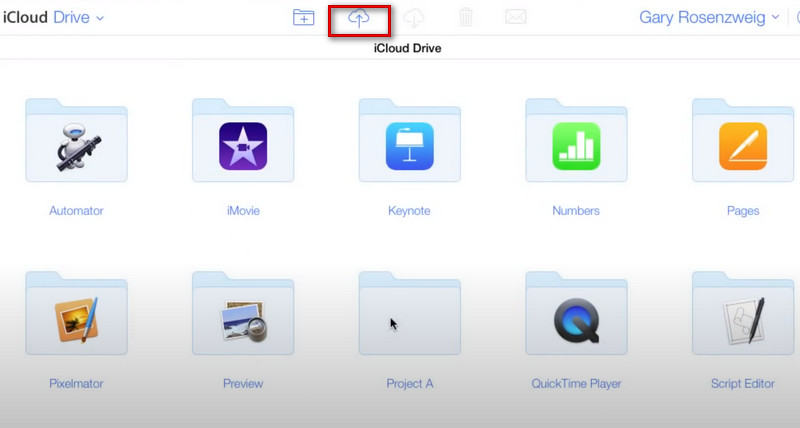
Step 2In the toolbar at the top, click the Upload button, which appears as an upward arrow inside a cloud.
Step 3If you're using a computer, find the ripped video in the folders and select Upload, or you can drag your files and drop them on the iCloud interface. For iPhone or iPad, tap either Photo Library or Choose Files, then select the video you want to upload.
Google Drive
Step 1Go to drive.google.com and sign in.
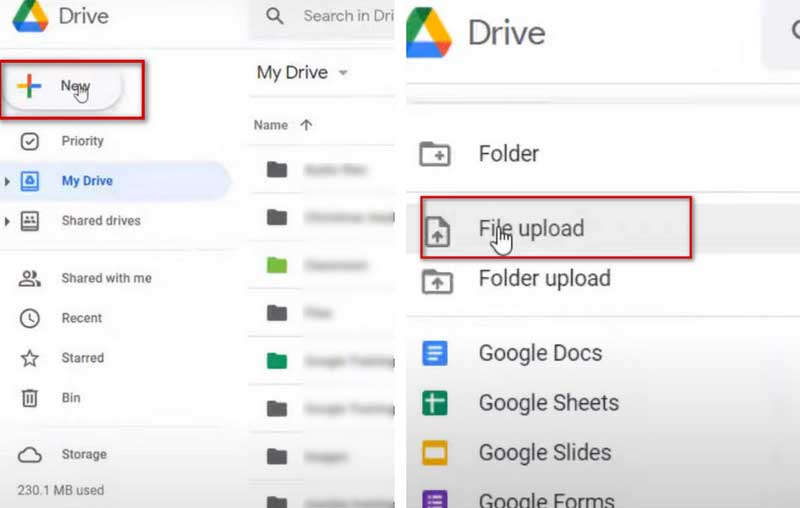
Step 2Click New in the top left corner, then select File Upload.
Step 3Select the ripped video, and click Open to upload it. Or drag-and-drop it to the window.
Step 4Once uploaded, the video file shows up in My Drive. You can double-click to play it directly on your browser.
Amazon Cloud
Step 1Install and open the Amazon Photos app. Sign in with your Amazon account.
Step 2Upload your video file by dropping it into the window or clicking Browse.

Step 3After uploading, select a cloud folder where you want to save the video, and click Select.
Dropbox
Step 1Go to dropbox.com and sign in with your account.
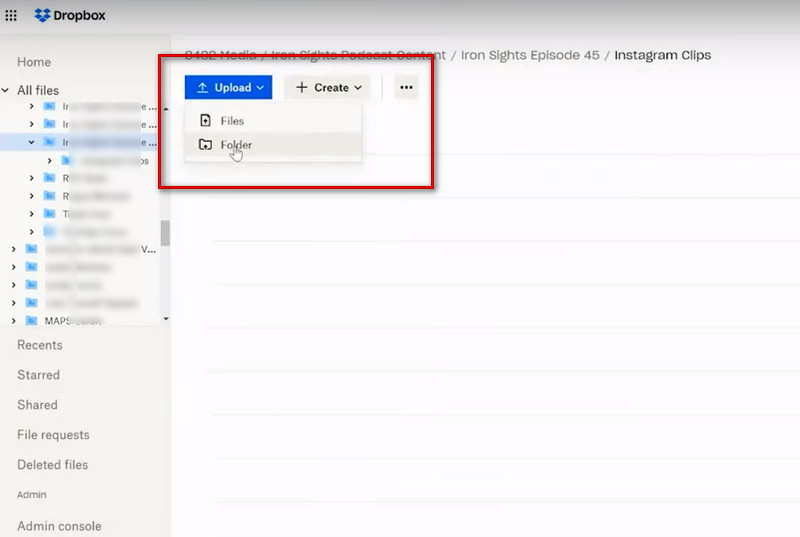
Step 2In Dropbox, open a folder where you want to save the video. Click Upload, then Files.
Step 3Select the ripped video and click Open. Then your file will be uploaded to Dropbox.
Part 4. FAQs about Convert DVDs to Cloud
Can I upload and stream a DVD directly in the cloud?
No. A DVD is physical media, but cloud services expect you to upload digital files. So if you want your DVD in the cloud, you need to digitalize it first. With AVAide DVD Ripper or MakeMKV, the ripping is no hassle.
How much cloud storage do I need for a ripped DVD?
If you convert the DVD to MP4 with H.264, the file can be smaller than the original, so about 5GB for a 2-hour standard DVD should be ideal. The exact size depends on your video quality and duration.
Is storing DVD files in the cloud safe?
From a technical point, yes – the cloud services mentioned above encrypt data to protect it against theft. But if you upload copyrighted DVD files, the service provider might detect and delete them. To avoid this, you can copy the DVD files to a USB.
Can I keep the original DVD quality in the cloud?
Yes, you can preserve the quality by keeping the original MPEG-2 codec. But the file size will likely be larger than H.264 files.
In this article, we provide you with a detailed guide to the process of copying DVDs to the Cloud. With the help of the best DVD ripper, we believe you can already play DVDs on smart TV and share movies with your friends on mobile devices. We sincerely hope you can benefit from our content.
ABOUT THE AUTHOR

Best tool for ripping and converting DVD Disc/Folder/ISO image file into over various formats.