Knowing how to crop a video in VLC is kinda useful when those unwanted edges, borders, or random space distract from what you are actually watching. This guide covers both temporary and permanent cropping options, along with a few troubleshooting notes and a simpler alternative to reduce fiddling.
Why Crop a Video in VLC?
Cropping a video in VLC helps with framing, cuts out distractions, and makes the footage fit better on different screens or in different places. Most people crop it for stuff like this:
- Getting rid of unwanted bits: Remove distracting edges, border bars, watermarks, or logos, or any other unnecessary parts of the image area.
- Switching aspect ratio: Change what you can see so it lines up better across different screens or platform limits.
- Highlighting the main subject: Remove extra space around the focal point so the composition looks tighter and more centered.
- Lowering file weight: If you crop out some of the frame, there is less visual material for processing, so after you re-encode, you might see a smaller final file.
Method 1: Temporary Cropping (Playback Only)
VLC lets you crop what you are actually seeing while it is playing, but it does not mess with the original video file at all. So you can throw in a couple different crop zones real fast, remove that weird border or the distracting edges, or just tweak the framing for easier viewing, without turning it into some big complicated project.
Step 1Open VLC Media Player, then load the video you want to crop.
Step 2Click Tools in the top menu and then choose Preferences.
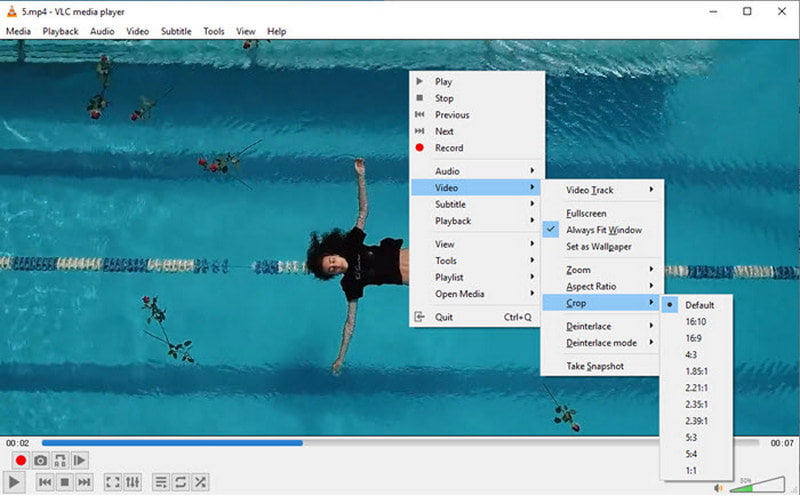
Step 3Pick Video from the settings list.
Step 4Find the Crop section and enter how many pixels you want cut off from the Left, Right, Top, and Bottom.
Step 5Hit Save, and lock the changes in.
Step 6Go back to the video and press play. VLC will render the view with the crop applied, but the original file remains unchanged.
- This will change how the video will display in VLC. Does not alter the video file legacy.
Method 2: Permanent Cropping (Save as New File)
If the crop is intended for use outside of VLC, then it is desirable to have a permanent crop. When converting these files and saving a file for you, VLC might crop - the original video is not being edited.
Step 1Click Tools > Preferences.
Step 2Please click on all Settings. This shows the top-level options.
Step 3Tap Effects > Filters. Turn on the Croppadd filter.
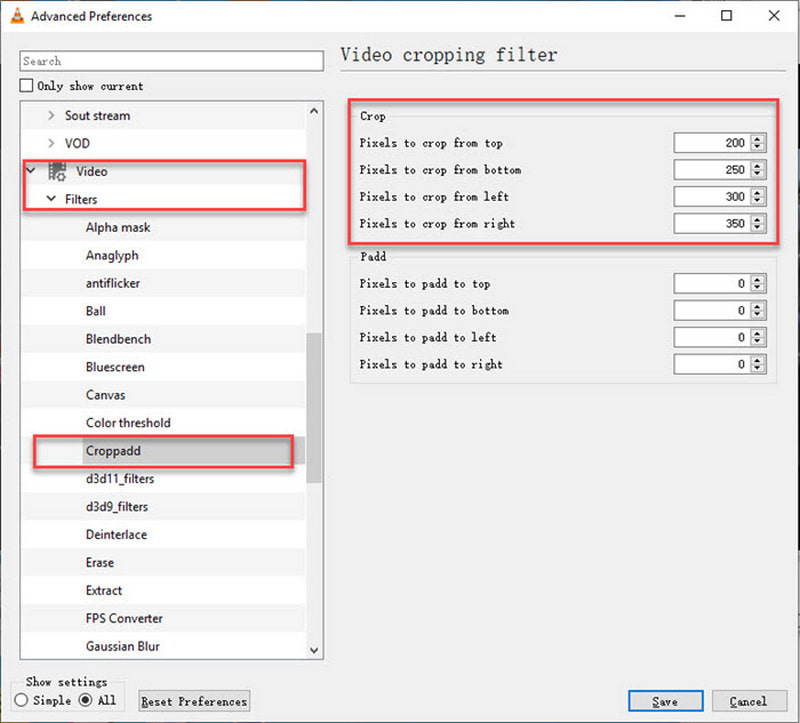
Step 4Add the number of pixels to be removed from the Top/Bottom/Left/Right.
Step 5Under Video > Filters. Enable the video cropping filter in VLC.
Step 6Click Save. Click Transform/Save in the Select Menu.
Step 7Click Add. Choose the video that was created in the beginning. Click Convert / Save.
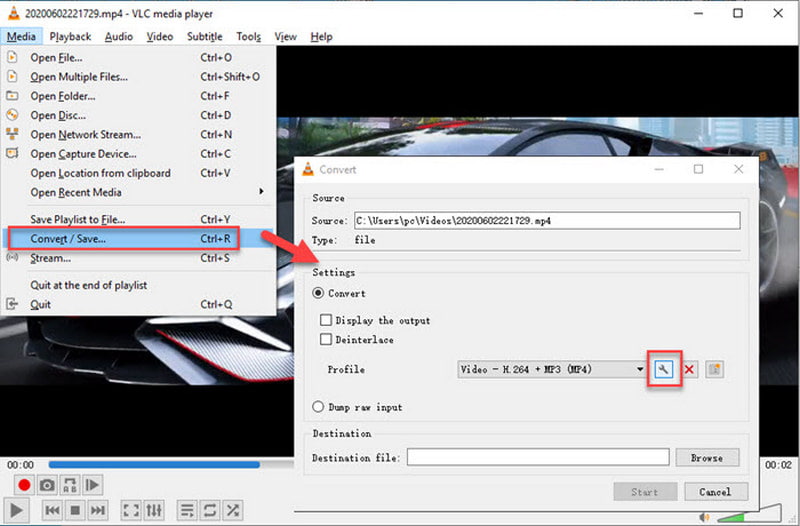
Step 8Select Output Profile, go to the destination file, and click the Start button.
Common Issues and Troubleshooting
The following example shows that cutting the video in VLC cannot be guaranteed, because the settings are defined in different parts of VLC. These are common issues that may occur when adjusting crop values, merging video, browsing the effects, or converting a video.
1. Video Cropping Filter Box Not Appearing
Some cropping options are not in the standard Video Settings because VLC has filters under Advanced Settings. In Open Tools, choose All under Show settings, and check Video > Filters under the available cropping options.
2. Not Applying Crop Value
Missetting the filter set, using the wrong filter, or not using the correct filter can result in it not affecting the crop. Before playing or converting video, be sure to select the proper Top, Bottom, Left, and Right crop values.
3. Cannot See the Effect of the Crop
The VLC crop features do not always provide a useful on-the-fly preview, especially if the crop is to be converted or used to blur a video or just a part of it. Play the video after saving the settings to see what the visible frame looks like, or run a short test conversion before processing the whole video.
4. Cropped Video Has Black Borders
If the correct crop and output sizes are not specified, black borders may appear in some cases. During conversion, check the crop value, aspect ratio, and the output file. Don't pad text or content.
5. VLC Only Converting Part of the Video
If the conversion settings designate a start time or duration, but only an edited portion of a video is being converted, then it will show up. If a portion of a video is being converted, and the conversion settings specify a start time or duration, then it will appear. Conversion options have start time & duration checkpoints, but the output is not controlled by these.
Bonus: VLC Alternative to Crop Video for Free
VLC offers a more advanced method for permanently cropping videos, while AVAide Video Converter has a dedicated video editing interface to better manage your cropped videos. There are also some useful cropping, conversion, and other editing tools available to make editing videos for various screens, platforms, and formats easier.
- Cut off all unwanted edges without the complexity of filter setups and configurations.
- Preview the frame you have adjusted before exporting to see the final composition.
- Tweak crop area to different aspect ratios and screen sizes.
- Enjoy up to 4K, 5K, and 8K resolutions for crisp and vivid output.
- Crop, trim, rotate, color adjust, and compress in one program.

 Secure Download
Step 1Download and install the Tool
Please download and install AVAide Video Converter from its official website. After installation, users can easily use the video editing features by clicking the video editing program.
Step 2Add the Video
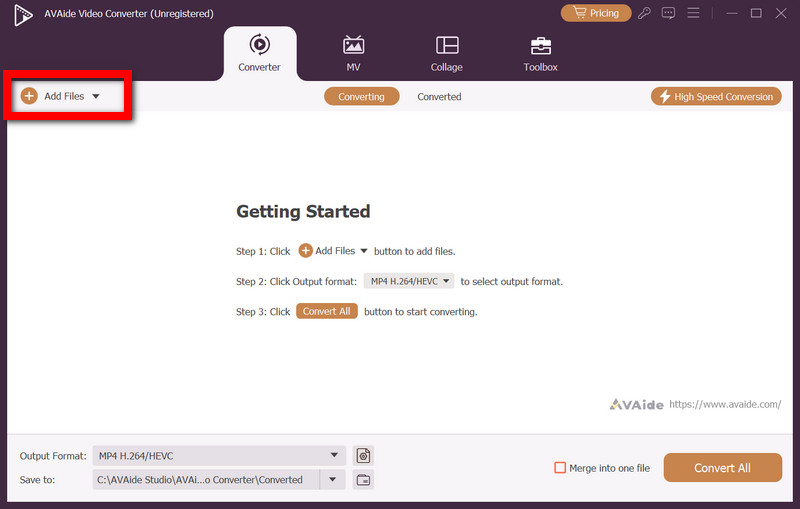
On the welcome screen, press the Add Files button and select the desired video to crop. Wait until the file is loaded into the program.
Step 3Open the Crop Tool
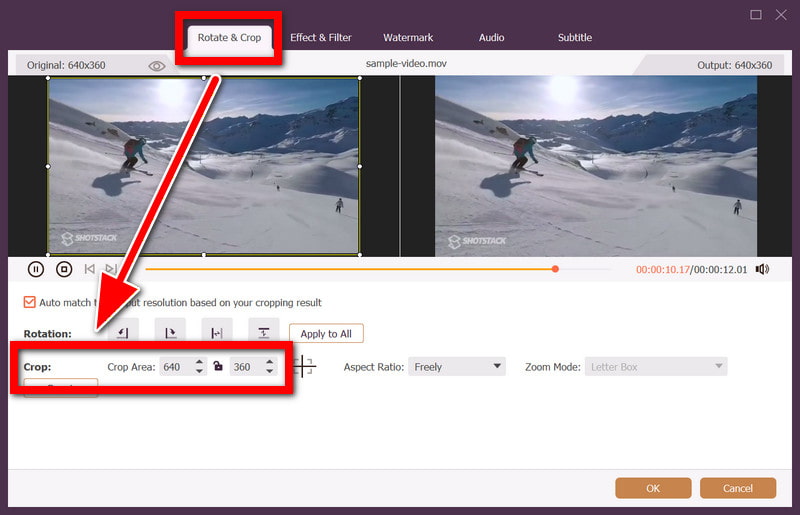
Right-click the imported video, click Edit, then Rotate & Crop. The video will be displayed in the video editing window as a cropped video that has an adjustable cropping frame.
Step 4Crop Area May be Scaled
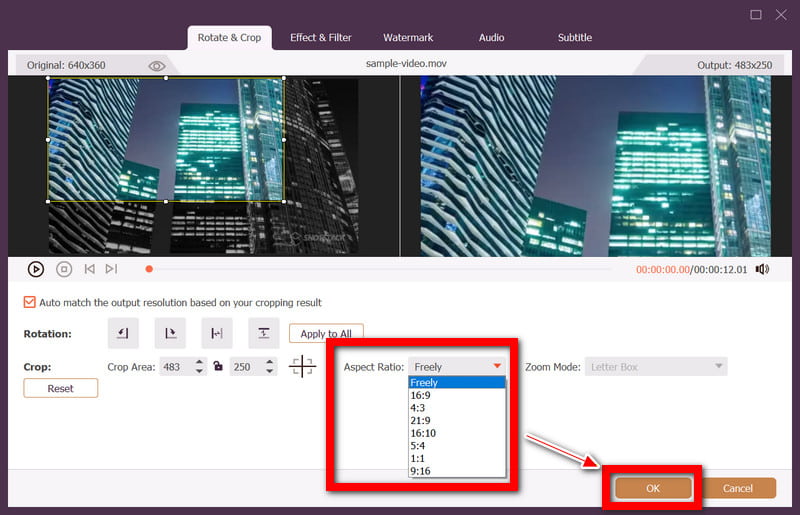
Use the edges of the crop frame to crop out unwanted areas. If necessary, choose the aspect ratio, 16:9, 4:3, 1:1, 9:16.If required, use an aspect ratio, 16:9, 4:3, 1:1, 9:16 and check the frame.
Step 5Use the Crop and Choose
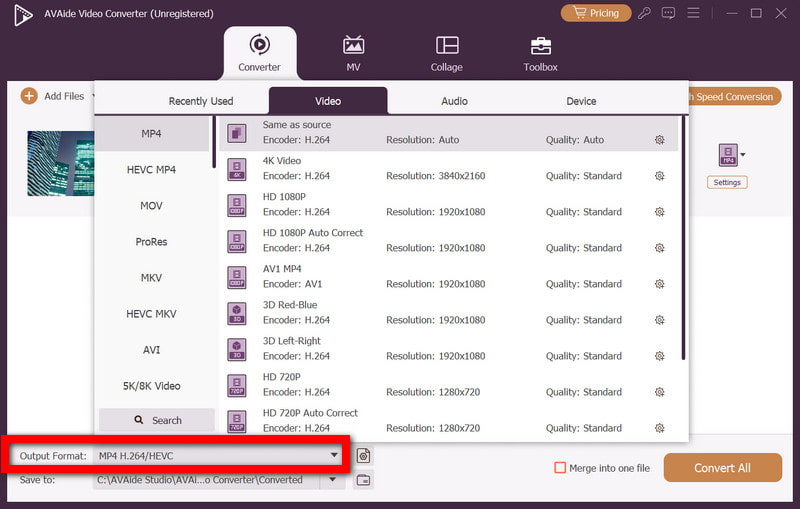
Click OK to make the crop settings. Return to the main interface and select the desired output format in the Output Format menu.
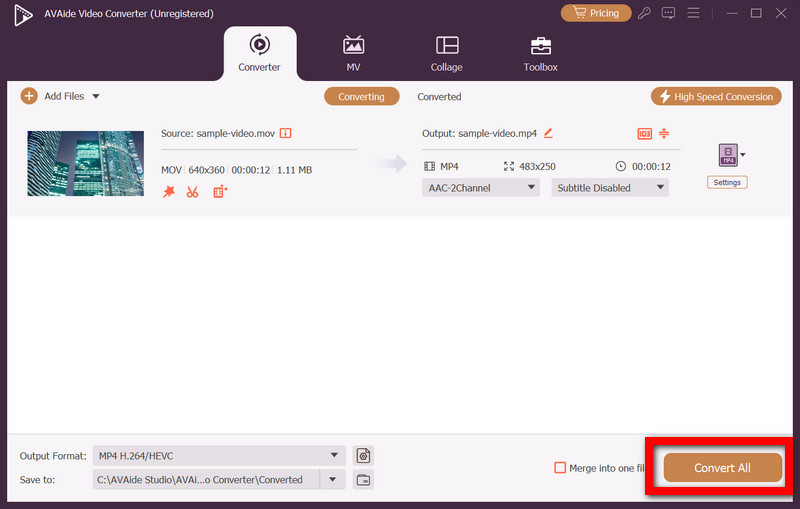
Step 6Export Video
Choose a folder to save the converted files, then press Convert All.
VLC Media Player crop video is an easy video cropping and enhancement tool. For those seeking permanent results, the AVAide Video Converter comes to the rescue with its simplified cropping, previewing, and exporting features.
ABOUT THE AUTHOR

Your complete video toolbox that supports 350+ formats for conversion in lossless quality.