Have you ever tried to play a video, but it cannot open on your media player, especially those saved from your VLC library? That happens because not all players support the same video formats and codecs.
The easiest fix is to convert VLC to MP4, a format that works almost everywhere. In this guide, you will find three powerful tools that can help you convert your videos quickly and easily. Discover them now and enjoy smooth playback on any device!
Part 1: Why You Need to Convert VLC to MP4
Many videos show the VLC icon because your computer uses VLC as its default player. It does not mean the file itself is a VLC video; it only means VLC is set to open it. Converting these videos to MP4 makes them easier to play on phones, TVs, and other players. MP4 keeps high quality, uses less storage, and works on almost every device and platform without needing an extra program.
Part 2: How to Convert VLC to MP4 in VLC
You can also use VLC Media Player to convert VLC to MP4 because it is not just a media player: it also has a built-in converter. This feature makes it easy to change video formats without needing an extra program. It works offline, supports many file types, and lets you fine-tune output settings like resolution or clarity before starting the conversion. Everything happens in one simple window!
Step 1Open VLC Media Player on your computer. If you do not have it yet, go to the VLC download page and install it first.
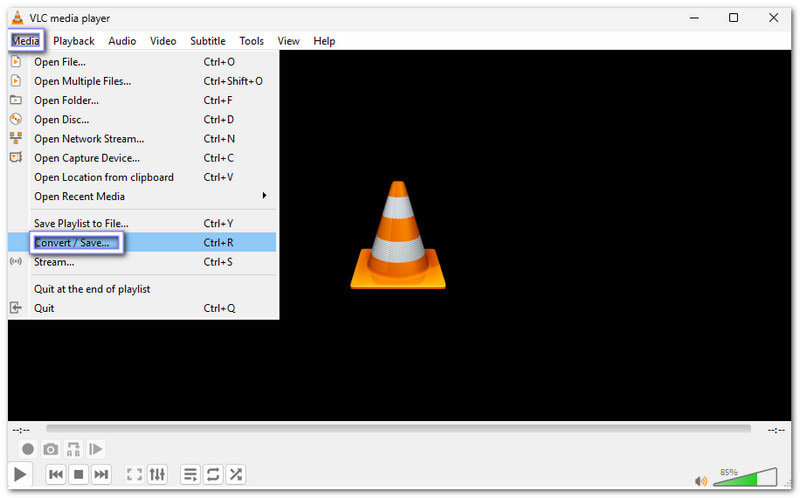
Step 2On the top menu, click Media, then choose Convert / Save from the drop-down. It will open a new display where you can select the files to convert.
Step 3Click Add to find the video files you want to convert. After selecting them, click Convert / Save at the bottom of the window to move to the next step.

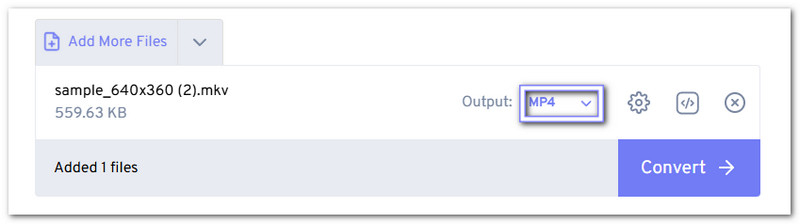
Step 4In the Convert window, look for the Profile drop-down menu. Pick the MP4 option that matches your needs. It sets the output format for your new file.

Step 5Hit Browse to choose where you want to save your MP4. After picking the folder, click Start. Please wait for VLC to finish converting your video. Big files may take more time, so be patient while it works.

- You can also use VLC to compress your video by tweaking its video and audio settings or trimming unnecessary clips.
Part 3: How to Convert VLC to MP4 Free Online
This VLC to MP4 converter only allows you to upload videos up to 1 gigabyte for free and enjoy full control with advanced settings. Despite that, it lets you change codecs, trim clips, or add subtitles before converting. It is secure too, using 256-bit SSL encryption to protect your files, which are deleted automatically after a few hours.
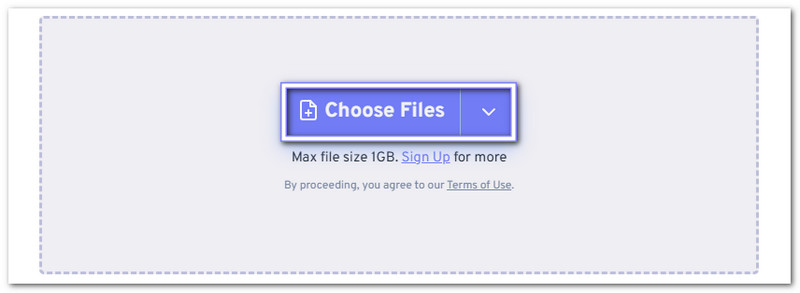
Step 1Open your browser and go to the FreeConvert - MP4 Converter website. Once you are there, press the Choose Files button to upload your VLC. You can also select and drop your file if that is easier for you.
Step 2After uploading, you will notice that MP4 is already chosen as the output format.
Step 3If you want to adjust the video, click the Cogwheel button. It opens more options where you can change video clarity, audio settings, subtitles, trimming, or cropping. Once done, click Apply Settings to save your changes.

Step 4Hit Convert to initiate the conversion. Once the process is complete, click Download MP4 to save your new file to your device.

Part 4: The Easiest Way to Convert VLC to MP4
If you are a beginner and want the easiest way to convert VLC to MP4, AVAide Video Converter is perfect for you. It lets you change any video to MP4 format with just a few clicks. It supports many codecs like H.264, HEVC, AAC, and MP3, so your files stay compatible and high-quality.
You can even upscale videos to 4K or 8K for a clearer look. Before converting, you can also edit your videos, crop, rotate, trim, merge, add filters, or put watermarks. Everything you need is already built in, making it simple and fun to use.
- Convert video and audio to 300+ formats.
- Support batch conversion to process many files at once.
- Customize output settings such as resolution, frame rate, etc.
- Speed up the process with 120× faster conversion performance.
- Provide clear 1080p, 4K, 5K, and 8K video output for better quality.

 Secure Download
Here is how to change VLC to MP4 using AVAide Video Converter:
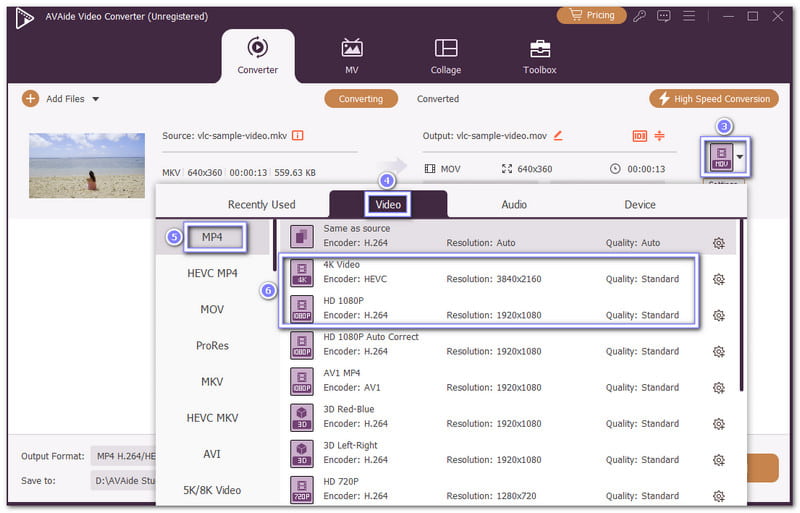
Step 1Get and set up AVAide Video Converter on your Windows or Mac computer. After that, open the program and press Add Files in the top left corner. Then, pick the VLC you want to convert, and it will show up on the screen ready for conversion.

Step 2Click the Format drop-down menu and go to the Video tab. From the list of formats, choose MP4. You will not struggle to find it because it is the first format shown. You can also pick your desired resolution, like 4K or 1080P, to make your video clearer or smaller, depending on your needs.
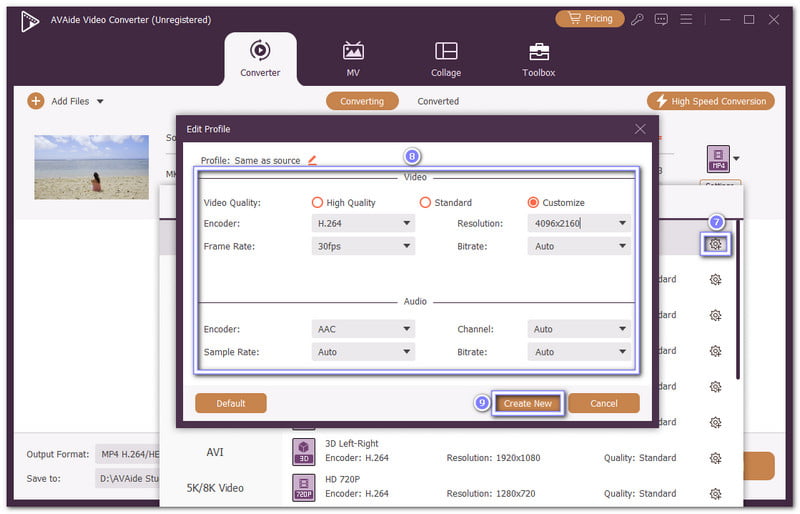
Step 3It is optional, but if you want to customize the output settings, open the Custom Profile button.
For Video settings, you can change the following:
• Encoder - Pick H.264, HEVC/H.265, MPEG-4, or AV1.
• Frame Rate - Select from 23.97fps to 144fps.
• Resolution - Choose higher ones like 1920×1080 to 4096×2160.
• Bitrate - Select from 900kbps to 6000kbps.
For Audio settings, you can change the following:
• Encoder - Pick AAC or AC3.
• Sample Rate - Select from 22050Hz to 48000Hz.
• Channel - Choose from 2 to 7.1.
• Bitrate - Select from 96kbps to 320kbps.
Once you are done setting it up, click Create New to save your changes.
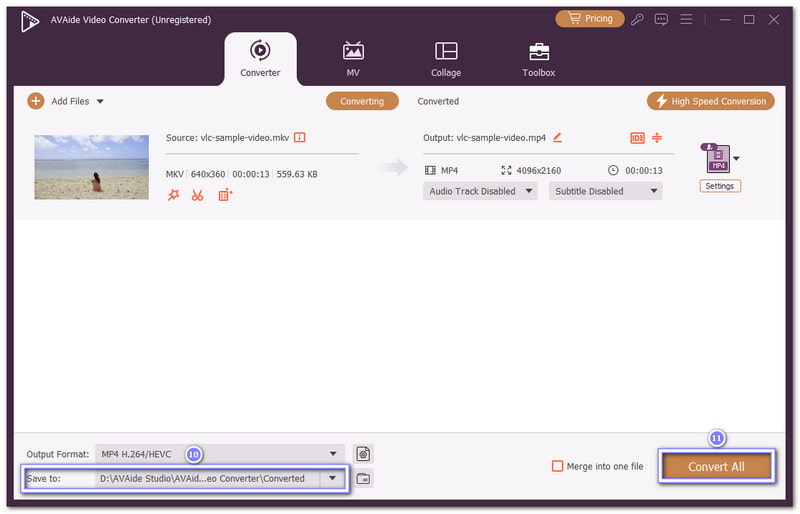
Step 4Click the Save to drop-down button to choose where you want your converted video to be stored. Finally, press the Convert All button to start changing your VLC into MP4 format. Once the conversion is finished, you will get a high-quality MP4 video.
Isn't it so easy to convert VLC into MP4? All the methods you learned here are simple and perfect for beginners. But if you want to explore more and make your videos look better, try using AVAide Video Converter. It helps improve your video quality and lets you edit before saving. It makes your videos more fun to watch and great to share online!
Your complete video toolbox that supports 350+ formats for conversion in lossless quality.