How to record audio from a computer? Well, recording audio directly from a computer is a useful skill for capturing voice input for projects, streaming content, system sounds, and more. Whether you are making a tutorial, recording podcasts, saving online audio, or knowing the right recorder makes the process straightforward. So, if you want to learn how to record audio with the best recorders, read this post to explore more.
Part 1. How to Record Audio on Windows
Want to learn how to record audio on a PC, especially on Windows? In that case, you can check all the methods we have provided below.
Method 1: Record Audio Using Built-In Recorder
You can use the Voice Recorder software on your Windows computer. This is a built-in recorder that lets you capture your microphone. What we like here is that you can record the audio easily, thanks to its simple and neat user interface.
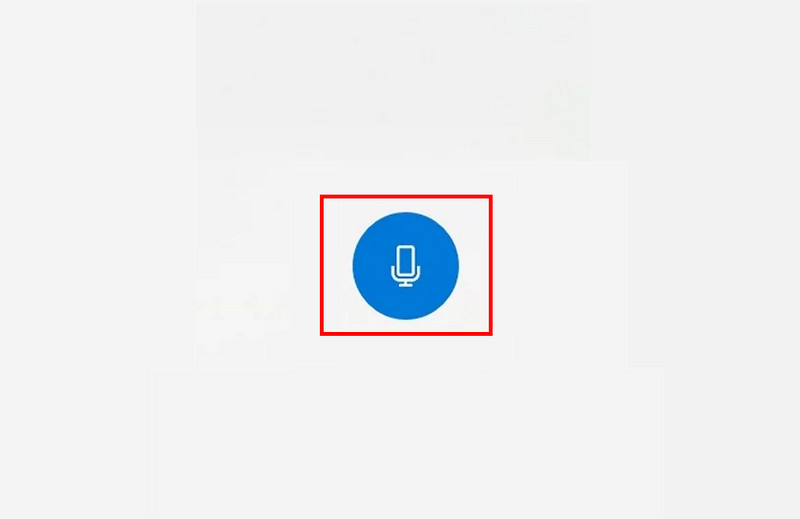
Step 1Go to the Start button below and start typing Voice Recorder. After that, launch it to start the process.
Step 2Then, click the Mic symbol to begin the recording process.
Step 3Tick the Stop button to finish the recording.
Method 2: Capture Audio Using Stereo Mix
If you want to record an internal system audio, you can use the Stereo Mix. It is perfect if you want to record on your Windows 7, Vista, and XP. If you have this too, you can ensure to record all the sound coming from your computer, such as game audio, microphone audio, system sound, and more.
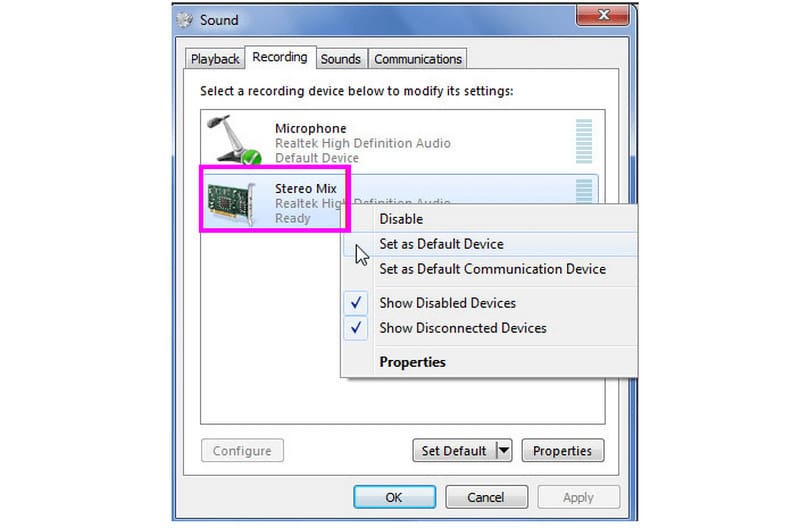
Step 1Proceed to the Control Panel and click Hardware and Sound > Sound options.
Step 2After that, when a mini Windows appears, tap the Recording tab to find the Stereo Mix option.
Step 3Right-click it to choose Enable. Then, hit OK to apply changes. Once done, you can start the recording.
Method 3: Record Audio Using Audacity
Do you want advanced recording and editing? In that case, you can use Audacity as the best audio recording software. This free audio recorder is perfect if you want to record and edit your content. You can adjust tempo, pitch, add more effects, etc. The best part here is that you can save the recorded audio with the best quality for better playback. Start the recording process using this Windows audio recording software.
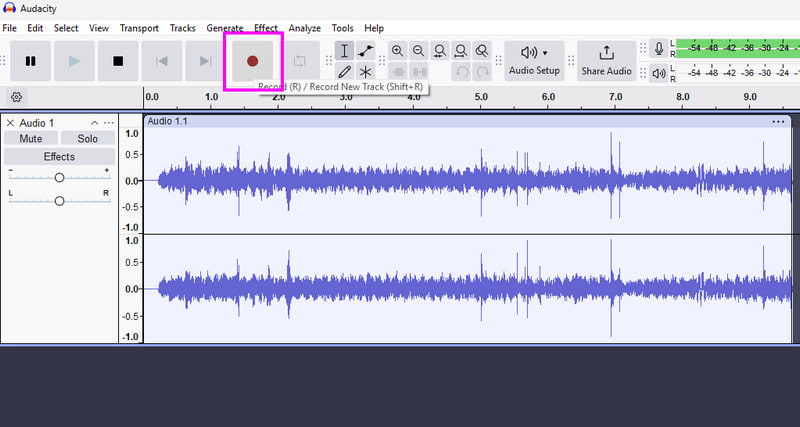
Step 1Download and install the Audacity program on your computer. Then, launch it to start the process.
Step 2Go to the top interface and tap the Record button to start the recording. After recording, you can tap the Stop button.
Step 3Finally, click the File > Save Project options to start saving the recorded audio on your computer.
Method 4: Record Audio Using AVAide Screen Recorder
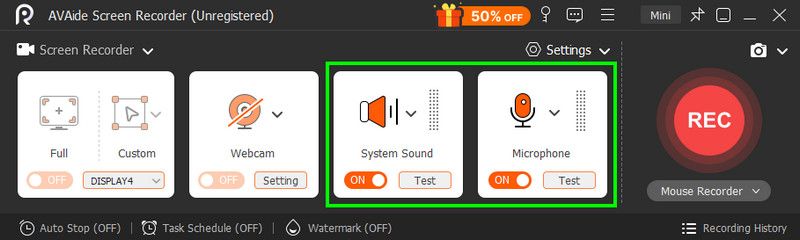
If you want to record on Windows 10 and other versions, you can use AVAide Screen Recorder. This software is perfect if you want a neat and simple recorder. With its audio recorder feature, you can capture any audio content. You can record audio from system sound, microphone, video, games, and more. In addition to that, you can adjust various parameters. You can modify the recording volume, cancel audio noise, use delay mode, and more. You can even save the audio with the best quality, resulting in a better listening experience.
Step 1You can click the buttons below to start downloading AVAide Screen Recorder on your Windows.

FREE DOWNLOAD For Windows 7 or later
 Secure Download
FREE DOWNLOAD For Mac OS X 10.13 or later
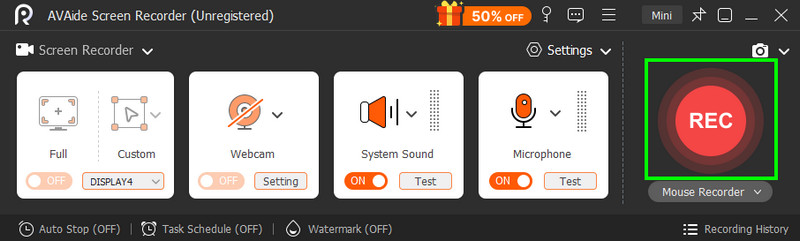
Secure DownloadStep 2After you launch the interface, turn on the System Sound and Microphone features. This way, you can record any audio from your computer and mic.
Step 3Once done, hit the REC button to begin the audio recording process. To finish the recording, hit the Stop button.
Method 5: Record Audio Using Xbox Game Bar
If you want to learn how to record audio on Windows 11, you can rely on the Xbox Game Bar. This built-in tool is not only ideal for recording gameplay or any content from your screen. You can also use it to record audio effectively. You can record a speaker, input audio, a microphone, and more. The process of recording the audio is also simple, making it suitable for all Windows users.
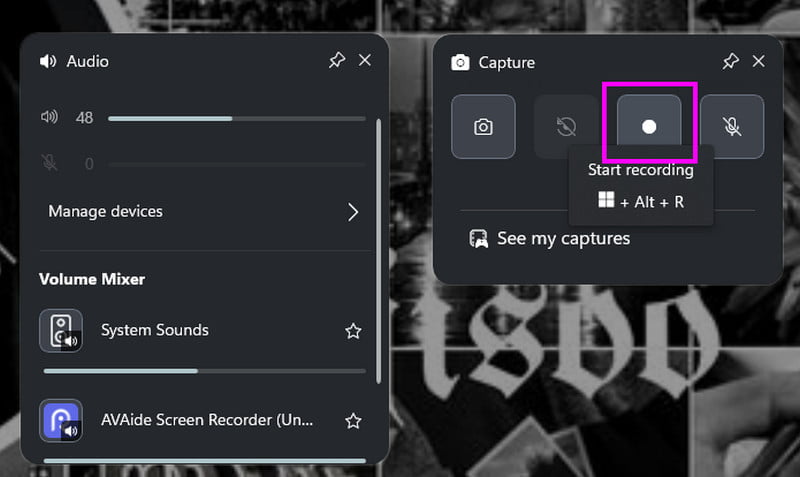
Step 1Press the Windows + G keys on your keyboard to launch Xbox Game Bar. Then, select the Audio Widgets to see a mini tab.
Step 2Then, you can adjust the volume based on your preferences. After that, proceed to the Capture tab and tick the Record option to begin the recording process.
Step 3 Click Stop to finish the audio recording procedure.
Part 2. How to Record Audio on Mac
How to Record Audio on Mac? Well, if you want to explore various methods to record your audio while using a Mac, check all the instructions below.
Method 1: Record Audio Using QuickTime Player
QuickTime Player is not just an effective media player. You can also access its audio recorder to record audio, especially with your microphone. It is perfect if you want to record voice on a Mac. It also has a smooth audio recording process, which makes it a helpful tool.

Step 1Launch the QuickTime Player on your Mac. Then, proceed to the File > New Audio Recording feature.
Step 2When the Audio Recording window shows up, you can start recording your audio by hitting the Record button.
Step 3Click Stop to finish the process. After that, go to the File > Save section to start the saving process.
Method 2: Record Audio Using BlackHole + QuickTime Player
Another method to record audio on a MacBook is by using the Blackhole. This virtual audio driver is perfect, especially if you integrate it with QuickTime Player. This is ideal if you want to record internal audio for free. You can even save the audio with a satisfying audio quality, making it more reliable.
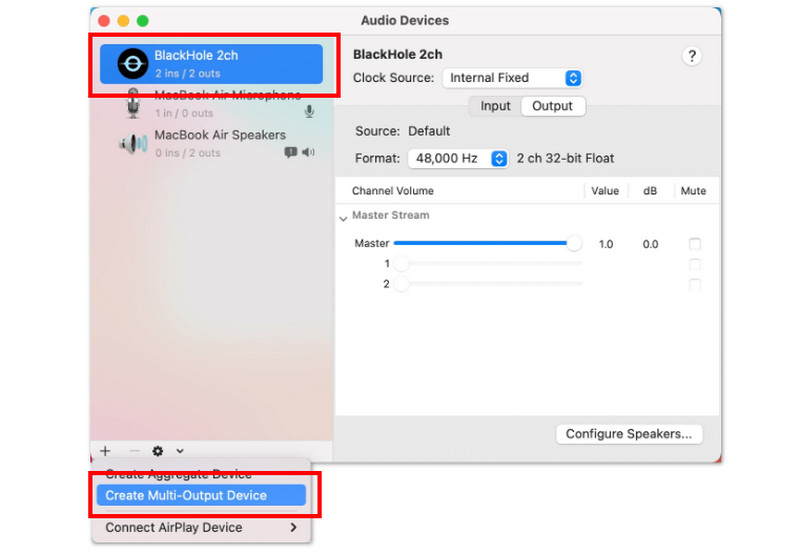
Step 1Download and install Blackhole. Then, open Audio MIDI Setup and create a Multi-Output Device that includes both Blackhole and your speakers.
Step 2Set the Multi-Output Device as the default audio output. After that, start launching the QuickTime Player.
Step 3Got to the File > New Audio Recording and chose Blackhole as the input. Then, start the recording process.
Method 3: Record Audio Using Physical Loopback Cable
For a hardware solution, you can use a physical loopback capable of recording audio when using a Mac. To start the process, you can use the steps below.
Step 1First, you can connect a 3.5mm loopback capable from your Mac's headphone jack to its microphone.
Step 2Then, you have to set the input device to the microphone post in the System Preferences > Sound section.
Step 3After that, start launching the QuickTime Player and navigate to the Audio Recording. Record audio as it plays via loopback connection.
Part 3. FAQs about How to Record Audio from a Computer
Can I record both system audio and the microphone at the same time?
Yes, but you will need software that can do the task. If you want to effectively record both microphone and system audio, you can use AVAide Screen Recorder and OBS Studio.
Will recording affect the audio quality?
The quality depends on your sound card, microphone, and chosen settings, like bitrate and sample rate. For a better audio quality, you must have higher settings.
Where are my recordings saved by default?
You can find your recordings in the Documents > Sound Recordings section. For Mac, QuickTime lets you choose where you want to save the audio.
To learn how to record sound on a computer, you can follow and use all the methods we have provided in this tutorial. Plus, if you prefer an easier method to record your audio, you can use AVAide Screen Recorder. With its audio recorder feature, you can record any audio content from your Windows and Mac computers.
ABOUT THE AUTHOR

Capture the best moment with AVAide Screen Recorder. Screencast, customize, and share in seconds.