Ever wished you could have your favorite iTunes movies on a DVD for a cozy movie night or to share the joy with friends and family? While iTunes offers a convenient platform for digital movie access, the desire to burn iTunes movies to DVD comes from the charm of having a tangible, shareable copy. This process, however, has its complexities due to digital rights protection.
This write-up will present an attested approach to recording iTunes movies to have a copy on your computer. Besides that, it will assist you with how to burn iTunes movies to DVD using an excellent DVD creator. To learn all these ways, please read the information provided below.
Part 1. Record iTunes Movies and Save on Computer
You might be in a situation where you want to keep a copy of your favorite iTunes movies on your computer. You may want to watch them offline or ensure you have a backup in case the content becomes unavailable. AVAide Screen Recorder can be a helpful program in such cases, allowing you to capture and save these movies for personal use.
AVAide Screen Recorder lets you capture whatever is happening on your desktop screen and save it as a video file. It enables you to select what part of your screen you want to capture. Whether it is the entire screen or a specific area, you have control over what gets recorded. Besides capturing visuals, it can also record the audio. It means you get the complete viewing experience, including sound. Furthermore, it allows you to customize your recording experience by changing settings such as video quality, frame rate, and audio preferences. It ensures that the recorded video meets your specific requirements.
Step 1Visit the AVAide Screen Recorder's official website, download it, and follow the installation instructions to set it up on your computer.

FREE DOWNLOAD For Windows 7 or later
 Secure Download
FREE DOWNLOAD For Mac OS X 10.13 or later
Secure DownloadStep 2Run the screen recorder to get started. Next, select the Video Recorder from the list of recording features on the main interface.

Step 3Toggle the Display1 button to access the recording screen options. Click the Full if you want to record the entire screen, and Custom if you have a preferred area where you want to record. Moreover, it enables the options to incorporate the Webcam, the System, and the Microphone's sound. Once settled, click the REC button to begin the recording.

Step 4You can use the Playback Controls while the recording is ongoing. Once you are done recording the movie, press the Stop button.
Step 5Your recorded movie will automatically play on the preview window. Once satisfied, hit the Done button to save it on your computer.

Part 2. Burn the Video to DVD
DVDs provide a stable and long-lasting backup solution for your recorded videos. If you want to preserve your recorded videos long-term, burning them to a DVD is reliable. The notable program that can help you achieve your task is Tipard DVD Creator. It is designed for efficient burning, ensuring you do not have to wait excessively long for the process to complete. Undoubtedly, it can help you burn iTunes movies to DVD, which you have recorded earlier.
Tipard DVD Creator supports various video formats, ensuring you can burn recorded videos from various devices without compatibility issues. It allows you to personalize your output by choosing from various menu templates. You can add background music, images, and more to make your DVDs eye-catching. Furthermore, you can tailor the output with customizable settings for video and audio quality. The DVDs created are compatible with various DVD players and devices, making it easy for others to enjoy your recorded videos.
Step 1First and foremost, get the Tipard DVD Creator installed on your computer.
FREE DOWNLOAD For Windows 7 or later
Secure DownloadFREE DOWNLOAD For Mac OS X 10.13 or later
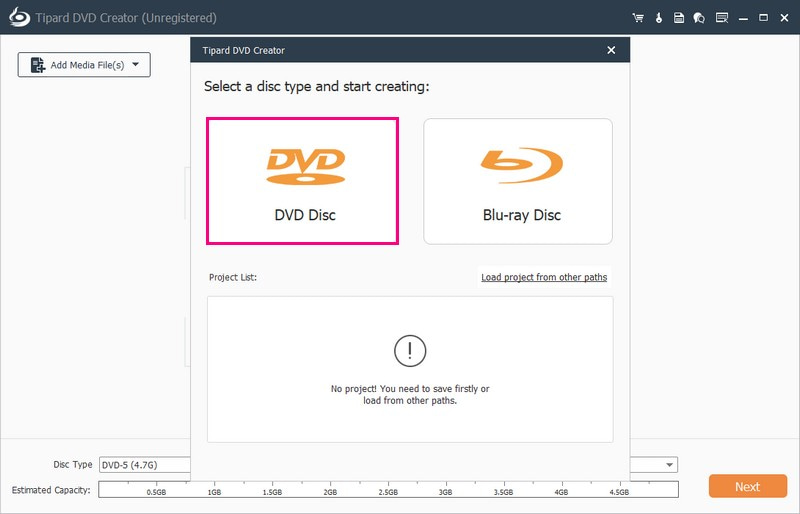
Secure DownloadStep 2Open the program to start doing your task. Next, choose DVD Disc type on the options presented.
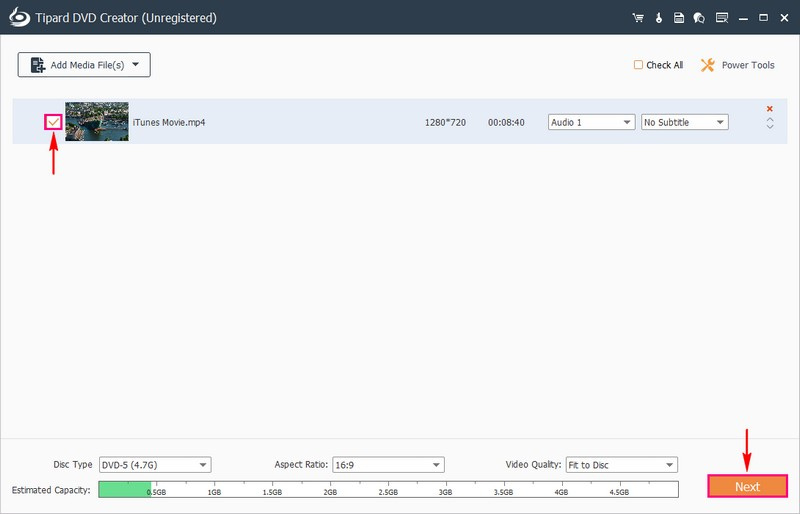
Step 3Click the Add Media File button to import the iTunes movie you have recorded into the program.

Step 4Put a mark beside the imported video to select it. Then, click the Next button to proceed.
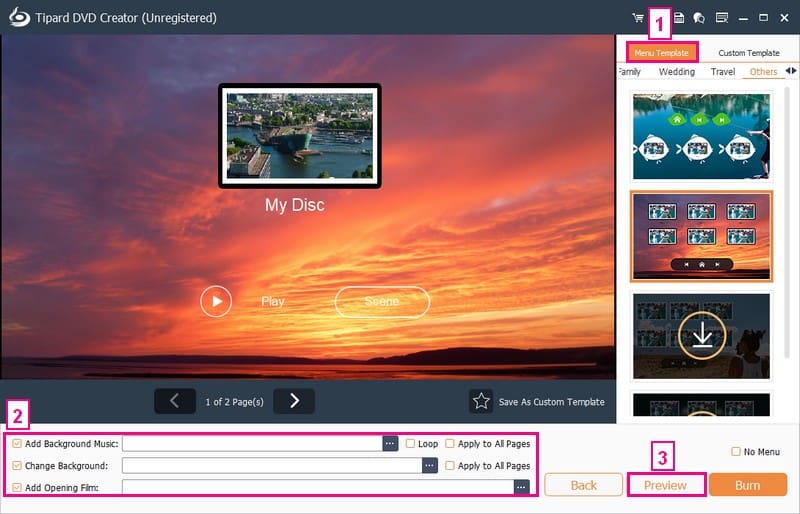
Step 5You will see several templates from the Menu Templates for Holiday, Family, Weddings, Travel, and more. Please select a design you would like to apply to your output. You can also change the Menu Navigation according to your liking.
You can also Add Background Music, Change Background, and Add Opening Film. To enable these options, put a checkmark beside them.
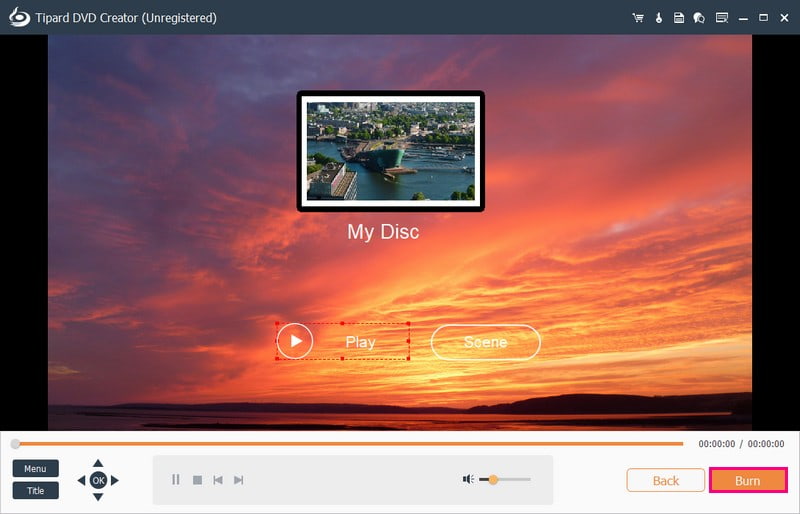
In addition, you can preview your DVD creation in real-time before finalizing the burning process. To do that, click the Preview button. Then, press the Play button for the video to start playing.
Step 6Once happy with your creation, click the Burn button and proceed to the next window. Finally, click the Start button to burn the iTunes video to DVD successfully.
Part 3. FAQs about Burning iTunes Movies to DVD
How to burn iTunes MP4 to DVD within iTunes?
First, put a blank disc into your computer. Open iTunes, go to File, New, and then Playlist. Drag your MP4 files into the new playlist. Access File, Burn Playlist to Disc, or right-click on the playlist and choose the same option. Set parameters as needed, click Burn and wait. When done, exit iTunes and eject the DVD.
Can you burn songs from iTunes to a CD?
Absolutely! You can make specific discs in iTunes – Audio CDs, MP3 CDs, and Data CDs. Audio CDs work in regular CD players, MP3 CDs in MP3-capable CD players, and Data CDs store and transfer files.
Can you copy iTunes movies to USB?
Open iTunes on your computer, sign in, go to the Store, check for Available Downloads, and download your movie. Then, use a USB drive to store the movie. But remember, you cannot watch these iTunes movies on a USB drive or Android phone.
Can I import a DVD to iTunes?
Certainly! Even though iTunes does not directly accept DVD movies, you can change DVDs to digital formats that iTunes supports. Then, it is simple to add the DVD content to iTunes.
What formats are compatible with DVD players?
Most DVD players work well with formats like MPEG-2 and AVI. But looking at your DVD player's details is essential to know which formats it can play.
Can you burn iTunes movies to DVD? Definitely! This post taught you how to record iTunes movies using AVAide Screen Recorder and burn iTunes movies to DVD using Tipard DVD Creator.
AVAide Screen Recorder is your go-to tool for capturing anything happening on your computer screen. On the other hand, Tipard DVD Creator is your solution for turning videos into DVDs for a tangible and shareable experience. So, what are you waiting for? Install them on your computer and enjoy your iTunes movie!
Capture screen activities with audio, online meetings, gameplay videos, music, webcam, etc.