Are you planning to burn ISO to DVD? If so, you are in for a smart move! Burning an ISO to a DVD has several benefits that can enhance data storage and accessibility. Plus, having a physical DVD allows you to share your files easily with friends, family, or colleagues.
This simple guide will walk you through burning an ISO to a DVD. This process is accessible to anyone looking to preserve, share, or utilize their digital content tangibly and practically. Please continue reading the following parts to unlock the full potential of your digital content in a tangible, accessible form.
Part 1. Burn ISO to DVD Using Windows Default Program
Windows comes with a built-in feature that simplifies the process of burning ISO files to DVDs. It enables you to burn ISO to DVD on Windows 10, Windows 8, Windows 11, and Windows 7. It is a user-friendly solution that enables you to create physical copies of ISO files. Whether you are working with DVDs, CDs, or Blu-ray discs, the Windows Default Program accommodates a variety of disc types.
Step 1Ensure your disc drive has an empty disc inserted.
Step 2Right-click on the ISO file and pick Burn Disc Image to open the Windows Disc Image Burner window.
On Windows 11, choose Show more options after right-clicking to access the Burn option. In Windows 7, you can double-click the ISO file. In newer Windows versions, double-clicking an ISO file will mount it as a virtual disc.
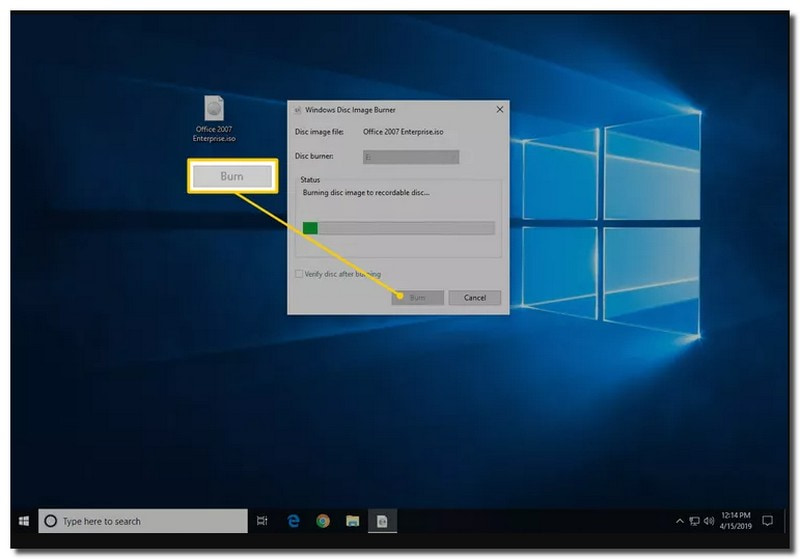
Step 3Choose the correct CD, DVD, or BD burner from the Disc burner menu. Typically, only one option is available, like the D: drive.
Step 4Hit the Burn button to start. The time depends on the ISO file's size and your disc burner's speed. It is commonly ranging from seconds to minutes.
Step 5You can check the Verify disc after burning option for data integrity, especially when burning firmware. The disc will eject when done, and the status will confirm a successful burn. Close the window, and your ISO-file-turned-disc is ready for use.
Part 2. Burn ISO to DVD Using Mac Default Program
Meet Disk Utility, your go-to tool on Mac for seamlessly burning ISO files to DVDs. This built-in program simplifies the process, ensuring you can easily create physical copies of your digital disc images. Whether your Mac has a built-in disc slot or not, Disk Utility is adaptable. You can use it with the internal disc slot or connect an external DVD drive. Below are the steps on how to burn an ISO to DVD using Disk Utility:
Step 1Place a blank DVD into your Mac's disc slot. Besides that, you can use an external DVD drive if your Mac does not have a disc slot.
Step 2Press the Magnifying Glass button to open the Spotlight. Next, type Disk Utility to find the Disk Utility app. Please click on it when it appears in the search results to open it.
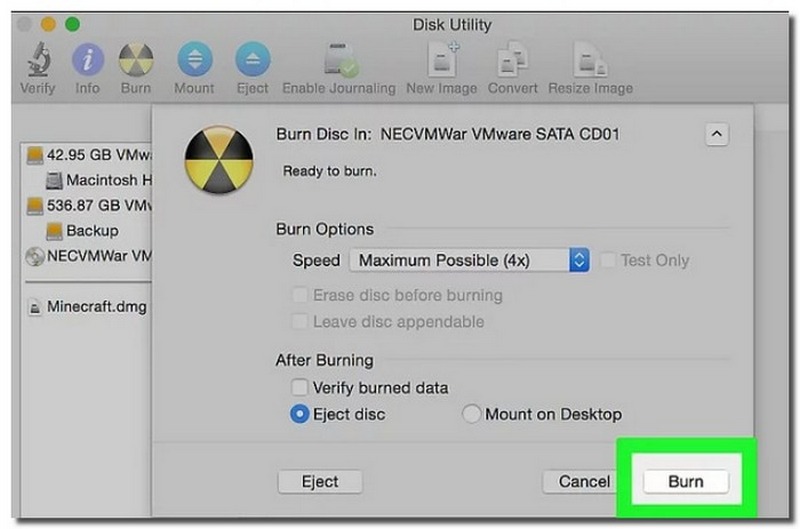
Step 3Press the Burn button on the Disk Utility window. A pop-up Finder window will appear, asking you to choose the ISO file to burn to DVD. After selecting the file, click the blue Burn button to close the Finder window.
Step 4Now, you will be in the Disk Utility interface. You will see a small window with options. Click the Burn button and click the OK button when prompted. You will see this in the lower-right corner of the completion window.
Part 3. Burn ISO to DVD Using Tipard DVD Creator
A handy program that allows you to bring your digital content to life in the form of physical DVDs is Tipard DVD Creator. It specializes in burning ISO files, which are digital disc images, into fully functional DVDs. It is equipped with powerful editing tools. You can customize the appearance, audio settings, subtitles, and more using the Video Tools and Chapter Tools options.
To enhance the DVD experience, Tipard DVD Creator offers a variety of Menu Templates. You have the option to pick a template that matches your preferences. In addition, you can enable additional features like adding background music, changing the background, and including an opening film. Before finalizing the DVD, Tipard DVD Creator lets users preview how their DVD will play. It ensures you can make any necessary adjustments before starting the burning process.
Here is how to burn ISO to DVD using Tipard DVD Creator:
Step 1Begin by downloading and installing Tipard DVD Creator on your computer.

FREE DOWNLOAD For Windows 7 or later
 Secure Download
FREE DOWNLOAD For Mac OS X 10.13 or later
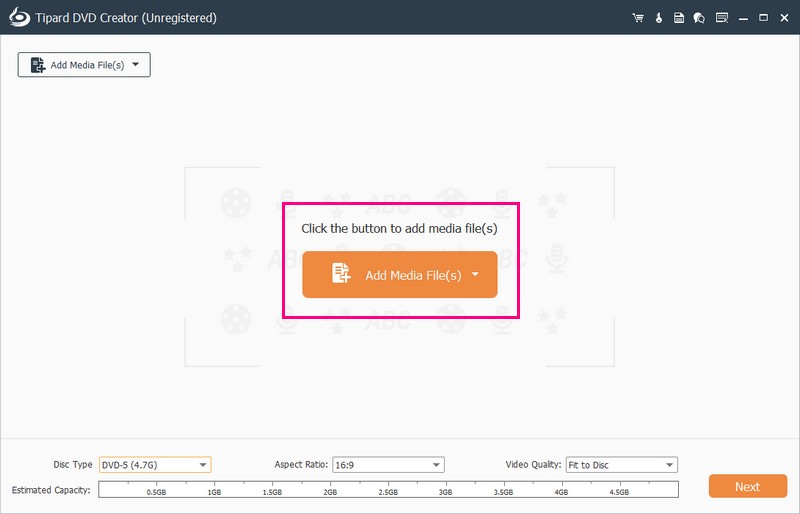
Secure DownloadStep 2Before you launch the program, insert a blank DVD into your computer's disc drive. Once the DVD is in, open the Tipard DVD Creator.
In the Tipard DVD Creator interface, choose DVD Disc from the available disc type options. Then, click the Add Media Files button to upload the ISO files you want to burn to DVD.
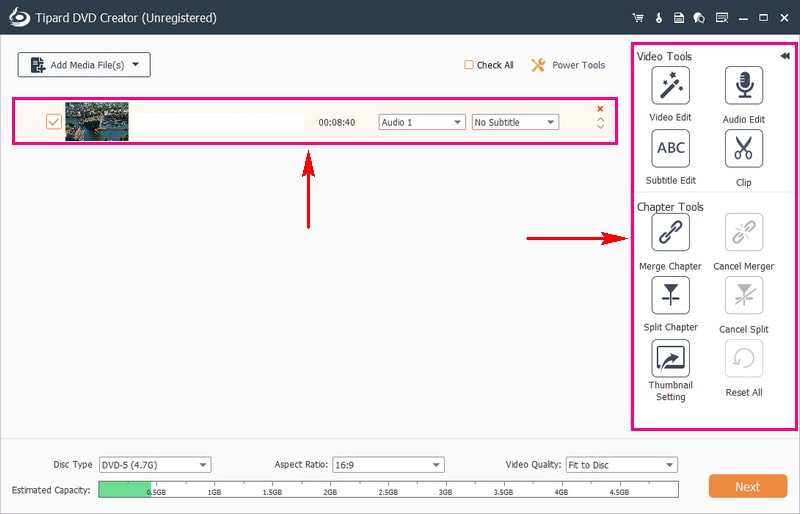
Step 3Put a checkmark and click the uploaded ISO file to enable the Power Tools feature. The Power Tools offers Video Tools and Chapter Tools you can use.
Under Video Tools, you can use the following options: Video Edit, Audio Edit, Subtitle Edit, and Clip. Under Chapter Tools, you can use the following options: Merge Chapter, Split Chapter, Thumbnail Setting, Cancel Merge, and Cancel Split.
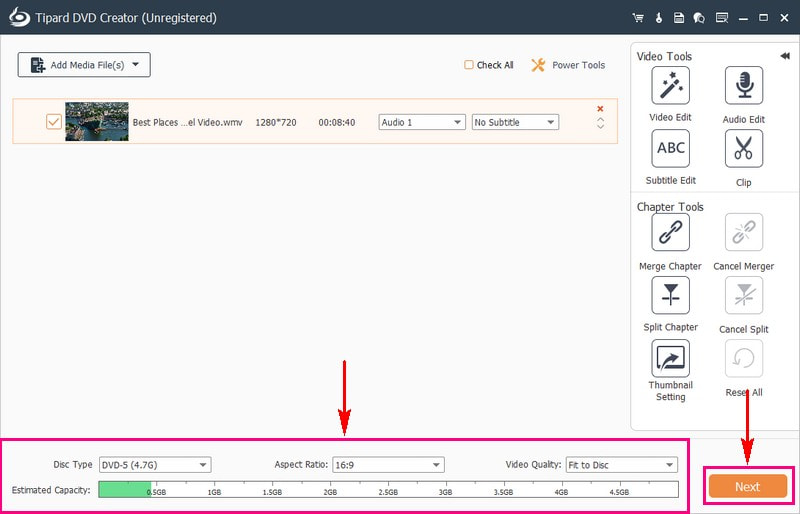
Step 4Head to the Disc Type and choose DVD-5, DVD-9, DVD-25, or DVD-50. Next, select your preferred Aspect Ratio, 16:9 or 4:3. Move to Video Quality and choose Fit to Disc, Low, Medium, or High. Once settled, click the Next button to proceed to another window.
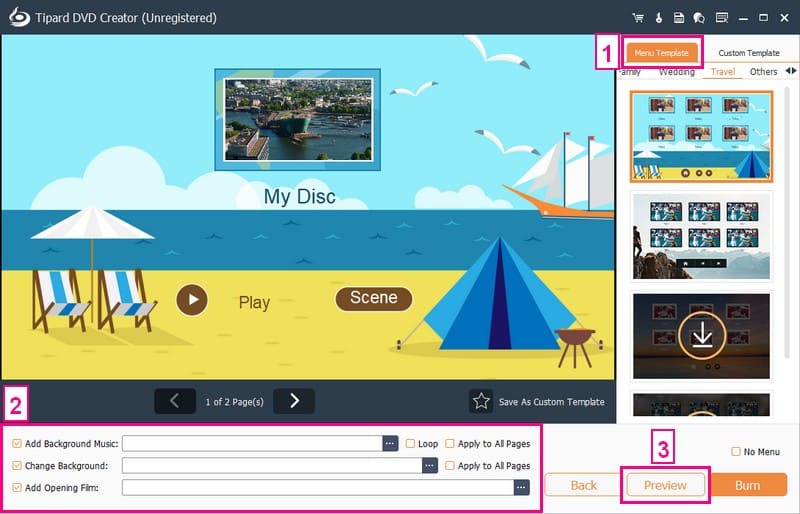
Step 5Navigate to the Menu Template and choose a suitable template for your DVD. After that, enable options like Add Background Music, Change Background, and Add Opening Film by putting a checkmark beside them. To see how your DVD looks and play, click the Preview button.
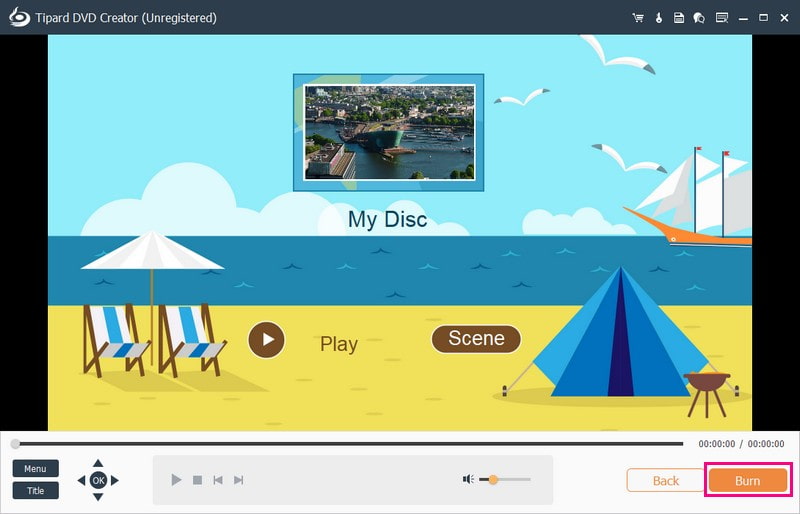
Step 6When satisfied with your output, click the Burn button to start the burning process. Then, Tipard DVD Creator will efficiently burn your ISO files to DVD.
Part 4. FAQs about Burning ISO to DVD
Can I use my DVD again after burning an ISO file in it?
Rewritable DVDs like DVD+/-RW or DVD RAM can delete ISO content and add new data multiple times. However, if you have a DVD+R or DVD-R disc, you can use it only once.
Can I use a rewritable DVD for burning ISO files?
Absolutely! Reusing the disc, you can use rewritable DVDs (DVD-RW or DVD+RW). Just be aware that rewritable discs have a limited number of write cycles.
What should I do if the burning process fails?
If the burning process fails, check if you use a compatible DVD. Ensure there is enough space, and verify the file's integrity. Trying a different brand of blank DVD or lowering the burning speed might also help.
Can I use a regular CD instead of a DVD for burning ISO files?
No, regular CDs have less storage capacity than DVDs. If your ISO file is too large for a CD, it will not fit. Stick to using DVDs or consider compressing the ISO file if needed.
Can I add a menu to my DVD when burning an ISO?
Definitely! Some burning software, like Tipard DVD Creator, allows you to add menus to your DVDs. It can enhance the viewing experience and make navigation easier.
Now that you have discovered how to burn an ISO to DVD, you can enjoy the benefits of creating a portable and shareable copy of data. This process makes your digital content tangible and keeps it a reliable backup. You can use third-party software like Tipard DVD Creator to achieve that. It is user-friendly and helps you create DVDs from your digital content. Give it a try and make your ISO to DVD process even simpler!
ABOUT THE AUTHOR

Rip DVD movies to various video & audio formats, as well as popular devices.