DVDs are a great way to back up important files and preserve memories. They provide a physical copy that works without needing an internet connection. Burning a DVD on Windows 10 ensures your data stays safe even if digital storage fails. In this article, we will show you four easy methods to burn a DVD on Windows 10 to keep your files secure and enjoy your videos anytime.
Part 1: Things to Prepare Before Burning DVD on Windows 10
Before burning a DVD on Windows 10, there are three things you need:
1. DVD Drive
Check if your computer has a DVD drive. If not, you have the option to use an external DVD drive.
2. Blank Disc
Get a blank DVD for burning. Common types include DVD-R and DVD-RW. These are affordable and work with most DVD players. If your video is over 120 minutes, use a dual-layer disc like DVD+R DL or DVD-R DL.
- DVD Type
- DVD+R & DVD-R
- DVD+RW & DVD-RW
- DVD+R DL or DVD-R DL
- DVD RAM
| Recording Support | Capacity |
| Records only once | 4.7 gigabytes |
| Rewritten around 1,000 times | 4.7 gigabytes |
| Records only once | 8.5 gigabytes |
| Rewritten approximately 100,000 times | 4.7 gigabytes |
3. DVD Burning Software
Install DVD-burning software to create playable DVDs on Windows 10. It is essential for high-quality results.
You can create DVDs that work on most players with a blank disc, a DVD drive, and reliable burning software.
Part 2: Burn a DVD on Windows 10 with Best Video and Audio Quality
If you desire to burn a DVD on Windows 10 with the best video and audio quality, Tipard DVD Creator is a great choice. It works with many video formats like MP4, MOV, AVI, and MKV, letting you create DVDs or Blu-rays from any file or recorded video. It also supports many disc types, including DVD-5 and DVD-9. It ensures compatibility with most media players.
This software also provides you with choices to make your DVDs special. You can merge several videos, create menus with templates or your photos, and modify videos by changing the brightness, adding subtitles, or even cutting the video. If you are a beginner or a professional, Tipard DVD Creator is the best tool because it creates DVDs quickly, and the quality is great.
Step 1Get the Tipard DVD Creator by hitting the Free Download button from the official website. Follow the installation steps, then open the software.

FREE DOWNLOAD For Windows 7 or later
 Secure Download
FREE DOWNLOAD For Mac OS X 10.13 or later
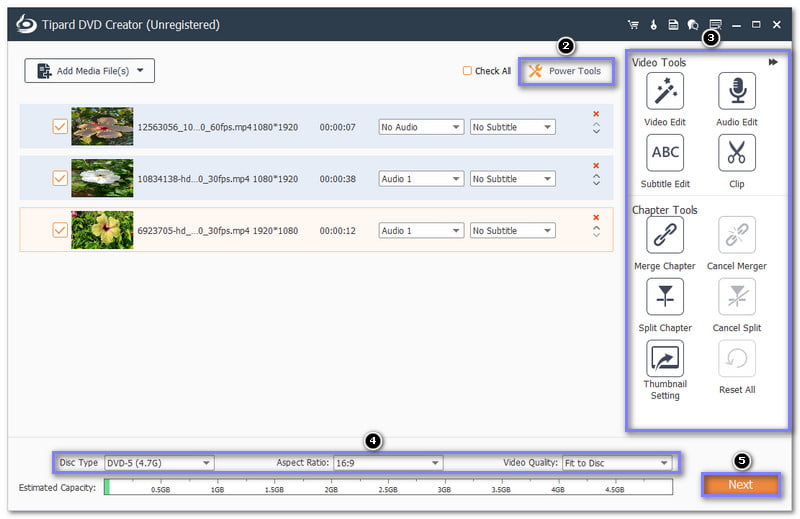
Secure DownloadStep 2Click the Add Media File(s) button to load your videos. You can add multiple files for your DVD project.
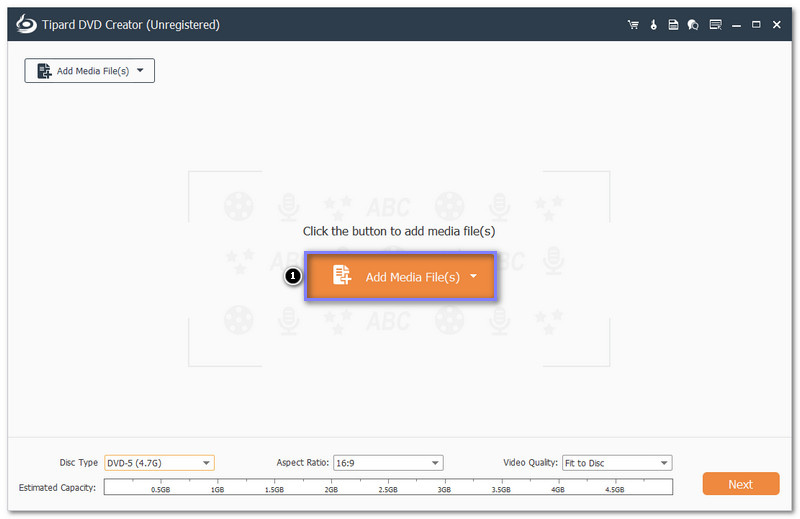
Step 3Put a checkmark on all the videos you imported. Now, use the Power Tools option to make changes. You can edit the video, adjust audio, add subtitles, merge or split chapters, and more. Also, in the lower corner of the interface, you can choose your Disc Type, Aspect Ratio, and Video Quality.
Once settled, click the Next button to proceed to the next step, creating a menu for your DVD project.
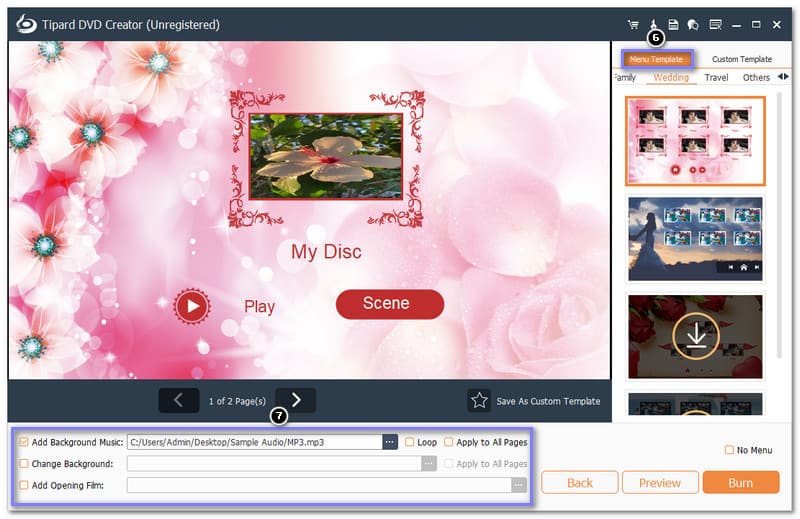
Step 4Head to the Menu Template and choose one from the family, wedding, and travel. Also, you can Add Background Music, Change Background, and Add Opening Film. Just put a checkmark beside each option to enable them.
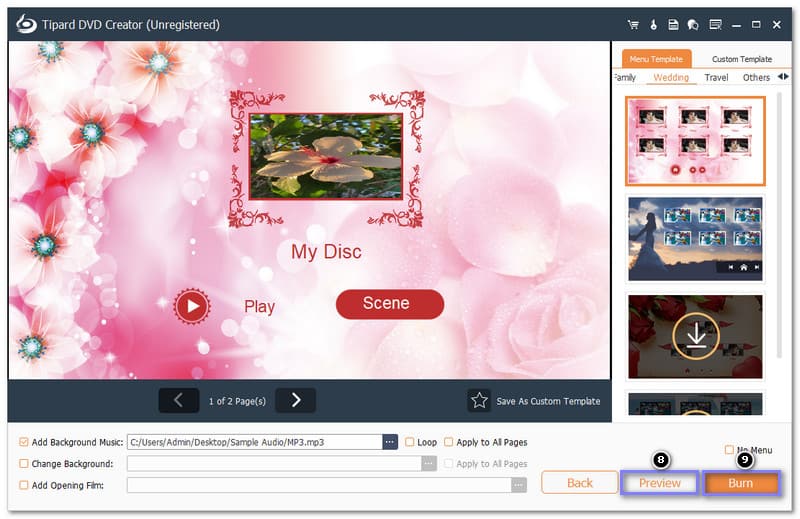
Step 5Use the Preview button to check your creation. Once satisfied, insert a blank DVD into your DVD drive. Set the burning options and hit the Burn button to start. After that, Tipard DVD Creator will burn your files into a playable DVD.
Part 3: Burn a DVD on Windows 10 with BurnAware
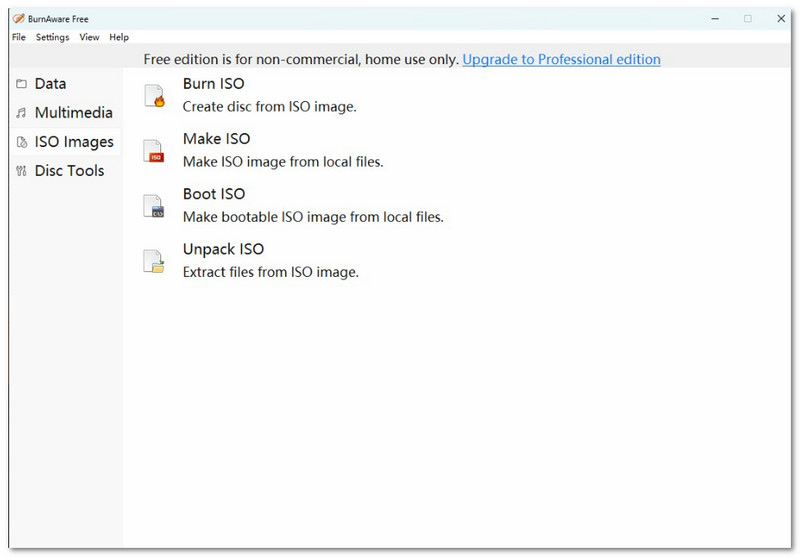
BurnAware is a free and advanced CD, DVD, and Blu-ray burner for Windows 10. It is packed with useful features for burning all discs, including M-Disc. With BurnAware, you can burn audio CDs, video DVDs, bootable discs, and multisession discs. You can also create, copy, and burn disc images. While the free version offers many tools, there are some limitations. It does not allow you to copy content directly from a DVD, and you cannot customize or compress files.
Step 1The first thing you need to do is to open BurnAware and click the DVD-Video button to start a new project.
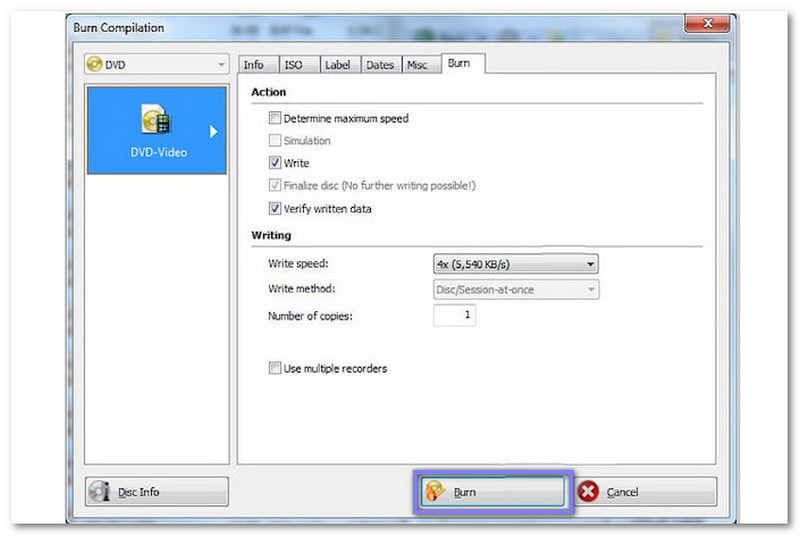
Step 2Choose either Convert and burn or Burn VIDEO_TS. If you pick Burn VIDEO_TS, select the folder with VOB, BUP, and IFO files. Make sure the VOB files are smaller than 1 gigabyte. Then, press Burn.
Step 3Click Add Files to choose your video files or drag them from Windows Explorer. Supported formats include AVI, MOV, MPG, VOB, MP4, WMV, and MKV. BurnAware will convert these files to DVD-Video format (*.mpg) before burning.
Step 4For the last step, press the Burn button to start the burning process.
Part 4: Burn a DVD on Windows 10 with DVD Flick
DVD Flick is a simple program that can burn DVDs on Windows 10. It employs FFMPEG to assist you in adding several video files and burning them on a DVD. You can add subtitles and audio files and create a basic menu for easier navigation. Although its interface feels outdated, it is easy to use. This DVD burner is a great choice for creating DVDs that work on your DVD player or media center.
Step 1Launch DVD Flick and import video files by clicking the Add title button.
Step 2Edit the titles by double-clicking or using the Edit title button. You can add audio, chapters, and subtitles, but trimming or cropping is unavailable.
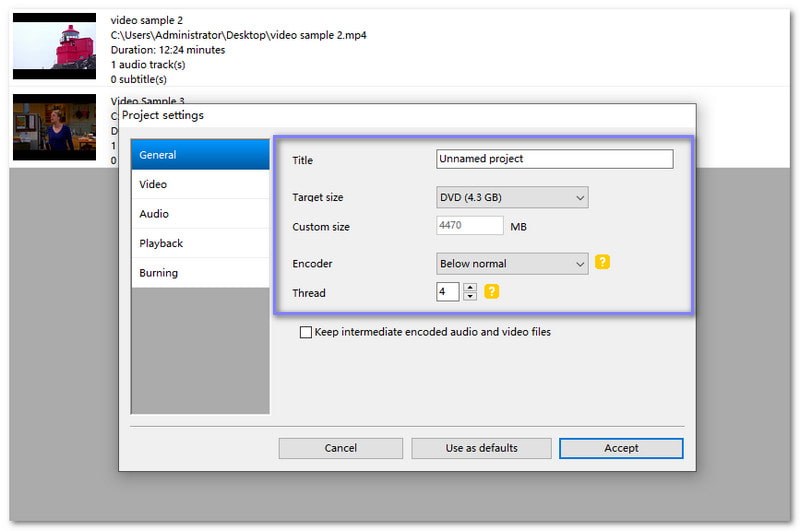
Step 3Go to Project settings and set your Target size. If using a DVD-9, change it from DVD-5 (4.3 GB) to DVD-9 (7.9 GB). Choose to burn directly to the disc in the Burning tab or create an ISO image. Set the burn speed to 4x-6x to avoid errors.
Step 4Add a menu by clicking Menu Settings. Choose from 6 templates, but you cannot preview titles during this step.
Step 5When ready, click Create DVD to start encoding and burning your DVD on Windows 10.
Part 5: Burn a DVD on Windows 10 in Nero Burning ROM
Nero Burning ROM is powerful software for burning CDs, DVDs, and Blu-ray discs. It works great for creating, copying, and burning discs. With Nero Burning ROM, you can burn movies, music, data, and even mix-mode discs. However, it uses a lot of system resources like CPU and memory. It can slow down your computer while burning discs.
Without further discussion, discover how to burn a DVD in Windows 10 using it below:
Step 1Launch Nero Burning ROM on your Windows 10 computer. Then, select DVD-Video from the options to produce a DVD that can be played on a home DVD player.
Step 2Click Add to add the video files that you wish to burn into the program. Ensure that the files are in formats such as MPEG-2 or MPEG-4.
Step 3To access additional options, click More. Here, you can set the target DVD recorder, the burning speed, and other options.
Step 4After you are done with the settings, click on Burn to begin the process. Nero Burning ROM will convert and burn the video into the DVD.
Your question, how can I burn a DVD on Windows 10, is now answered. Now, it is high time for you to attempt the methods we have provided above. If you want to achieve the best results, choose Tipard DVD Creator. It is because it is easy, fast, and produces excellent quality. Try it today and start making your DVDs right now!
Best tool for ripping and converting DVD Disc/Folder/ISO image file into over various formats.