Many people wonder how to get their DVDs into iTunes to watch on their iPhone, iPad, or iPod touch. You might have tried software that is slow or complicated and felt frustrated.
The truth is, iTunes does not support DVDs directly. But you can rip your DVDs to iTunes-supported formats, and it is easier than you think. Just follow the tutorials below to add your DVDs to iTunes quickly and safely!
Part 1: Benefits of Adding a DVD to iTunes
For a detailed look at the benefits of adding DVDs to iTunes, please read on to see how it can make your collection easier to watch and manage.
1. Easy Access Anywhere
Once your DVD is in iTunes, you can watch it on your iPhone, iPad, Mac, or Apple TV anytime without needing the physical disc.
2. Save Space & Protect DVDs
Digital copies take up less physical space and prevent your DVDs from getting scratched, broken, or lost.
3. Better Organization
iTunes makes it easy to locate and organize your collection by automatically sorting your videos by title, genre, or date.
4. Flexible Playback Options
You can easily stream your movies across Apple devices, make playlists, and modify playback settings.
5. Backup & Security
Digital copies act as backups, so even if your DVD is damaged or lost, you still have a copy to enjoy.
6. Improved Portability
With DVDs added to iTunes, you can carry your movie collection on your devices and watch anywhere, even on the go.
Part 2: Best Software to Rip DVD to iTunes
It would be easy for you to do your task if you use the best software to rip DVD to iTunes, and that is none other than AVAide DVD Ripper.
It supports many output video formats, and you can even select iTunes (MP4 and MOV) directly for fast and fully compatible conversion. It can also handle copy-protected DVDs, such as CSS-encrypted discs, region-locked DVDs, and common studio releases.
With hardware acceleration, it can rip a 2-hour DVD in a few minutes at up to 30× faster speed. It works on both Windows and Mac, so try it now by following the step-by-step guide below.
Step 1First and foremost, download and install AVAide DVD Ripper on your Mac or Windows computer and open it.

FREE DOWNLOAD For Windows 7 or later
 Secure Download
FREE DOWNLOAD For Mac OS X 10.13 or later
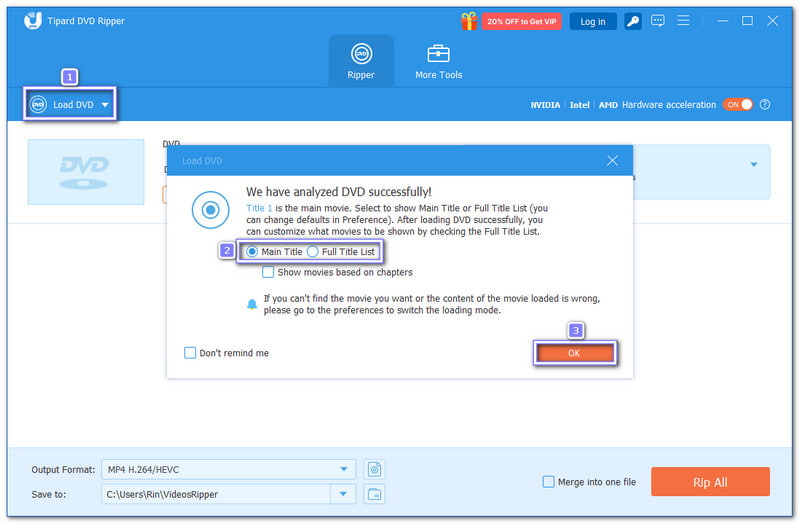
Secure DownloadStep 2Now, insert your disc into a readable DVD drive. Then, click the Load DVD button on the upper left of the interface. The program will start analyzing your selected disc. Once done, it will require you to choose the Main Title or Full Title List before loading the content.
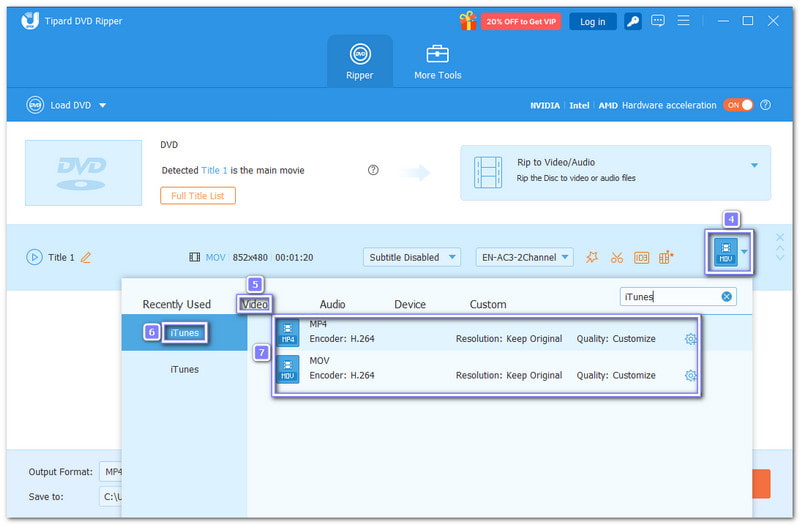
Step 3It is time to open the Format drop-down menu. Head to the Video section, scroll down, or type iTunes in the search bar. Then, choose MP4 or MOV format on the right side. These formats work best with iTunes and Apple devices. You can also fine-tune the output settings in the Custom Profile option if needed.
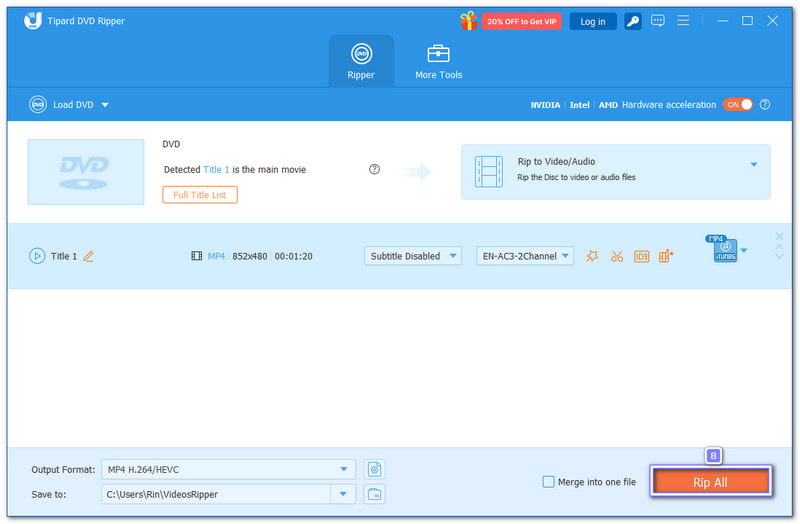
Step 4For the last step, click the Rip All button to begin ripping the DVD to iTunes. Once the process is finished, go to the preset folder to find your video, ready to add to iTunes and sync to your device.
Part 3: 2 More Free DVD to iTunes Converters
There are two more free DVD to iTunes converters that can help you rip your DVDs to formats iTunes supports. So, please read on to discover these two converters and how they can turn your DVD into a file compatible with iTunes.
1. HandBrake
Turning DVDs into files that work on iTunes is possible without paying anything. HandBrake makes this happen with wide format support and Apple-ready presets. It can convert DVDs to MP4 and MOV, which iTunes accepts well.
With the help of the libdvdcss file, it can also read CSS-protected discs, making it a dependable DVD decrypter. However, it uses more system power and may fail with some studio DVDs.
Step 1Insert your DVD into your computer and open HandBrake. If the DVD has CSS protection, install libdvdcss first so HandBrake can read the disc.
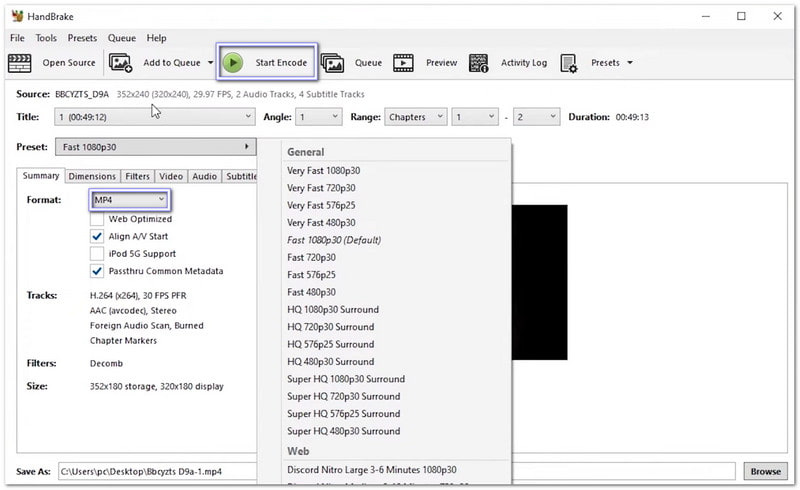
Step 2Please wait while HandBrake scans the DVD. Once the titles load, go to Preset, then choose Devices, and select Apple 720p30 Surround for iTunes playback.
Step 3Move to the Video section if you want changes. You can pick the video encoder, set the frame rate, or fine-tune the bitrate based on your needs.
Step 4Check the summary and confirm the output format is MP4. Then, choose where to save the file so you can find it later without trouble.
Step 5Click the green Start Encode button to rip the DVD to iTunes format. Watch the progress bar at the bottom until the process ends.
2. VLC
Playing almost any video file is what most people know it for, but VLC can also rip DVDs for iTunes use. It lets you extract DVD videos and save them as MP4 files. These files work on iTunes, Apple TV, iPhone, and iPad. The process is simple and free.
However, VLC lacks advanced ripping tools. It cannot decrypt protected DVDs, and the ripping speed is slower than dedicated DVD rippers.
Step 1Download and open VLC, then insert your DVD into the computer drive so VLC can detect it.
Step 2Click Media in the top menu and choose Convert / Save. In the new display, open the Disc tab and select your DVD drive.
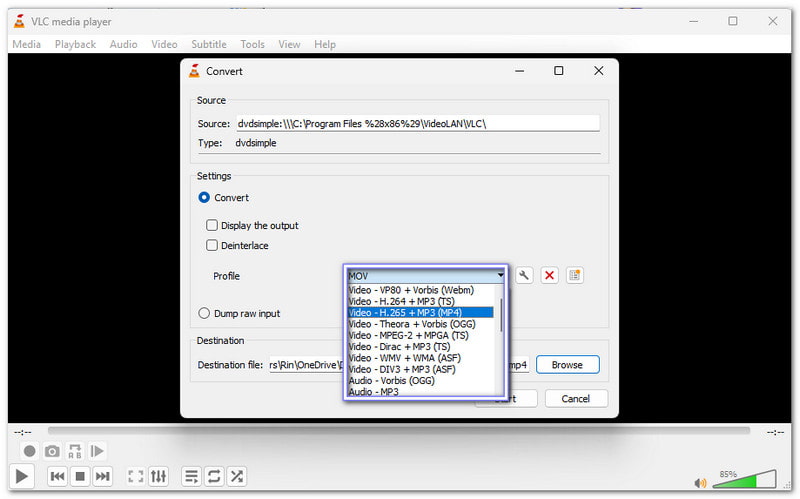
Step 3In the Convert display, choose an iTunes-supported format like MP4 (H.264 + AAC). You can also modify the resolution or bitrate if needed.
Step 4Click Browse to set the save location and file name. Make sure the file ends with .mp4 for easy iTunes import.
Step 5Hit Convert / Save to start ripping. After it finishes, open iTunes or the Apple TV app, add the MP4 file to the library, and sync it to your device.
Part 4: Comparison Table Among the 3 DVD to iTunes Converters
To see which DVD to iTunes converter works best for you, check out the comparison table below. It showcases their platform, ease of use, benefits, and other key factors to help you make the right choice.
| DVD to iTunes Converters | Platform | Ease of Use | Speed | Custom Settings | Benefits | Drawbacks |
| AVAide DVD Ripper | It works on Windows and Mac. | It is beginner-friendly with one-click presets and a simple interface. | It boasts a 30× faster speed. | It allows full control over resolution, bitrate, audio tracks, and subtitles. | It is fast, easy, supports protected DVDs, and provides high-clarity output. | It offers a free trial version with some limitations. |
| HandBrake | It works on Windows, Mac, and Linux. | It has a technical interface that requires some learning. | Its ripping speed is moderate and depends on computer performance. | It offers full control over the video encoder, frame rate, bitrate, and subtitles. | It is free, open-source, and supports many formats. | It needs libdvdcss for DRM DVDs and has a steep learning curve. |
| VLC | It works on Windows, Mac, and Linux. | It is simple for video playback, but its DVD ripping feature is hidden. | It converts DVDs slowly, especially for longer videos. | It only provides basic options like resolution, bitrate, and audio track. | It is free, lightweight, and can play almost any video. | It cannot handle protected DVDs, is slow, and has limited formats. |
No more "can I rip a DVD to iTunes" questions, because it is really possible with the help of AVAide DVD Ripper, HandBrake, and VLC. Among these three, AVAide DVD Ripper is the best choice. It supports iTunes formats like MP4 and MOV, and can handle CCS-encrypted and region-locked DVDs with ease.
Best tool for ripping and converting DVD Disc/Folder/ISO image file into over various formats.