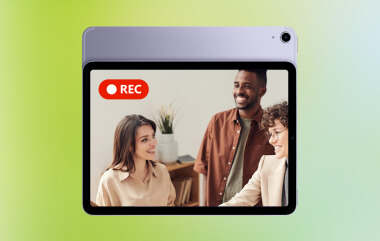
วิธีการบันทึกหน้าจอในแล็ปท็อป Lenovo ขึ้นอยู่กับเครื่องมือที่คุณเลือก ตั้งแต่ฟีเจอร์ในตัวของ Windows ไปจนถึงซอฟต์แวร์ขั้นสูง คู่มือนี้แสดงวิธีการที่ง่าย ชัดเจน และมีประสิทธิภาพสำหรับการจับภาพหน้าจอของคุณบนอุปกรณ์ Lenovo ไม่ว่าจะเป็นเพื่อการสอน การประชุม การเล่นเกม หรือการบันทึกในชีวิตประจำวัน
วิธีที่ 1. การใช้ Xbox Game Bar
ฟีเจอร์การบันทึกในตัวของ Xbox Game Bar เป็นของ Microsoft ซึ่งผสานรวมเข้ากับ Windows ได้อย่างราบรื่น และเป็นโซลูชันการบันทึกที่สะดวกที่สุดสำหรับผู้ใช้ Lenovo มันถูกสร้างขึ้นมาเพื่อใช้เล่นเกมไปพร้อมๆ กับการทำหน้าที่เป็นโปรแกรมบันทึกแอปพลิเคชันทั่วไป โปรแกรมสร้างวิดีโอสอน และโปรแกรมบันทึกเบราว์เซอร์ ข้อดีที่สุดคือไม่ต้องตั้งค่าใดๆ สามารถใช้งานได้ทันที
แต่ก็มีข้อเสียอยู่บ้างเช่นกัน คือไม่สามารถบันทึกหน้าจอเดสก์ท็อปหรือ File Explorer ได้ และการปรับแต่งก็จำกัดอยู่เฉพาะเครื่องมือระดับมืออาชีพเท่านั้น อย่างไรก็ตาม มันก็ยังเป็นหนึ่งในตัวเลือกในตัวที่สะดวกที่สุดสำหรับการใช้งานทั่วไปที่ไม่เน้นคุณภาพและความพยายามมากนัก
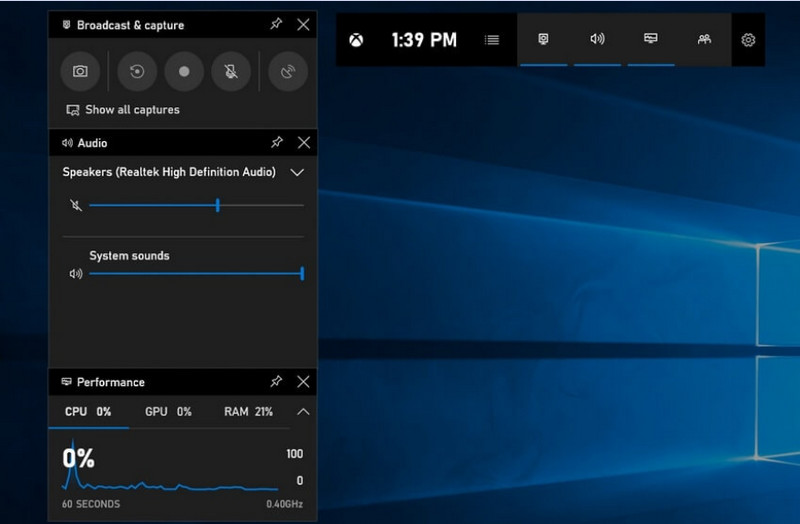
ขั้นตอนที่ 1หากต้องการเปิด Xbox Game Bar ให้กดปุ่ม วินโดวส์ + จี บนแป้นพิมพ์ของคุณ
ขั้นตอนที่ 2ค้นหา การจับกุม แผงควบคุม หรือคลิกจากแผงควบคุม วิดเจ็ต เมนู.
ขั้นตอนที่ 3คลิก บันทึก (●) ปุ่มหรือกด หน้าต่าง + Alt + R.
ขั้นตอนที่ 4หากคุณต้องการบันทึกเสียง โปรดเปิดใช้งาน ไมโครโฟน.
ขั้นตอนที่ 5กด หน้าต่าง + Alt + R อีกครั้งหรือคลิก หยุด (■) เพื่อให้เสร็จสมบูรณ์
ขั้นตอนที่ 6คุณจะพบไฟล์บันทึกของคุณใน วิดีโอ > จับภาพ.
วิธีที่ 2. การใช้ Lenovo Vantage
Lenovo Vantage ไม่ใช่โปรแกรมบันทึกหน้าจอโดยตรง แต่เป็นชุดโปรแกรมสำหรับการจัดการและเพิ่มประสิทธิภาพระบบ บทบาทของมันในการบันทึกจึงค่อนข้างทางอ้อม โดยมีฟีเจอร์เพียงเล็กน้อยที่ช่วยในการบันทึกโดยตรง ขึ้นอยู่กับรุ่นของอุปกรณ์ที่ใช้บันทึก หรือบางอุปกรณ์อาจมีทางลัดหรือเครื่องมือสำหรับกล้อง/จอแสดงผลที่ช่วยในการบันทึกได้
ประสิทธิภาพและความพร้อมใช้งานมีความแตกต่างกันอย่างมาก อุปกรณ์ Lenovo บางรุ่นอาจรองรับฟังก์ชันการบันทึกพื้นฐาน แต่บางรุ่นอาจไม่มีเลย ความสามารถในการบันทึกแบบเต็มหน้าจอค่อนข้างจำกัดและไม่สม่ำเสมอ แต่ก็อาจมีประโยชน์สำหรับผู้ใช้ที่ต้องการใช้งานผลิตภัณฑ์ของ Lenovo ต่อไป บันทึกพอดแคสต์ เนื้อหาที่สร้างด้วยเครื่องมือพื้นฐาน
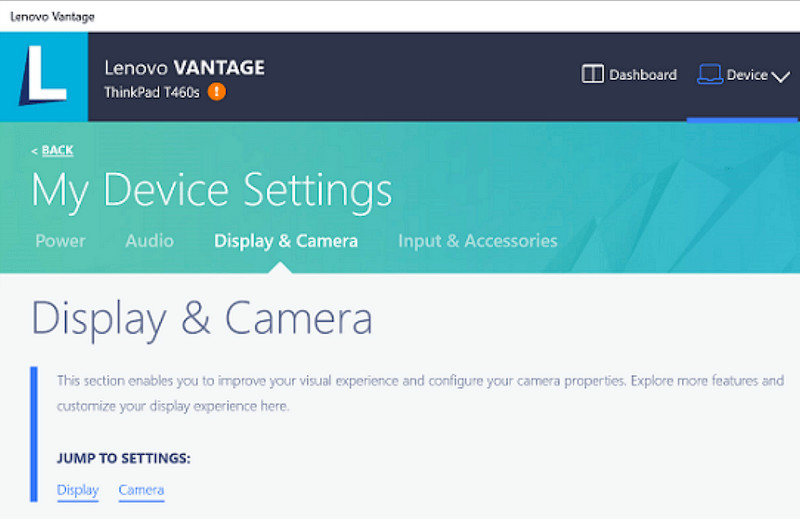
ขั้นตอนที่ 1ไปที่ เริ่ม เมนูและคลิกที่ เลโนโว แวนเทจ.
ขั้นตอนที่ 2แตะ การตั้งค่าอุปกรณ์ของฉัน > จอแสดงผลและกล้อง.
ขั้นตอนที่ 3ตรวจสอบการบันทึกหรือฟังก์ชันอื่นๆ ที่มีให้ใช้งาน
ขั้นตอนที่ 4จัดเตรียมตัวเลือกหรือทางลัดที่จำเป็นให้พร้อมใช้งาน
ขั้นตอนที่ 5บันทึกเสียงเพลงโดยใช้ฟังก์ชันที่มีให้ (ถ้าเป็นไปได้)
ขั้นตอนที่ 6ค้นหาคลิปวิดีโอที่คุณบันทึกไว้ในโฟลเดอร์วิดีโอของคุณ
วิธีที่ 3 การใช้ Legion Zone / Lenovo Nerve Center
Lenovo Nerve Center (หรือ Legion Nerve Center - เครื่องมือรุ่นใหม่จาก Legion ได้เข้ามาแทนที่ Nerve Sense แล้ว) ได้รับการปรับแต่งมาสำหรับอุปกรณ์ Lenovo โดยเฉพาะแล็ปท็อป Lenovo Legion ที่มุ่งเป้าไปที่เกมเมอร์ นอกจากนี้ยังผสานรวมเข้ากับเครื่องมือเพิ่มประสิทธิภาพการเล่นเกมอย่างแน่นหนา ทำให้ผู้ใช้สามารถถ่ายภาพหน้าจอเกมไปพร้อมๆ กับการตรวจสอบและเพิ่มประสิทธิภาพทรัพยากรระบบได้
อย่างไรก็ตาม โปรแกรมบันทึกเสียงนี้ค่อนข้างพื้นฐาน เน้นความสะดวกสบายมากกว่าการปรับแต่ง และมีเพียงตัวเลือกการบันทึกพื้นฐานเท่านั้น โดยมีการควบคุมความละเอียด อัตราบิต และการตั้งค่าขั้นสูงอย่างจำกัด นอกจากนี้ ยังใช้งานได้เฉพาะในระบบรุ่นใหม่บางระบบเท่านั้น และบางระบบก็ได้เปลี่ยนหรือถอดโปรแกรมนี้ออกจากระบบแล้ว ดังนั้นจึงไม่น่าเชื่อถือเท่าที่เคยเป็นมา
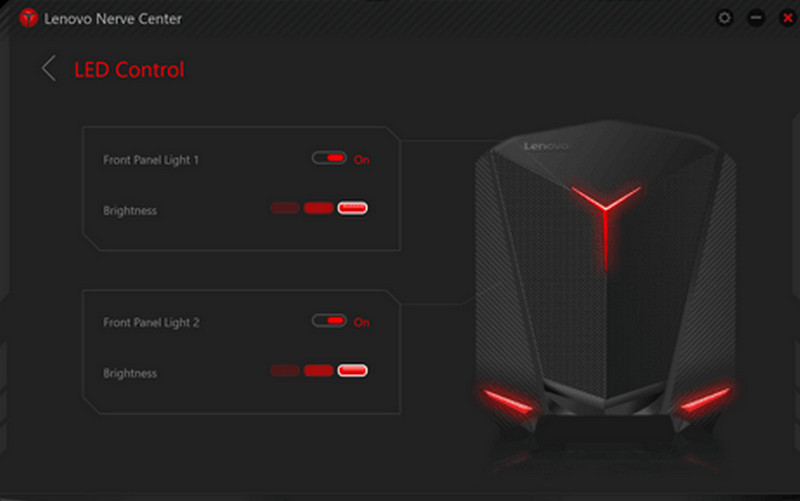
ขั้นตอนที่ 1เข้าถึง ศูนย์ประสาทเลโนโว หรือ เขตเลเจียน จากอุปกรณ์
ขั้นตอนที่ 2เข้าไปที่ส่วนเครื่องมือบันทึกและ/หรือเครื่องมือเล่นเกม
ขั้นตอนที่ 3หากมีตัวเลือก ให้เปลี่ยนการตั้งค่าการบันทึก เช่น ความละเอียดหรือคุณภาพเสียง
ขั้นตอนที่ 4เริ่มเกมหรือแอปพลิเคชัน
ขั้นตอนที่ 5บันทึกโดยใช้ปุ่มลัดหรือปุ่มเริ่มต้น
ขั้นตอนที่ 6หยุดบันทึกแล้วดูใน... วิดีโอ เพื่อตรวจสอบว่าไฟล์นั้นถูกบันทึกในโฟลเดอร์หรือไม่
วิธีที่ 4. การใช้โปรแกรมบันทึกหน้าจอ AVAide
โปรแกรมบันทึกหน้าจอ AVAide เป็นโปรแกรมบันทึกหน้าจอที่ล้ำหน้าและใช้งานได้หลากหลายกว่าโปรแกรมบันทึกหน้าจอในตัวของ Lenovo ออกแบบมาสำหรับผู้ที่ต้องการคุณภาพวิดีโอ การทำงานที่ราบรื่น และการควบคุมการบันทึกที่มากขึ้น เป็นเครื่องมือที่สมบูรณ์แบบสำหรับการสร้างวิดีโอสอนการใช้งาน บันทึกการประชุม หรือบันทึกการเล่นเกม โดยไม่ต้องตั้งค่าที่ซับซ้อน และได้ผลลัพธ์ในระดับมืออาชีพ
นอกจากจะสามารถบันทึกเสียงระบบ เสียงไมโครโฟน เว็บแคม และพื้นที่หน้าจอได้แล้ว ยังรองรับการบันทึกแบบ Full HD และ 4K โดยมีดีเลย์น้อยที่สุดเมื่อเทียบกับโปรแกรมบันทึกพื้นฐาน ทำให้เป็นแอปพลิเคชันบันทึกหน้าจอแบบครบวงจรสำหรับทั้งการทำงานและการพักผ่อน
- บันทึกวิดีโอในความละเอียด 1080p หรือ 4K ได้อย่างราบรื่นและไม่มีอาการกระตุก
- บันทึกในโหมดเต็มหน้าจอหรือโหมดกำหนดเอง ขึ้นอยู่กับความต้องการของคุณ
- บันทึกเสียงภายในและเสียงพูดพร้อมกันได้อย่างชัดเจน
- เพิ่มฟังก์ชันบันทึกภาพหน้ากล้องสำหรับวิดีโอสอนการใช้งาน การนำเสนอ หรือวิดีโอเกมเพลย์
- ตัดแต่ง บีบอัด และปรับปรุงคุณภาพเสียงบันทึกหลังจากบันทึกเสร็จแล้ว

 ดาวน์โหลดอย่างปลอดภัย
ขั้นตอนที่ 1ดาวน์โหลดและติดตั้งซอฟต์แวร์
เยี่ยมชมเว็บไซต์อย่างเป็นทางการของ AVAide Screen Recorder ดาวน์โหลด Windows Installer ติดตั้งลงในแล็ปท็อป Lenovo ของคุณ แล้วเรียกใช้งาน
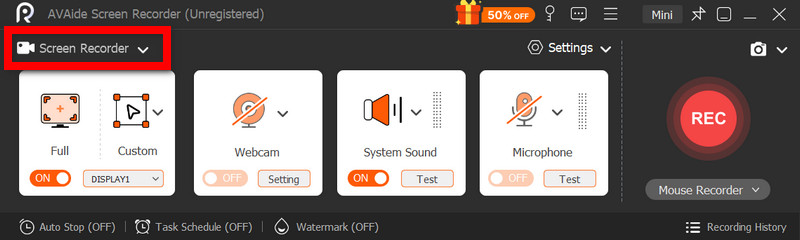
ขั้นตอนที่ 2เลือกโหมดการบันทึก
เปิดโปรแกรม จากนั้นคลิก บันทึกหน้าจอบันทึกภาพหน้าจอทั้งหมดด้วย เต็ม หรือส่วนหนึ่งของหน้าจอที่มี กำหนดเอง.
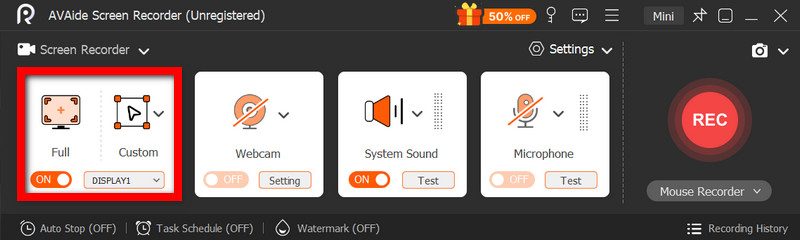
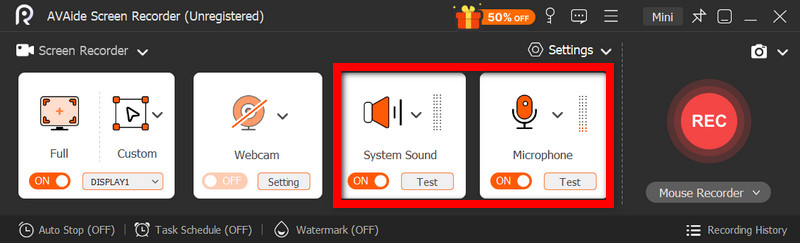
ขั้นตอนที่ 3กำหนดค่าการตั้งค่าเสียง
หากต้องการบันทึกเสียงใดๆ ที่เกิดจากคอมพิวเตอร์ ให้เปิดใช้งาน ระบบเสียงหากต้องการแสดงความคิดเห็นของคุณเอง ให้เปิดใช้งาน ไมโครโฟนนอกจากนี้ยังสามารถเปิดใช้งานเว็บแคมได้ตามความเหมาะสม
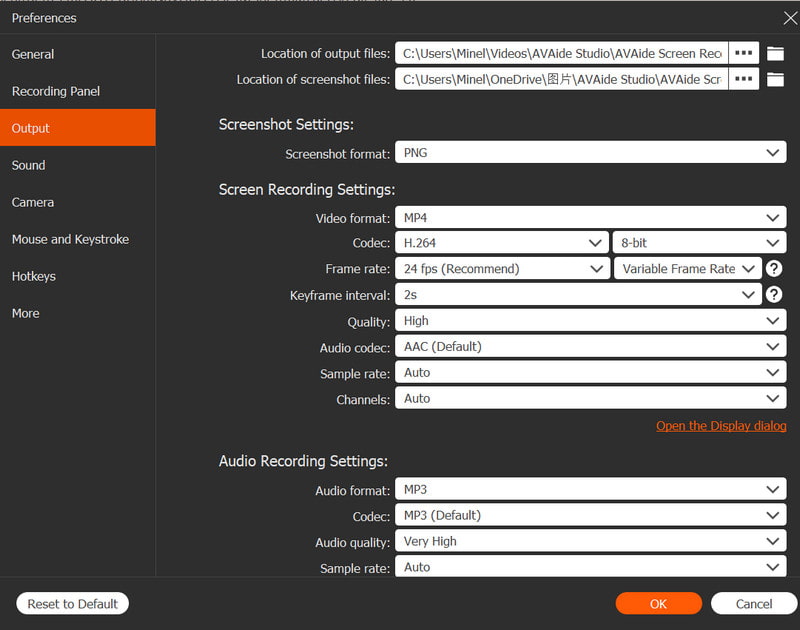
ขั้นตอนที่ 4ปรับการตั้งค่าการบันทึก
ใช้ การตั้งค่า ปุ่มสำหรับตั้งค่าคุณภาพวิดีโอ ความละเอียด อัตราเฟรม และรูปแบบเอาต์พุต เพื่อให้ได้ประสิทธิภาพการบันทึกที่ดีที่สุด
ขั้นตอนที่ 5เริ่มบันทึก
กด REC กดปุ่มเพื่อเริ่มบันทึก การบันทึก Google Meet, บทแนะนำ, การเล่นเกม หรือกิจกรรมใดๆ บนหน้าจอ สามารถบันทึกได้อย่างราบรื่น
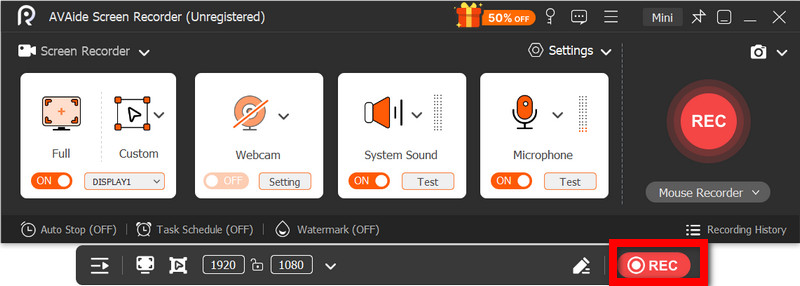
ขั้นตอนที่ 6หยุดและบันทึกการบันทึก
เมื่อคุณทำเสร็จแล้ว ให้คลิกที่ หยุด ปุ่มนี้ ดูตัวอย่างการบันทึกของคุณ แก้ไขได้อย่างรวดเร็วหากจำเป็น และบันทึกไปยังคอมพิวเตอร์ของคุณได้ทันที
วิธีที่ 5. การใช้การตั้งค่าด่วน
แท็บเล็ต Android ของ Lenovo มีตัวเลือกการบันทึกหน้าจอในตัวอยู่ในเมนูการตั้งค่าด่วน วิธีที่ดีที่สุดในการบันทึกวิดีโอสอนการใช้งาน การเล่นเกม หรือกิจกรรมแอปบนแท็บเล็ตของคุณคือการบันทึกโดยไม่ต้องดาวน์โหลดแอปจากภายนอก ใช้งานง่าย รวดเร็ว และปรับให้เหมาะสมสำหรับการใช้งานบนมือถือ จึงเหมาะอย่างยิ่งสำหรับการบันทึกอย่างรวดเร็วขณะเดินทาง
โปรแกรมนี้ขาดคุณสมบัติการแก้ไขและการปรับแต่งขั้นสูงที่พบในโปรแกรมจับภาพหน้าจออื่นๆ แต่ก็เพียงพอสำหรับการจับภาพหน้าจอแบบง่ายๆ พร้อมเสียง
ขั้นตอนที่ 1ปัดขึ้นจากด้านล่างของหน้าจอเพื่อเปิด การตั้งค่าด่วน.
ขั้นตอนที่ 2มองหา บันทึกหน้าจอ หรือ บันทึกหน้าจอ ปุ่ม หากไม่พบ ให้คลิกที่ปุ่ม แก้ไข ปุ่มนั้นแล้วเพิ่มเข้าไปในแผงควบคุมของคุณ
ขั้นตอนที่ 3คลิก บันทึกหน้าจอจากนั้นเลือกการตั้งค่าที่คุณต้องการ
ขั้นตอนที่ 4แตะ เริ่ม เพื่อเริ่มการบันทึก จะมีการนับถอยหลังก่อนเริ่มการบันทึก
ขั้นตอนที่ 5แตะที่แถบเครื่องมือลอยหรือแถบการแจ้งเตือน จากนั้นกด หยุด เพื่อยุติการบันทึก
การแก้ไขปัญหาการบันทึกหน้าจอที่พบบ่อยบน Lenovo
คุณสามารถอ่านคำแนะนำเกี่ยวกับการแก้ไขปัญหาทั่วไปเมื่อบันทึกหน้าจอในอุปกรณ์ Lenovo ได้
โดยทั่วไปแล้ว การบันทึกหน้าจอในอุปกรณ์ Lenovo มักไม่มีปัญหาใหญ่ ๆ แต่ก็มีโอกาสเกิดปัญหาได้เสมอ ขึ้นอยู่กับโปรแกรมหรืออุปกรณ์ที่ใช้บันทึกหน้าจอ ด้านล่างนี้คือปัญหาที่พบบ่อยที่สุดและวิธีแก้ไข
- โปรแกรมบันทึกหน้าจอไม่ทำงาน: รีสตาร์ทอุปกรณ์ของคุณแล้วลองใหม่อีกครั้ง สำหรับเครื่องมือในตัว เช่น Xbox Game Bar โปรดตรวจสอบให้แน่ใจว่าได้เปิดใช้งานแล้วในการตั้งค่า Windows ในส่วนเกม
- ไม่มีเสียงในการบันทึก: ตรวจสอบว่าได้เปิดเสียงระบบหรือไมโครโฟนไว้หรือไม่ก่อนทำการบันทึก และตรวจสอบให้แน่ใจว่าไม่ได้ปิดเสียงระบบอยู่
- วิดีโอกระตุกหรือคุณภาพต่ำ: ลดคุณภาพวิดีโอหรือปิดแอปพลิเคชันที่ทำงานอยู่เบื้องหลัง การอัปเกรดไดรเวอร์การ์ดจออาจช่วยเพิ่มประสิทธิภาพได้เช่นกัน
- ไม่สามารถบันทึกหน้าจอเดสก์ท็อปหรือ File Explorer ได้: นี่เป็นหนึ่งในข้อจำกัดทั่วไปของ Xbox Game Bar หากคุณต้องการบันทึกหน้าจอและจับภาพทุกอย่าง ให้ใช้โปรแกรมขั้นสูง เช่น AVAide Screen Recorder ซึ่งเป็นหนึ่งในโปรแกรมที่ดีที่สุด โปรแกรมบันทึกหน้าจอที่ดีที่สุดสำหรับ Mac และวินโดวส์
- การบันทึกไม่สำเร็จ: ตรวจสอบให้แน่ใจว่าพื้นที่เก็บข้อมูลของคุณไม่เต็ม และตรวจสอบตำแหน่งการบันทึกเริ่มต้น ในการตั้งค่า ให้เปลี่ยนโฟลเดอร์เอาต์พุต แล้วลองดูอีกครั้ง
ปุ่มบันทึกหน้าจอ Lenovo ตัวเลือกต่างๆ จะแตกต่างกันไปขึ้นอยู่กับอุปกรณ์และเครื่องมือที่คุณใช้ โดยรวมแล้ว ฟีเจอร์ในตัวและแอปพลิเคชันจากผู้พัฒนาภายนอกทำให้การบันทึกทำได้ง่าย ช่วยให้คุณมีวิธีที่ยืดหยุ่นในการบันทึก จัดเก็บ และจัดการกิจกรรมบนหน้าจอได้อย่างมีประสิทธิภาพบนอุปกรณ์ Lenovo
เกี่ยวกับผู้เขียน

จับภาพกิจกรรมบนหน้าจอด้วยเสียง การประชุมออนไลน์ วิดีโอการเล่นเกม เพลง เว็บแคม ฯลฯ