ลองนึกภาพว่าคุณกำลังพยายามบันทึกวิดีโอแนะนำการใช้งาน ช่วงเวลาการเล่นเกม หรือการประชุมออนไลน์ แต่คุณไม่แน่ใจว่าจะบันทึกอย่างไรบนอุปกรณ์ของคุณ การรู้ว่า... วิธีบันทึกหน้าจอบน iPad การบันทึกหน้าจอช่วยให้บันทึกและแบ่งปันช่วงเวลาเหล่านี้ได้ง่ายขึ้น คู่มือนี้จะแนะนำคุณเกี่ยวกับวิธีการเปิดใช้งานการบันทึก การใช้เสียง การแก้ไขปัญหา และการปรับปรุงคุณภาพเพื่อให้การบันทึกหน้าจอราบรื่นและดียิ่งขึ้นทุกครั้ง
ส่วนที่ 1 วิธีเปิดใช้งานการบันทึกหน้าจอใน iPad
ไม่ต้องกังวลไป ปุ่มบันทึกหน้าจอยังไม่ได้ติดตั้งอยู่ในศูนย์ควบคุมของคุณ เว้นแต่ว่า iPad ของคุณจะไม่มีฟังก์ชันนี้ Apple ได้รวมฟังก์ชันนี้ไว้ใน iPadOS แล้ว และคุณต้องเปิดใช้งานก่อนจึงจะสามารถใช้งานได้ เมื่อเพิ่มแล้ว คุณสามารถบันทึกหน้าจอได้ทุกเมื่อด้วยการปัดและแตะเพียงครั้งเดียว
ขั้นตอนที่ 1แตะ การตั้งค่า แอปบน iPad ของคุณ
ขั้นตอนที่ 2คลิกที่ ศูนย์กลางการควบคุม ในเมนูขณะที่คุณเลื่อนลงมา
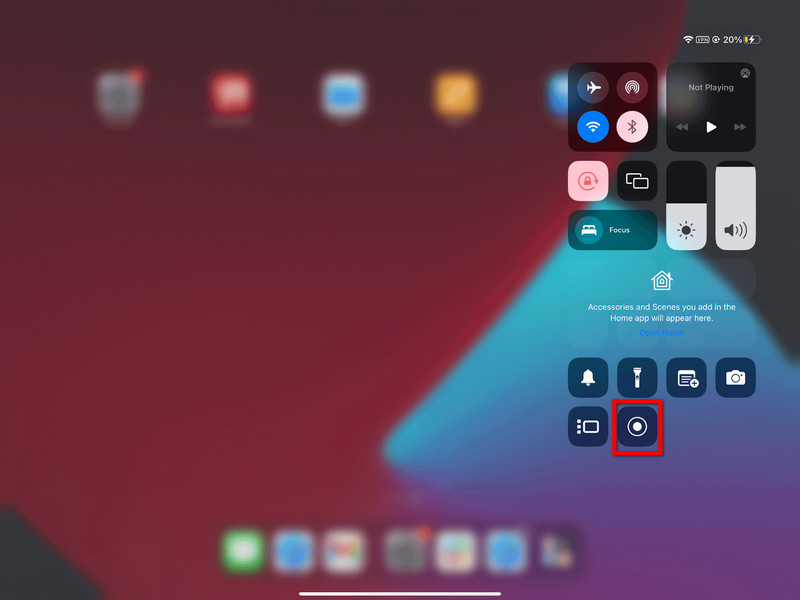
ขั้นตอนที่ 3แตะ + (เพิ่ม) ปุ่มใน การบันทึกหน้าจอ ส่วนหนึ่งของรายการตัวควบคุมที่มีอยู่
ขั้นตอนที่ 4ในการเข้าถึง ศูนย์กลางการควบคุมปัดลงจากมุมบนขวาของหน้าจอ ตอนนี้คุณควรจะเห็นบันทึกแล้ว
ส่วนที่ 2 วิธีการบันทึกหน้าจอบน iPad
เมื่อเปิดใช้งานแล้ว การบันทึกหน้าจอ iPad ของคุณจะง่ายและรวดเร็ว ฟีเจอร์บันทึกหน้าจอในตัวของ iPadOS นั้นใช้งานง่าย ช่วยให้คุณบันทึกการเล่นเกม วิดีโอแนะนำ หรือแม้แต่การสนทนาทางวิดีโอโดยไม่ต้องติดตั้งแอปพลิเคชันจากภายนอก
ขั้นตอนที่ 1แตะค้างไว้ที่มุมขวาบนของหน้าจอ iPad แล้วลากลงมา
ขั้นตอนที่ 2แตะที่ การบันทึกหน้าจอ กดปุ่ม จะมีตัวนับถอยหลัง 3 วินาทีก่อนเริ่มบันทึก
(ไม่จำเป็น) กดค้างไว้ การบันทึกหน้าจอ กดปุ่มแล้วแตะ ไมโครโฟน เพื่อเปิดใช้งานเมื่อคุณต้องการบันทึกเสียงของคุณ
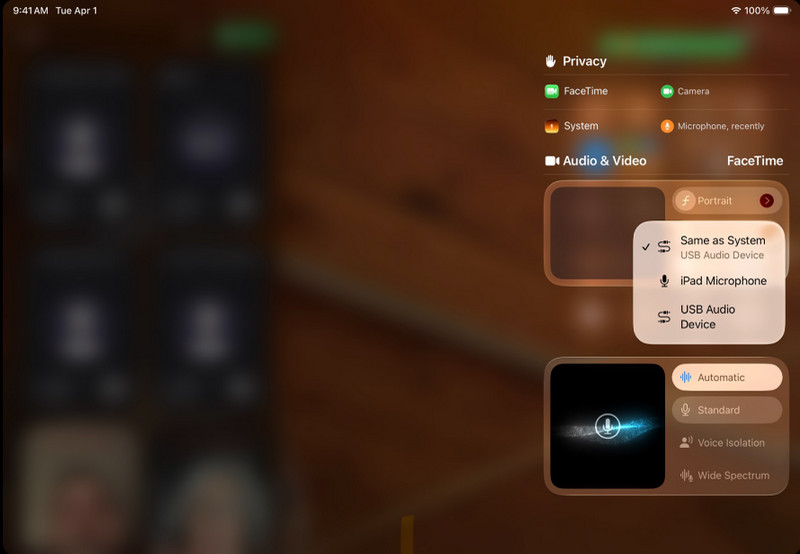
ขั้นตอนที่ 3เลือกแอปหรือกิจกรรมที่คุณต้องการบันทึก
ขั้นตอนที่ 4แตะที่แถบสถานะสีแดง จากนั้นแตะอีกครั้ง หยุดหรือกลับไปที่ ศูนย์กลางการควบคุม และแตะ บันทึก ปุ่มอีกครั้ง
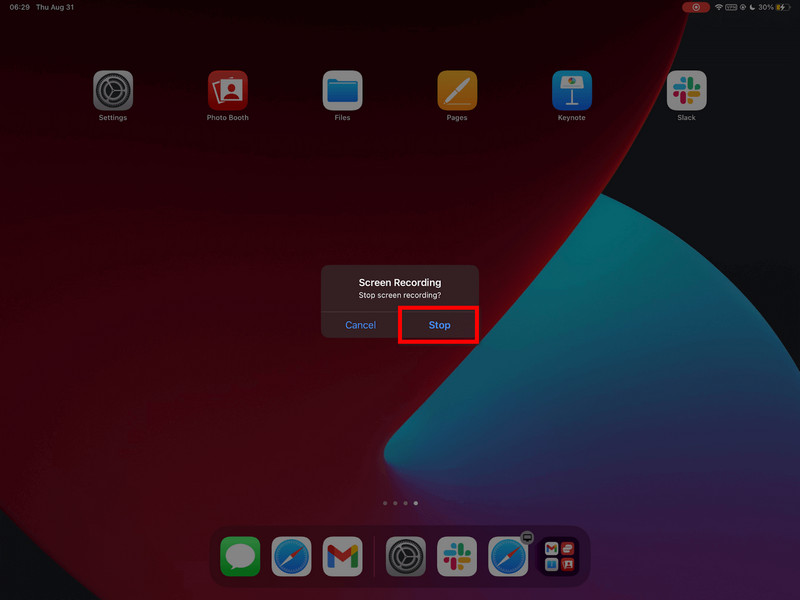
ขั้นตอนที่ 5วิดีโอของคุณจะถูกบันทึกโดยอัตโนมัติใน ภาพถ่าย แอปที่คุณสามารถแก้ไขหรือแชร์ได้
ส่วนที่ 3 วิธีการบันทึกหน้าจอ iPad พร้อมเสียง
การบันทึกหน้าจอและเสียงด้วย iPad มีประโยชน์สำหรับการสอน การเล่นเกม ชั้นเรียนออนไลน์ และการสาธิต การบันทึกบน iPadOS ทำงานได้ในระดับจำกัดเท่านั้น และสิ่งสำคัญคือต้องเข้าใจความสัมพันธ์ระหว่างไมโครโฟนและเสียงของระบบก่อนทำการบันทึก
ข้อแตกต่างที่สำคัญ: ไมโครโฟน กับ ระบบเสียง
| ประเภทเสียง | สิ่งที่บันทึกไว้ | พร้อมใช้งานบน iPadOS | กรณีการใช้งานที่ดีที่สุด |
| เสียงไมโครโฟน | ไมโครโฟนของ iPad จะบันทึกเสียงของคุณและเสียงภายนอกต่างๆ | มีอยู่ | คำอธิบาย, บทช่วยสอน, การบรรยาย |
| ระบบเสียง | เสียงภายในจากแอป เกม วิดีโอ และการเล่นสื่อต่างๆ | ไม่ได้รับการสนับสนุนโดยตรง | ต้องใช้เครื่องมือภายนอกหรือวิธีการแก้ไขปัญหาเฉพาะหน้า |
ขั้นตอนการบันทึกเสียงด้วยไมโครโฟน
ขั้นตอนที่ 1ปัดขึ้นจากมุมขวาบนของหน้าจอ iPad เพื่อเปิด ศูนย์กลางการควบคุม.
ขั้นตอนที่ 2กดค้างไว้ การบันทึกหน้าจอ กดปุ่มเพื่อดูตัวเลือกเพิ่มเติม
ขั้นตอนที่ 3กดปุ่มไมโครโฟนเพื่อเปิดใช้งาน ไฟแสดงสถานะจะเปลี่ยนเป็นสีแดงเพื่อแสดงว่ากำลังบันทึกเสียงอยู่
ขั้นตอนที่ 4คลิก เริ่มบันทึกและเมื่อการนับถอยหลัง 3 วินาทีสิ้นสุดลง การบันทึกก็จะเริ่มต้นขึ้น
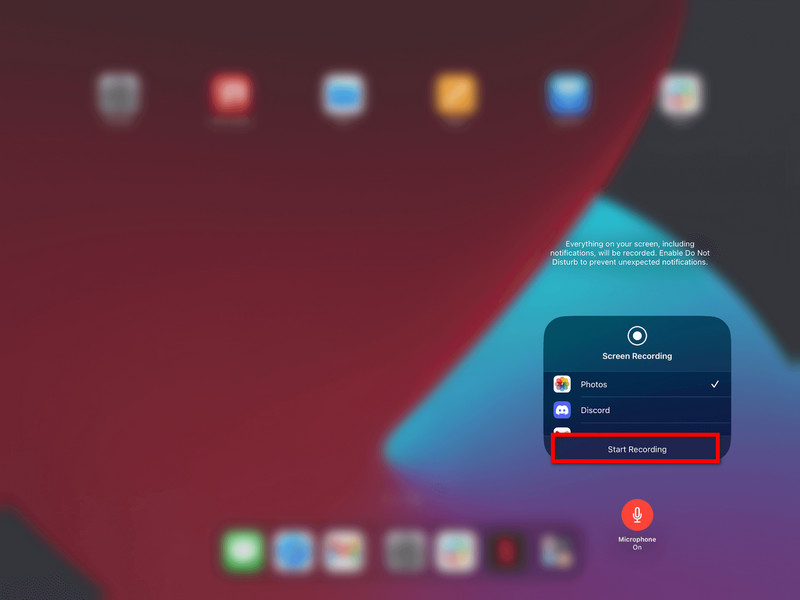
ขั้นตอนที่ 5ทำซ้ำการเคลื่อนไหวที่คุณต้องการบันทึก หากไมโครโฟนเปิดอยู่ เสียงของคุณจะถูกบันทึกด้วย
ขั้นตอนที่ 6แตะแถบสถานะสีแดงที่ด้านบนของหน้าจอ หรือกลับไปที่ ศูนย์กลางการควบคุม และแตะ บันทึก ปุ่มอีกครั้ง
ขั้นตอนที่ 7วิดีโอจะถูกบันทึกโดยอัตโนมัติใน ภาพถ่าย แอปที่คุณสามารถดูหรือแก้ไขได้
ทางเลือกอื่นสำหรับการบันทึกเสียงระบบ
น่าเสียดายที่เนื่องจากข้อจำกัดของระบบ คุณไม่สามารถบันทึกเสียงภายในโดยตรงบน iPad ได้ ดังนั้นจึงจำเป็นต้องใช้โซลูชันที่ใช้คอมพิวเตอร์ เครื่องมือที่ดีเยี่ยมอย่างหนึ่งคือ โปรแกรมบันทึกหน้าจอ AVAideซึ่งช่วยให้คุณสามารถสะท้อนหน้าจอ iPad และบันทึกหน้าจอและเสียงระบบได้พร้อมกัน
AVAide Screen Recorder เป็นซอฟต์แวร์บันทึกหน้าจอคุณภาพสูงที่บันทึกกิจกรรมบนหน้าจอได้อย่างคมชัด สามารถบันทึกได้โดยไม่กระตุกหรือหน่วงเวลาได้ถึงความละเอียด 4K/1080p นอกจากนี้ยังสามารถบันทึกเสียงระบบและเสียงไมโครโฟนพร้อมกันได้ เหมาะสำหรับบทเรียน เกม และการนำเสนอ
- การบันทึกคุณภาพสูงช่วยให้คุณบันทึกวิดีโอในความละเอียด 4K หรือ 1080p ด้วยภาพที่คมชัดและมีคุณภาพสูง
- ระบบเสียงสองภาษา
- รองรับการบันทึกเสียงจากระบบและเสียงจากไมโครโฟนพร้อมกัน
- ฟังก์ชัน Screen Mirroring ของ iOS จะแสดงและบันทึกหน้าจอ iPad ของคุณบนพีซีหรือ Mac
- โหมดหน้าจอที่ยืดหยุ่นรองรับการบันทึกแบบเต็มหน้าจอหรือแบบกำหนดพื้นที่เองได้
- เครื่องมือตัดต่อในตัวช่วยให้คุณตัดต่อ ปรับปรุง และแก้ไขไฟล์บันทึกได้อย่างรวดเร็ว

 ดาวน์โหลดอย่างปลอดภัย
ขั้นตอนที่ 1ดาวน์โหลดและติดตั้ง
เยี่ยมชมเว็บไซต์อย่างเป็นทางการและดาวน์โหลดโปรแกรม AVAide Screen Recorder ดาวน์โหลด AVAide Screen Recorder จากเว็บไซต์อย่างเป็นทางการ เมื่อติดตั้งเสร็จแล้ว คุณสามารถเรียกใช้งานได้จากคอมพิวเตอร์ Windows หรือ Mac ของคุณ
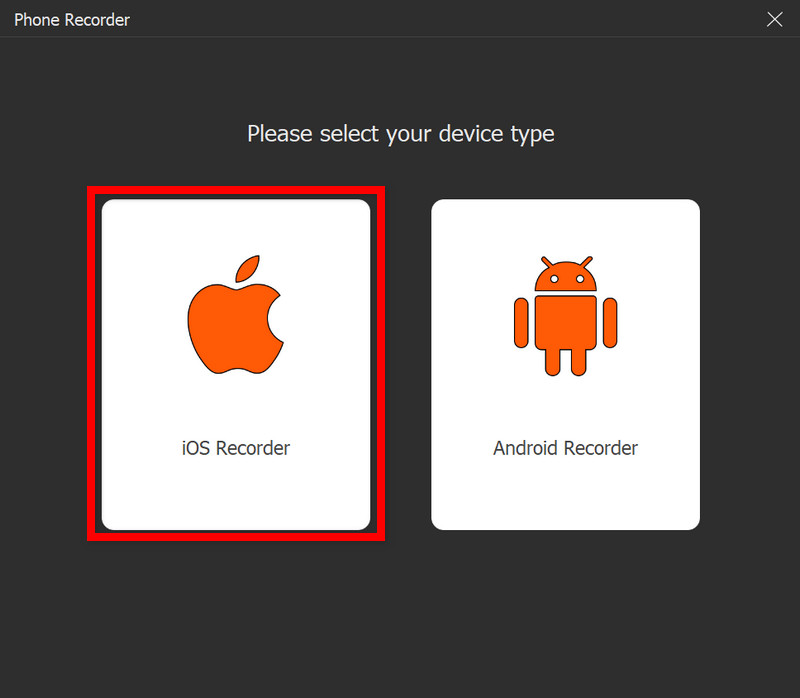
ขั้นตอนที่ 2เลือกตัวเลือก iOS
ในหน้าจอหลัก ให้คลิก เครื่องบันทึกโทรศัพท์จากนั้นเลือก เครื่องบันทึก iOS จากรายการตัวเลือก (iOS และ Android)
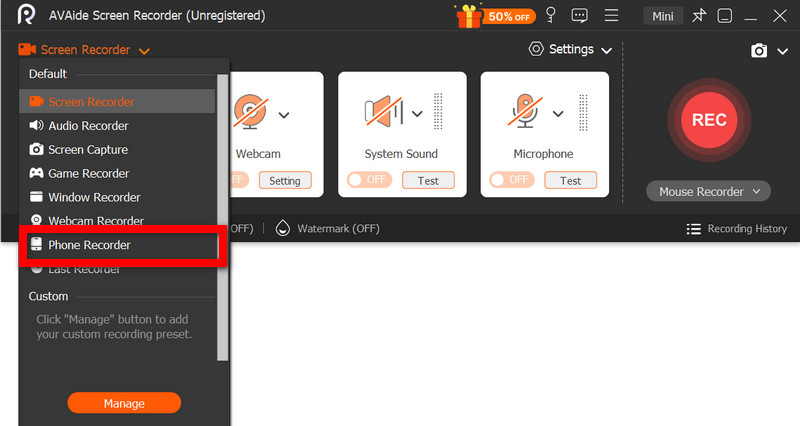
ขั้นตอนที่ 3เชื่อมต่อ iPad กับคอมพิวเตอร์
การสะท้อนหน้าจอ iPad ไปยังคอมพิวเตอร์แบบไร้สายนั้นสามารถทำได้ผ่านเครือข่ายเดียวกัน หรือผ่านสาย USB หากมี ในแอป Screen Mirroring บน iPad ของคุณ ให้เลือกอุปกรณ์ AVAide คุณจะเห็นหน้าจอ iPad แสดงบนคอมพิวเตอร์เมื่อเชื่อมต่อแล้ว
ขั้นตอนที่ 4เริ่มบันทึก
เมื่อทำการสะท้อนภาพสำเร็จแล้ว ให้กด บันทึก เพื่อเริ่มบันทึกหน้าจอ iPad เสียงระบบ และสัญญาณเสียงจากไมโครโฟน (ถ้ามี)
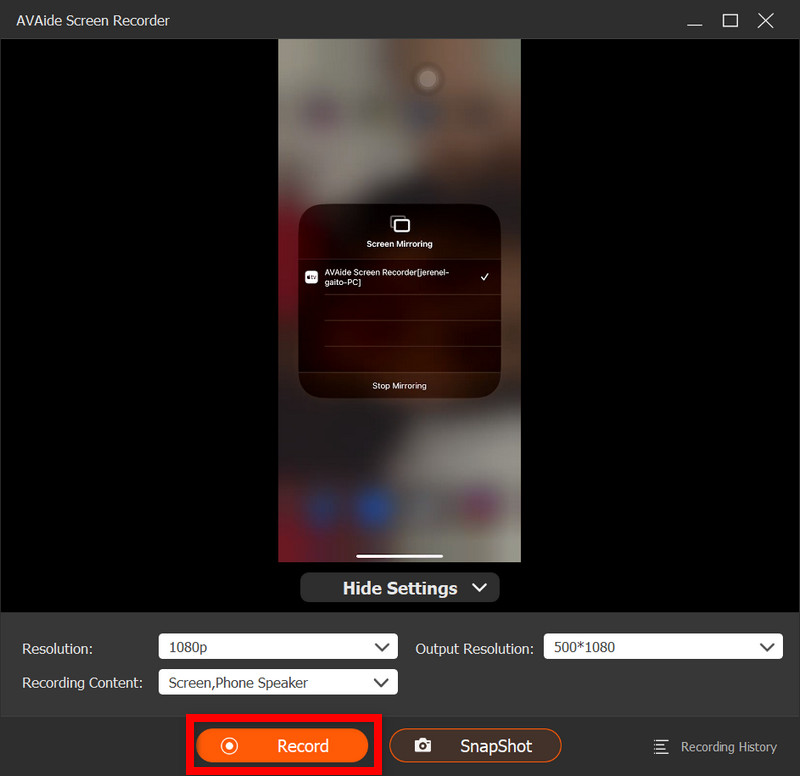
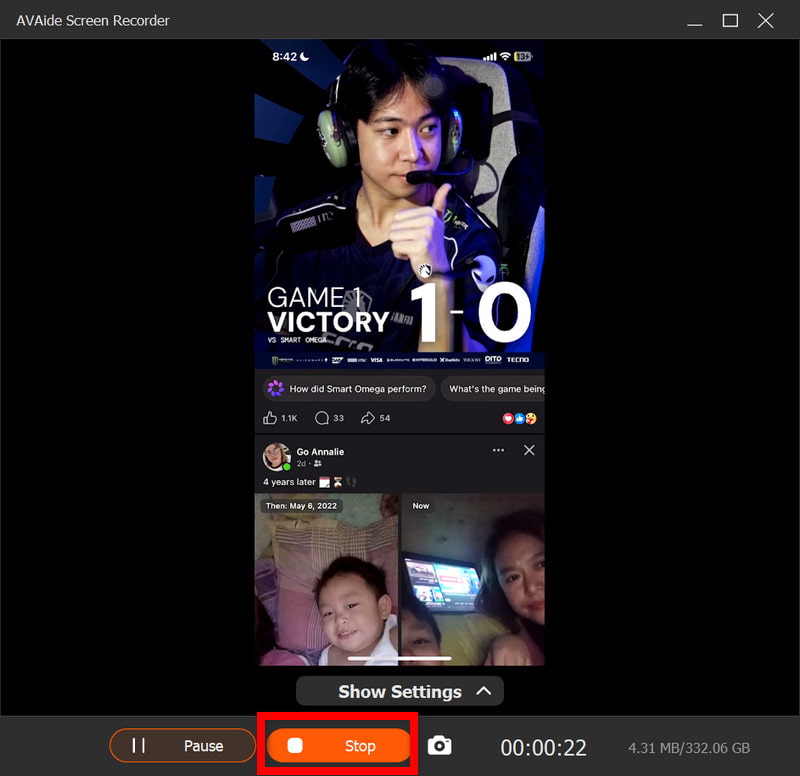
ขั้นตอนที่ 5หยุดการบันทึก
กด หยุด กดปุ่มเมื่อบันทึกเสร็จแล้ว การบันทึกของคุณจะถูกบันทึกในคอมพิวเตอร์โดยอัตโนมัติ
ขั้นตอนที่ 6แก้ไขวิดีโอ
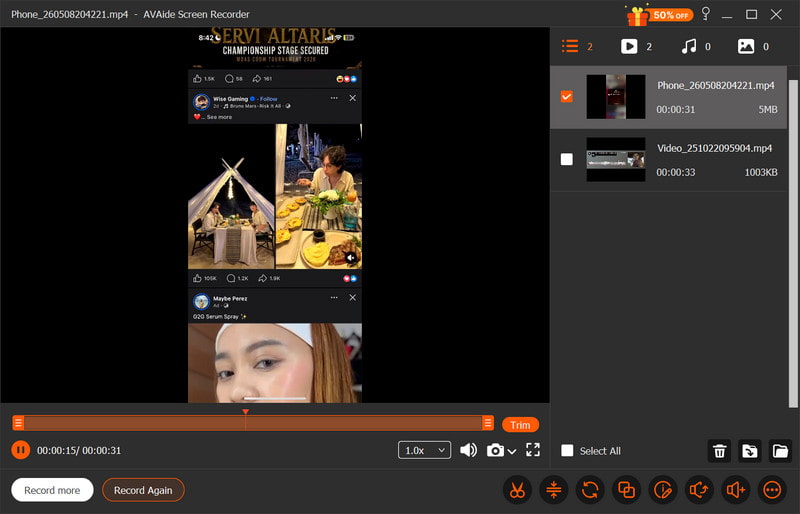
เมื่อบันทึกเสร็จแล้ว หน้าต่างแสดงตัวอย่างจะเปิดขึ้น คุณสามารถตัดส่วนที่ไม่ต้องการ ปรับเสียง หรือแก้ไขเล็กน้อยก่อนส่งออกวิดีโอฉบับสุดท้ายได้
ส่วนที่ 4. ทำไมฉันถึงบันทึกหน้าจอใน iPad ไม่ได้?
ปัญหาการบันทึกวิดีโอใน iPad มักเกิดจากการตั้งค่า ข้อจำกัด หรือปัญหาด้านประสิทธิภาพ ปัญหาและสาเหตุที่พบบ่อยที่สุดแสดงไว้ด้านล่าง
1. ปุ่มหายไปทั้งหมด
ปัญหานี้จะเกิดขึ้นหากไม่ได้ติดตั้งโปรแกรมบันทึกหน้าจอไว้ในศูนย์ควบคุม คุณต้องเพิ่มโปรแกรมบันทึกหน้าจอด้วยตนเองใน การตั้งค่า > ศูนย์ควบคุม เพื่อให้ปรากฏขึ้นที่นั่น
2. ปุ่มเป็นสีเทาหรือไม่ตอบสนอง
โดยทั่วไป สาเหตุเกิดจากการจำกัดการบันทึกหน้าจอจากการตั้งค่าระบบหรือการควบคุมของอุปกรณ์
- สามารถตั้งค่าจำกัดเวลาการใช้งานหน้าจอได้
- การบันทึกอาจถูกห้ามโดยการตั้งค่าโปรไฟล์อุปกรณ์ของโรงเรียนหรือที่ทำงาน
- แอปบางแอปอาจไม่อนุญาตให้คุณถ่ายภาพหน้าจอขณะใช้งาน
3. การบันทึกจะหยุดทันทีหลังจากเริ่มต้น
ปัญหาดังกล่าวส่วนใหญ่มักเกี่ยวข้องกับระบบหรือปัญหาในการจัดเก็บข้อมูล เช่น พื้นที่ว่างไม่เพียงพอ หรือแอปพลิเคชันอื่น ๆ รบกวนกระบวนการบันทึก
4. ไม่มีเสียงในไฟล์บันทึก
ปัญหานี้เกิดขึ้นเมื่อการเชื่อมต่อเสียงไม่ถูกต้อง หรือเมื่อผู้ใช้คาดหวังเสียงภายในเครื่อง เนื่องจากไม่สามารถบันทึกหน้าจอภายในเครื่องบน iPadOS ได้ ดังนั้นจึงต้องใช้... โปรแกรมบันทึกหน้าจอที่ดีที่สุดสำหรับ Mac สามารถช่วยบันทึกเสียงระบบได้อย่างถูกต้อง
5. การบันทึกภาพกระตุกหรือคุณภาพต่ำ
โดยทั่วไปแล้ว สาเหตุนี้เกิดจากปัจจัยใดปัจจัยหนึ่งต่อไปนี้: พื้นที่เก็บข้อมูลในอุปกรณ์มีจำกัด, การใช้งานแอปพลิเคชันมากเกินไป หรือ iPad รุ่นเก่าที่ไม่สามารถบันทึกที่ความละเอียดสูงเช่นนี้ได้
ส่วนที่ 5. เคล็ดลับระดับมืออาชีพเพื่อการบันทึกหน้าจอที่ดีขึ้น
เมื่อบันทึกวิดีโอบน iPadOS โปรดตรวจสอบให้แน่ใจว่า iPad ของคุณได้รับการตั้งค่าอย่างถูกต้อง เพื่อให้ได้การบันทึกที่ราบรื่น ชัดเจน และมีคุณภาพสูง ต่อไปนี้เป็นเคล็ดลับที่เป็นประโยชน์บางประการสำหรับการปรับคุณภาพวิดีโอและเสียงให้เหมาะสม
1. เพิ่มพื้นที่เก็บข้อมูล
ก่อนเริ่มบันทึก โปรดตรวจสอบให้แน่ใจว่ามีพื้นที่ว่างบน iPad ของคุณเพียงพอ เพื่อป้องกันอาการหน่วงหรือผิดพลาด ซึ่งอาจทำให้เกิดปัญหาในการบันทึกขณะที่คุณกำลังถ่ายทำ
2. ปิดแอปพลิเคชันที่ไม่ได้ใช้งาน
ปิดแอปพลิเคชันที่ทำงานอยู่เบื้องหลังโดยไม่จำเป็นทั้งหมด เพื่อปรับปรุงประสิทธิภาพของระบบและป้องกันการหยุดชะงักหรือความล่าช้าขณะบันทึก
3. เปิดใช้งานโหมดห้ามรบกวน
เปิดใช้งานโหมดห้ามรบกวนเพื่อป้องกันไม่ให้สายเรียกเข้า ข้อความ และการแจ้งเตือนต่างๆ ปรากฏบนหน้าจอและรบกวนคุณขณะบันทึก
4. รักษาการตั้งค่าหน้าจอให้คงที่
ห้ามปรับความสว่าง การวางแนว หรือการตั้งค่าระบบขณะบันทึก เนื่องจาก1การเปลี่ยนแปลงอย่างกะทันหันอาจส่งผลต่อความสม่ำเสมอของวิดีโอและคุณภาพการบันทึก
5. ทดสอบเสียงก่อน
ก่อนเริ่มถ่ายวิดีโอ ให้ลองบันทึกทดสอบสั้นๆ เพื่อตรวจสอบว่าระดับเสียงไมโครโฟนถูกต้อง และเสียงของคุณชัดเจนและถูกบันทึกอย่างเหมาะสม
6. ใช้หน้าจอหลักที่สะอาดตา
จัดระเบียบหน้าจอหลักของคุณ หรือย้ายแอปหรือแอปพลิเคชันที่สำคัญไปยังโฟลเดอร์อื่น เพื่อให้การบันทึกของคุณดูมีสมาธิ เป็นมืออาชีพ และไม่รกตา
7. บันทึกในสภาพแวดล้อมที่เงียบสงบ
หากคุณสามารถบันทึกเสียงในห้องที่เงียบสงบและมีเสียงรบกวนจากภายนอกน้อย ไมโครโฟนของคุณจะรับเสียงพูดได้ดีขึ้นและลดเสียงรบกวนที่ไม่ต้องการได้ การบันทึกเสียงบนเครื่อง Mac หรือไอแพด
การบันทึกหน้าจอ iPad เป็นวิธีที่ง่ายแต่ทรงพลังในการบันทึกบทแนะนำ การเล่นเกม และช่วงเวลาสำคัญต่างๆ จากอุปกรณ์ของคุณโดยตรง ด้วยการตั้งค่าและเคล็ดลับที่เหมาะสม คุณสามารถปรับปรุงคุณภาพทั้งวิดีโอและเสียงเพื่อผลลัพธ์ที่ดีขึ้น ไม่ว่าจะใช้เครื่องมือในตัวหรือซอฟต์แวร์ภายนอก การบันทึกก็จะง่ายขึ้นและน่าเชื่อถือมากขึ้น
เกี่ยวกับผู้เขียน

จับภาพกิจกรรมบนหน้าจอด้วยเสียง การประชุมออนไลน์ วิดีโอการเล่นเกม เพลง เว็บแคม ฯลฯ