ไม่ว่าคุณจะเป็นเกมเมอร์ที่ต้องการบันทึกสถิติคะแนนสูงสุด มืออาชีพที่สร้างบทช่วยสอน หรือนักเรียนที่บันทึกการบรรยายทางไกล การรู้ข้อมูลเหล่านี้จะเป็นประโยชน์ วิธีการบันทึกหน้าจอใน Windows การบันทึกหน้าจอเดสก์ท็อปไม่ใช่เรื่องฟุ่มเฟือยอีกต่อไป แต่เป็นสิ่งจำเป็น ยุคสมัยที่ต้องใช้ซอฟต์แวร์ราคาแพงจากบริษัทอื่นเพื่อบันทึกหน้าจอเดสก์ท็อปนั้นหมดไปแล้ว ปัจจุบัน Windows 10 และ Windows 11 มาพร้อมกับฟีเจอร์การบันทึกที่มีประสิทธิภาพในตัว
ตั้งแต่ Xbox Game Bar ที่ใช้งานง่าย ไปจนถึง Snipping Tool เวอร์ชันอัปเดต และแม้แต่ตัวเลือกคุณภาพระดับมืออาชีพอย่าง OBS Studio มีหลายวิธีในการบันทึกหน้าจอพร้อมวิดีโอและเสียงคุณภาพสูงบนพีซีของคุณ ในคู่มือนี้ เราจะแนะนำวิธีการที่ดีที่สุดในการบันทึกหน้าจอ ปรับการตั้งค่าเสียง และบันทึกคลิปของคุณในรูปแบบที่เหมาะสมเพื่อให้แชร์ได้ง่าย
ส่วนที่ 1: วิธีการบันทึกหน้าจอแบบสำเร็จรูปบน Windows
ในระบบปฏิบัติการ Windows ตั้งแต่เวอร์ชัน 7 ถึง 11 มีวิธีการบันทึกหน้าจอพื้นฐานอยู่สองวิธี ได้แก่ Snipping Tool และ Xbox Game Bar คุณอาจไม่เคยสังเกตเห็นมาก่อน แต่ตอนนี้คุณสามารถเรียนรู้วิธีใช้เครื่องมือเหล่านี้เพื่อเริ่มการบันทึกหน้าจอได้
1. เครื่องมือจับภาพหน้าจอ
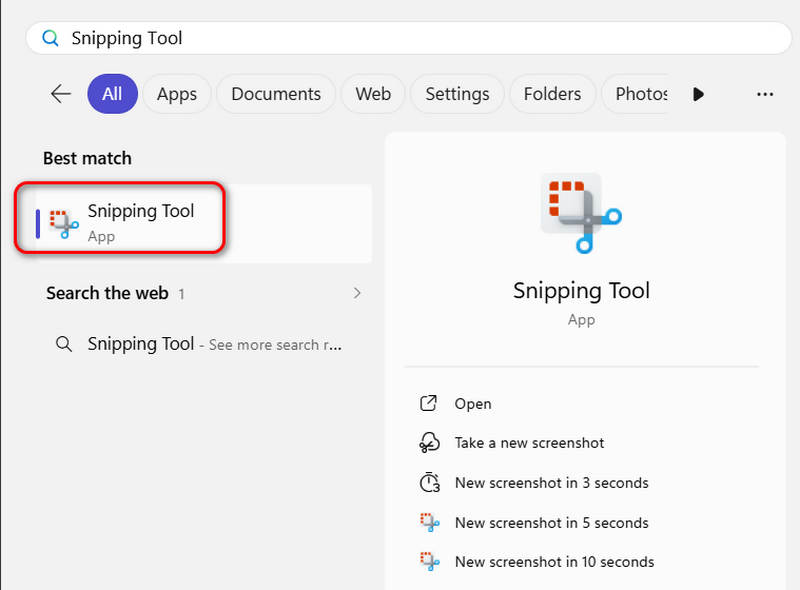
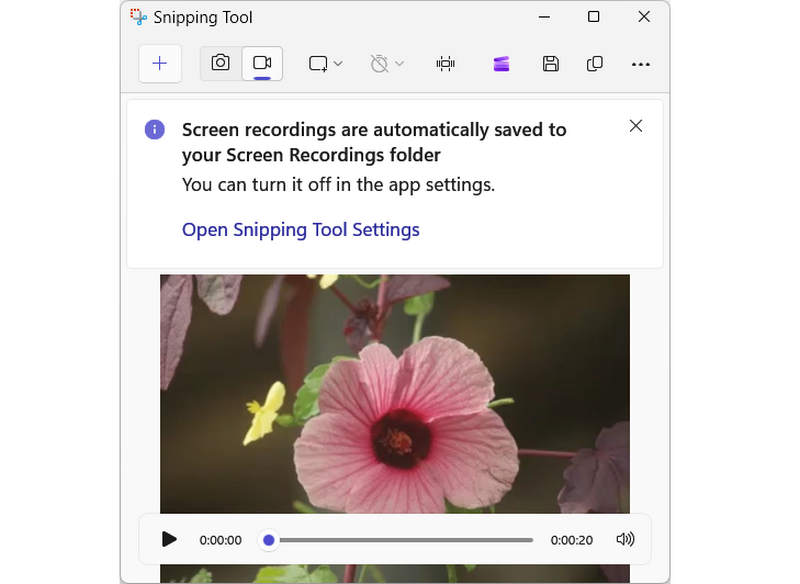
ขั้นตอนที่ 1เปิด ค้นหา เปิดกล่องข้อความทางด้านซ้ายล่างของเดสก์ท็อป แล้วค้นหา เครื่องมือสนิปจากนั้น ค้นหาและเปิดโปรแกรมนี้
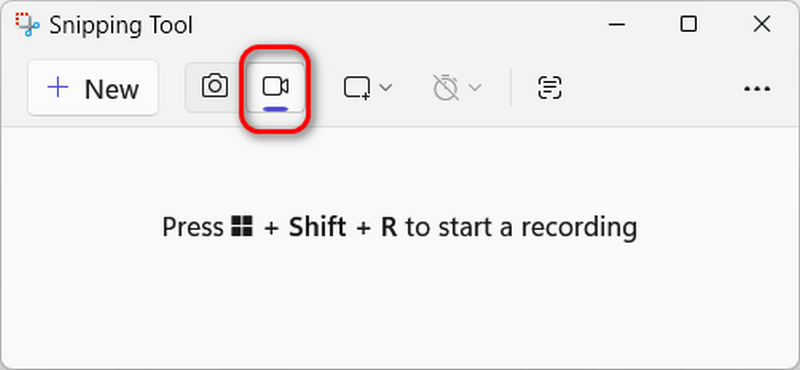
ขั้นตอนที่ 2บนหน้าจอโปรแกรม ให้เลือก บันทึก มีไอคอนรูปกล้องอยู่ จากนั้นทำตามคำแนะนำบนหน้าจอเพื่อกด Windows + กะ + อาร์จากนั้น คุณต้องลากส่วนใดส่วนหนึ่งบนหน้าจอแล้วคลิก เริ่ม ปุ่มสำหรับเริ่มบันทึกหน้าจอในคอมพิวเตอร์ Windows ของคุณ
ขั้นตอนที่ 3การบันทึกของคุณจะถูกบันทึกโดยอัตโนมัติไปยังโฟลเดอร์บันทึกหน้าจอเริ่มต้นในหมวดวิดีโอ คุณยังสามารถเปิดการตั้งค่าเครื่องมือจับภาพหน้าจอเพื่อเปลี่ยนตำแหน่งได้อีกด้วย
2. Xbox Game Bar
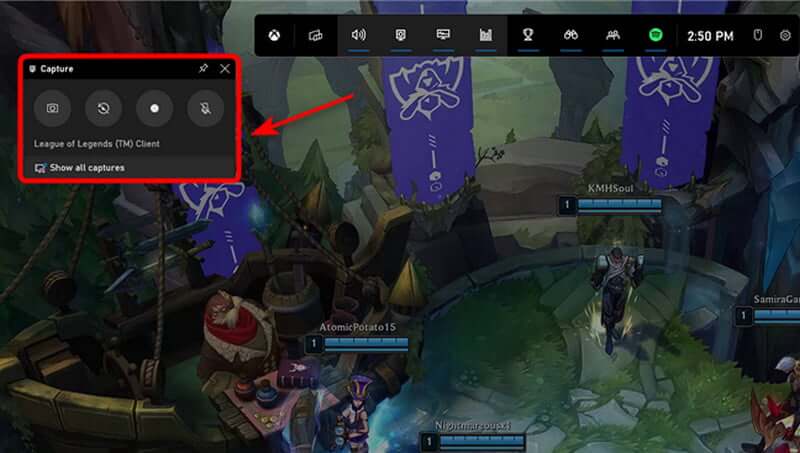
Xbox Game Bar เป็นโอเวอร์เลย์สำหรับเล่นเกมที่มีประสิทธิภาพ ซึ่งผสานรวมเข้ากับ Windows 10 และ 11 โดยตรง ออกแบบมาเพื่อให้คุณเข้าถึงเครื่องมือที่จำเป็นได้โดยไม่รบกวนการเล่นเกมของคุณ เพียงแค่กด Win + G คุณก็สามารถสลับวิดเจ็ตต่างๆ เพื่อบันทึกคลิปเกมคุณภาพสูง ถ่ายภาพหน้าจอ และตรวจสอบประสิทธิภาพของระบบแบบเรียลไทม์ได้ แต่ไม่ใช่แค่โปรแกรมบันทึกเกมโดยเฉพาะ คุณยังสามารถใช้ Xbox Game Bar เพื่อบันทึกหน้าจอใน Windows ได้อีกด้วย ไม่ว่าคุณจะกำลังเล่นเกมกับเพื่อนๆ หรือจัดการทรัพยากรของพีซี แอปพลิเคชันในตัวนี้จะช่วยให้คุณไม่ต้องกด Alt-Tab เพื่อออกจากเกมอีกต่อไป ดูวิดีโอด้านล่างเพื่อดูวิธีการใช้งานฟีเจอร์การบันทึกหลักๆ อย่างละเอียด
ขั้นตอนที่ 1เปิดซอฟต์แวร์ในตัว
ก่อนอื่นให้เปิด Xbox Game Bar และเปิดใช้งานวิดเจ็ตการจับภาพ คุณสามารถบันทึกการเล่นเกมทั้งหมดของคุณสำหรับลูกหลานหรือบันทึกไฮไลท์ เช่น การต่อสู้กับบอสล่าสุดของคุณหรือการสังหาร Penta
ขั้นตอนที่ 2เริ่มบันทึก
คุณสามารถเริ่มบันทึกภาพหน้าจอใน Windows ได้ทันทีโดยการเลือก บันทึก ต่อจากนี้. หากคุณต้องการจับภาพหน้าจอ คุณสามารถทำได้โดยคลิกที่ไอคอนกล้องและถ่ายภาพสิ่งที่เกิดขึ้นในเกม
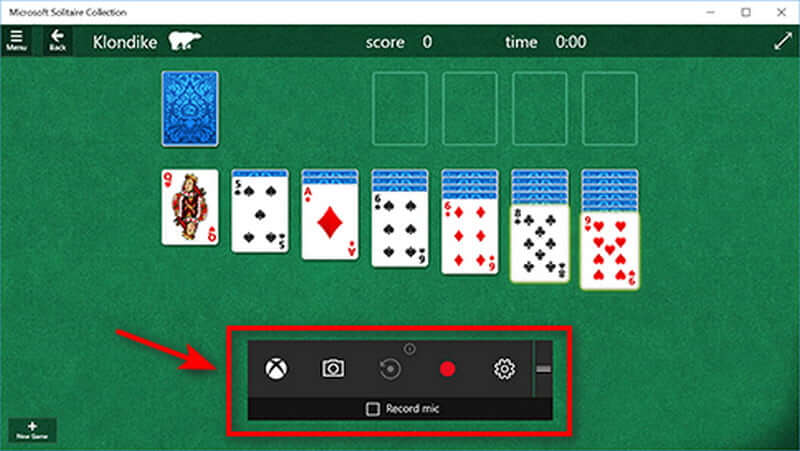
ขั้นตอนที่ 3ปรับระดับเสียง
การเปิดใช้เครื่องมือจะแสดงช่องสัญญาณเสียงทั้งหมดที่แสดงเสียงบนอุปกรณ์ Windows ของคุณ หากคุณต้องการฟังเพลงขณะเล่นเกม คุณสามารถปรับระดับเสียงของแต่ละแทร็กเสียงได้

- นอกจากนี้ คุณยังสามารถใช้วิดเจ็ตเสียงเพื่อปรับระดับเสียงไมโครโฟนได้หากต้องการบันทึกหน้าจอพร้อมเสียงบน Windows ในกรณีนี้ ฟังก์ชันนี้จะมีประโยชน์เพราะคุณสามารถควบคุมได้ว่าเสียงของคุณจะถูกบันทึกดังหรือเบาแค่ไหน
ขั้นตอนที่ 4หยุดการบันทึก
กด Windows แป้นโลโก้ + Alt + G หรือคลิกไอคอนสี่เหลี่ยมเพื่อหยุดการบันทึกในเกม PC แบบเต็มหน้าจอ เปิดแอป Xbox โดยกดปุ่ม Xbox แล้วเลือก จับภาพ เพื่อแก้ไขคลิป
วิธีแก้ไขการบันทึกหน้าจอจาก Game Bar บน Windows
ผู้ใช้ Windows ส่วนใหญ่เชื่อว่าการติดตั้งซอฟต์แวร์บันทึกหน้าจอบนคอมพิวเตอร์หรือแล็ปท็อปเป็นวิธีเดียวที่จะจับภาพหน้าจอวิดีโอได้ แต่นี่ไม่เป็นความจริง ด้วยแอป Xbox Game Bar ในตัว คุณยังสามารถเริ่มแก้ไขการบันทึกหน้าจอของคุณได้อีกด้วย นอกจากนี้ เครื่องมือนี้ยังเป็นส่วนประกอบของแอป Xbox ซึ่งติดตั้งโดยค่าเริ่มต้นใน Windows 10 ซึ่งมีฟังก์ชันทั้งหมดที่จำเป็นสำหรับการแก้ไขการบันทึกหน้าจอของคุณอย่างรวดเร็ว
ขั้นตอนที่ 1ไปที่การตั้งค่า
ขั้นตอนที่ 2ปรับการบันทึกพื้นหลัง
หากมีการเปลี่ยนแปลงการตั้งค่า จะเป็นการสร้างบัฟเฟอร์เนื้อหาที่บันทึกโดยอัตโนมัติเป็นเวลา 30 วินาทีหรือนานกว่านั้น ดังนั้น หากคุณกำลังเล่นเกมและเพิ่งได้รับการสังหารครั้งยิ่งใหญ่ คุณสามารถใช้แถบเกมเพื่อบันทึก 30 วินาทีล่าสุดได้ แม้ว่าคุณจะไม่ได้บันทึกหน้าจอไว้ก็ตาม แม้ว่าชื่อของการตั้งค่านี้จะแตกต่างกันระหว่าง Windows 11 และ 10 แต่ฟังก์ชันการทำงานยังคงเหมือนเดิม
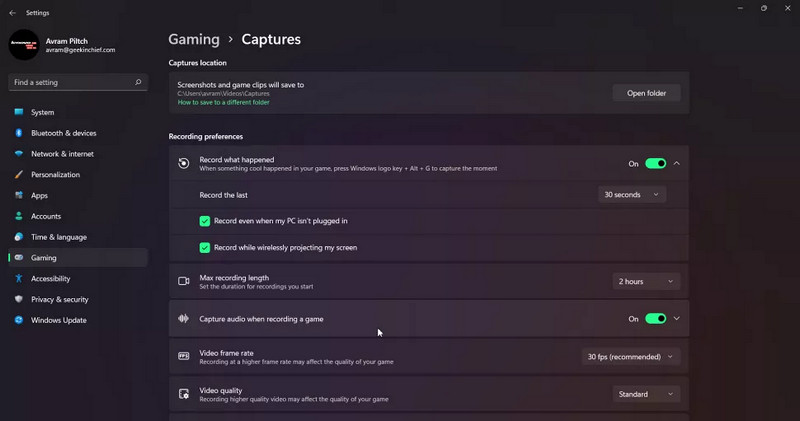
ขั้นตอนที่ 3บันทึกเสียง
โดยค่าเริ่มต้น สิ่งเหล่านี้จะบันทึกเสียงจากไมโครโฟนและเกมของคุณเท่านั้น ไม่ใช่จาก Windows หรือแอปอื่นๆ คุณสามารถปิดการบันทึกเสียงทั้งหมด เปิดใช้งานเพื่อบันทึกเสียงของระบบ หรือปรับสมดุล

- คุณสามารถแก้ไขอัตราเฟรมของวิดีโอได้ โดยค่าเริ่มต้นคือ 30 เฟรมต่อวินาที แต่คุณสามารถเปลี่ยนเป็น 60 เฟรมต่อวินาทีได้ นอกจากนี้ ให้เลือกระหว่างคุณภาพวิดีโอมาตรฐานและคุณภาพสูง สุดท้าย เราแนะนำให้ปล่อยการจับภาพเคอร์เซอร์ของเมาส์ไว้เมื่อบันทึกเกมที่เปิดใช้งาน โดยเฉพาะอย่างยิ่งหากบันทึกแอปที่ไม่ใช่เกม
ส่วนที่ 2: วิธีดูวิดีโอการบันทึกหน้าจอของคุณบน Windows
หลังจากบันทึกหน้าจอ Windows 10/11 ด้วย Snipping Tool หรือ Game Bar เสร็จแล้ว คุณอาจต้องการแก้ไข เปลี่ยนชื่อ หรือแชร์ไฟล์ โดยไฟล์วิดีโอจะถูกจัดเก็บไว้ในหนึ่งในไดเร็กทอรีต่อไปนี้ ขึ้นอยู่กับเครื่องมือที่คุณใช้
1. การค้นหาไฟล์บันทึกจากโปรแกรม Snipping Tool
โดยปกติแล้ว การบันทึกหน้าจอด้วย Snipping Tool ใน Windows จะบันทึกไปยังโฟลเดอร์เฉพาะภายในโปรไฟล์ผู้ใช้ของคุณ
เส้นทางโฟลเดอร์: C:\Users\[ชื่อผู้ใช้ของคุณ]\Videos\Screen Recordings
วิธีเดินทางไปถึงที่นั่นอย่างรวดเร็ว:
- 1.เปิดโปรแกรมสำรวจไฟล์ (วินโดวส์ + อี).
- 2.คลิกที่ วิดีโอ ในแถบด้านข้างซ้าย
- 3.เปิด การบันทึกหน้าจอ โฟลเดอร์
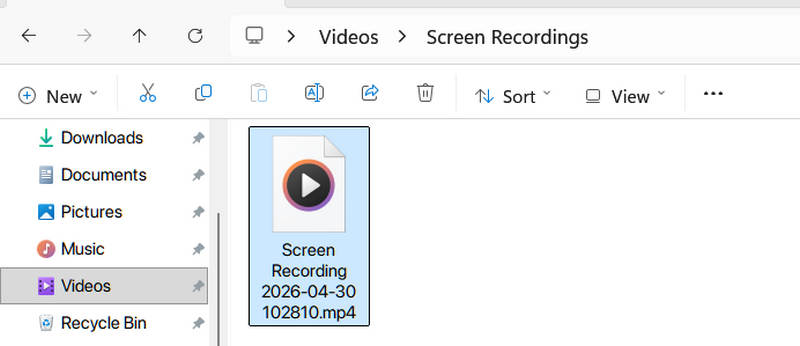
เคล็ดลับสำหรับมืออาชีพ: หากคุณเพิ่งบันทึกหน้าจอเสร็จบน Windows โดยปกติจะมีข้อความแจ้งเตือนปรากฏขึ้นที่มุมล่างขวา การคลิกที่ข้อความแจ้งเตือนนั้นจะเปิดหน้าต่างแสดงตัวอย่างวิดีโอ ซึ่งคุณสามารถคลิกเพื่อบันทึกได้ มากกว่า ปุ่มและเลือก เปิดโฟลเดอร์.
2. การค้นหาไฟล์บันทึก (แคปเจอร์) ของ Xbox Game Bar
Xbox Game Bar จะบันทึกวิดีโอลงในโฟลเดอร์ Captures ซึ่งอยู่ในไลบรารีวิดีโอของคุณเช่นกัน แต่เป็นโฟลเดอร์ย่อยแยกต่างหาก
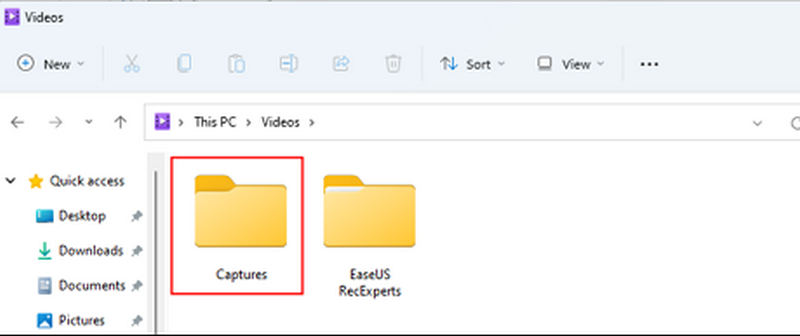
เส้นทางโฟลเดอร์: C:\Users\[ชื่อผู้ใช้ของคุณ]\Videos\Captures
วิธีการเข้าถึงผ่านทางอินเทอร์เฟซ:
- 1.กด Windows + ช เพื่อเปิดโอเวอร์เลย์ Game Bar
- 2.คลิกที่วิดเจ็ตแกลเลอรี (ไอคอนจะมีลักษณะคล้ายโฟลเดอร์/รูปภาพขนาดเล็ก)
- 3.ในหน้าต่างแกลเลอรี ให้คลิก เปิดตำแหน่งไฟล์การทำเช่นนี้จะเปิดหน้าต่าง File Explorer ขึ้นทันทีที่ตำแหน่งที่ระบุ
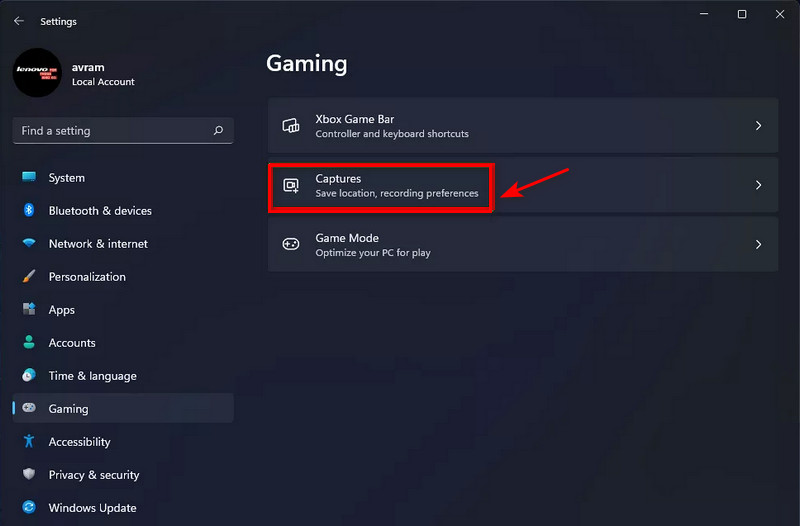
ทางลัด: คุณสามารถไปที่ การตั้งค่า > การเล่นเกม > จับภาพ ในเมนูการตั้งค่าหลักของ Windows คุณจะเห็นเส้นทางที่แน่นอน และคุณยังสามารถเปลี่ยนตำแหน่งที่ไฟล์เหล่านี้จะถูกบันทึกในอนาคตได้อีกด้วย
ส่วนที่ 3: ข้อจำกัดของโปรแกรมบันทึกหน้าจอเริ่มต้นของ Windows
แม้ว่าเครื่องมือบันทึกวิดีโอในตัวจะทำให้การบันทึกหน้าจอใน Windows สะดวกสบายอย่างมากโดยไม่ต้องดาวน์โหลดซอฟต์แวร์เพิ่มเติม แต่ก็มีข้อจำกัดบางประการ ขึ้นอยู่กับความซับซ้อนของโครงการของคุณ ไม่ว่าจะเป็นการสัมมนาออนไลน์ระดับมืออาชีพหรือบทเรียนสร้างสรรค์ขั้นสูง คุณอาจพบกับอุปสรรคดังต่อไปนี้:
1. ขาดชุดโปรแกรมตัดต่อวิดีโอขั้นสูง: ทั้ง Snipping Tool และ Xbox Game Bar ออกแบบมาเพื่อการบันทึกแล้วใช้งานได้ทันที จึงไม่มีฟังก์ชันไทม์ไลน์ในตัว การตัดต่อเสียงหลายแทร็ก หรือความสามารถในการเพิ่มคำอธิบาย (เช่น ลูกศรและข้อความ) หลังจากการบันทึกเสร็จสิ้น หากคุณต้องการปรับแต่งวิดีโอที่บันทึกหน้าจอใน Windows คุณอาจต้องนำไฟล์ดิบไปใช้ในโปรแกรมตัดต่อวิดีโออื่น
2. อัตราเฟรมและอัตราบิตคงที่: สำหรับผู้ใช้งานขั้นสูงและเกมเมอร์ การควบคุมคุณภาพของวิดีโอเป็นสิ่งสำคัญ โปรแกรมบันทึกหน้าจอเริ่มต้นของ Windows มักใช้เฟรมเรตแปรผัน (VFR) ซึ่งอาจนำไปสู่ปัญหาการซิงค์เสียงกับภาพในซอฟต์แวร์ตัดต่อระดับมืออาชีพ เช่น Premiere Pro ต่างจากโปรแกรมบันทึกหน้าจอเฉพาะทาง คุณมีการควบคุมที่จำกัดเกี่ยวกับบิตเรตหรือค่าที่ตั้งไว้ล่วงหน้าสำหรับการเข้ารหัสที่ใช้ในระหว่างกระบวนการ
3. ข้อจำกัดด้านเดสก์ท็อปและส่วนติดต่อผู้ใช้:
- Xbox Game Bar: ออกแบบมาเพื่อใช้กับเกมและแอปพลิเคชันเฉพาะเป็นหลัก มักมีปัญหาในการบันทึกหน้าจอเดสก์ท็อปของ Windows หรือ File Explorer บางครั้งอาจหยุดการบันทึกหากสลับไปมาระหว่างแอปพลิเคชันต่างๆ
- เครื่องมือจับภาพหน้าจอ: แม้ว่าจะมีความยืดหยุ่นมากกว่าสำหรับการบันทึกบนเดสก์ท็อป แต่ก็ขาดคุณสมบัติบางอย่าง เช่น การไฮไลต์เมาส์หรือเอฟเฟกต์การคลิก ซึ่งจำเป็นอย่างยิ่งสำหรับการบันทึกวิดีโอแนะนำที่เข้าใจง่าย
4. ข้อจำกัดในการรับสัญญาณเสียง: แม้ว่าคุณจะสามารถบันทึกหน้าจอใน Windows โดยใช้เสียงระบบและไมโครโฟนได้ แต่การจัดการแหล่งเสียงหลายแหล่ง (เช่น การโทร Discord เกม และเพลงแยกต่างหาก) นั้นทำได้ยาก เนื่องจากโปรแกรมเหล่านี้ไม่มีตัวผสมเสียงในตัวที่จะช่วยปรับระดับเสียงแบบเรียลไทม์ขณะที่คุณบันทึกวิดีโอหน้าจอใน Windows
ส่วนที่ 4: วิธีการบันทึกหน้าจอที่เบาและมีประสิทธิภาพบน Windows
โปรแกรมบันทึกหน้าจอ AVAide เป็นหนึ่งในเครื่องมือบันทึกหน้าจอที่ได้รับการแนะนำมากที่สุดสำหรับ Windows เนื่องจากมีคุณสมบัติขั้นสูง เช่น การปรับแต่งพื้นที่การบันทึก การบันทึกเสียงและไมโครโฟนของระบบ และแม้แต่การปรับรูปแบบวิดีโอที่ส่งออก มันบันทึกกิจกรรมหน้าจอ, แฮงเอาท์วิดีโอ, รายการโทรทัศน์หรือการเล่นเกมบนหลายแพลตฟอร์มโดยไม่มีการสูญเสียคุณภาพและเสียงที่ชัดเจน
เครื่องบันทึกหน้าจอสามารถควบคุมได้โดยใช้ปุ่มลัด นอกจากนี้ยังบันทึกวิดีโอคุณภาพสูงซึ่งเหมาะสำหรับการส่งออก สามารถบันทึกวิดีโอได้ทั้งจากการ์ดระบบและอุปกรณ์ภายนอก
- บันทึกภาพหน้าจอ Windows ต้นฉบับ แล้วปรับความละเอียดเป็น 4K หากจำเป็น
- ช่วยให้คุณปรับการตั้งค่าเอาต์พุตวิดีโอและเสียงได้ รวมถึงตัวแปลงสัญญาณ (HEVC, AV1, H.264), อัตราบิต, ความละเอียด, อัตราเฟรม และอื่นๆ
- รองรับการเพิ่มความละเอียดภาพด้วย AI เพื่อเพิ่มคุณภาพและคุณภาพของวิดีโอที่บันทึกไว้
- รองรับการบันทึกต่อเนื่องเป็นเวลานานโดยไม่กระตุกหรือสะดุด
- บันทึกหน้าจอ หน้าต่าง เกม และส่วนต่างๆ พร้อมเสียงระบบ การซ้อนทับเว็บแคม และไมโครโฟนได้อย่างราบรื่น
- จัดการวิดีโอที่บันทึกไว้ได้อย่างง่ายดาย และแชร์ไปยังโซเชียลมีเดียต่างๆ เช่น YouTube และ Instagram

 ดาวน์โหลดอย่างปลอดภัย
ขั้นตอนที่ 1ดาวน์โหลดซอฟต์แวร์บันทึก
ในการเริ่มต้น ให้ดาวน์โหลดและติดตั้งเครื่องมือโดยคลิกปุ่มดาวน์โหลดด้านบน การติดตั้งซอฟต์แวร์จะใช้เวลาสองสามนาที คลิก เครื่องอัดวีดีโอ ไอคอนเพื่อเริ่มการบันทึก

ขั้นตอนที่ 2ปรับเฟรม
ปรับพื้นที่ที่คุณต้องการบันทึกรอบๆ หน้าต่าง เลือก กำหนดเอง จากลูกศรแบบเลื่อนลงบนตัวครอบตัดตัวแรกและป้อนตำแหน่งที่บันทึก เลือก เต็มจอ เพื่อจับภาพทั้งฉาก

ขั้นตอนที่ 3เพิ่มเสียงและการบันทึกเสียง
คุณสามารถบันทึกวิดีโอพร้อมเสียงโดยใช้เสียงและไมโครโฟนในตัวของระบบ หรือไมโครโฟนภายนอกที่เชื่อมต่ออยู่เพื่อบันทึกหน้าจอเดสก์ท็อปพร้อมคำบรรยายด้วยเสียง คลิก ไมโครโฟน ปุ่มเพื่อปิดการบรรยายด้วยเสียงขณะบันทึก

ขั้นตอนที่ 4เริ่มบันทึก
ในการเริ่มบันทึก ให้กด REC ปุ่ม.

ขั้นตอนที่ 5หยุดและส่งออก
หลังจากคุณบันทึกเสร็จแล้ว ให้กดปุ่ม หยุด ปุ่มเพื่อหยุดมันแล้ว คลิป เพื่อครอบตัดคลิปบันทึกของคุณก่อนบันทึก จากนั้น ในการบันทึกวิดีโอของคุณ ให้คลิกที่ ส่งออก ปุ่ม.

ขั้นตอนที่ 6ดูการบันทึกวิดีโอ
หลังจากบันทึกการบันทึก คุณสามารถดูบันทึกวิดีโอในประวัติการบันทึกได้แล้ว เรียงตามลำดับเวลา โดยเริ่มจากการบันทึกล่าสุดและดำเนินไปจนถึงรายการเก่าที่สุด

ส่วนที่ 5: คำถามที่พบบ่อยเกี่ยวกับวิธีการบันทึกหน้าจอใน Windows
เป็นไปได้ไหมที่จะติดตามภาพหน้าจอ?
เว็บไซต์สามารถบอกได้ว่าคุณถ่ายภาพหน้าจอหรือใช้เบราว์เซอร์เพื่อทำ เว็บไซต์ยังสามารถทราบได้ว่าคุณถ่ายภาพหน้าจอหรือไม่โดยกดปุ่มพิมพ์หน้าจอบนแป้นพิมพ์ของคุณ อย่างไรก็ตาม หากคุณใช้โปรแกรมอย่าง Snipping Tool เว็บไซต์จะไม่ทราบว่าคุณถ่ายภาพหน้าจอ
การจับภาพหน้าจอจะอยู่ได้นานแค่ไหน?
คุณสามารถสกรีนบันทึกได้ไม่จำกัดด้วยซอฟต์แวร์บันทึกหน้าจอที่เหมาะสม คุณสามารถจับภาพการกระทำต่อไปได้ตราบเท่าที่มองเห็นได้บนหน้าจอของคุณ ไม่ได้หมายความว่าคุณจะสามารถจับภาพวิดีโอได้หลายชั่วโมงและหลายชั่วโมงเสมอไป
ทำไมปุ่ม Alt+R ใน Windows ถึงใช้งานไม่ได้?
ปุ่มลัด Windows + Alt + R อาจใช้งานไม่ได้ด้วยหลายสาเหตุ ที่พบบ่อยที่สุดคือ Xbox Game Bar ถูกปิดใช้งานในการตั้งค่าระบบของคุณ หรือ... บันทึกในพื้นหลัง ฟังก์ชันนี้ถูกปิดใช้งานแล้ว นอกจากนี้ ทางลัดนี้ออกแบบมาเพื่อบันทึกแอปพลิเคชันและเกมโดยเฉพาะ จะไม่ทำงานหากคุณกำลังใช้งานเดสก์ท็อป Windows หรือ File Explorer อยู่
การบันทึกหน้าจอมีผลอย่างไร?
การจับภาพหน้าจอนั้นเหมาะสมเมื่อคุณต้องการแสดงบางสิ่งที่คุณเห็นบนจอคอมพิวเตอร์ของคุณ บางครั้งการจับภาพหน้าจอภาพนิ่งก็เหมาะอย่างยิ่ง หรือที่เรียกว่าภาพหน้าจอ ในทางกลับกัน screencast อาจเป็นตัวเลือกที่ดีกว่า หากการจับภาพหน้าจอของคุณต้องการคำอธิบายมากมาย
ท้ายที่สุดแล้ว การเรียนรู้ที่จะเชี่ยวชาญวิธีการนั้นสำคัญที่สุด บันทึกหน้าจอบน Windows ขึ้นอยู่กับความต้องการของคุณ เครื่องมือในตัวอย่าง Snipping Tool และ Xbox Game Bar เหมาะสำหรับการบันทึกภาพอย่างรวดเร็วโดยไม่ต้องติดตั้ง และการเล่นเกมแบบทั่วไป อย่างไรก็ตาม เครื่องมือเหล่านี้มักขาดฟังก์ชันการแก้ไขขั้นสูง การจัดรูปแบบที่ยืดหยุ่น และความเสถียรทั่วทั้งเดสก์ท็อปที่จำเป็นสำหรับโครงการระดับมืออาชีพ
สำหรับโซลูชันที่มีประสิทธิภาพยิ่งขึ้น โปรแกรมบันทึกหน้าจอ AVAide AVAide คือโปรแกรมที่เราแนะนำเป็นอันดับต้นๆ มันเอาชนะข้อจำกัดของระบบโดยการนำเสนอการซ้อนภาพจากเว็บแคมที่ราบรื่น การใส่คำอธิบายประกอบแบบเรียลไทม์ และการส่งออกเฟรมเรตสูงโดยไม่ทำให้ระบบของคุณช้าลง หากคุณต้องการผลลัพธ์ระดับมืออาชีพที่ดูดีและ "คลิกเดียว" สำหรับบทเรียนหรือการนำเสนอ AVAide คือตัวเลือกที่ดีที่สุดสำหรับการบันทึกวิดีโอหน้าจอใดๆ บน Windows
เกี่ยวกับผู้เขียน

จับภาพกิจกรรมบนหน้าจอด้วยเสียง การประชุมออนไลน์ วิดีโอการเล่นเกม เพลง เว็บแคม ฯลฯ
บันทึกหน้าจอและวิดีโอ
- บันทึกหน้าจอบน Mac
- บันทึกหน้าจอบน Windows
- บันทึกหน้าจอบน iPhone
- บันทึกเสียงบน iPhone
- บันทึกรายการทีวีโดยไม่มี DVR
- บันทึกหน้าจอ Snapchat บน iPhone และ Android
- บันทึกการโทรแบบ FaceTime
- วิธีใช้ VLC เพื่อบันทึกหน้าจอ
- แก้ไขรหัสข้อผิดพลาดของ Amazon 1060
- แก้ไข OBS Window Capture Black
- วิธีสร้าง PowerPoint ให้เป็นวิดีโอ [บทช่วยสอนที่สมบูรณ์]
- วิธีทำวิดีโอการสอน: การเตรียมการและแนวทางปฏิบัติ
- วิธีบันทึกหน้าจอพร้อมเสียงใน iOS 15 และใหม่กว่า
- วิธีสกรีนบันทึกบน TikTok: โซลูชันเดสก์ท็อปและมือถือ
- วิธีสกรีนบันทึกบน Samsung ใน 2 วิธีที่ได้รับการพิสูจน์แล้ว [แก้ไขแล้ว]
- วิธีบันทึกการเล่นเกมบน PS4 โดยไม่ต้องใช้การ์ดจับภาพ
- วิธีบันทึกการเล่นเกมบน Xbox One [บทช่วยสอนฉบับเต็ม]