เคยเผชิญหน้ากับ... หน้าจอ OBS เป็นสีดำ ก่อนที่จะบันทึกหรือสตรีมใน OBS ล่ะ? เมื่อคุณเปิดเกมและตั้งค่าทุกอย่างเสร็จเรียบร้อยแล้ว การที่ไม่เห็นภาพตัวอย่างเกมอาจทำให้รู้สึกหงุดหงิด เราจะมาแนะนำเทคนิคแบบง่ายๆ ที่คุณสามารถใช้เพื่อให้หน้าจอของคุณถูกบันทึก และยังมีโปรแกรมบันทึกหน้าจอทางเลือกอื่นๆ อีกด้วย
ส่วนที่ 1 รายการตรวจสอบการแก้ไขปัญหาเร่งด่วน
1. รีสตาร์ท OBS:
ปิด OBS แล้วเปิดใหม่อีกครั้ง หน้าต่างแสดงตัวอย่างอาจเป็นสีดำ ซึ่งอาจเกิดจากความผิดพลาดหรือปัญหาเกี่ยวกับแหล่งที่มาหรือซอฟต์แวร์อื่นๆ การรีสตาร์ท OBS ควรแก้ไขปัญหาได้ทันที!
2. ตรวจสอบว่าซอร์สโค้ดของคุณแสดงอยู่หรือไม่:
ในแผงแหล่งที่มาของคุณ คุณเห็นแหล่งที่มาหรือไม่? หากมีปุ่มรูปตาที่มีเส้นขีดทับอยู่ แสดงว่าแหล่งที่มานั้นถูกซ่อนอยู่ คลิกที่ปุ่มนั้นเพื่อทำให้มองเห็นได้อีกครั้ง จากนั้นตรวจสอบว่าภาพตัวอย่างกลับมาหรือไม่
3. ตรวจสอบฉากของคุณ:
OBS ใช้ฉาก หากฉากว่างเปล่า หน้าจอของคุณจะเป็นสีดำ ลองสลับระหว่างฉากต่างๆ ในแผงฉาก ตรวจสอบให้แน่ใจว่าคุณใช้ฉากนั้นกับแหล่งที่มาของการบันทึกภาพของคุณ
4. ปิดโหมดสตูดิโอ:
โหมดสตูดิโออาจแสดงภาพตัวอย่าง/ฉากที่ไม่ทำงานอยู่ ให้คลิกปุ่มเล็กๆ ที่มุมขวาบนของ OBS เพื่อปิดโหมดนี้ จากนั้นลองดูว่าหน้าจอแสดงผลทำงานได้ปกติหรือไม่
ส่วนที่ 2 การแก้ไขปัญหาหน้าจอดำขณะใช้งาน OBS Game Capture
อาจมีบางกรณีที่หน้าจอดำเนื่องจากปัญหาเกี่ยวกับสิทธิ์ การตั้งค่า หรือปัญหาด้านกราฟิกขณะใช้งาน Game Capture วิธีแก้ปัญหาเหล่านี้จะช่วยให้ OBS ตรวจจับและแสดงเกมของคุณได้
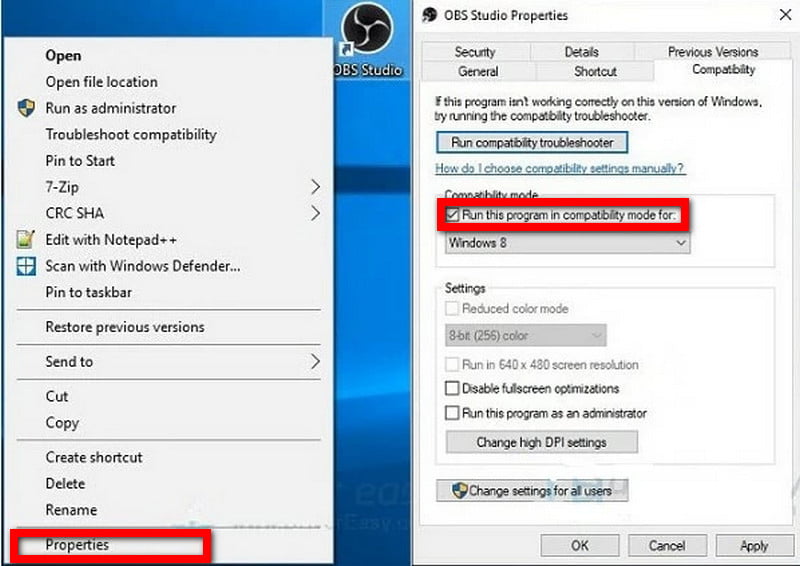
1. เรียกใช้ OBS ในฐานะผู้ดูแลระบบ
เกมบางเกมที่ใช้สิทธิ์การเข้าถึงสูงกว่าอาจใช้งานร่วมกับ OBS ไม่ได้ การเรียกใช้ OBS ในฐานะผู้ดูแลระบบจะช่วยให้มั่นใจได้ว่า OBS มีสิทธิ์การเข้าถึงเท่าเทียมกับเกมนั้นๆ
ขั้นตอนที่ 1ปิดโปรแกรม OBS ให้สนิท
ขั้นตอนที่ 2คลิกขวาที่ไอคอนทางลัด OBS ใน เริ่ม เมนูหรือบนเดสก์ท็อป
ขั้นตอนที่ 3คลิกที่ เรียกใช้ในฐานะผู้ดูแลระบบ.
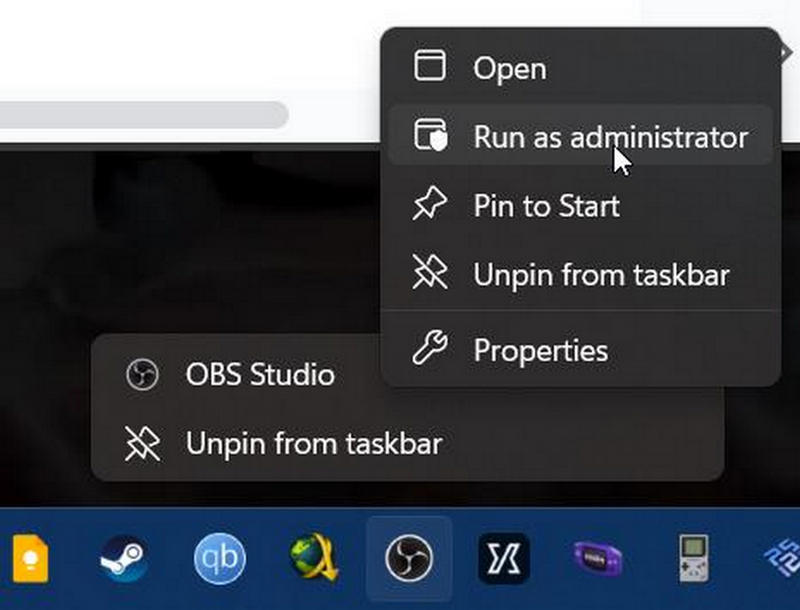
ขั้นตอนที่ 4เริ่มเกมแล้วดูว่าหน้าจอสีดำหายไปหรือไม่
หากวิธีนี้ช่วยแก้ปัญหาได้ คุณสามารถตั้งค่าโหมดผู้ดูแลระบบในการตั้งค่าความเข้ากันได้ และใช้การจับภาพเกมแทนการจับภาพหน้าจอ/หน้าต่าง
2. ใช้การจับภาพเกมแทนการจับภาพหน้าจอ/หน้าต่าง
การบันทึกภาพเกม (Game Capture) เป็นวิธีที่นิยมใช้ในการบันทึกภาพหน้าจอ ควรใช้บันทึกภาพหน้าต่างเกมมากกว่าหน้าต่างแสดงผล วิธีการบันทึกภาพขึ้นอยู่กับวัตถุประสงค์ การบันทึกภาพเกมมักเป็นตัวเลือกที่ปลอดภัยที่สุดเมื่อบันทึกเกม
ขั้นตอนที่ 1เปิด OBS แล้วเลือกแผง Sources เปิด OBS อีกครั้งแล้วเลือกแผง Sources
ขั้นตอนที่ 2คลิก + ปุ่ม.
ขั้นตอนที่ 3เลือก การบันทึกเกม.
ขั้นตอนที่ 4สร้างแหล่งข้อมูลขึ้นเอง หรือเลือกใช้แหล่งข้อมูลที่มีอยู่แล้ว
ขั้นตอนที่ 5เลือก การจับภาพหน้าต่าง.
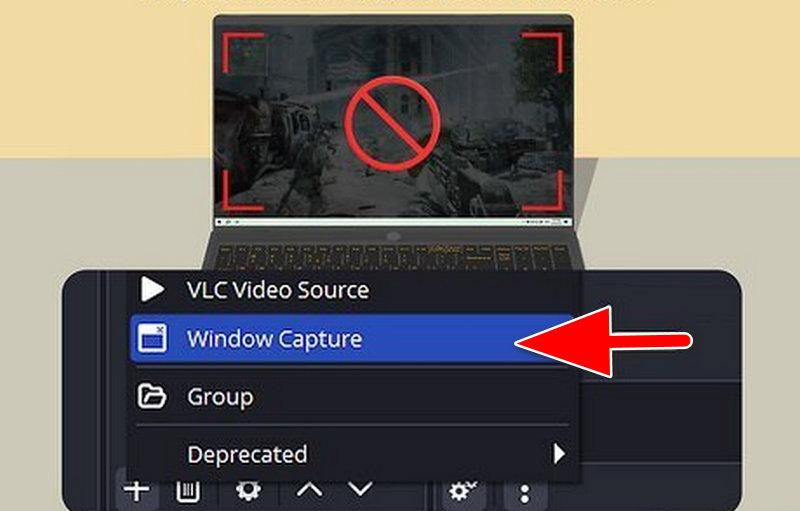
ขั้นตอนที่ 6เริ่มเกมของคุณและตรวจสอบดูว่าเกมปรากฏในหน้าต่างแสดงตัวอย่างหรือไม่
3. เปลี่ยนคุณสมบัติการจับภาพเกม
เกมบางเกมอาจใช้งานไม่ได้กับการตั้งค่าการบันทึกเกมที่ตั้งไว้ หากคุณเปลี่ยนการตั้งค่าแหล่งที่มาของการบันทึกเกม OBS จะสามารถจดจำเกมได้
ขั้นตอนที่ 1คุณต้องคลิกขวาที่แหล่งที่มาของการบันทึกเกมของคุณ
ขั้นตอนที่ 2จากนั้นคุณต้องเลือก คุณสมบัติ.
ขั้นตอนที่ 3หากระบุว่าเป็นการจับภาพแบบเต็มหน้าจอ คุณควรเปลี่ยนเป็น เรียกใช้โปรแกรมนี้ในโหมดความเข้ากันได้สำหรับ:.
ขั้นตอนที่ 4ตอนนี้คุณต้องเลือกหน้าต่างเกมจากรายการ
ขั้นตอนที่ 5หากคุณเห็นตัวเลือกให้ จำกัดอัตราเฟรมการจับภาพ.
ขั้นตอนที่ 6คุณสามารถเปิดหรือปิดได้
ขั้นตอนที่ 7หลังจากนั้น คุณต้องกดปุ่มเหล่านั้นและลองเปิดใช้งานดู การบันทึกเกม อีกครั้ง.
4. ปิดใช้งานโหมดเกมบน Windows
โหมดเกมของ Windows อาจรบกวนการทำงานของซอฟต์แวร์บันทึกและจับภาพได้ในบางครั้ง รวมถึง... โปรแกรมบันทึกหน้าจอโอเพ่นซอร์ส เช่น OBS ซึ่งอาจทำให้เกิดปัญหาในการบันทึกหรือแสดงผล
ขั้นตอนที่ 1กด วินโดวส์ + ฉัน เพื่อเปิดการตั้งค่า
ขั้นตอนที่ 2เลือก การเล่นเกม.
ขั้นตอนที่ 3คลิก โหมดเกม จากแถบด้านข้างซ้าย
ขั้นตอนที่ 4ปิดเครื่อง โหมดเกม สวิตช์.
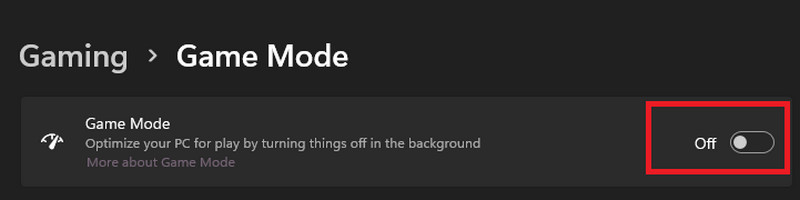
ขั้นตอนที่ 5รีสตาร์ทเกมและ OBS เพื่อให้การเปลี่ยนแปลงมีผล
5. อัปเดตไดรเวอร์การ์ดจอ
ไดรเวอร์การ์ดจอที่ล้าสมัยอาจทำให้เกิดปัญหา ส่งผลให้หน้าจอดำเมื่อคุณพยายามบันทึกภาพ ดังนั้นคุณจึงจำเป็นต้องอัปเดตไดรเวอร์การ์ดจอ ไดรเวอร์การ์ดจอมีความสำคัญมากสำหรับการบันทึกเกมและโปรแกรมอื่นๆ เครื่องบันทึกวิดีโอเนื่องจากไดรเวอร์การ์ดจอมีผลต่อวิธีการที่ซอฟต์แวร์เข้าถึงและจับภาพวิดีโอจากระบบของคุณ ในการอัปเดตไดรเวอร์การ์ดจอ คุณต้องทำตามขั้นตอนเหล่านี้
ขั้นตอนที่ 1ขั้นแรก คุณต้องตรวจสอบว่าคอมพิวเตอร์ของคุณมีการ์ดจอแบบใด เพื่อจะได้ติดตั้งไดรเวอร์การ์ดจอ
ขั้นตอนที่ 2จากนั้นคุณควรเข้าไปที่เว็บไซต์ของบริษัทผู้ผลิตการ์ดจอเพื่อดาวน์โหลดไดรเวอร์การ์ดจอ
ขั้นตอนที่ 3ขั้นตอนต่อไป คุณต้องดาวน์โหลดไดรเวอร์การ์ดจอสำหรับระบบคอมพิวเตอร์ของคุณและไดรเวอร์กราฟิก
ขั้นตอนที่ 4หลังจากนั้น คุณควรติดตั้งการอัปเดตไดรเวอร์การ์ดจอ
ขั้นตอนที่ 5จากนั้นคุณต้องรีสตาร์ทคอมพิวเตอร์เพื่อให้ไดรเวอร์การ์ดจอทำงาน
ขั้นตอนที่ 6สุดท้ายนี้ คุณควรเปิด OBS ลองใช้คำสั่งต่อไปนี้ดู การบันทึกเกม อีกครั้งเพื่อตรวจสอบว่าปัญหาเกี่ยวกับไดรเวอร์การ์ดจอได้รับการแก้ไขแล้วหรือไม่
ส่วนที่ 3 การแก้ไขปัญหาหน้าจอดำขณะใช้งาน OBS Display Capture บน Mac
หาก OBS ปรากฏขึ้นบนหน้าจอขณะพยายามจับภาพหน้าจอโดยใช้คุณสมบัติการจับภาพหน้าจอ (Display Capture) บน Mac แสดงว่าผู้ใช้ไม่ได้อนุญาตให้ซอฟต์แวร์ดำเนินการดังกล่าว เนื่องจาก macOS บล็อกการอนุญาตนี้โดยค่าเริ่มต้น หากต้องการใช้คุณสมบัติการจับภาพหน้าจอ ผู้ใช้ต้องอนุญาตให้ OBS ทำงานได้
อนุญาตให้ OBS บันทึกหน้าจอ
ขั้นตอนที่ 1คลิก แอปเปิ้ล เมนู. เปิด การตั้งค่าระบบ.
ขั้นตอนที่ 2เลือก ความเป็นส่วนตัวและความปลอดภัย จากแถบด้านข้าง
ขั้นตอนที่ 3เลื่อนลง คลิก การบันทึกหน้าจอ.
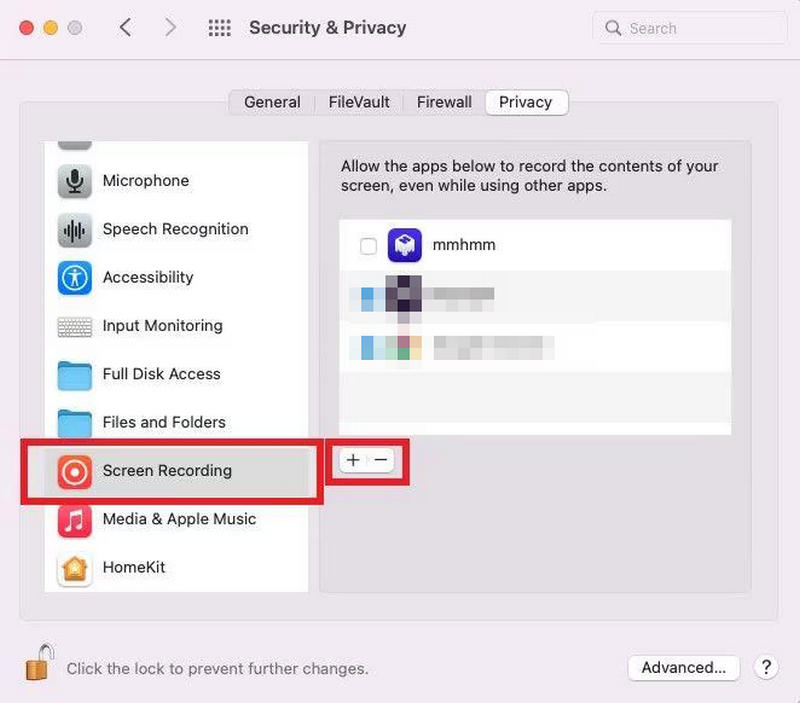
ขั้นตอนที่ 4ค้นหา OBS Studio ในรายการแอปพลิเคชัน
ขั้นตอนที่ 5เปิดใช้งานสวิตช์ที่อยู่ถัดจาก OBS Studio
ขั้นตอนที่ 6ปิดโปรแกรม OBS ให้สนิทหากกำลังทำงานอยู่
ขั้นตอนที่ 7เปิดใหม่ ทดสอบการจับภาพหน้าจอด้วย OBS
ส่วนที่ 4 การแก้ไขปัญหา OBS ที่ทำให้ทั้งสองหน้าจอมืดเมื่อแสดงตัวอย่างแบบเต็มหน้าจอ
หากจอภาพทั้งสองจอกลายเป็นสีดำเมื่อคุณเปิดใช้งานการแสดงตัวอย่างแบบเต็มหน้าจอใน OBS มักเป็นปัญหาเกี่ยวกับไดรเวอร์การ์ดจอของคุณ ไดรเวอร์ที่เก่าหรือมีข้อบกพร่องอาจทำให้เกิดปัญหาในการแสดงผลเมื่อ OBS พยายามแสดงตัวอย่างบนหน้าจอ
อัปเดตไดรเวอร์การ์ดจอของคุณ
ขั้นตอนที่ 1ตรวจสอบว่าคอมพิวเตอร์ของคุณติดตั้งการ์ดจออะไรอยู่
ขั้นตอนที่ 2เข้าไปที่เว็บไซต์ของผู้ผลิตการ์ดจอของคุณ
ขั้นตอนที่ 3ดาวน์โหลดไดรเวอร์การ์ดจอสำหรับรุ่นรถของคุณ
ขั้นตอนที่ 4เรียกใช้โปรแกรมติดตั้ง และทำการอัปเดตให้เสร็จสิ้น
ขั้นตอนที่ 5โปรดรีสตาร์ทคอมพิวเตอร์หลังจากติดตั้งเสร็จ
ขั้นตอนที่ 6เปิด OBS แล้วเปิดใช้งาน โปรเจ็กเตอร์แบบเต็มหน้าจอจากนั้นตรวจสอบดูว่าปัญหาได้รับการแก้ไขแล้วหรือไม่ด้วย OBS
ส่วนที่ 5. ใช้โปรแกรมอื่นแทน OBS
การจัดการกับหน้าจออาจเป็นเรื่องน่ารำคาญ โดยเฉพาะอย่างยิ่งเมื่อคุณต้องการบันทึกบางสิ่งบนหน้าจอ นี่เป็นเรื่องจริงสำหรับผู้ที่ต้องการบันทึกการเล่นเกม การประชุม หรือบทเรียนต่างๆ โปรแกรมบันทึกหน้าจอ AVAide เป็นอีกทางเลือกหนึ่งหากคุณมีปัญหาในการใช้ซอฟต์แวร์บันทึกอื่นๆ โปรแกรมนี้ทำงานได้ดี ใช้งานง่าย คุณสามารถบันทึกหน้าจอ ส่วนใดส่วนหนึ่งของหน้าจอ หรือแม้แต่เสียงจากคอมพิวเตอร์หรือไมโครโฟนของคุณก็ได้ นอกจากนี้ยังมีฟีเจอร์เว็บแคม ซึ่งหมายความว่าคุณสามารถบันทึกภาพคุณภาพสูงได้โดยไม่ต้องยุ่งยากกับการตั้งค่า
- บันทึกหน้าจอของคุณด้วยคุณภาพสูงสุด 4K หรือ 1080p โดยมีความหน่วงน้อยที่สุด
- บันทึกเสียงระบบและเสียงไมโครโฟนพร้อมกัน
- จับภาพหน้าจอทั้งหมด หน้าต่าง หรือพื้นที่ที่กำหนดเอง
- เพิ่มภาพซ้อนจากเว็บแคมลงในบทเรียน วิดีโอการเล่นเกม และงานนำเสนอ
- ตัดต่อ ผสาน บีบอัด แปลง และส่งออกไฟล์บันทึกในรูปแบบต่างๆ

 ดาวน์โหลดอย่างปลอดภัย
ขั้นตอนที่ 1รับเครื่องบันทึกหน้าจอ AVAide
คุณต้องดาวน์โหลดโปรแกรม AVAide Screen Recorder จากเว็บไซต์ จากนั้นติดตั้งลงในคอมพิวเตอร์ Windows หรือ Mac ของคุณ หลังจากนั้น คุณก็สามารถเปิดโปรแกรมได้
ขั้นตอนที่ 2เลือกวิธีการบันทึกที่คุณต้องการ
เมื่อคุณเปิดโปรแกรม คุณจะเห็นหน้าจอ คุณต้องเลือก บันทึกหน้าจอ ตัวเลือก จากนั้นคุณตัดสินใจว่าจะบันทึกหรือไม่ เต็ม หรือ กำหนดเอง ส่วนหนึ่งของหน้าจอ
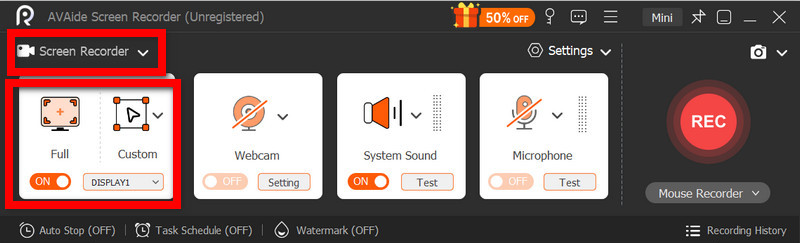
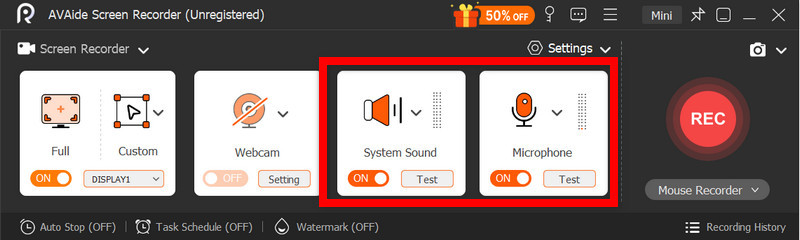
ขั้นตอนที่ 3ตั้งค่าการบันทึก
คุณสามารถเลือกพื้นที่หน้าจอที่ต้องการบันทึกได้ นอกจากนี้ คุณยังสามารถเปิดหรือปิดฟังก์ชันการบันทึกได้อีกด้วย ระบบเสียง และ ไมโครโฟนขึ้นอยู่กับสิ่งที่คุณต้องการสำหรับการบันทึกของคุณ
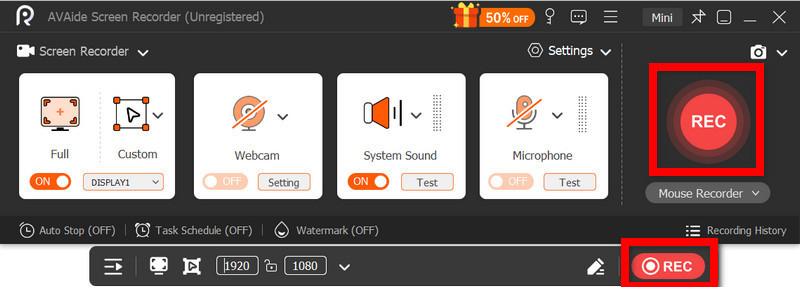
ขั้นตอนที่ 4เริ่มการบันทึก
คุณต้องคลิก REC กดปุ่มเพื่อเริ่มบันทึก จากนั้นรอจนกว่าการนับถอยหลังจะเสร็จสิ้น หลังจากนั้น AVAide Screen Recorder จะเริ่มบันทึกหน้าจอของคุณ พร้อมกับเสียงที่คุณเลือกไว้
ขั้นตอนที่ 5หยุดการบันทึก
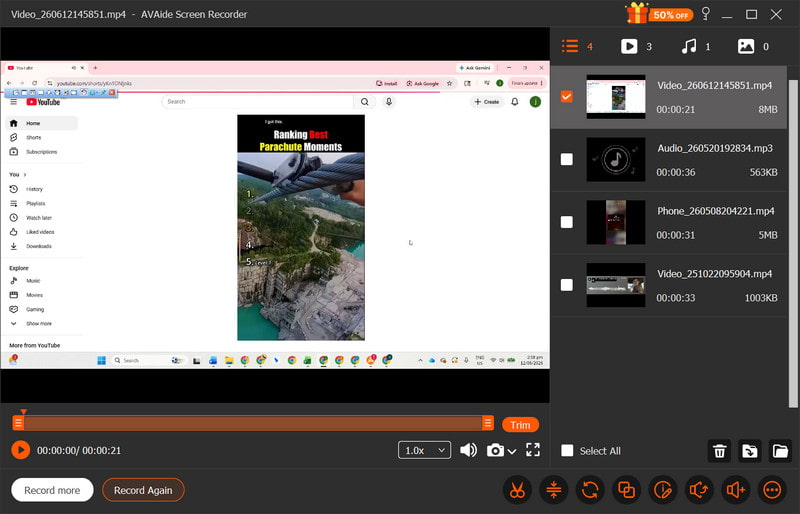
เมื่อบันทึกเสร็จแล้ว คุณต้องคลิกที่ปุ่ม หยุด กดปุ่ม วิดีโอจะเปิดในหน้าต่างแสดงตัวอย่างเพื่อให้คุณสามารถดูได้
ขั้นตอนที่ 6แก้ไขและบันทึก
หากจำเป็น คุณสามารถใช้เครื่องมือตัดต่อเพื่อปรับปรุงคุณภาพการบันทึกของคุณได้ จากนั้นคุณสามารถเลือกรูปแบบวิดีโอที่คุณต้องการได้
โดยรวมแล้ว วิธีแก้ไขปัญหาหน้าจอดำของ OBS ขึ้นอยู่กับว่าปัญหาเกิดจากการตั้งค่าการบันทึก สิทธิ์การเข้าถึง หรือความขัดแย้งของระบบหรือไม่ การทำตามขั้นตอนข้างต้นจะช่วยให้คุณสามารถบันทึกได้อย่างราบรื่นและหลีกเลี่ยงการหยุดชะงักระหว่างการเล่นเกมหรือการสตรีมได้
เกี่ยวกับผู้เขียน

จับภาพกิจกรรมบนหน้าจอด้วยเสียง การประชุมออนไลน์ วิดีโอการเล่นเกม เพลง เว็บแคม ฯลฯ
บันทึกหน้าจอและวิดีโอ
- บันทึกหน้าจอบน Mac
- บันทึกหน้าจอบน Windows
- บันทึกหน้าจอบน iPhone
- บันทึกเสียงบน iPhone
- บันทึกรายการทีวีโดยไม่มี DVR
- บันทึกหน้าจอ Snapchat บน iPhone และ Android
- บันทึกการโทรแบบ FaceTime
- วิธีใช้ VLC เพื่อบันทึกหน้าจอ
- แก้ไขรหัสข้อผิดพลาดของ Amazon 1060
- แก้ไข OBS Window Capture Black
- วิธีสร้าง PowerPoint ให้เป็นวิดีโอ [บทช่วยสอนที่สมบูรณ์]
- วิธีทำวิดีโอการสอน: การเตรียมการและแนวทางปฏิบัติ
- วิธีบันทึกหน้าจอพร้อมเสียงใน iOS 15 และใหม่กว่า
- วิธีสกรีนบันทึกบน TikTok: โซลูชันเดสก์ท็อปและมือถือ
- วิธีสกรีนบันทึกบน Samsung ใน 2 วิธีที่ได้รับการพิสูจน์แล้ว [แก้ไขแล้ว]
- วิธีบันทึกการเล่นเกมบน PS4 โดยไม่ต้องใช้การ์ดจับภาพ
- วิธีบันทึกการเล่นเกมบน Xbox One [บทช่วยสอนฉบับเต็ม]