Taking a screenshot is simple and effective for backing up and sharing information. How to capture a screenshot on Windows? The methods are far more than you may expect. In this article, we will introduce 10+ ways to take screenshots on a PC for all situations.
- Part 1. Quick Keyboard Shortcuts (The Fastest Methods)
- Part 2. Using Built-in Windows Tools (More Control)
- Part 3. How to Capture Specific Types of Screenshots
- Part 4. Where Do Screenshots Go on Windows?
- Part 5. Troubleshooting Common Screenshot Problems
- Part 6. How to Screenshot on Windows Without the Windows Key
- Part 7. How to Perform Screenshot on Windows Surface (No Keyboard)
- Part 8. Quick Reference Table: All Screenshot Methods
Part 1. Quick Keyboard Shortcuts (The Fastest Methods)
Windows screenshot shortcuts are the easiest way to capture screenshots. Here are 4 shortcuts to screenshot on Windows using Print Screen. They work on every Windows version.
Method 1: Print Screen (PrtScn) – Full Screen to Clipboard
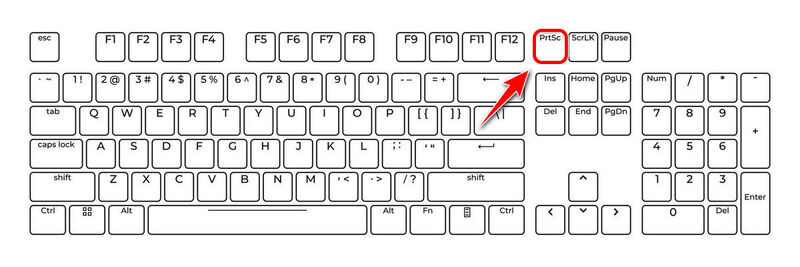
Press the Print Screen (PrtScn) button to copy the entire screen to your clipboard. When you have multiple monitors connected, it will save a screenshot of all the screens in one single image. Then press Ctrl + V to paste it wherever you like, whether you want to send it via email or post it in a document, or something like that.
How to view the screenshots on Windows clipboard? Press Windows + V to launch the clipboard. If it's your first time opening it, the clipboard will present you with a Turn On button. Click on it, and you can use it normally.
Just a reminder: the clipboard will wipe itself when you shut down your PC. So, save the snapshots before shutting down if you don't want to lose them.
Method 2: Windows + Print Screen – Full Screen Saved Automatically
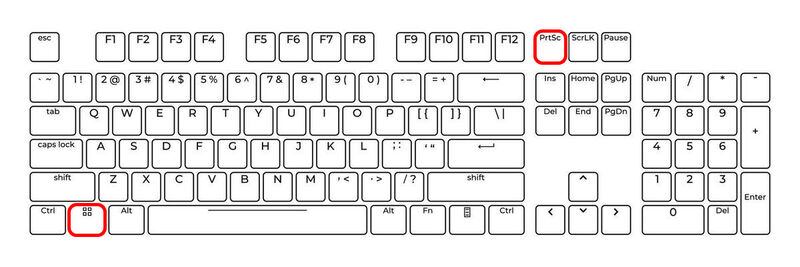
The screenshot command Windows + Print Screen captures the whole screen too, but instead of going to the clipboard, it goes to your local storage. When you press the buttons, your screen dims for a second, indicating the screenshot is successfully taken.
How to choose between the two full-screen methods? If you plan to delete the screenshot shortly after, press the single Print Screen key. As the clipboard automatically clears all contents when you shut down the PC, you don't need to delete the screenshot manually. On the other hand, if you want to save the screenshot permanently, Windows + Print Screen is the better option.
Method 3: Alt + Print Screen – Active Window Only
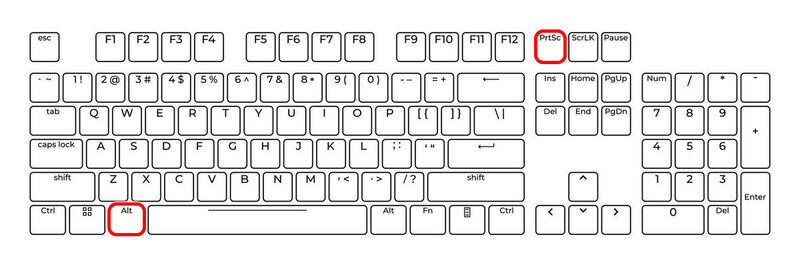
Pressing Alt + Print Screen takes a screenshot of one active window. Single-click on the window you want to capture to make sure it's in focus before you press the shortcut. The screenshot is copied to the clipboard.
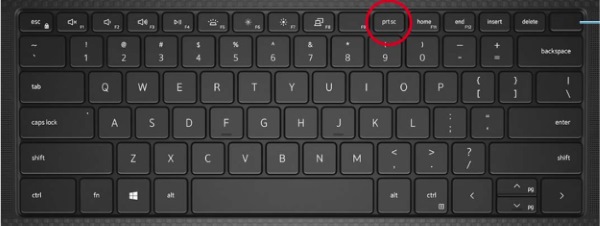
Tip: Where can you find the Print Screen key on a laptop keyboard?
To screenshot on a Windows laptop, press the Print Screen button at the top of the keyboard, usually close to the F1 – F12 keys.
Method 4: Windows + Shift + S – Open Snip & Sketch / Snipping Tool (Partial Screenshots on Windows)
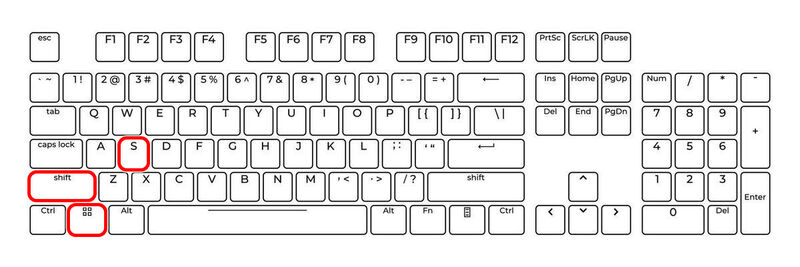
Windows + Shift + S summons the Snip & Sketch / Snipping Tool, a built-in screenshot tool on Windows 7, 10, and 11. After pressing the keys, the screen darkens, and a screenshot toolbar appears at the top.
The tool supports four modes of screen capture: Rectangular, Free-form, Window, and Full-screen. You can take cropped screenshots on Windows and annotate the image with pens, highlighters, erasers, etc. Get a complete step-by-step guide for it in the following Part 2.
Part 2. Using Built-in Windows Tools (More Control)
Shortcuts are quick and easy, but if you want advanced features like editing, delaying, and sharing, perhaps the built-in screenshot tools on Windows are what you need.
Method 1: Snip & Sketch / Snipping Tool (Windows 7, 10, 11)
Although with different names, they are basically two versions of the same Windows screenshot tool, and they do the same job: 4 snipping modes, annotation tools, and a delay timer. Snip & Sketch was introduced in Windows 10 as a modern alternative to the classic Snipping Tool. In Windows 11, Microsoft merged them and renamed the modern version back to Snipping Tool.
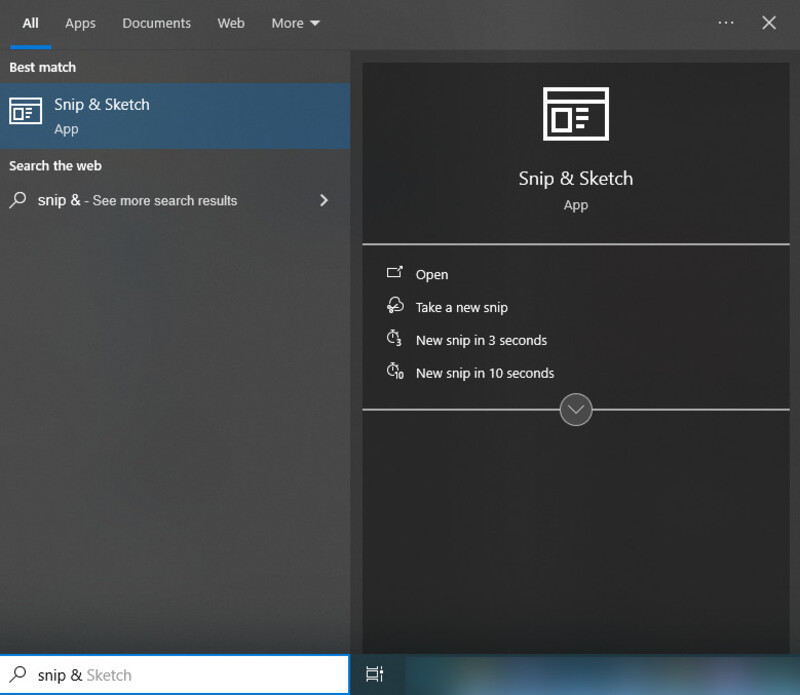
Apart from the shortcuts Windows + Shift + S, you can also open Snip & Sketch / Snipping Tool by typing the name into the Start search box. Then click the New button at the top left to start taking a screenshot.
- If you're taking a screenshot on Windows 7/11, search for Snipping Tool. For screenshots on Windows 10, both names are acceptable.
You can choose to take 4 types of screenshots: Rectangular, Free-form, Window, and Full-screen. In the classic version, they are listed in the drop-down menu of Mode. In the modern version, they appear in the toolbar at the top of the screen.

Rectangular Snip: You can screenshot a section on Windows with this option. Click on it, and drag out a square region on your screen. When you release your mouse, the region is immediately captured and saved.
Free-form Snip: This option lets you hold your mouse and brush an area in any form. As you release your mouse, the content in the area is saved.
Window Snip: Hover your mouse on the window you want, and click to capture.
Full-screen Snip: A single click on the button captures the entire screen.
Snip & Sketch / Snipping Tool saves screenshots automatically to the clipboard, after which a notification pops up on your screen. Click on it to edit the screenshot. (If you miss the notification, open the clipboard and paste the screenshot to Microsoft Paint or a Word document, then save the image as a file and open it in Snipping Tool.) Here you can change the size of the image, draw lines with a pen or a highlighter, and set a delay timer for screen capture.
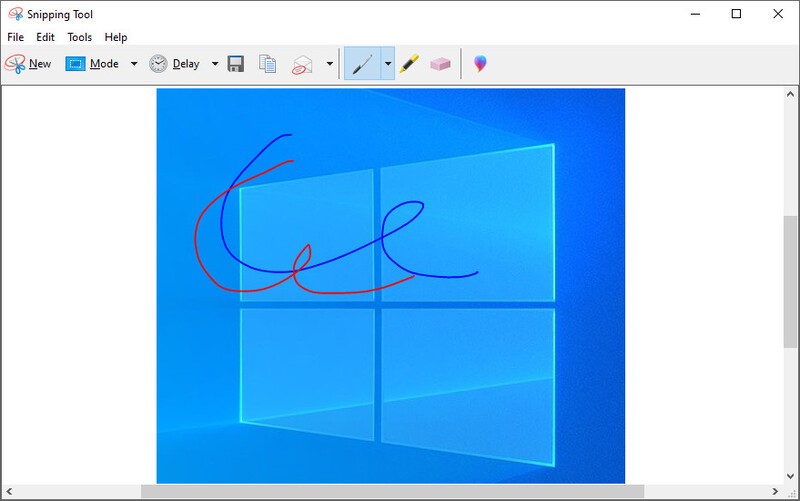
Key differences between Snip & Sketch and Snipping Tool
| Snipping Tool | Snip & Sketch | |
| Windows Versions | 7/10/11 | 10 |
| Interface Design | Old style | Modern |
| Sharing Options | Save, Copy, Email | Save, Copy, Email, WhatsApp, Copilot, Phone |
| Open Existing Images | Limited | Can open and annotate other images |
Method 2: Game Bar – For Game Screenshots
Xbox Game Bar is a built-in Windows game recorder originally designed for gamers, but it also works for regular screenshots. It's especially helpful when you're playing games in fullscreen mode.
There are two ways to take screenshots using Xbox Game Bar.
- 1.Press Windows + G to open the Game Bar, then click the camera button. This opens a screen-capture toolbar on the left. In the toolbar, click the camera button again.
- 2.Press the quick shortcut: Windows + Alt + Print Screen.
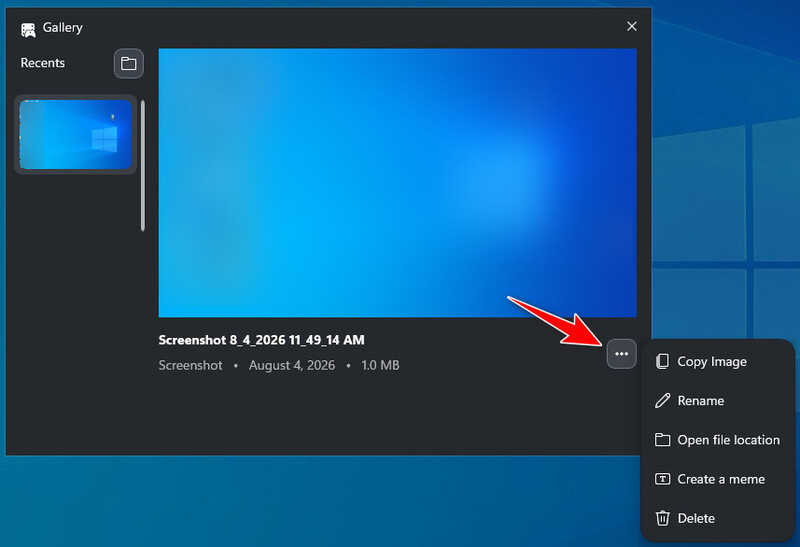
It captures your active window, or the full screen when no window is in focus. After that, it automatically saves the image and presents a notification. Click on the notification to open the Sharing window. Here you can copy, rename, open the file location, add text to create a meme, and delete.
Part 3. How to Capture Specific Types of Screenshots
Scrolling Screenshots (Capture an Entire Web Page or Document)
How to take scrolling screenshots in Windows 7/10/11? Those basic built-in tools can't do it. You'll need to use third-party software or a browser.
1. Take Scrolling Screenshots with AVAide Screen Recorder
AVAide Screen Recorder is a dedicated tool for recording videos, audio, and capturing images of your screen. It's easy to take scrolling screenshots with this tool.
- Capture every detail in up to 4K quality.
- Take special screenshots for scrolling pages or dropdown menus with ease.
- Edit screenshots with lines, shapes, blurs, and callouts.
- Screenshot while recording a video at the same time.
Step 1Download and install AVAide Screen Recorder for Windows.
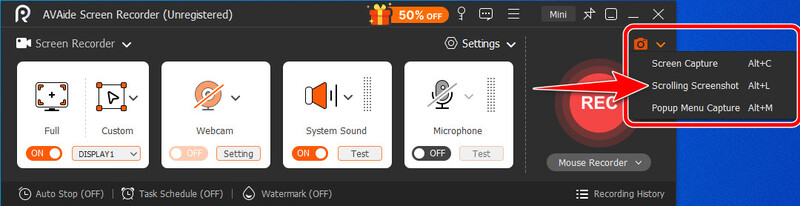
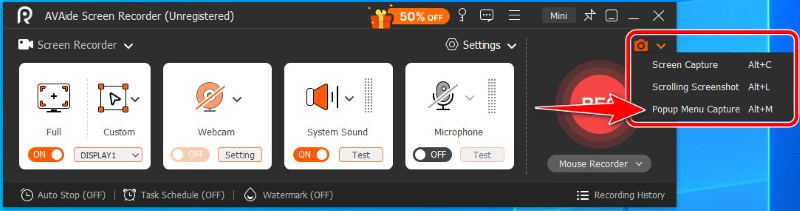
Step 2Run the software. At the top-right corner, there's a camera button. Click the downward arrow next to it, and in the dropdown list, select Scrolling Screenshot.
Alternative shortcut: Open AVAide Screen Recorder and press Alt + L to enter Scrolling mode right away.
Step 3Hover your mouse over the webpage or document you want to capture. When the window lights up, it means it's selected. Click to confirm it as the capture area.
Step 4Use your mouse wheel or the Space key to scroll the page. You can also left-click your mouse to let it scroll down automatically. A real-time preview of the output is displayed beside the capture area, so you know exactly when to stop.
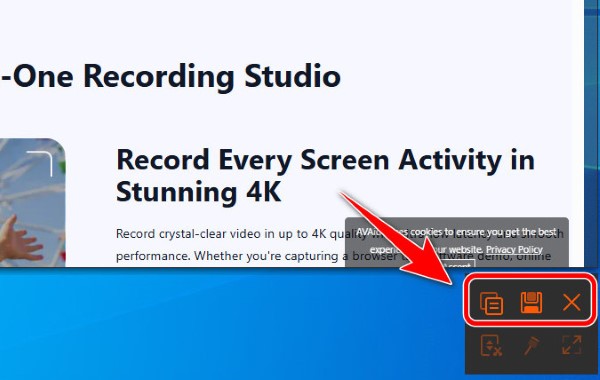
Step 5When you feel like it's done, press Esc to complete. AVAide then presents the image on screen and lets you copy, save, or delete it at will.
2. Use Microsoft Edge Built-in Feature
You can capture scrolling screenshots directly on a Microsoft Edge page without addons.
Step 1Open the webpage you want to capture on Edge.
Step 2Press Ctrl + Shift + S.
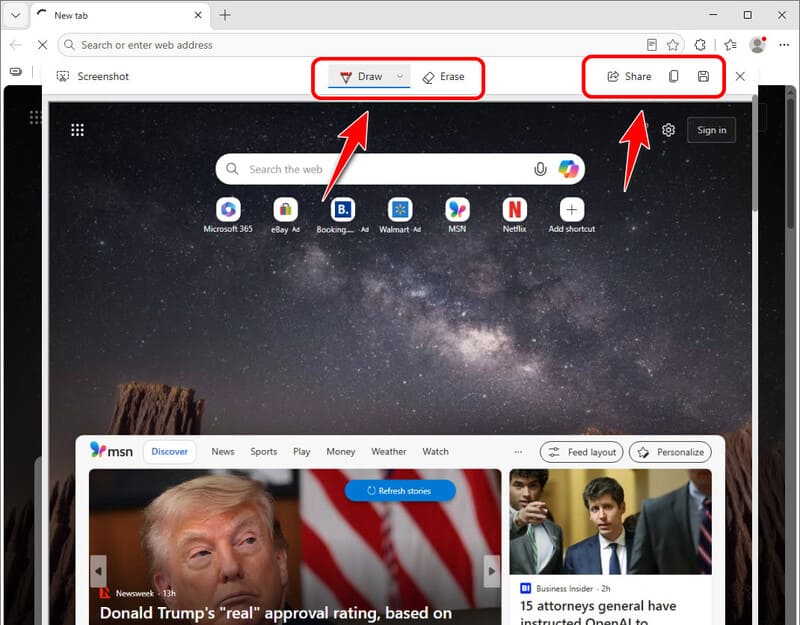
Step 3In the toolbar that appears at the top, click Capture full page. Edge will automatically scroll down to the bottom and capture the entire page.

Step 4You are free to edit, share, copy, or save the screenshot.
3. Browser Extension for Chrome/Edge/Firefox
GoFullPage is an extension designed exactly for scrolling screenshots. It's available for free on the Chrome, Edge, and Firefox add-on stores. You only need a single click to capture the whole page.
Step 1Open the page you want to capture on Chrome, Edge, or Firefox.
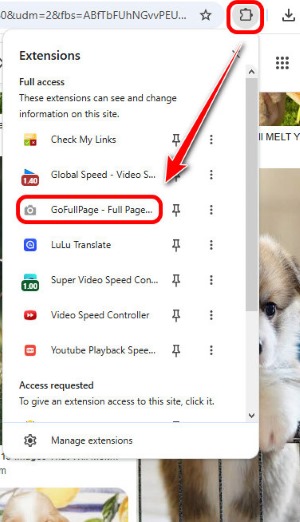
Step 2Click the puzzle piece button at the top-right corner. In the dropdown menu, click on GoFullPage. It starts to take a scrolling screenshot at once.
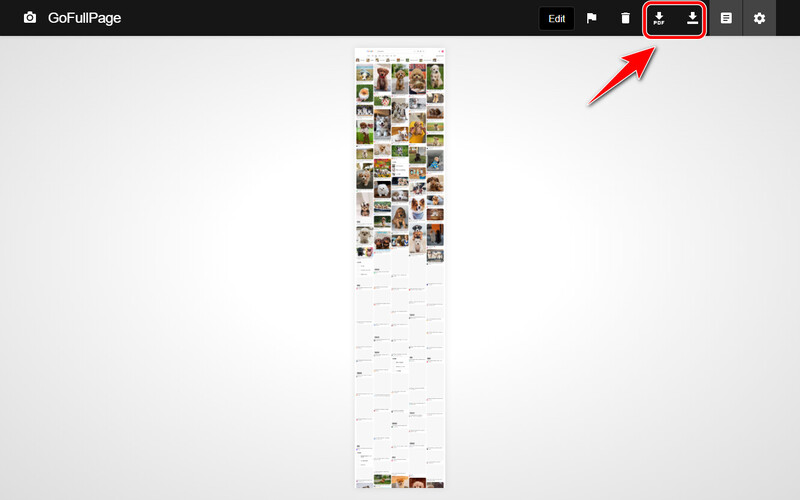
Step 3When it's finished, a new tab opens to display the snapshot. Clicking on the image will zoom it in to show details more clearly. The screenshot is auto-saved to the extension's history, and you can choose to download it as a PDF or a PNG. GoFullPage also provides editing tools, but requires an upgrade.
Popup Menu Screenshots (Capture Dropdowns)
1. Capture Pop-up Menu with AVAide Screen Recorder
AVAide Screen Recorder can also capture a specific pop-up menu.

FREE DOWNLOAD For Windows 7 or later
 Secure Download
FREE DOWNLOAD For Mac OS X 10.13 or later
Secure DownloadStep 1Open AVAide Screen Recorder. Go to the top-right corner and click the downward arrow beside the camera button.
Step 2From the dropdown, select Popup Menu Capture. Or simply press Alt + M to launch it quickly.
Step 3Now there should be a floating bar following your mouse that says "Pop up the menu and move your mouse over it". You only need to do as it says. AVAide Screen Recorder automatically detects and selects the menu. Keep your mouse over it and press Ctrl, Shift, or Space to capture.
2. Use Windows Built-in Rectangular Snip to Capture Manually
Step 1Open the pop-up menu.
Step 2While the menu is open, press Windows + Shift + S to launch Snip & Sketch / Snipping Tool. It freezes your screen, keeping the pop-up menu visible.
Step 3From the toolbar, pick Rectangular Snip and drag over the area that includes the menu. Let go of your mouse, and the menu is captured.
Part 4. Where Do Screenshots Go on Windows?
How to find the screenshots on Windows? It depends on the method you used to take them. Read this clear list of Windows screenshot locations.
| Methods | Default Save Locations |
| Print Screen | The clipboard |
| Alt + Print Screen | The clipboard |
| Windows + Print Screen | C:\Users\[UserName]\Pictures\Screenshots |
| Snip&Sketch / Snipping Tool | Your selected location when you click Save |
| Xbox Game Bar | C:\Users\[UserName]\Videos\Captures |
Note: If you have enabled OneDrive auto-save, the screenshots that go to PicturesScreenshots will also create a backup in OneDrive.
Part 5. Troubleshooting Common Screenshot Problems
Why Can't I Screenshot on Windows?
Here are some common causes and how to fix them.
- 1.If you're using a laptop, try pressing Fn + Print Screen instead of just Print Screen alone, as some laptop keyboards require the Function key modifier.
- 2.If you're using the Snipping Tool, it may be glitching. Go to Settings > Apps > Installed Apps > Snipping Tool, and click the three dots. Select Advanced Options, then click Reset.
- 3.If the Print Screen key is not responsive, the shortcut might be turned off. Go to Settings > Accessibility / Ease of Access > Keyboard, and toggle on the Print Screen shortcut.
- 4.If you're capturing gameplay, perhaps the game is full-screen exclusive. Try using Xbox Game Bar to work around it.
How to Screenshot Windows That Turn Black
Screenshot turning black is usually due to 3 reasons:
- 1.The browser hardware acceleration is on. Go to the browser's Settings > System, and turn off "Use hardware acceleration when available". After that, restart the browser and try again.
- 2.The content you want to capture is protected. Windows built-in tools often get blocked out by protections. Try using third-party tools like AVAide Screen Recorder or the GoFullPage extension.
- 3.You're in a full-screen exclusive game. Use Xbox Game Bar to take screenshots, or switch the game to Borderless Windowed Mode.
How to Capture Multiple Screenshots Quickly in Windows 11
For full-screen capture, repeatedly press the screenshot shortcut Windows + Print Screen. Each screenshot is automatically saved as a file. Or if you don't want a large batch of files filling up your storage, press Print Screen alone, and then view the images in the clipboard.
If you want to capture several sections of your screen, turn on Multiple Windows in the Snipping Tool Settings. In this way, you can take multiple partial screenshots one by one, and they will be displayed in separate windows simultaneously.
Part 6. How to Screenshot on Windows Without the Windows Key
Don’t have a working Windows key, or using a keyboard without one? No problem. Without the Windows key, you can still take screenshots with the methods below.
1. Use PrtScn alone (copies to clipboard).
Without the Windows key, the Print Screen key alone saves the full-screen picture to the clipboard.
2. Open Snip & Sketch / Snipping Tool from the Start menu.
Search for Snip & Sketch or Snipping Tool in the Start search box and open it from the search result.
3. Use the On-Screen Keyboard.
Go to Start > Settings > Ease of Access / Accessibility > Keyboard, and turn on Use the On-Screen Keyboard. Then click the Print Screen button of the on-screen keyboard.
Part 7. How to Perform Screenshot on Windows Surface (No Keyboard)
Windows Surface is a series of products that can work as both a laptop and a tablet. In tablet mode, it doesn't have a physical keyboard.
How to screenshot on it? While you can use the methods in Part 6 for no-keyboard screen capture, there are some solutions specifically for Windows Surface.
Method 1. Full-Screen: Use Windows Surface Hardware Buttons
Step 1Press and hold the Power button.
Step 2While holding it, press and release the Volume Up button.
Step 3The screen flashes black for a second, confirming the screenshot. Then you can find the full-screen image at Pictures > Screenshots.
Method 2. Partial Capture: Use Surface Pen (If You Have One)
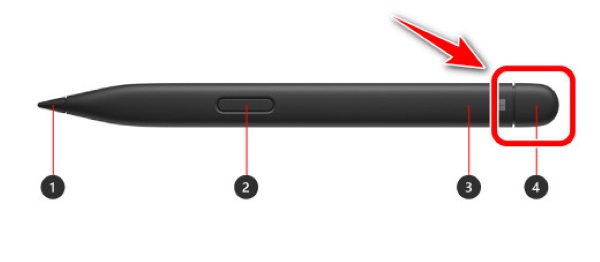
Double-click the top button of the Surface Pen. This opens the Snipping Tool, so you can select what to capture.
Part 8. Quick Reference Table: All Screenshot Methods
| Method | Capture Area | Save Location | Difficulty |
| Print Screen | Full screen | Clipboard | ★☆☆ Easy |
| Windows + Print Screen | Full screen | Pictures > Screenshots | ★☆☆ Easy |
| Alt + Print Screen | Active window only | Clipboard | ★☆☆ Easy |
| Snipping Tool / Snip & Sketch | Rectangular, Free-form, Window, Full screen | Clipboard / manually selected location | ★★☆ Medium |
| Xbox Game Bar | Game window / active window / Full Screen | Videos > Captures | ★☆☆ Easy |
| AVAide Screen Recorder | Scrolling pages, popup menus, custom areas | Your selected location | ★☆☆ Easy |
| Microsoft Edge Full Page Capture | Entire webpage | Your selected location | ★★☆ Medium |
| GoFullPage Extension | Entire webpage | Your selected location | ★★☆ Medium |
| On-Screen Keyboard | Full screen | Clipboard | ★★☆ Medium |
| Surface Hardware Buttons | Full screen | Pictures > Screenshots | ★☆☆ Easy |
| Surface Pen | Selected area | Snipping Tool location | ★☆☆ Easy |
Quick Recommendation
| If you want to… | Use this method |
| Capture the whole screen instantly | Win + PrtScn |
| Capture only part of the screen | Win + Shift + S (Snipping Tool) |
| Capture a scrolling webpage | AVAide Screen Recorder / Edge Full Page Capture |
| Capture a drop-down menu | AVAide Screen Recorder |
| Screenshot a game | Xbox Game Bar |
| Screenshot without a Windows key | PrtScn / Snipping Tool / On-Screen Keyboard |
| Screenshot on Surface without a keyboard | Power + Volume Up or Surface Pen |
There are many convenient ways to take screenshots on Windows. Whether you want to capture the full screen, a specific window, a selected area, a scrolling webpage, or a drop-down menu, there is a method for every situation. For quick captures, shortcuts like Win + PrtScn and Win + Shift + S are the easiest solutions. For advanced needs, tools like Snipping Tool and AVAide Screen Recorder offer more flexibility. With the right screenshot method, you can capture and share screenshots efficiently on any Windows device.
ABOUT THE AUTHOR

Record screen, audio, webcam, gameplay, online meetings, as well as iPhone/Android screen on your computer.