Need to save something on your screen before it disappears? The PrtScn key is one of the fastest ways to capture what you see, but it is not the only option. Windows offers several screenshot shortcuts, and different keyboards may work in different ways. You might also wonder where your screenshots are saved or whether the same methods work on a Mac. This guide explains how to Print Screen on Windows, covers alternative screenshot methods, fixes common issues, and shows where to find your saved images.
Part 1. How to Print Screen on Windows
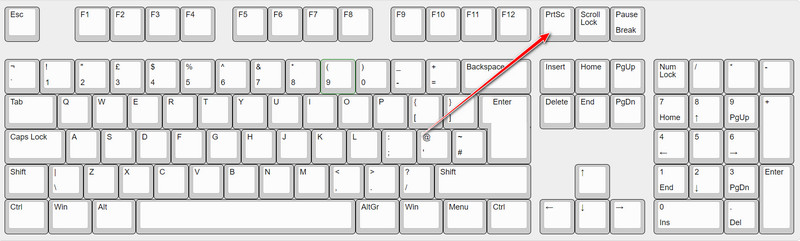
1. The Classic Print Screen Key
To capture what is on your screen, tap the Print Screen key, which saves the image to the clipboard. As simple as that, you can now use the shortcut key to paste the image, which is Ctrl + V, to a document or as a message and send it to others.
2. Windows + Print Screen (Automatic Save)
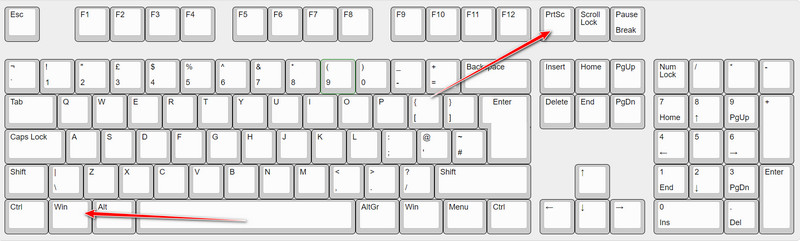
To automatically save the entire screen on Pictures in Windows, just press the Windows key and PrtScn because this is the print screen hotkey to do it. A sudden low-light will appear on your screen, which indicates that it is already done taking a screenshot of your entire screen. To check it, open the File Explorer, go to Pictures, and find the Screenshots.
3. Alt + Print Screen (Active Window Only)
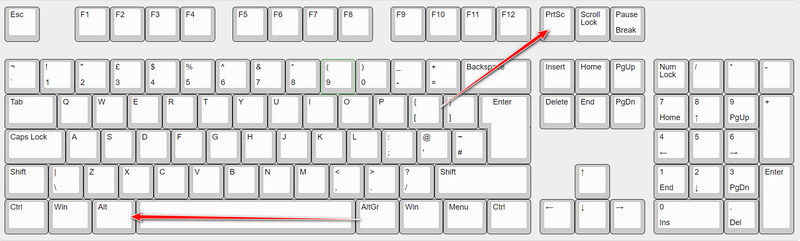
Place your mouse on the active window that you want to capture, then press the Alt + PrtScn on your keyboard to activate this print screen keyboard shortcut, and it will instantly capture the image of that window, then save it to your clipboard. Paste the captured image into a documentation or messages to see the final result.
Part 2. How to Print Screen on Mac
Surely, you are wondering how to Print Screen on a Mac without having the PrtScn key present on your Mac. Even if you have connected a keyboard to your Mac and pressed the PrtScn, it will do nothing because it is not a native built-in shortcut unless you map the PrtScn to take the screenshot. But no need to worry because there is a way to do a screenshot on a Mac without using the PrtScn key.
1. Command (⌘) + Shift + 3
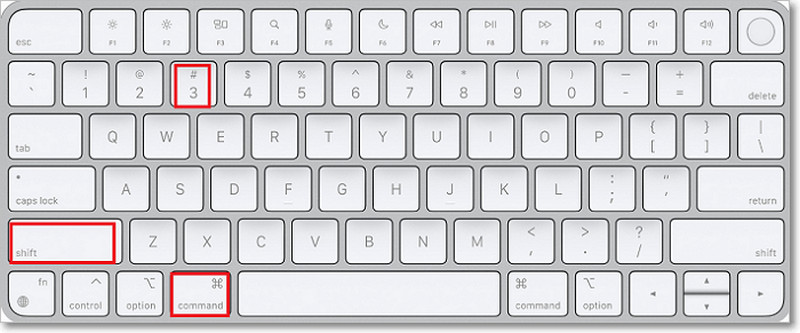
By pressing the Command (⌘) + Shift + 3, you can take a fast screenshot of your entire screen and save it to your desktop immediately.
2. Command (⌘) + Shift + 4
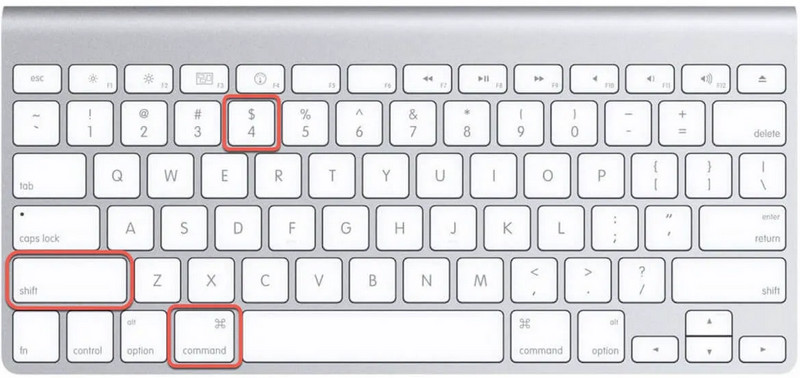
Pressing the Command (⌘) + Shift + 4 turns your mouse pointer into a crosshair, wherein you can drag and select a specific portion of your screen that you want to save. If you tap the Spacebar while on crosshair, your cursor will turn into a camera that you can use to capture a single active window or menu.
3. Command (⌘) + Shift + 5
By pressing the Command (⌘) + Shift + 5, you open the Screenshot toolbar that you previously used for screenshotting. This menu allows you to have access to its on-screen controls to capture the entire screen, selected window, or portion of the screen. The updated version of macOS also offers a way to record your screen as a video.
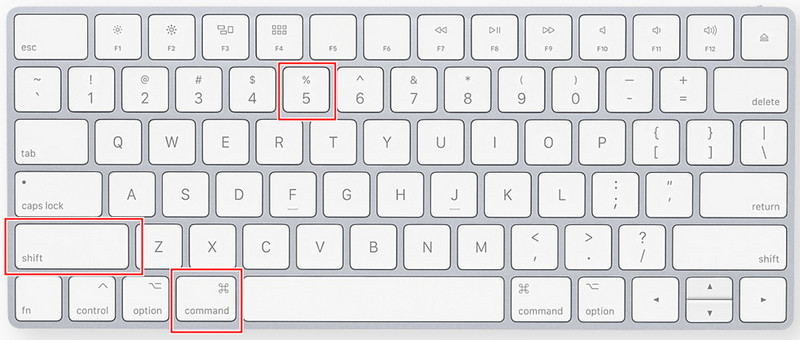
- If you do not want to save the screenshot to your desktop and want to create a copy of it on your clipboard, then just add the Control key to it. For example, instead of Command (⌘) + Shift + 3/4/5, you will use Command (⌘) + Control + Shift + 3/4/5.
Part 3. How to Screenshot Without a Print Screen Key
There are times when the Print Screen is not working, which is why you need to explore more options that are already readily available on your Windows. If an instance occurs and you can not use it, then try to use the alternatives that we have here.
1. Windows + Shift + S (Snipping Tool / Snip & Sketch)
If your keyboard does not respond when you press the PrtScn, then try to use the Windows + Shift + S, also known as the Snipping Tool or Snip & Sketch. It is a pre-built snipping tool that allows users to capture the entirety of their screen, a certain area, and a window without the need to download it. It is a practical option for anyone learning how to print screen on Windows 11 because the image is copied to the clipboard and can be saved or shared immediately. To use it, follow the steps below.
Step 1Press the Windows + Shift + S simultaneously, and it will lightly darken your screen. Select the screencapture mode that you want to use, which is already available here.

Step 2After a quick flash, the screen-captured image is saved on the clipboard.
2. Using the Snipping Tool (Windows 10 & 11)
Unlike what you can get on Windows + Shift + S, accessing the Snipping Tool directly gives you more control than basic keyboard shortcuts. You can delay a screenshot, choose a capture mode, and add simple annotations before saving the image. This is a much better option than the PrtScn because you can preview the image you have captured, and it is readily available on Windows 10 and 11. It is a reliable choice if you want a straightforward way to learn how to print screen on a computer without relying on the dedicated key we discussed here. Follow this guide to know how to use it.
Step 1Press the Windows key, and type in the name of it, Snipping Tool. Once it appears on the results, click it twice to open the app.
Step 2Tick the Mode, choose the capturing mode that you want to use, which is available here, then your mouse cursor will change depending on the mode you choose.
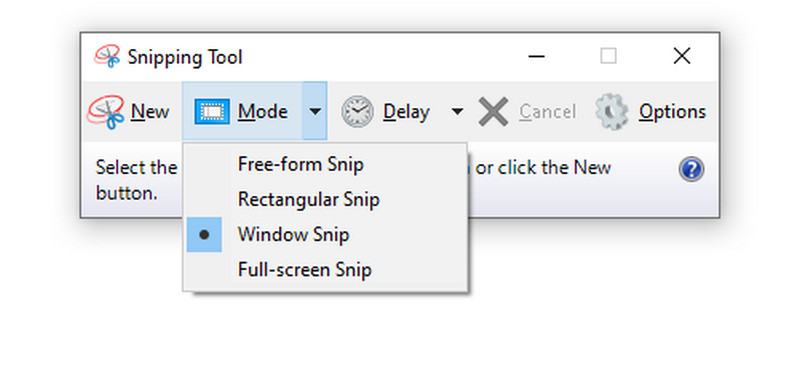
Step 3Click once to save, and it will open a new window wherein you can annotate the image before saving it.
3. AVAide Screen Recorder (Windows & Mac)
If you want to make screen capture extensive and have more options in annotating that are used in a professional environment, then the AVAide Screen Recorder is the choice. It is not only a screen recorder, but it can also capture still images. With its screenshot feature, you can capture a selected area with a clear image quality better than the default ways have to offer. If you are looking for how to print a screen on a PC that offers more than a capture option, then follow the guide we have.
Step 1First of all, download and install the screen recorder on your Windows or Mac by ticking the button that we have here. No need to worry, it is safe to get this app from here.

FREE DOWNLOAD For Windows 7 or later
 Secure Download
FREE DOWNLOAD For Mac OS X 10.13 or later
Secure DownloadStep 2After launching the app, click the dropdown button and choose the Screen Capture amongst the list of options available.
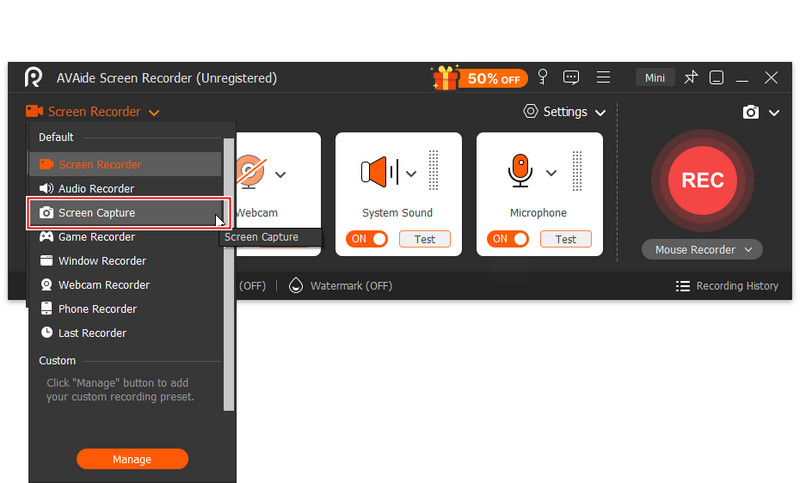
Then your cursor will turn into a crosshair, but there are two ways of capture mode it provides:
- Click once on an active window to capture the entire window.
- Click and drag over the area you want to capture. Release the mouse button to take a screenshot of the selected region.
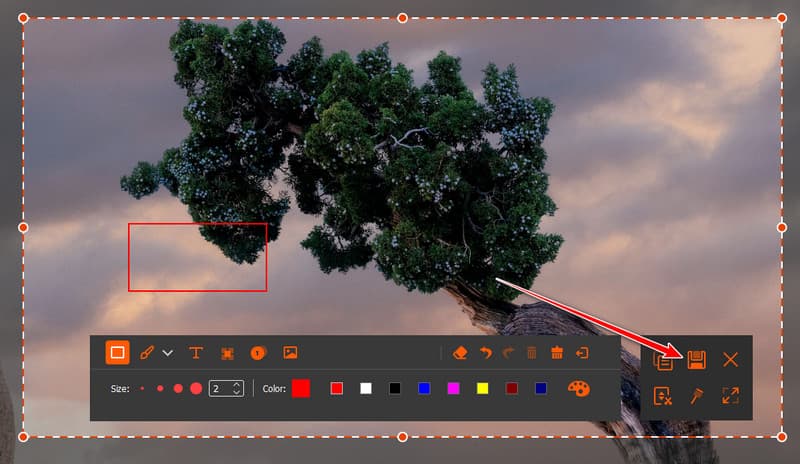
Step 3The floating toolbar will appear on your screen, wherein you can start to draw on the captured image and click on it to use it. Once you are done, click the Save button.
Part 4. Troubleshooting "Print Screen Not Working"
1. Check if you have an Fn key
If you are wondering why your Print Screen is not working, then this is one of the first things you need to check because the key may not be working as the primary function. When you press the Print Screen key, it does nothing; your keyboard may require an additional key to function, which is the Fn. This is common on laptops from other brands. Try pressing the Fn + PrtScn, Fn + Windows + PrtScn, or check if the Fn Lock feature is enabled.
2. Update or reinstall keyboard drivers
Aside from pressing another key, another issue occurs when you are using an outdated or corrupted keyboard driver, which prevents your shortcut key from being recognized and working properly. To solve the problem, open the Device Manager, expand the Keyboard section, and select Update Driver. If the keyboard driver is hidden, then click the View and pick the Show hidden devices.
If the problem still persists, try to uninstall it and restart your computer to get a fresh copy automatically. This practical troubleshooting step is for you if you are trying to learn how to Print Screen on Windows 10, but the shortcut is not working.
3. Check for conflicting software
Some apps do override the Print Screen key and assign it to their own screenshot tools. Programs such as HD screen recorders, remote desktop software, cloud storage apps, or gaming overlays may intercept the shortcut before Windows can recognize what you are trying to use it for. To solve it, close the app running in the background and try to press the PrtScn again. If the shortcut starts working again after shutting down the app, then review its keyboard shortcut settings and assign a different hotkey to it.
4. Use the Snipping Tool as a fallback
If your keyboard does not include a Print Screen key or if the problem still persists, then use the Snipping Tool. It works the same as the PrtScn, but it provides more capturing modes. You can either press Windows + Shift + S or search for it on your desktop and open it. This is the easiest solution if I don’t have print screen on my keyboard, since it works immediately without requiring me to press the PrtScn.
5. Restart your computer
If there is a temporary glitch that happened on your device, we suggest that you restart it to refresh it and close the app that interferes with the keyboard input. If the problem remains after restarting, then it is better to go back to part 3 and use the alternatives we have introduced earlier.
Part 5. Where Do Screenshots Go
If you are wondering where does the print screen goes? Then here is some quick information on where you can find the saved screenshot based on the screenshot method you choose.
| Screenshot Method | Where the Screenshot Goes |
| Print Screen or PrtScn | Copied to the clipboard |
| Windows + Print Screen | Saved to the Pictures > Screenshots |
| Alt + Print Screen | Copies the active window into the clipboard |
| Windows + Shift + S | Copied it to the clipboard |
| Snipping Tool | Open a new window to edit the captured image before saving |
| AVAide Screen Recorder | Saved to the output folder set in its Preferences. You can change the location at any time. |
The Print Screen key is a certified shortcut key used to capture what is on your screen. With the addition of Windows, you can save it to the Screenshots, while the Alt gives you the option to capture an active window. Despite having it as a conventional option to capture the screen, there are times when it does not work for that purpose. That is why we suggest alternatives that work well on Windows. There is no need to panic when the PrtScn is not working because we've got you covered!
ABOUT THE AUTHOR

Record screen, audio, webcam, gameplay, online meetings, as well as iPhone/Android screen on your computer.