Do you want to learn how to screenshot on an iPhone? Taking a screenshot is another strategy you can use to capture your favorite scene from the video, or important information, highlight specific action from the game, and more. So, if you are interested in learning more about the effective methods of taking a screenshot, visit here, as we offer all the techniques you can use.
Part 1. Basic Screenshot Method on iPhone
Want to learn how to take a screenshot on an iPhone? Well, capturing your iPhone screen is a simple way to save and collect various content. iPhone can even offer a basic method, making it possible for all iPhone users. So, if you want to capture your screen easily and effectively, you can use the simple methods provided in this section.
Method 1. Screenshot on iPhone with Face ID
Are you using an iPhone X and other modern models, like iPhone 11, 12, 13, up to 17? In that case, taking a screenshot would be a possible task. All you need to do is press the buttons on your phone, and you will get the result you need. This ensures that you can capture text-based information, non-downloadable images, record gameplay, scenes from the video, and more. You can even resize the image on the iPhone using the cropper tool from the Photos app. If you want to start learning how to capture your iPhone 16 and other latest models, see the instructions below.
Step 1Open your iPhone and go to the content you want to take a screenshot of.
Step 2After that, press and hold the Volume Down + Power buttons. Then, release the buttons after one to two seconds.
Step 3Once the capturing process is done, the screenshot will show up in the bottom-left corner. You can check the image on the Photos app.
Method 2. Screenshot on iPhone with Home Button
After learning the screenshot method of using modern iPhone models, you might be wondering how to take a screenshot on the older models. Well, if you are using iPhone SE, 6s, 7, 8, and other models, taking a screenshot is also a simple task. As we all know, older iPhones come with a home button at the front. This button is the key to achieving the result you want after the process. See the steps below and learn how to take a screenshot on an iPhone.
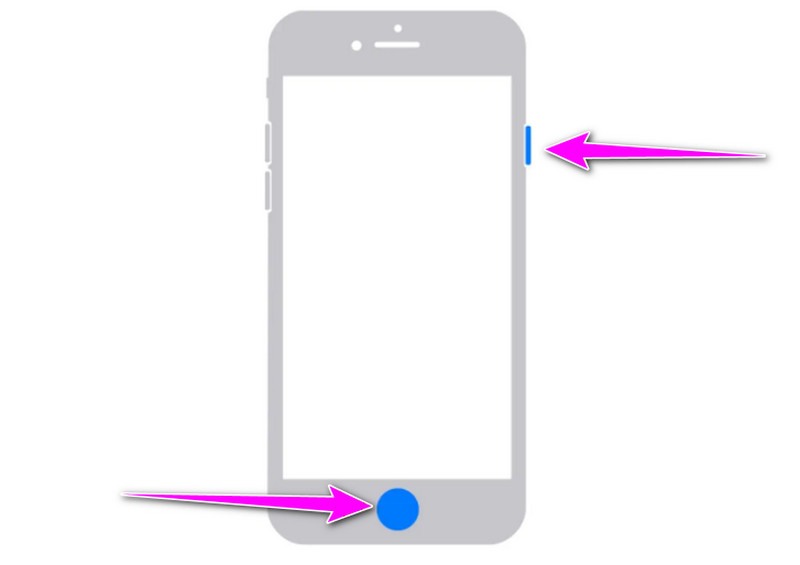
Step 1Open your older iPhone device and go to the content you want to capture.
Step 2To begin capturing the screen, press the Home button and the Side/Top button at the same time. Then, release both buttons instantly.
Step 3The screenshot preview will show up on your screen. Note that there are times when the image is blurry. To unblur an image on an iPhone, you must use a separate app.
Part 2. Advanced Screenshot Features on iPhone
The good thing about the iPhone is that it is capable of offering basic methods of taking a screenshot. It can also offer advanced features for a better iPhone screen-capturing process. Some of the advanced features you can use are the scrolling screenshot and screen recording. To get more ideas about these features, you can check the methods below.
Method 1. How to Take a Scrolling Screenshot
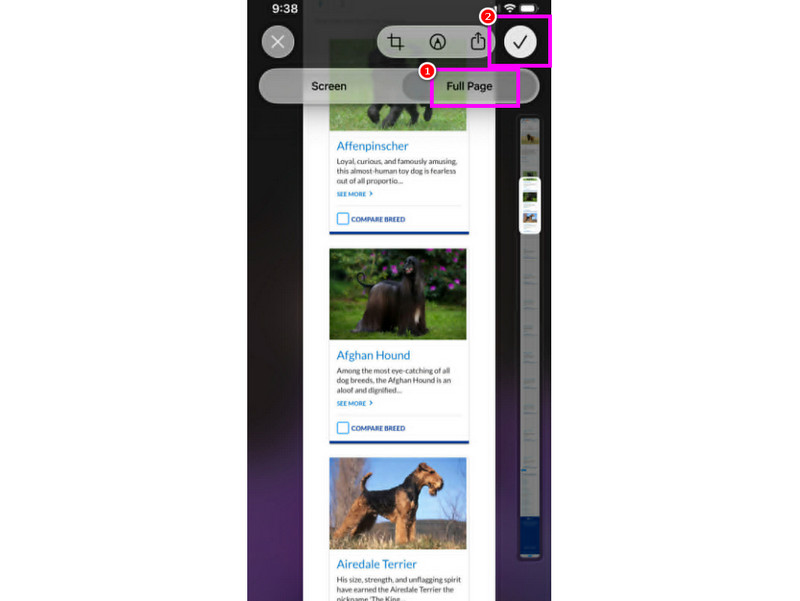
Scrolling screenshot is an ideal feature of the iPhone. This lets you capture everything from the webpage or document in Safari. The good thing here is that you can capture as long as you want. It also ensures that the image has the best quality to make it more readable after zooming in on the image. Follow the steps below and start learning about the scrolling screenshot on iPhone.
Step 1Go to your Safari and browse the information you want to capture.
Step 2After that, start capturing the screen using the basic method. Once the preview shows up, press it.
Step 3Then, tap the Full Page option on your screen. Once you are done scrolling and capturing everything, hit the Check button to save it on your device. With this method, you now know how to take a long screenshot on an iPhone.
Method 2. How to Take a Video Screenshot
What makes the iPhone ideal for capturing is its capability to offer its built-in screen recorder. With this feature, you can ensure that you capture everything from your mobile device. Plus, using this feature is simple, making it suitable for all iPhone users. If you want to start recording your iPhone screen, you can use the simple methods below.
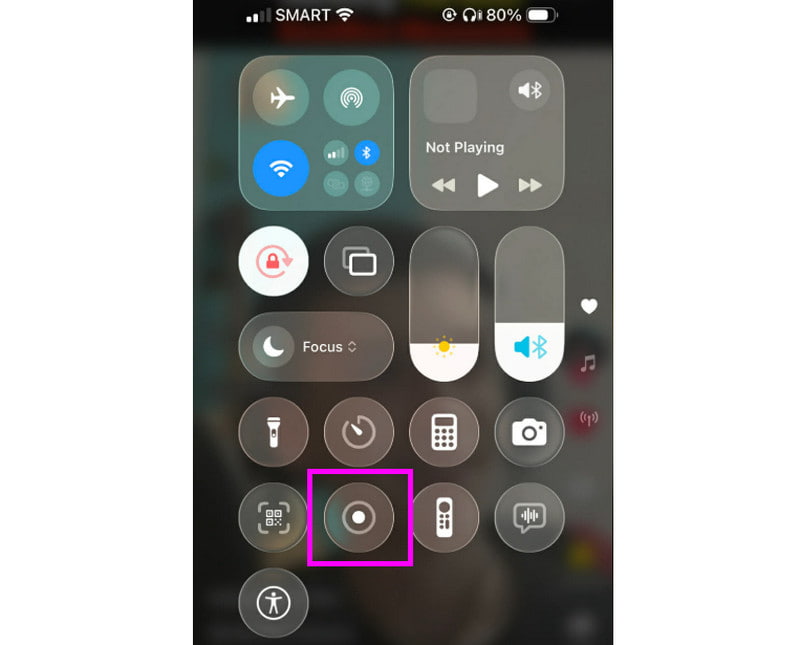
Step 1From your iPhone, navigate to the Control Center section. You can tap the Assistive Touch for a faster process.
Step 2Then, tap the Recorder button to start the capturing process. The recording will be in after the 3-second countdown.
Step 3Tap Stop to finish the recording.
Part 3. Managing Your Screenshots
Do you wonder where the screenshots are being saved, how to turn off the screenshot, and how to change the screenshot settings? Well, knowing all of these is ideal if you want to manage your screenshots well. In this section, we will answer all these questions to give you more insights.
Where are screenshots saved on an iPhone?
After taking a screenshot, you might be wondering where you can access and view them. Well, the good thing here is that you can directly see all the captured screens on your Photos app. You can even select all of them and create a separate album. That way, you can see all your screenshots better.
How to Change Screenshot Settings on iPhone?
Want to know how to change the screenshot settings? Well, all you need is to adjust the screenshot options, like editing tools or sharing, by opening the screenshot preview that shows up right after the screen-capturing process. From there, you can improve the screenshot by cropping, annotating, adding effects, and sharing directly with other platforms.
How to Turn Off Screenshot Sound?
Do you want to turn off the screenshot sound to make the capturing process less disturbing? Well, iPhones don't have direct settings to disable the sound from screenshots. The best thing you can do is to switch your iPhone into Silent Mode using the side switch. You can also lower the volume before taking a screenshot on an iPhone. This way, you can capture the iPhone screen without any sound.
Part 4. Troubleshooting: Screenshots are Not Working
Taking a screenshot on an iPhone is the most effective way to capture everything on your screen. However, there are times when the screenshot is not working well. Buttons might not be working well, the screenshot is black, or the screenshot thumbnail disappears too fast. If you want an effective troubleshooting process, see all the information in this section.
Buttons Not Responding
Sometimes, the buttons are not performing well. Maybe there is a problem with the hardware or settings, resulting in a screenshot error. If that is the case, you have to go to the Settings app and proceed to the Accessibility > Touch > Assistive Touch section. Then, you can create a shortcut or customize it to create your own way of taking a screenshot. You can go to the Double-tap option and select the Screenshot option. This way, you don't have to use the buttons.
iPhone Black Screenshot
If there is a black screenshot after the capturing process, it means that the content is restricted. Well, some apps block screenshots for privacy. If you want to capture restricted content, you can use the Screen Recorder feature of your iPhone. If the content is still black, it would be better to respect the content.
Screenshot Thumbnail Disappears Too Fast
If the preview disappears instantly, then you don't have to tap it unless you want to edit. The best solution is to proceed to the Photos app and view the captured screen. In this app, you can deal with your screenshots. You can edit, such as cropping, inserting effects, attaching text, sharing, and more. If the thumbnails consistently disappear, you can also try restarting your iPhone.
Part 5. How to Screenshot on iPhone with a Larger Display
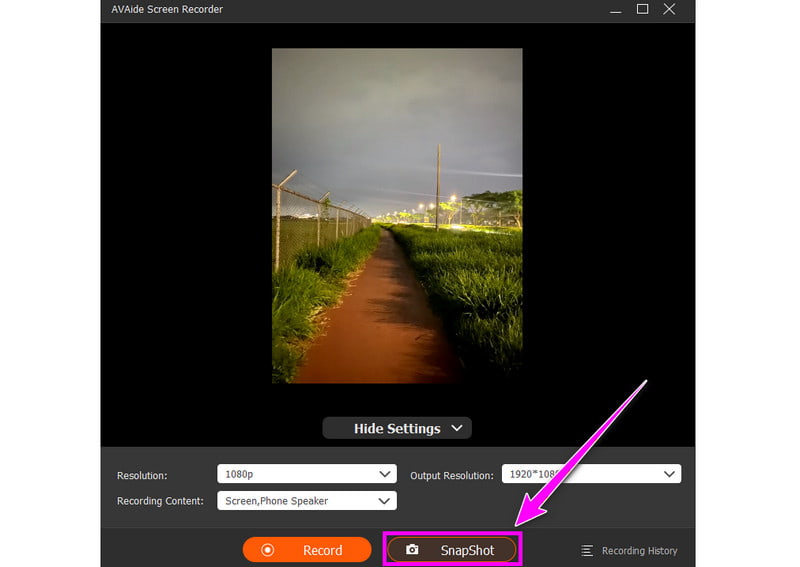
Do you want to take a screenshot on a larger display? In that case, you can access AVAide Screen Recorder. This program can offer its Phone Recorder feature. It can offer its Snapshot feature to effectively and smoothly capture any content from your screen. It can even deal with restricted ones. Taking a screenshot using this program is simple, thanks to its comprehensive user interface. It can also let you save the image with the best quality. What we like here is that you can also improve the captured screen using its built-in editing functions. Thus, if you want to take a screenshot on an iPhone with a larger screen, consider using AVAide Screen Recorder.
- The program can record webcam, videos, meetings, and more.
- It can save the captured screen with the best quality for up to 4K.
- It has a flexible capture mode. It lets you capture the whole/entire screen or a certain screen area.
- It is a one-click capture.

 Secure Download
To start taking a screenshot on a larger display, see the steps below.
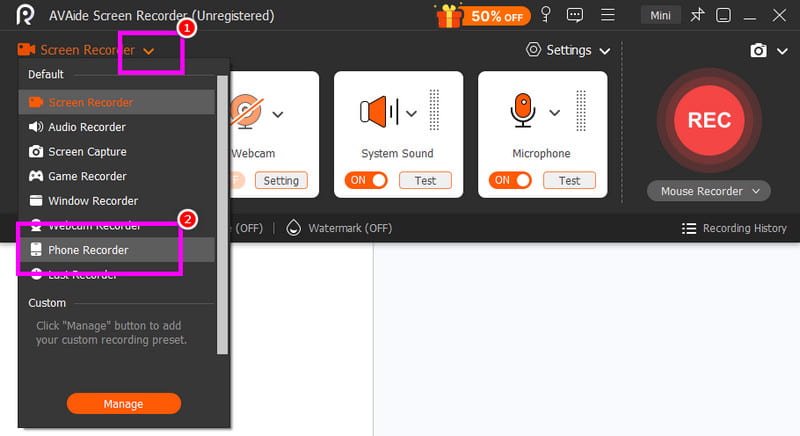
Step 1Download and launch AVAide Screen Recorder on your desktop. When the primary interface appears, proceed to the next step.
Step 2Then, click the Drop-down button and select the Phone Recorder feature. After that, click the iOS Recorder option.
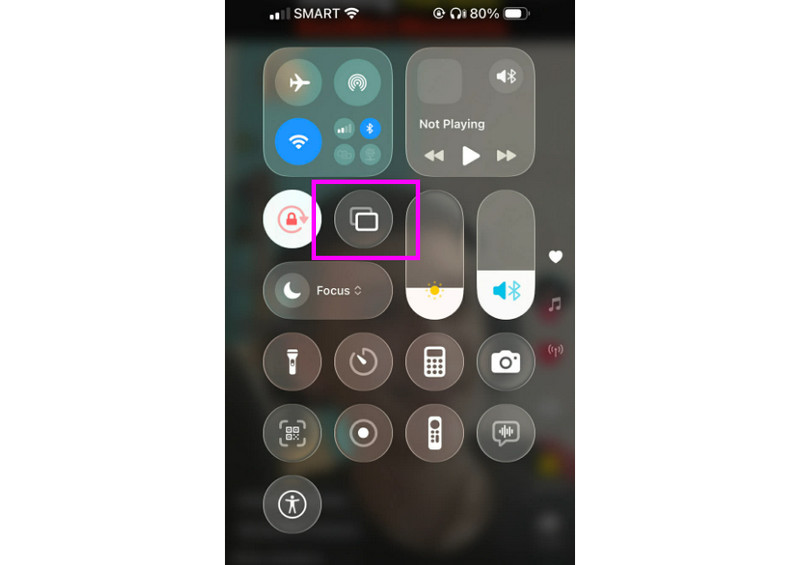
Step 3From your iPhone, go to the Control Center and hit the Mirror feature. Then, press the AVAide Screen Recorder.
Step 4From your desktop screen, you can start clicking the Snapshot button to begin capturing the screen from your iPhone. Once done, you can check the captured screen in your computer folder.
Now you have learned the best ways to take a screenshot on an iPhone device. You even explored how to manage your screenshots by knowing where they are being saved, how to turn off the screenshot sound, and how to change the screenshot settings. Plus, if you prefer taking a screenshot on a larger screen, it is best to access AVAide Screen Recorder. This program can offer its Phone Recorder feature that can help you instantly and perfectly capture your iPhone screen with the best output quality, making it an ideal software for users.
ABOUT THE AUTHOR

Record screen, audio, webcam, gameplay, online meetings, as well as iPhone/Android screen on your computer.