Uploading videos to YouTube is a great way to share your content. However, if you have a video stored on a DVD, you cannot directly upload the DVD to YouTube. You need to convert the DVD video into a digital format that YouTube supports first.
Converting a DVD to a YouTube-friendly format may sound difficult, but the process is easier than you might think. In this post, we will show you how to convert a DVD for YouTube step by step, so you can easily upload and share your DVD videos online.
Part 1. YouTube Video Upload Requirements
YouTube has specific requirements for video formats, resolutions, and other technical specifications. You should follow these requirements when converting DVD videos for YouTube.
Video Format: This is the most important requirement when you want to upload DVD videos to YouTube. YouTube supports several video formats, such as MP4, MOV, AVI, and WebM. MP4 with AV1 encoding is the most recommended format because it offers good quality and wide compatibility.
Resolution: YouTube supports videos from standard definition (SD) to 8K resolution. For the best viewing experience, uploading videos in 1080p or higher is recommended.
Aspect Ratio: Most YouTube videos use a 16:9 aspect ratio. If your DVD video is in 4:3 format, you can keep the original aspect ratio to avoid stretching or distortion.
Bitrate: For 1080p videos, YouTube recommends a bitrate of around 8 Mbps for standard frame rates and higher for 60fps videos. 4K videos usually require higher bitrates.
Frame Rate: YouTube supports frame rates of up to 60fps. Using the same frame rate as the original footage is recommended for the best quality.
Audio Format: AAC audio with a bitrate of 128 kbps or higher is recommended for YouTube uploads.
Video Length and Size: YouTube allows videos up to 256GB in size or 12 hours in length, whichever limit is reached first.
Part 2. Convert DVD to Compatible Video Formats for YouTube
As we all know that we cannot directly upload DVDs to YouTube; you must rip DVDs first. And you can use AVAide DVD Ripper. This software can re-encode your DVD video and audio streams to dedicated YouTube playback presets, so that you don't need to manually set all the requirements mentioned above. AVAide can convert and upscale your DVD movies to 720p, 1080p, and even 4K resolutions while increasing the visual quality.
- Compress the large DVD movie size to no higher than 1 GB.
- Support H.264, HEVC, and AV1 codecs for compatible playback on YouTube.
- Able to rip copy-protected DVDs automatically when they are loaded.
- Recognize your DVD in titles and chapters, letting you select your desired plots.

 Secure Download
Step 1Load DVD in AVAide DVD Ripper
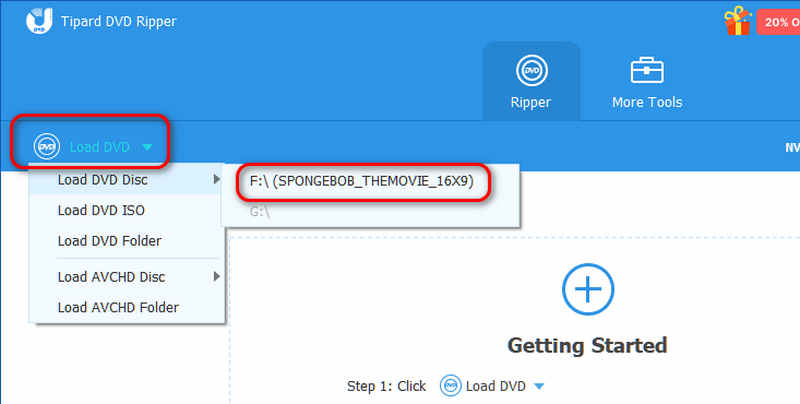
Download, install, and launch AVAide DVD Ripper. Click the Load DVD button to import the DVD to AVAide after you insert the DVD into your computer.
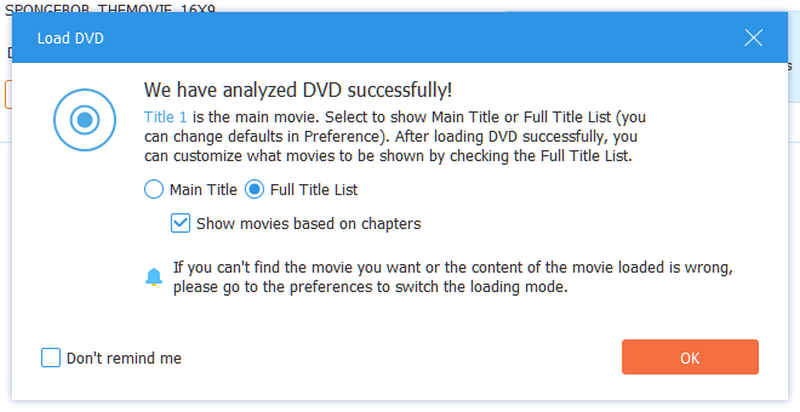
Since you want to upload the DVD video to YouTube, you can choose your desired plots in the whole DVD. Select Full Title List and Show movies based on chapters to check all separate chapters in the DVD. If you only want to get the main movie, just select Main Title.
Step 2Choose a YouTube Optimized Preset
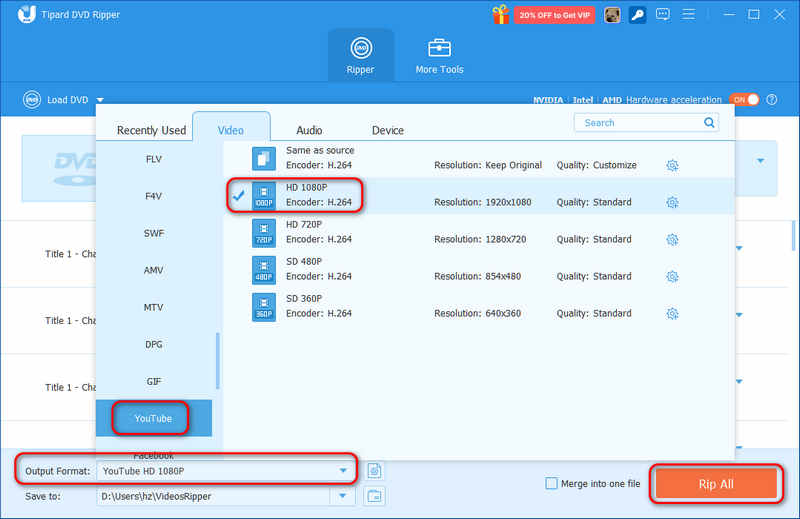
All the chapters are loaded. If you want to preview one, just click the Play button in each chapter bar. Then, click the Output Format dropdown list on the bottom left side. Then, locate the Video tab and scroll down to select YouTube.
Then, you can choose a desired YouTube preset, like HD 1080P. Then, click the Rip All button to convert the DVD to a YouTube-optimized format.
Part 3. How to Upload DVD Video to YouTube
After you convert DVDs to YouTube videos, you can now upload them. It's worth noting that uploading copyrighted content to YouTube without permission can violate YouTube's terms of service and may lead to your account being terminated. So make sure you have the legal right to upload the content before doing so. You can learn from the beyond part to upload them:
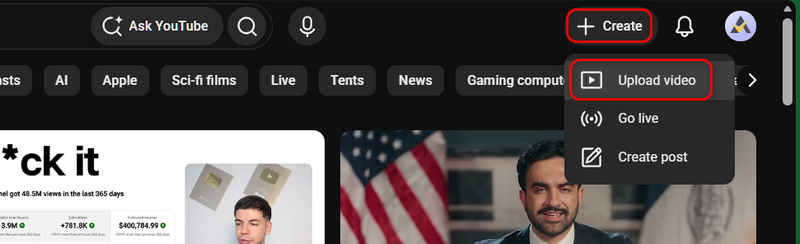
Step 1First, you should sign in to your YouTube account. And then, click the Upload video button from the Create button on the top of the website.
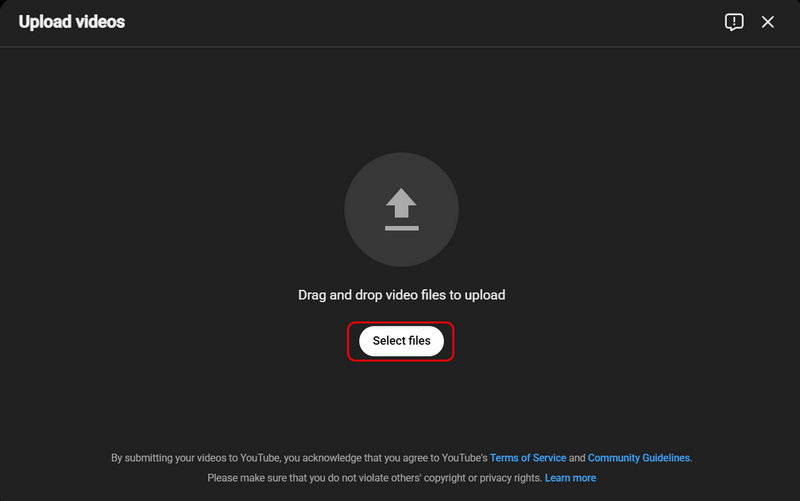
Step 2You can drag and drop the ripped video file into the upload window. Or you can click the Select button to select it from your computer's file explorer.
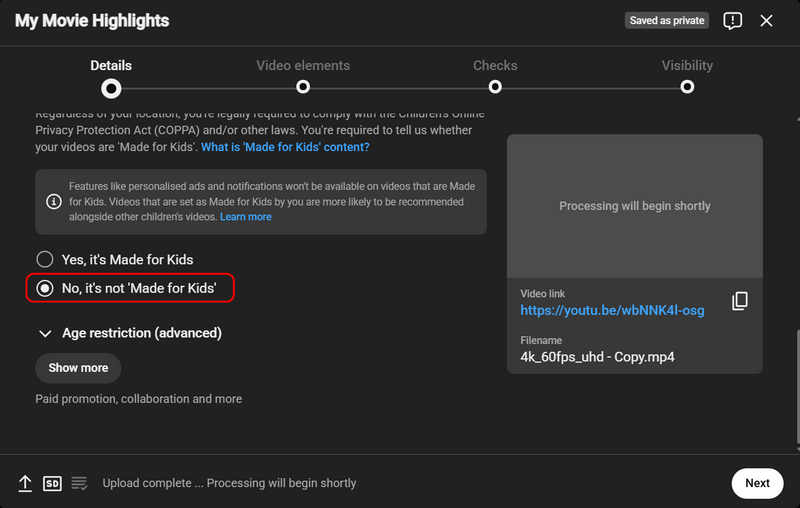
Step 3Add a title, description, and tags to the video. Choose No, it's not 'Made for Kids' if you want to gain more views.
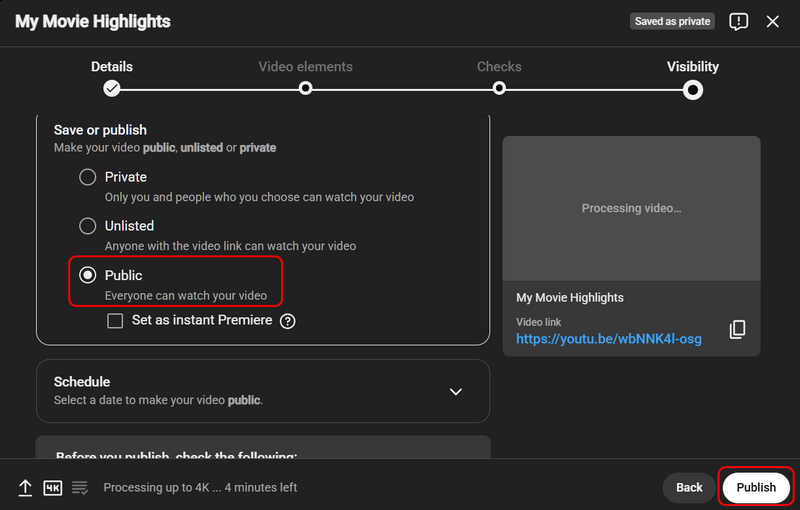
Step 4When it comes to the Visibility section, you should choose Public, of course, unless you don't want the video to be seen by others. Finally, click the Publish button to upload your DVD video to YouTube.
Part 4. FAQs about DVD to YouTube
What video format should I choose when ripping a DVD to YouTube?
MP4 is a widely supported video format that is compatible with YouTube. You should choose this format when ripping the DVD to ensure maximum compatibility with YouTube.
Can I upload a DVD to YouTube if it contains copyrighted content?
No. Uploading copyrighted content to YouTube without permission can violate YouTube's terms of service and may lead to your account being terminated. You should ensure that you have the legal right to upload the content before doing so.
Can I upload a DVD to YouTube without losing quality?
No. Uploading a DVD to YouTube will generally result in some loss of quality due to compression. However, you can minimize the loss of quality by choosing a high-quality video format when ripping the DVD. Or you can learn how to upscale DVDs and upload the video to YouTube in the highest resolution possible.
In conclusion, converting a DVD to YouTube is a straightforward process requiring patience and the right tools. Following the steps outlined in the article, you can easily extract the video content from your DVD and convert the DVD to a YouTube-compatible format with AVAide DVD Ripper as your best YouTube movie maker. And then, you can share the videos on YouTube for the world to see.
ABOUT THE AUTHOR

Best tool for ripping and converting DVD Disc/Folder/ISO image file into over various formats.