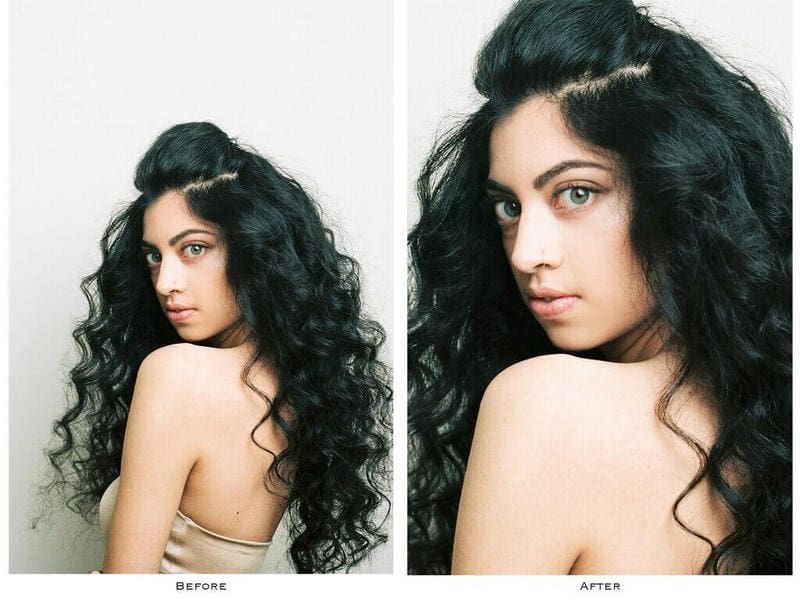
How to convert a low-quality image to high quality? How do I fix poor image quality? Thus, here comes an image quality enhancer to your aid, capable of detailing, sharpening, and restoring clarity. From AI-based tools to advanced software like Photoshop, everyone has their own ways to improve the quality of the image. Beginners and experts need guidance to transform a simple picture into a high-resolution image, including detailed steps. So what are you waiting for? Go check out this step-by-step guide.
Part 1. 6 Easy Adjustments Tips to Enhance Image Quality
Want to increase the clarity of your picture without expending too much effort? You could apply any of the techniques below for a hassle-free enhancement that would improve the overall visuals, colors, and clarity.
1. Adjust Brightness and Contrast to Achieve Balance
Precisely adjusting the brightness level makes it possible to expect a result from an underexposed or overly dark image. Furthermore, the contrast makes the detail of the shadow and highlight images into opposite ones sharper.
2. Crop for Composition Focus
Cropping can help remove distractions, emphasize critical points, and help frame an image. Try applying the Rule of Thirds, which suggests placing important features along grid lines to make the end result visually pleasing.
3. Emphasize With Blur Painting Backgrounds
The principal subject matter of an image can be effectively highlighted with a blurred background, and this look is incredibly professional and appealing. This is also helpful when placing text over pictures, as text readability is achieved without compromising looks.
4. Rely on Auto-Enhance Features and AI Tools
AI-based tools can make quick work of looking at image automation by doing color enhancement, detailing sharpening, and exposure adjusting. Such features as AI upscalers and Auto Enhance can bring back clarity to low-quality images without much effort.
5. Adjust Saturation and Apply Sharpening
Sharpening algorithms identify areas in an image with pronounced changes in brightness or color, enhancing local contrast. Sharpening also amplifies the high-frequency components representing detail in the image, making textures and lines more prominent.
The saturation control function can enhance or reduce color intensity. Increasing an image's saturation enriches its colors, making the image more vivid; decreasing saturation produces a softer, vintage, or monochrome effect.
6. Style Customization With Filters

Image atmosphere can be altered with filters by changing color tone, contrast, brightness, and other features. This is great for achieving a specific tone but set a filter aesthetic carefully because the result may be overly processed.
Part 2. 4 Online Tools Help You to Enhance Image Quality
With AI-powered modern online tools, enhancing image quality has become remarkably simple. These online tools enable you to quickly improve, enlarge, and optimize images across multiple devices.
| Category | AVAide Image Upscaler | Let’s Enhance | Upscale.media | Fotor Online Photo Enhancer |
| Maximum Upscaling | Up to 8× | Up to 16× | Up to 4× | Up to 4× |
| Watermark | No watermark | Need to sign in or a plan | No watermark under certain usage limits | Watermark may apply on free exports |
| Batch Processing | Supported | Supported | Supported | Limited batch support |
| Key Focus | High upscaling ratio and clean output | Multiple output modes | Simple operation | One-click enhancement and basic photo editing |
1. AVAide Image Upscaler
With AVAide Image Upscaler, you can easily enhance image quality online for free. This tool is particularly effective for old or low-quality images, as it focuses on increasing resolution, sharpening details, and reducing pixelation. If you want to improve image clarity quickly, it's an excellent choice.
Key Features:
- Uses artificial intelligence to upscale images without experience。
- No software to download; everything is processed directly on the website.
- Offer 2×, 4×, 6×, and 8× enlargement options.
- Ensure images remain colorful and detailed even after upscaling.
Step 1Access the AVAide Image Upscaler Website
To begin, open any web browser and go to the AVAide Image Upscaler page.
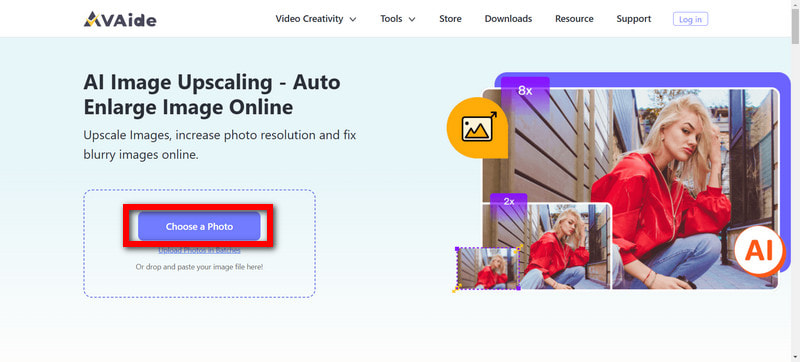
Step 2Upload Your Image
Select the Choose a Photo button to let you browse your files. Choose the required image and wait for it to upload automatically.
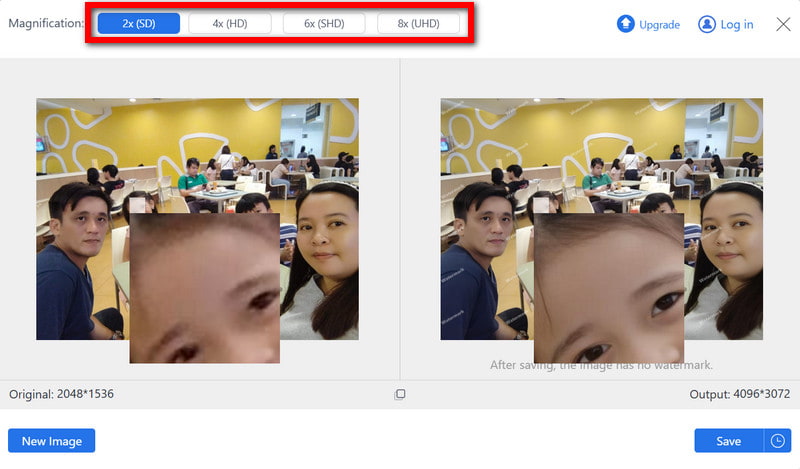
Step 3Select the Enlargement Scale
Select the enlargement scale you wish the AI to enhance. Options include 2×,4×,6× and 8×. AI will ensure details are enhanced and pixelation is reduced.
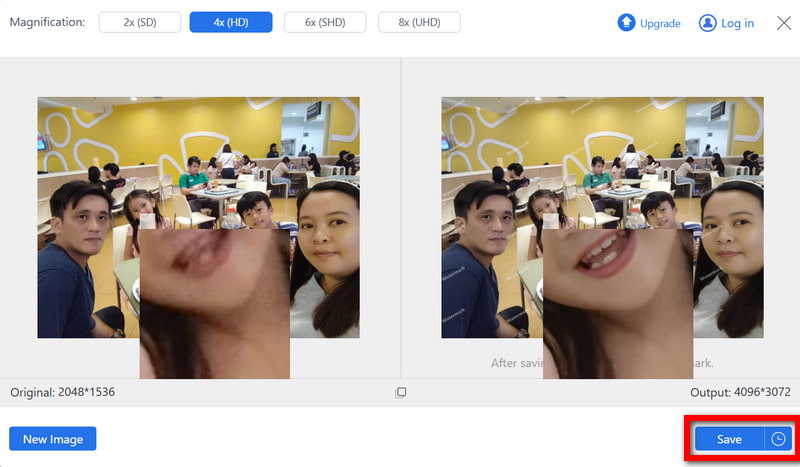
Step 4Review and Adjust if Needed
Finally, click on the Save button to apply the magnification. Ensure that the image being upscaled meets the expectation of sharpness and clarity.
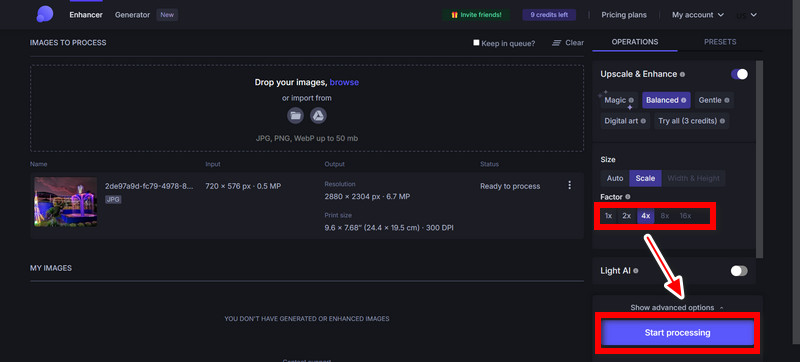
2. Let's Enhance
Let's Enhance is an image resolution enhancer that utilizes AI technology to upscale and restore images. It's perfect for low-quality pictures because it automatically improves the quality by refining textures, removing noise, and increasing the image's resolution.
Step 1To start, navigate to the Let's Enhance website.
Step 2Click the Upload Image button and select a file to upload.
Step 3Choose your preferred options regarding noise reduction, color correction, and upscaling.
Step 4Then click Start Processing so the AI-powered technology can improve your image.
Step 5The final step is to download and save the enhanced version of the image.
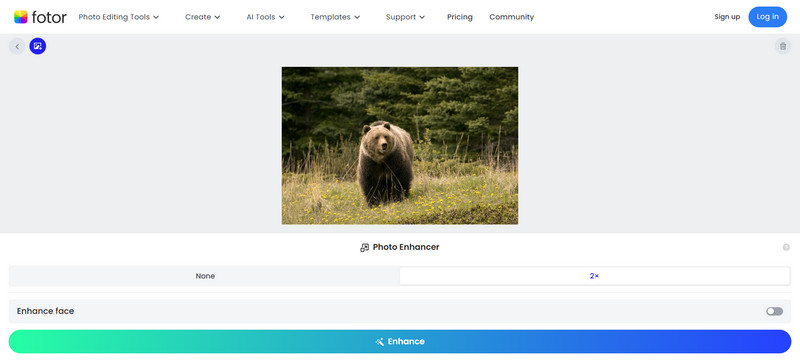
3. Fotor Online Photo Enhancer
Fotor is an online editor that is much simpler to operate and improves images by adjusting brightness, contrast, and sharpness. It is an effective tool for people who wish to edit photos quickly.
Step 1First, go to the Fotor website and select the Photo Enhancer tool.
Step 2Select the image you want to edit from there by clicking the Open Image button.
Step 3Select the Enhance option to let the AI-powered technology automatically adjust the image.
Step 4If necessary, the final touch can be done by manually adjusting the image's sharpness, brightness, and contrast.
Step 5The last step is to click Download and save the image.
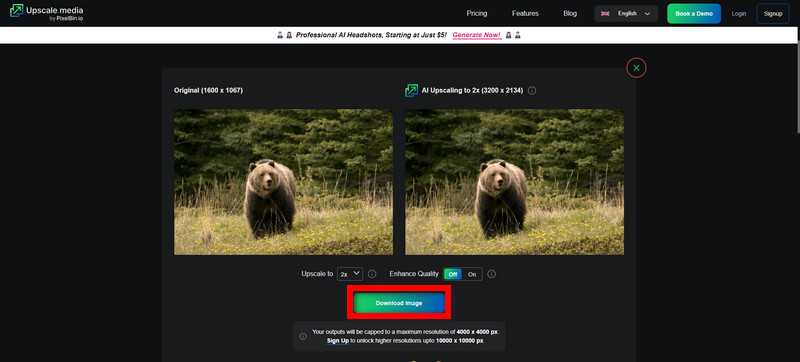
4. Upscale.media
Another outstanding tool that leverages artificial intelligence for image enhancement is Upscale.media. It can upscale images while simultaneously improving resolution, reducing noise, sharpening edges, and more. Compared to other feature-rich online tools, its functionality is relatively straightforward, but it offers a more user-friendly experience.
Step 1Go to the website of Upscale.media first.
Step 2Then, select the picture you wish to upscale by clicking on Upload Picture.
Step 3Select the desired level of upscaling (2× or 4×), and AI will process your image and sharpen the required edges.
Step 4Examine the output following the increment, then click the Download Image. If you still want further changes, you can enhance the output again.
Step 5A clear and well-defined image saves the refined image onto your device to achieve the optimal outcome.
Part 3. 2 Methods to Enhance Image Quality in Photoshop
No matter if you want to increase the resolution and detail of an image or even bring an old photo back to life, Photoshop provides you with multiple tools to enhance the overall quality of the image. Here are two options that would help increase the resolution and quality of pictures using Photoshop.
Method 1: Improving Photos Using Super Resolution
With the help of Artificial Intelligence, Super Resolution in Photoshop helps to increase the clarity and sharpness of a photograph by multiplying the number of megapixels within the image. For me, it is beneficial to work with lower-resolution pictures and prepare them for both digital and print media.
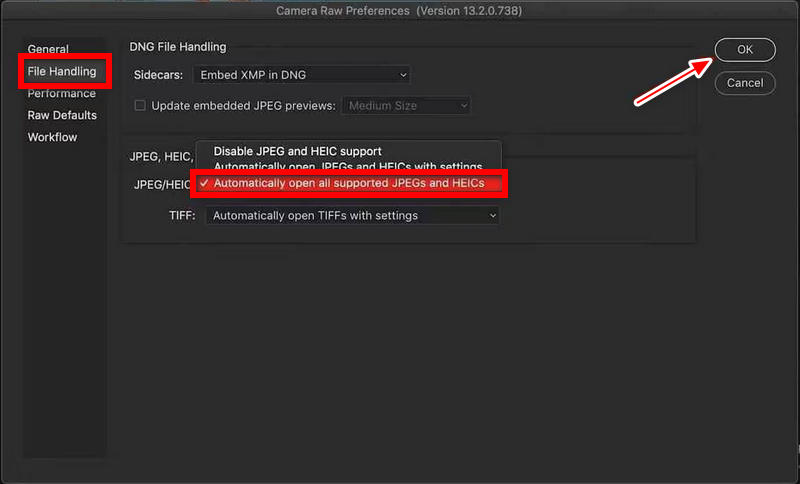
Step 1Open Photoshop. Then, go to Edit. Depending on your software version, you may choose Preferences or File Handling.
Step 2From the Preferences menu, select the camera raw window preferences. Enable Auto Process All Supported JPEGs and HEICs, then click OK.
Step 3Now, right-click on the image and select Enhance. This will open a preview window where you can adjust some settings about the enhancements.
Step 4Check the Super Resolution box in the Enhance Preview window. Click Enhance, and AI in Photoshop will instantly double the resolution.
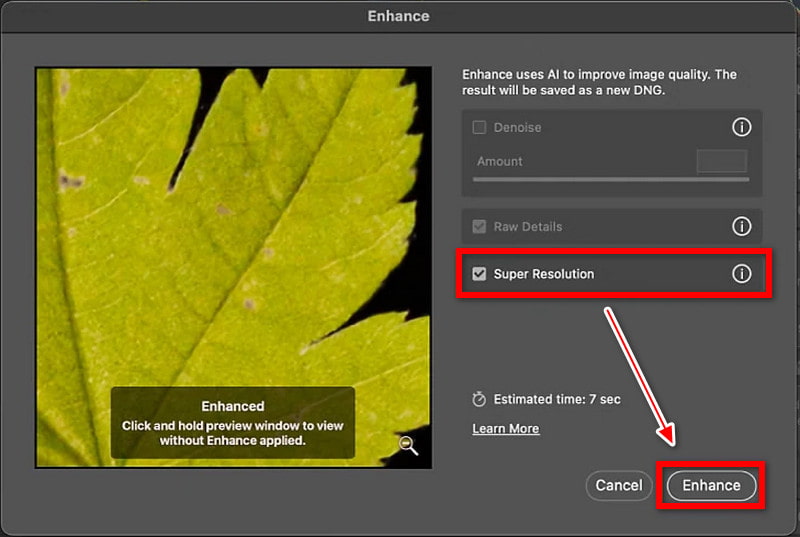
Step 5Review the enhanced image to finish up and ensure it meets your expectations. When satisfied, save the image in your preferred format.
Method 2: Increasing Resolution Using Filters
Photoshop Neural Filters can increase the image resolution and maintain quality if you want more control in the enhancement process. Neural Filters analyze contextual information within images through deep learning models, understanding the structure, texture, and semantic relationships of existing pixels. Then predict the most probable pixel values for missing or blurred areas. This method works best for improving details manually. You can unblur images, reduce noise, remove artifacts, and enhance sharpness.
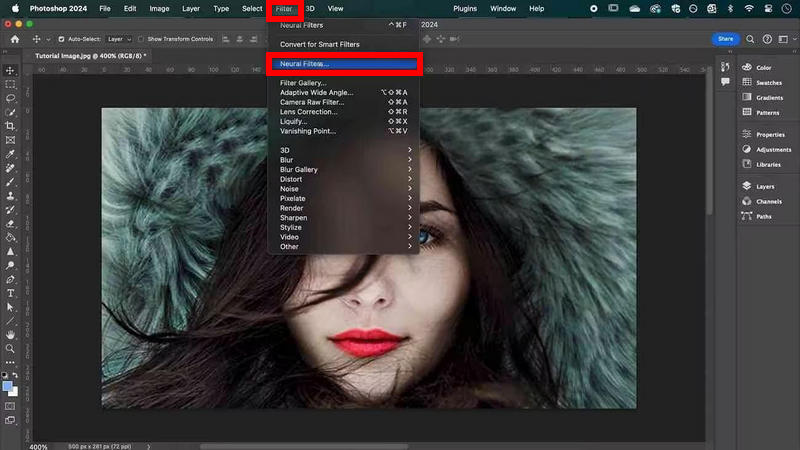
Step 1To start, open your image in Photoshop. Afterward, go to Filter > Neural Filters to open the advanced editing tools.
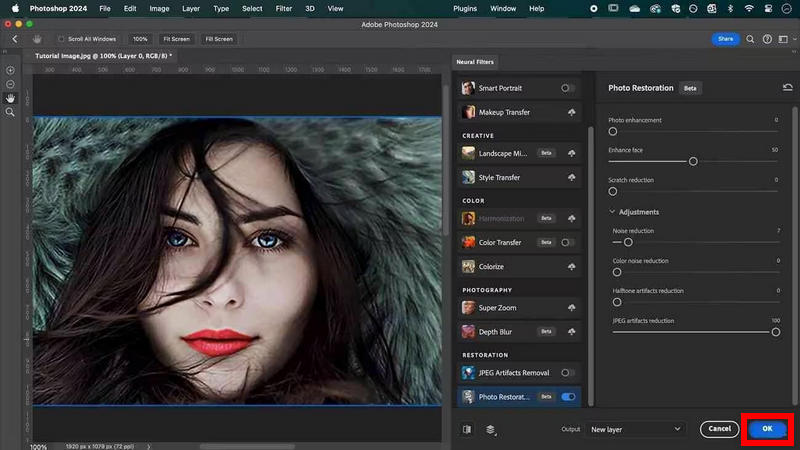
Step 2Once the panel is opened, look for the Photo Restoration filter and turn it on. After that, the Enhance Face slider and Photo Enhancement slider can be adjusted to make the photo more straightforward.
Step 3From here, you can also expand the Adjustments menu, further noise reduction for a sharper image, and fine-tune JPEG artifact reduction for a cleaner image.
Step 4After making all the desired changes, click OK to apply the changes, then save the image using your preferred file type.
Artificial intelligence technology, manual adjustment tools, and advanced Photoshop features can all be used to enhance image quality. Each method delivers stunning results. Using AVAide Image Upscaler is the fastest and simplest way to improve quality. Open this tool now to make your images clearer and sharper.
ABOUT THE AUTHOR


Image Upscaler
Our AI technology will automatically enhance the quality of your images, remove noise and fix blurry images online.
PROCESS NOW