Tenk deg at du prøver å lagre en veiledning, et spilløyeblikk eller et nettmøte, men du er usikker på hvordan du skal fange det opp på enheten din. hvordan man tar opp skjermen på iPad kan gjøre det enkelt å lagre og dele disse øyeblikkene. Denne veiledningen veileder deg gjennom aktivering av opptak, bruk av lyd, løsning av problemer og forbedring av kvaliteten for jevnere og bedre skjermopptak hver gang.
Del 1. Slik aktiverer du skjermopptak på iPad
Ikke bekymre deg, skjermopptaksknappen er ikke installert i Kontrollsenteret ennå, med mindre du ikke har den på iPaden din. Apple har inkludert denne funksjonaliteten innebygd i iPadOS, og den må slås på før den kan brukes. Når den er lagt til, kan du ta opp skjermen når som helst med bare et sveip og et trykk.
Trinn 1Trykk på Innstillinger appen på iPaden din.
Steg 2Klikk på Kontroll senter i menyen mens du blar nedover.
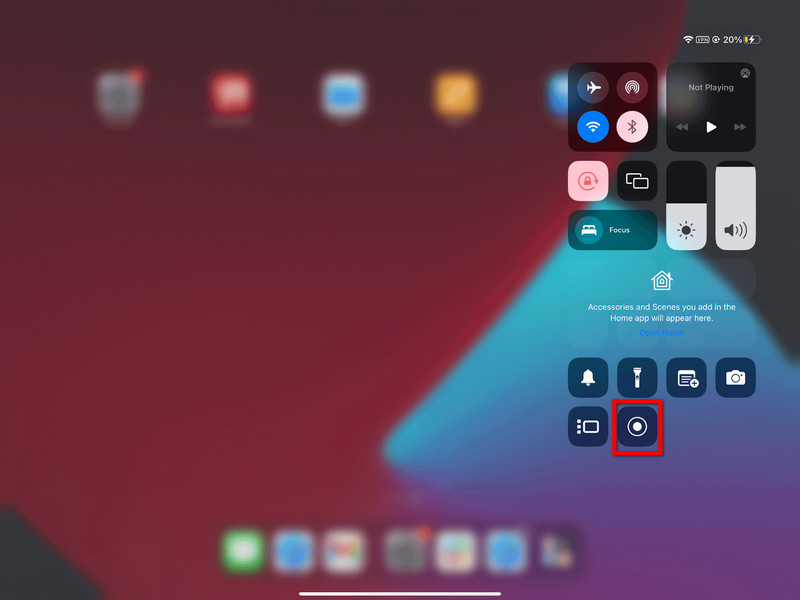
Trinn 3Trykk på + (Legg til) knappen i Skjermopptak delen av listen over tilgjengelige kontroller.
Trinn 4For å få tilgang til Kontroll senter, sveip ned fra øverste høyre hjørne av skjermen. Nå skal du se oppføringen.
Del 2. Slik tar du opp skjermbilder på iPad
Når du har aktivert den, er det enkelt og raskt å ta opp iPad-skjermen. Den innebygde opptakeren i iPadOS er en sømløs funksjon som lar deg ta opp spilling, veiledninger eller til og med videosamtaler uten å installere tredjepartsapper.
Trinn 1Trykk og hold øverst til høyre på iPad-skjermen, og dra den deretter ned.
Steg 2Trykk på Skjermopptak -knappen. Det vil bli en nedtelling på 3 sekunder før opptaket starter.
(Valgfri) Hold nede Skjermopptak knappen og trykk på Mikrofon for å aktivere den når du vil ta opp stemmen din.
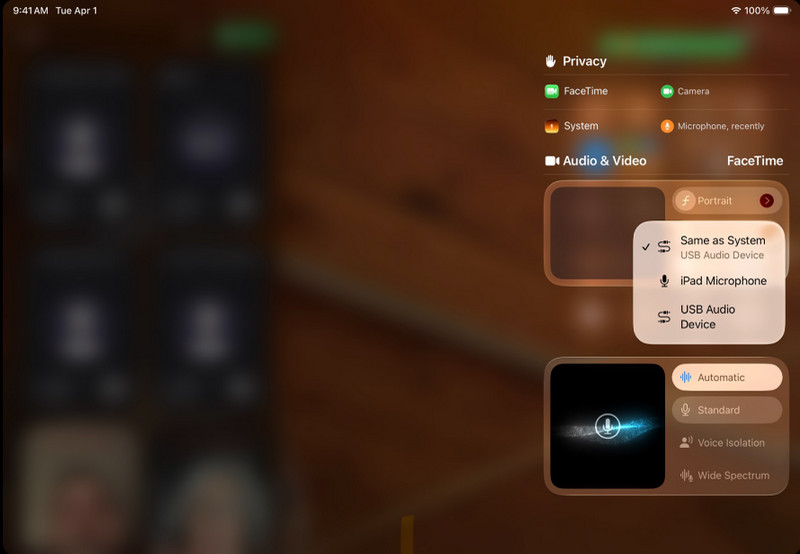
Trinn 3Velg appene eller aktivitetene du vil ta opp.
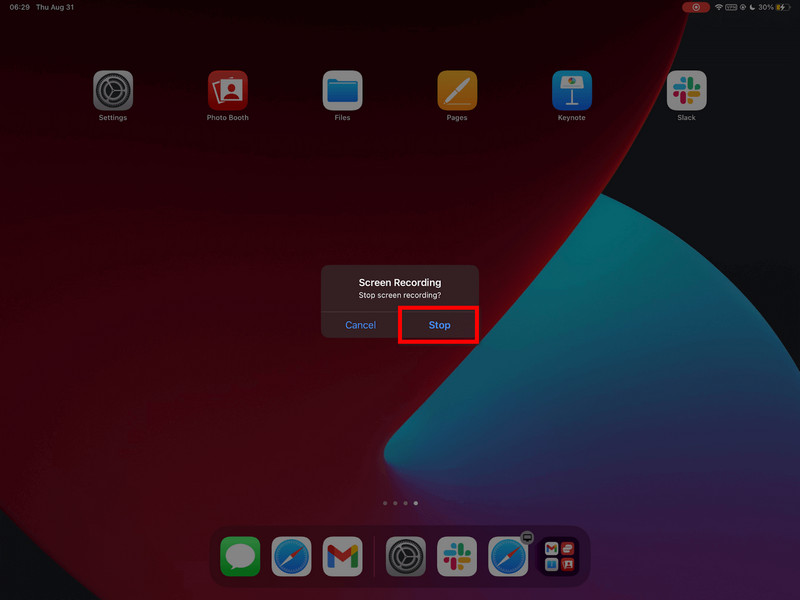
Trinn 4Trykk på den røde statuslinjen, og trykk deretter på Stoppe, eller gå tilbake til Kontroll senter og trykk på Ta opp knappen igjen.
Trinn 5Videoen din lagres automatisk i Bilder app, hvor du kan redigere eller dele den.
Del 3. Slik tar du opp skjermbilder på iPad med lyd
Det er nyttig å ta opp skjerm og lyd med iPaden for veiledninger, spill, nettkurs og demonstrasjoner. Opptak på iPadOS fungerer bare i begrenset grad, og det er viktig å forstå forholdet mellom mikrofonen og systemlyden før opptak.
Viktig forskjell: Mikrofon vs. systemlyd
| Lydtype | Hva den registrerer | Tilgjengelighet på iPadOS | Beste brukstilfeller |
| Mikrofonlyd | Stemmen din og eksterne lyder fanges opp av iPadens mikrofon. | Tilgjengelig | Kommentarer, veiledninger, fortellerstemme. |
| Systemlyd | Interne lyder fra apper, spill, videoer og medieavspilling. | Ikke direkte støttet | Krever eksterne verktøy eller en løsning. |
Fremgangsmåte for å ta opp lyd med en mikrofon
Trinn 1Sveip oppover fra øverst til høyre på iPad-skjermen for å åpne Kontroll senter.
Steg 2Hold nede Skjermopptak knappen for å se flere alternativer.
Trinn 3Trykk på mikrofonen for å slå den på. Den skal bli rød for å indikere at taleopptak er på.
Trinn 4Klikk Start opptak, og når nedtellingen på 3 sekunder er fullført, starter opptaket.
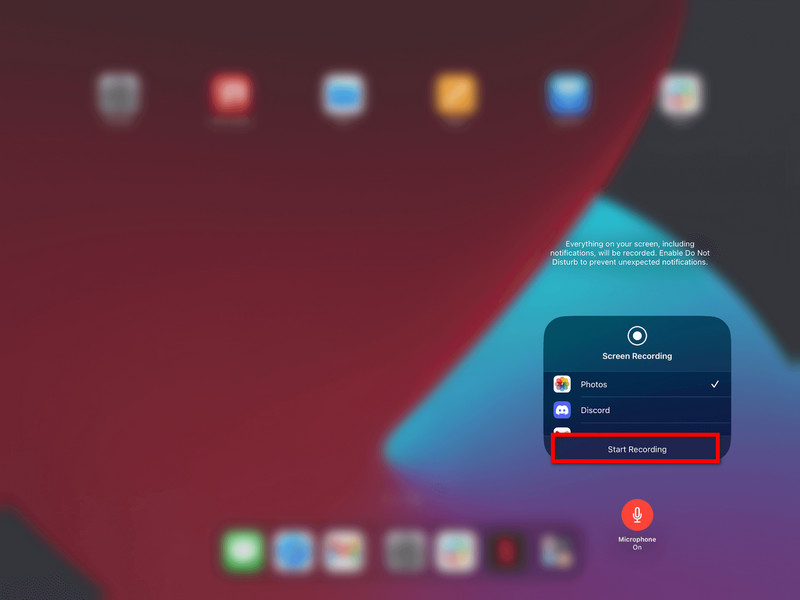
Trinn 5Gjenta bevegelsene du ønsker å ta opp. Hvis mikrofonen er på, vil stemmen din bli tatt opp.
Trinn 6Trykk på den røde statuslinjen øverst på skjermen eller gå tilbake til Kontroll senter og trykk på Ta opp knappen igjen.
Trinn 7Videoen lagres automatisk i Bilder app, hvor du kan se eller redigere den.
Alternativ for systemlydopptak
Dessverre kan du ikke ta opp intern lyd direkte på iPaden på grunn av systembegrensninger, så en databasert løsning er nødvendig. Et utmerket verktøy er AVAide skjermopptaker, som lar deg speile en iPad og ta opp skjerm- og systemlyd samtidig.
AVAide Screen Recorder er en programvare for skjermopptak av høy kvalitet som fanger opp skjermaktivitet med klarhet. Den kan ta opp uten forsinkelse eller lagg i opptil 4K/1080p. Den tillater også samtidig opptak av system- og mikrofonlyd, perfekt for veiledninger, spilling og presentasjoner.
- Høykvalitetsopptak lar deg ta opp videoer i 4K eller 1080p med klare resultater av høy kvalitet.
- Dobbel lyd
- Støtter opptak av systemlyd og mikrofonlyd samtidig.
- iOS Screen Mirroring viser og tar opp iPad-skjermen din på en PC eller Mac.
- Fleksible skjermmoduser støtter fullskjermsopptak eller opptak av tilpassede områder.
- Innebygde redigeringsverktøy hjelper deg med å trimme, forbedre og redigere opptak raskt.

 Sikker nedlasting
Trinn 1Last ned og installer
Gå til det offisielle nettstedet og last ned AVAide Screen Recorder. Last ned AVAide Screen Recorder fra det offisielle nettstedet. Når det er installert, kan det kjøres fra Windows- eller Mac-datamaskinen din.
Steg 2Velg iOS-alternativ
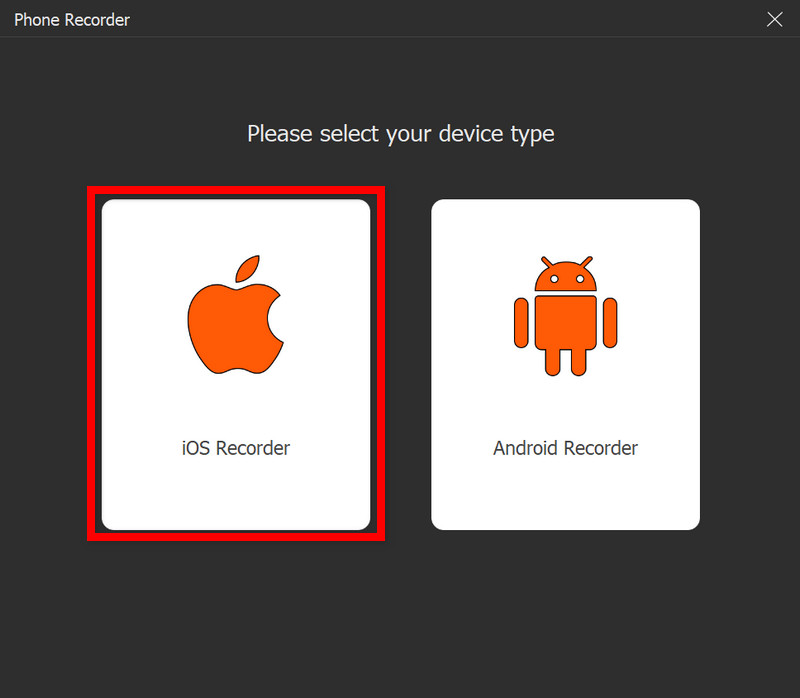
I hovedgrensesnittet klikker du på Telefonopptaker, og velg deretter iOS-opptaker fra listen over alternativer (iOS og Android).
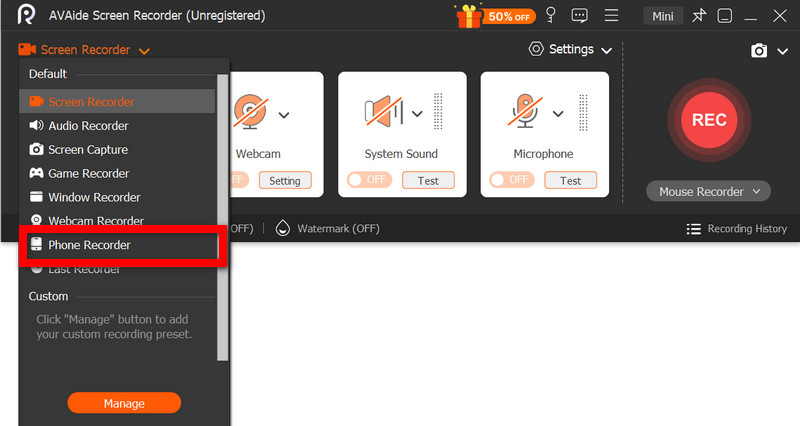
Trinn 3Koble iPaden til PC-en
Det er mulig å speile iPaden din trådløst til datamaskinen over samme nettverk, eller via en USB-kabel hvis en er tilgjengelig. I Screen Mirroring-appen på iPaden velger du AVAide-enheten. Du vil se iPad-skjermen din på datamaskinen når du er koblet til.
Trinn 4Start opptak
Når speilingen er fullført, trykk på Ta opp for å starte opptak av iPad-skjermen, systemlyd og mikrofoninngang (hvis noen).
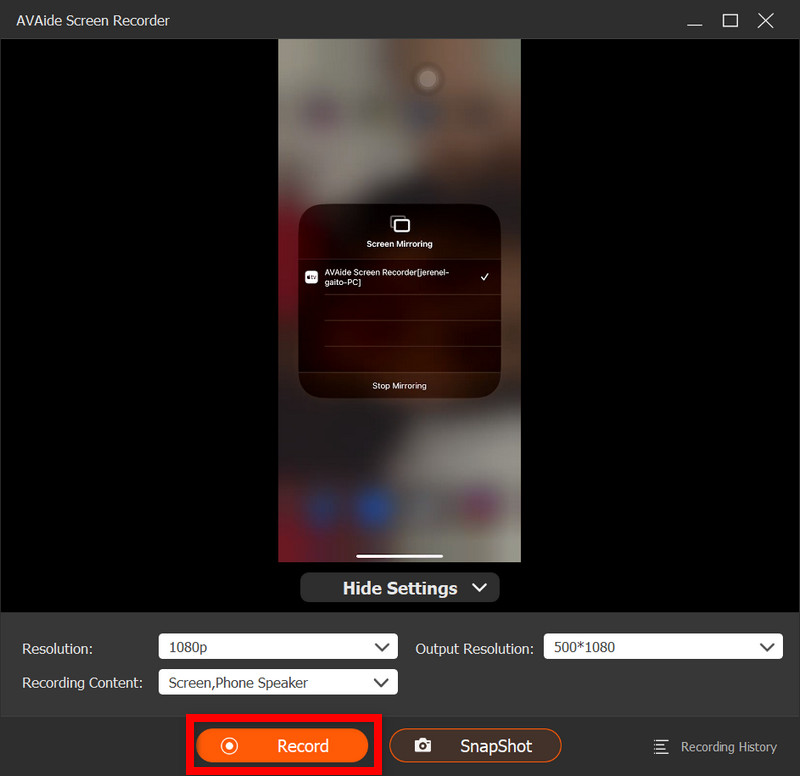
Trinn 5Stopp opptak
trykk Stoppe -knappen når du er ferdig. Opptaket lagres automatisk på datamaskinen.
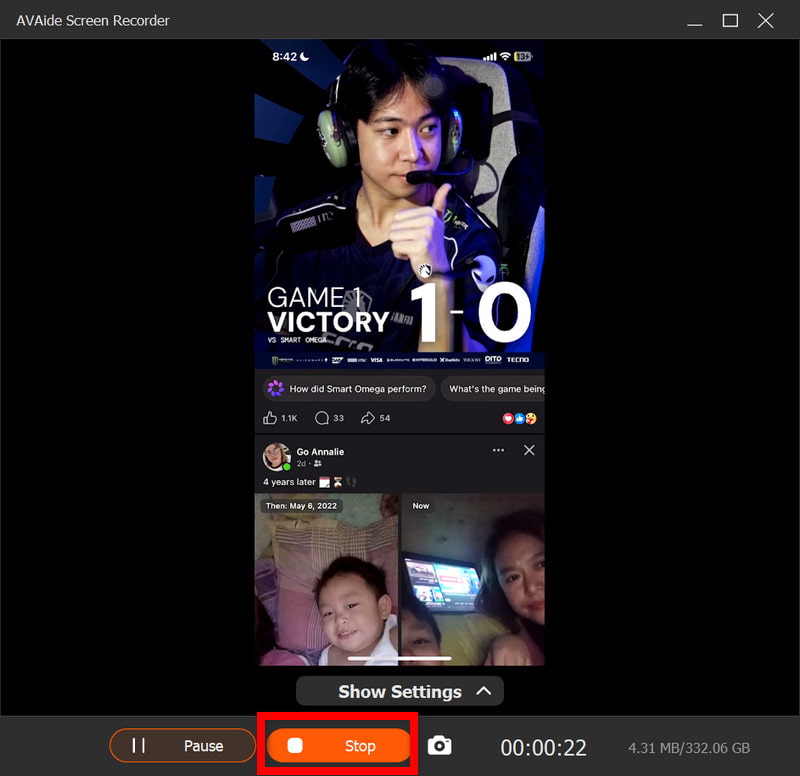
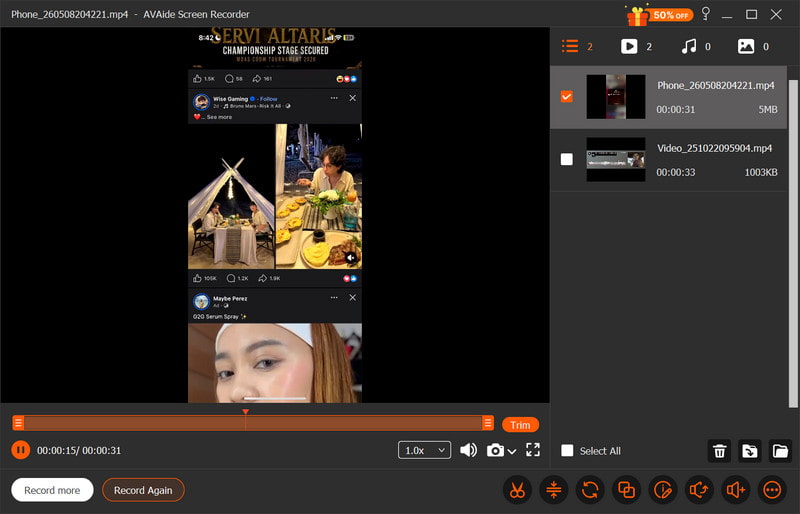
Trinn 6Rediger videoen
Når du har tatt opp, åpnes et forhåndsvisningsvindu. Uønskede deler kan klippes bort, lyden justeres eller enkel redigering gjøres før den endelige videoen eksporteres.
Del 4. Hvorfor kan jeg ikke ta opp skjermbilde på iPad-en min?
Et problem med videoopptak på iPaden oppstår vanligvis på grunn av innstillinger, begrensninger eller ytelsesproblemer. De vanligste problemene og årsakene vises nedenfor.
1. Knappen mangler helt
Dette skjer hvis Skjermopptak ikke er installert i Kontrollsenteret. Du må legge til Skjermopptak manuelt i Innstillinger > Kontrollsenter for at det skal vises der.
2. Knappen er nedtonet eller svarer ikke
Vanligvis skyldes dette en begrensning på skjermopptak fra systeminnstillinger eller enhetskontroller.
- Skjermtidsgrenser kan settes på.
- Opptak kan være forbudt av skole- eller jobbprofilinnstillinger.
- Enkelte apper tillater kanskje ikke at du tar skjermbilder mens du bruker dem.
3. Opptaket stopper umiddelbart etter start
Problemet er ofte relatert til system- eller lagringsproblemer, for eksempel utilstrekkelig tilgjengelig plass eller andre applikasjoner som forstyrrer opptaksprosessen.
4. Ingen lyd på opptaket
Dette skjer når lyden ikke er riktig tilkoblet, eller når brukeren forventer intern lyd. Det er ikke mulig å ta opp skjermen internt på iPadOS, så bruk av beste skjermopptaker for Mac kan bidra til å fange opp systemlyd riktig.
5. Opptaket er hakkete eller av lav kvalitet
Dette skyldes vanligvis en av disse faktorene: begrenset lagringsplass på enheten, for mange apper som kjører, eller en eldre iPad-modell som ikke kan ta opp med så høy oppløsning.
Del 5. Profftips for bedre skjermopptak
Når du spiller inn på iPadOS, må du sørge for at iPaden er riktig konfigurert for et jevnt, klart og høykvalitetsopptak. Her er noen nyttige tips for å optimalisere video- og lydkvaliteten.
1. Frigjør lagringsplass
Før du begynner å spille inn, må du sørge for at det er god ledig plass på iPad-en din, slik at den ikke lagger eller får problemer med opptak mens du filmer.
2. Lukk ubrukte apper
Lukk alle unødvendige bakgrunnsapper for å forbedre systemytelsen og forhindre avbrudd eller nedgang under opptak.
3. Slå på Ikke forstyrr
Aktiver Ikke forstyrr for å forhindre at alle innkommende anrop, meldinger og varsler vises på skjermen og distraherer deg under opptak.
4. Hold et stabilt skjermoppsett
Ikke juster lysstyrke, retning eller systeminnstillinger under opptak, da plutselige endringer kan påvirke videokonsistens og opptakskvalitet.
5. Test lyd først
Før du begynner å filme videoen, bør du gjøre et kort testopptak for å sjekke at mikrofonnivåene er riktig innstilt og at stemmen din høres tydelig ut og blir tatt opp riktig.
6. Bruk en ren startskjerm
Rydd opp på startskjermen eller flytt sensitive apper eller applikasjoner til en annen mappe, slik at opptaket ditt ser fokusert, profesjonelt og ryddig ut.
7. Ta opp i et stille miljø
Hvis du kan ta opp i et stille rom med lite bakgrunnsstøy, vil mikrofonen din fange opp talelyd bedre og minimere uønskede lyder når du innspilling av stemme på en Mac eller iPad.
iPad-skjermopptak er en enkel, men kraftig måte å fange opp veiledninger, spilling og viktige øyeblikk direkte fra enheten din. Med de riktige innstillingene og tipsene kan du forbedre både video- og lydkvaliteten for bedre resultater. Enten du bruker innebygde verktøy eller ekstern programvare, blir opptak enklere og mer pålitelig.
OM FORFATTEREN

Fang skjermaktiviteter med lyd, nettmøter, spillvideoer, musikk, webkamera osv.
Skjermopptak