M4A files are great for music, podcasts, and voice recordings. But what if you need to fix or change one? Luckily, you can edit M4A files with the right tool. We have seven tools to help you edit M4A files in simple steps. You will also find tips for better editing. Scroll down to find what works for you!
- What Is an M4A File
- Method 1: Using Audacity (Best Free Desktop Editor)
- Method 2: Using AVAide Video Converter (Best All-in-One Tool)
- Method 3: Using QuickTime Player (Built-in Trimming on Mac)
- Method 4: Using GarageBand (Free Apple DAW)
- Method 5: Using VEED (Free Online Tool)
- Method 6: Using SMV Audio Editor (Best Free Android Editor)
- Method 7: Using Audio Editor & Tool (Designed for iPhone and iPad)
- Tips for Better M4A Editing
What Is an M4A File
Definition
M4A is an audio file format. It often uses the AAC codec. It can give you good sound with a small file size.
Common Uses
M4A works well for music and podcasts. It is also used for voice recordings. You may find it on phones, computers, and other devices.
Why M4A Is Popular
M4A files can save space. They can still keep good sound quality. This makes them useful for everyday audio.
The Challenge
M4A files can be harder to edit with some free audio programs. This is because many M4A files contain AAC audio, which some editors may not support out of the box. In some cases, you may need to install an extra tool or library before you can open and edit the file.
Method 1: Using Audacity (Best Free Desktop Editor)
If you wonder, can Audacity edit M4A files? The answer is yes. You can work on small parts of a track with care. It also lets you change the sound itself. This makes it useful when simple cuts are not enough.
Step 1Download and install Audacity on your desktop. Open it when the setup is done.
Step 2Click File > Open. Find and select your M4A file. If Audacity cannot open it, install the FFmpeg library first.
Step 3Edit your M4A file on the timeline. You can cut, copy, paste, delete, or duplicate parts. You can also use effects to change the sound.
Step 4Try tools for volume, pitch, tempo, or fades. Preview the audio as you work.
Step 5When everything sounds right, click File > Export Audio. Choose the format and save your edited file.
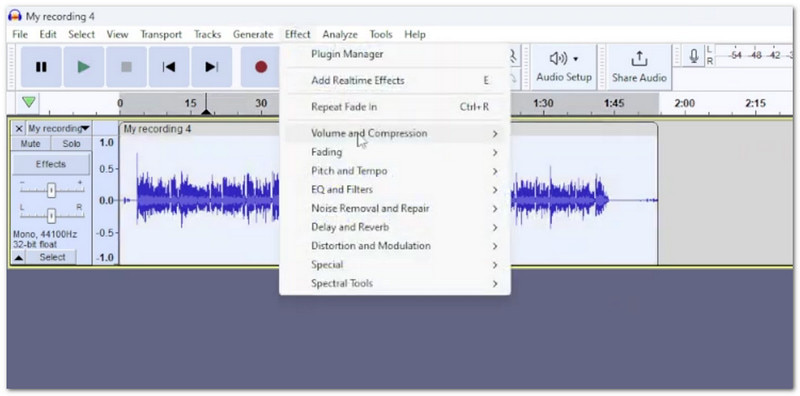
Note: Audacity can also remove background noise. Go to Effect, select Noise Reduction, click Get Noise Profile, and highlight the whole audio.
Method 2: Using AVAide Video Converter (Best All-in-One Tool)
AVAide Video Converter puts several useful audio tools in one simple place. You can edit M4A files by making quiet audio louder and removing parts you do not need. You can also add fade effects or join several M4A tracks together. Before saving, you can fine-tune the output settings to fit your needs.
Step 1Get AVAide Video Converter, install it on your computer, and open the program. Download buttons:

FREE DOWNLOAD For Windows 7 or later
 Secure Download
FREE DOWNLOAD For Mac OS X 10.13 or later
Secure DownloadStep 2Click Add Files and pick your M4A file. You can also drag the file right into the program.
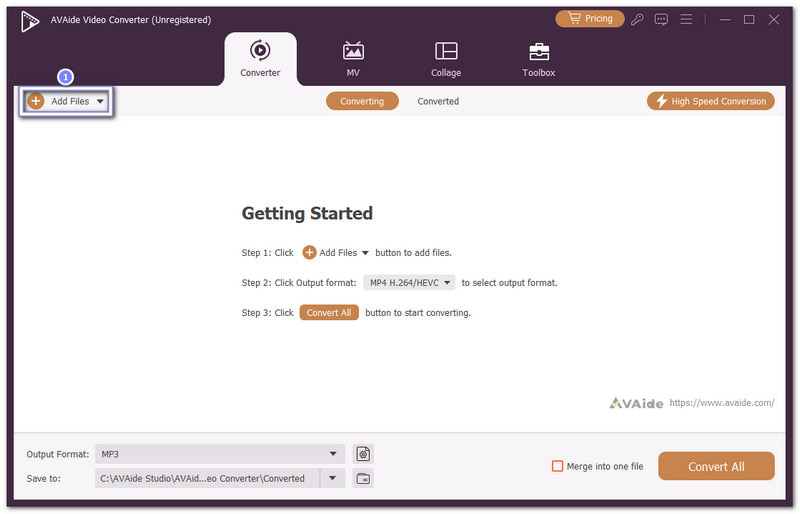
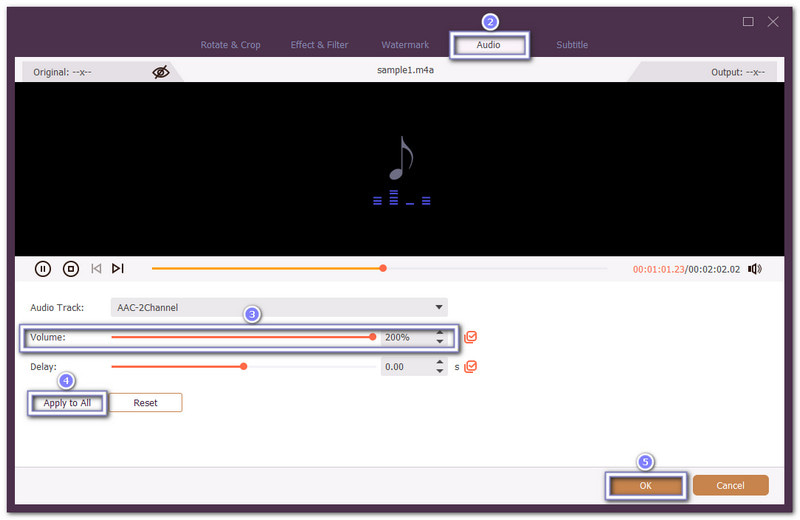
Step 3Want a louder sound? Click the Wand button beside the file. You will be directed to the Audio tab. Raise the Volume to 200%. If you added many files, enable the Apply to All option. Then, click OK.
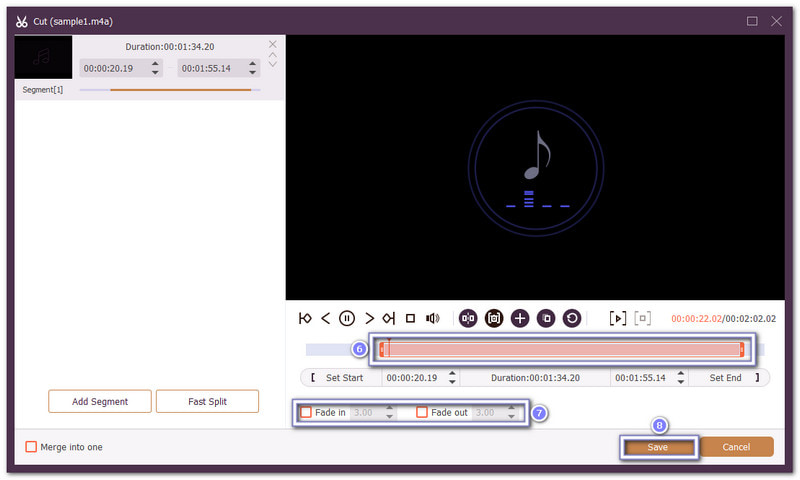
Step 4Now, clean up the track. Click the Scissors button. Cut away unwanted parts from the start or end. You can also add Fade In or Fade Out. Click Save when you are done.
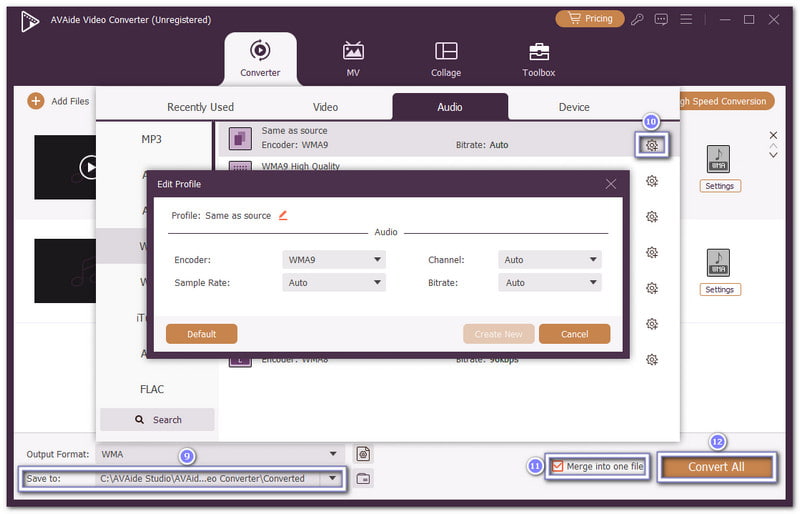
Step 5Choose M4A to keep the same format under the Output Format menu. You can also open the Custom Profile to change settings such as the encoder, sample rate, channel, and bitrate. To join your M4A files, enable Merge into one file. Once everything is set, click Convert All to save your edited M4A audio.
To edit audio files, you only need AVAide Video Converter. It is the best all-in-one tool for a reason. It gives you everything you need to improve your audio with ease.
Method 3: Using QuickTime Player (Built-in Trimming on Mac)
QuickTime Player is a simple option for cutting M4A audio. It is a good fit for small edits, especially when you only want to remove unwanted parts. You can make these changes with its trim tool instead of using a complex audio editor.
Step 1Open QuickTime Player on your Mac. Click File > Open File and choose your M4A file.
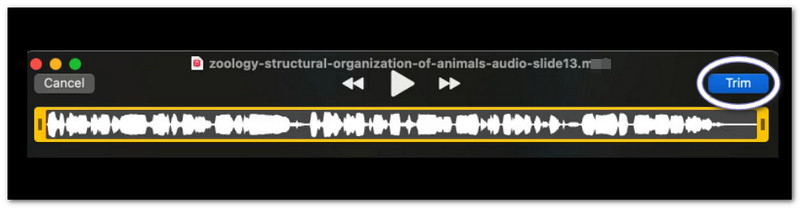
Step 2Press Command + T to open the trim feature.
Step 3Drag the yellow handles on the timeline. Keep the part of the audio you want.
Step 4Play the trimmed audio. Check that the start and end sound right.
Step 5Click File > Save or use the available export option. Choose where to save the new audio file.
Method 4: Using GarageBand (Free Apple DAW)
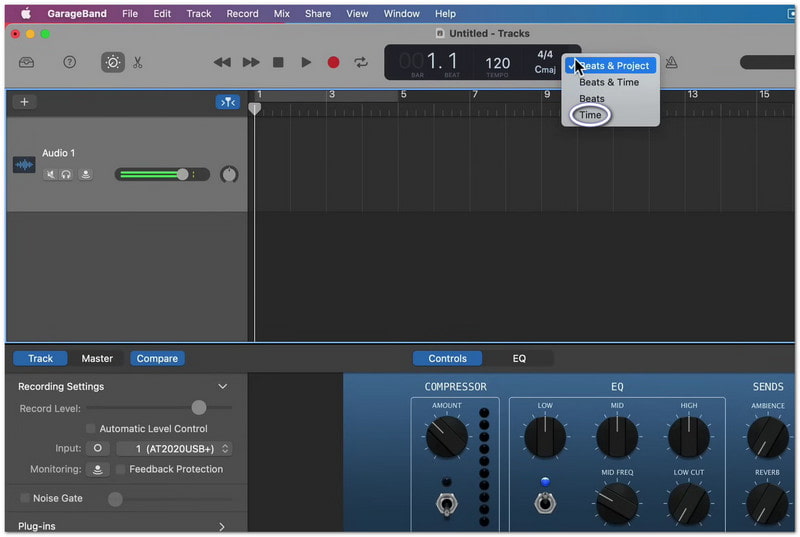
An M4A file can be used as part of a larger audio project. GarageBand lets you add it to a project and work with other audio tracks. You can edit M4A files for free while keeping voice and music on separate tracks. This makes it easier to adjust each sound and create the final audio.
Step 1Open GarageBand on your Mac. Create a new empty project with an audio track.
Step 2Turn off the Metronome and Count-in. Set the project view to Time instead of Beats.
Step 3Drag your M4A file into the audio track. You can trim the ends by dragging the clip's edge.
Step 4Add more audio if needed. You can place clips together or put them on separate tracks. You can also lower the volume or add a fade-out.
Step 5When you are happy with the result, click Share > Export Song to Disc. Pick a format such as AAC, MP3, AIFF, or WAV.
Method 5: Using VEED (Free Online Tool)
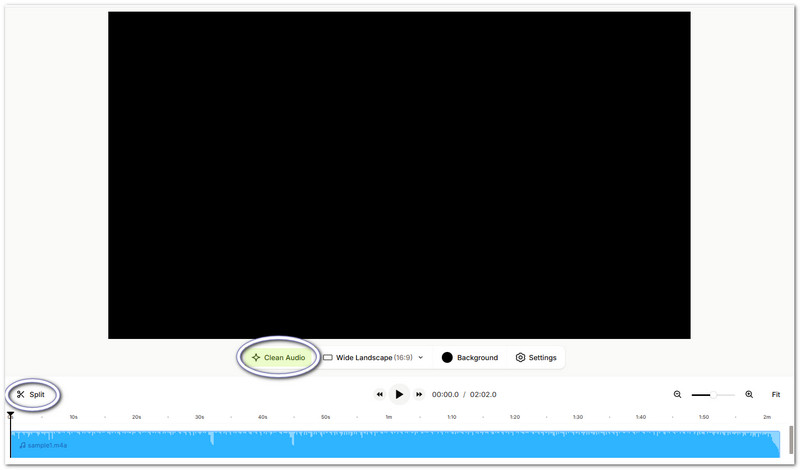
VEED gives you a clear view of your audio. You can edit M4A files online without downloading anything. You can also use the file with video projects. This helps when your audio will become part of a video.
Step 1Open VEED's online editor. Upload your M4A file by dragging it into the editor.
Step 2Move the playhead to the part you want to change. Click Split or press S to cut the audio.
Step 3Select unwanted clips and delete them. You can also move the remaining clips to change their order.
Step 4Use Clean Audio to reduce background noise. However, this feature may require a Pro plan.
Step 5Play the edited audio to check your work. Hit Export when you are ready to save it.
Method 6: Using SMV Audio Editor (Best Free Android Editor)
SMV Audio Editor supports many audio tools and formats. It can handle simple cuts, effects, and other sound changes. You can edit M4A files for free with the free version, which saves files up to 5 minutes.
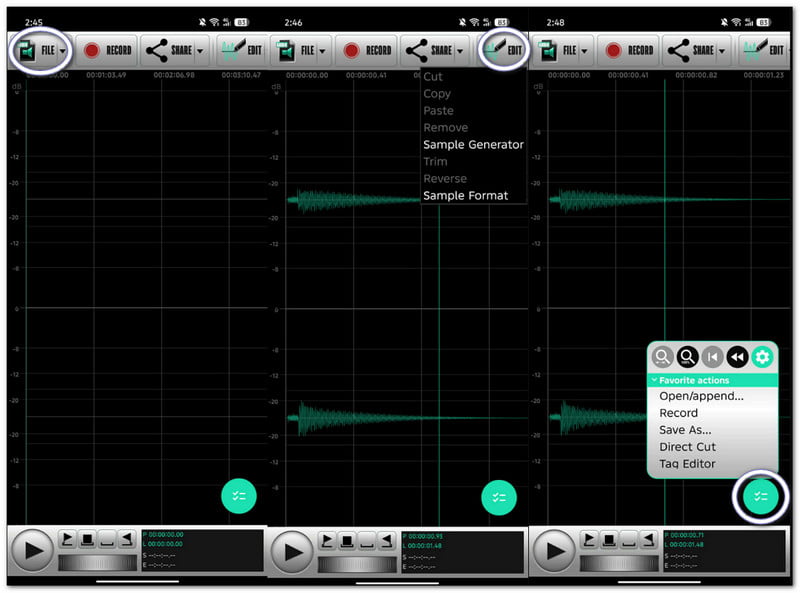
Step 1Get SMV Audio Editor from Google Play. Next, open the app and navigate to the Files menu.
Step 2Select the M4A file you want to edit. Check the file details first. This helps you choose the right file.
Step 3Open the Edit menu. Pick the tool you need. You can cut, copy, paste, remove, trim, or reverse audio.
Step 4You can also try the sample generator and sample format tools. Preview your changes before saving.
Step 5Tap the Round button in the lower-right corner. Choose Save As... to save your edited M4A file.
Method 7: Using Audio Editor & Tool (Designed for iPhone and iPad)
Audio Editor & Tool can help you learn how to edit M4A files using tools for cutting, trimming, mixing, and more. It can work with files from the Music or Files app. You can also separate vocals from other sounds. Moreover, it supports several export formats.
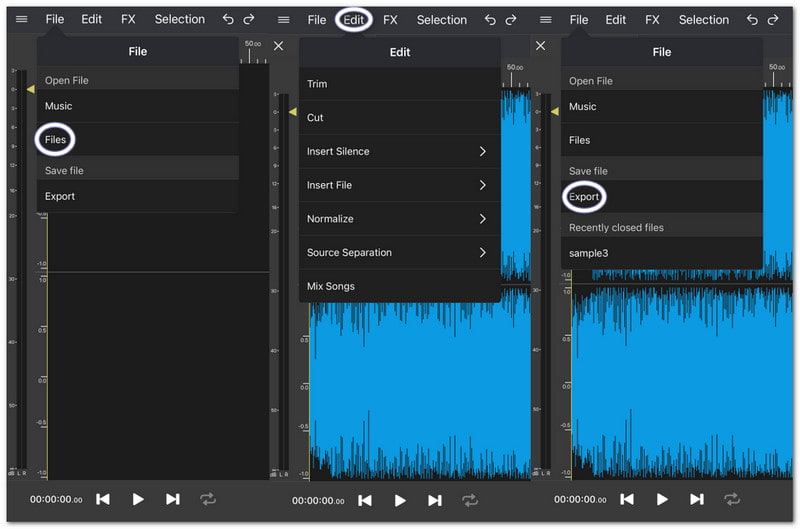
Step 1Install Audio Editor & Tool on your iPhone or iPad. Then, open the app and tap File.
Step 2Choose Files and find your M4A file. Open the file you want to edit.
Step 3Tap Edit to see the editing tools. You can trim or cut the audio. You can also insert silence or another file.
Step 4Try other tools when needed. You can normalize the sound. You can also separate sources or mix songs.
Step 5Check your edited audio. Once satisfied, go back to the File menu and tap Export to save the result.
Tips for Better M4A Editing
A few simple habits can make your edits cleaner. Take a moment to check your audio before you save it.
- Make a copy of the original file first.
- Play the audio before making cuts.
- Cut only the parts you do not need.
- Use fade effects to make sudden cuts smoother.
- Keep the volume at a clear and comfortable level.
- Listen to the whole file before exporting.
- Choose the output file format based on how you will use the file.
Indeed, you can do a lot if you plan to edit M4A files. You can cut parts, change volume, add fades, and join tracks. If you want the best all-in-one tool, AVAide Video Converter is a great choice. It keeps your M4A editing simple and smooth!
ABOUT THE AUTHOR

Your complete video toolbox that supports 350+ formats for conversion in lossless quality.