MP3 is a well-known file format for audio, and it is accessible for editing almost everywhere digitally. To edit MP3s, you will need tools for trimming, cutting, adjusting volume, changing speed, and others. In this article, you will learn about different tools and how to use them for various audio editing tasks effectively.
- Part 1. Different Scenarios for MP3 Editing Tasks
- Part 2. How to Trim or Cut MP3 Files (Remove Unwanted Sections)
- Part 3. How to Change MP3 Speed (Slow Down or Speed Up)
- Part 4. How to Adjust MP3 Volume (Fix Quiet or Loud Audio)
- Part 5. How to Merge Multiple MP3s Into One File
- Part 6. How to Remove Background Noise from MP3
- Part 7. How to Edit MP3 Metadata (Title, Artist, Album, etc.)
- Part 8. FAQs About Editing MP3
Part 1. Different Scenarios for MP3 Editing Tasks
Audio has become a staple part of digital projects, and there could be some scenarios in which you will need to edit an MP3. For most cases, audio editing is part of sampling and mixing, which can be applied to films, ads, and vlogs. You will need to split or rearrange some parts of the sound or apply audio effects. In another scenario, editing can also mean you have to focus on its metadata, such as adding or removing tags.
Part 2. How to Trim or Cut MP3 Files (Remove Unwanted Sections)
Trimming is one of the basic editing functions for MP3. Let's see how to cut and edit MP3 length using the following recommendations.
1. mp3DirectCut (Windows) - Fast, Lossless, Free
mp3DirectCut is regarded as a lossless audio editor for AAC and MP3. It allows you to edit while preserving the original quality. Here's how you can use this tool to edit MP3 audio files for free.
Step 1Upload the MP3 file to the software until you see the waveform.
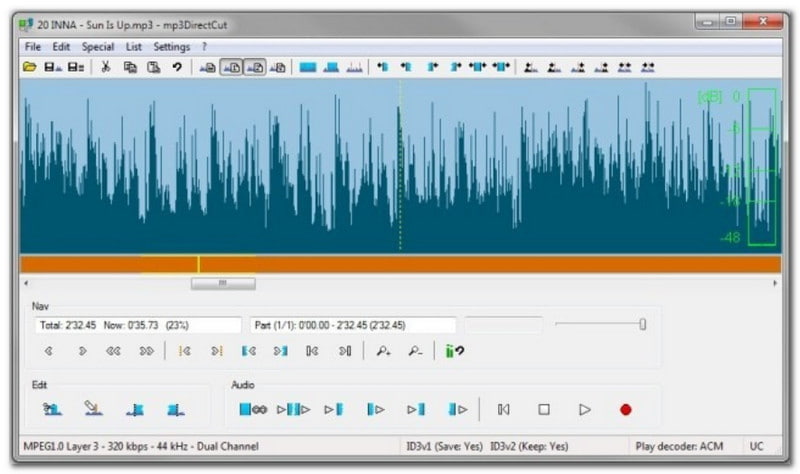
Step 2Move the playback line to the starting point and click Set Begin to lock. Move the cursor again for the end point and click Set End. You may undo or delete the selected section.
2. AudioMass (Online, Free) - No Installation Needed
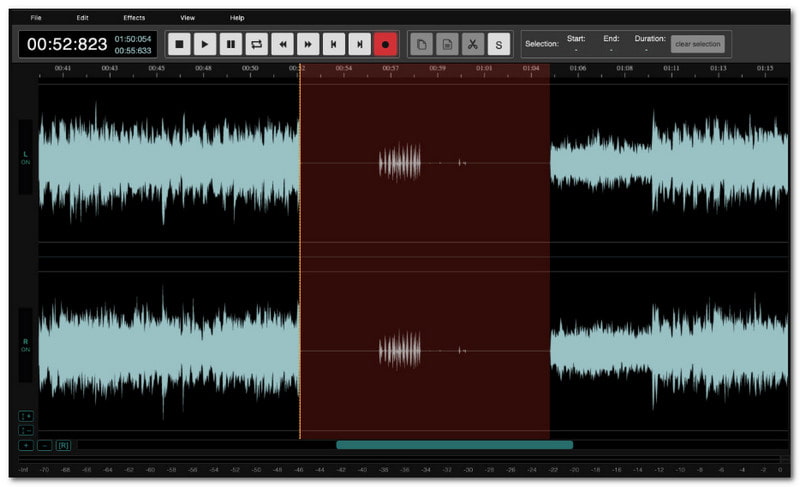
If you wish to edit an MP3 online, AudioMass is a good alternative. It offers recording and editing, including basic audio trimming and cutting, without installation required. Here are the simple steps.
Step 1Choose and upload the MP3 file to the tool. Then, find the audio part that you want to cut.
Step 2Highlight the target part using the cursor in the waveform. Delete unwanted parts by pressing Shift + X.
3. AVAide Video Converter - Visual and Cross-Platform
AVAide Video Converter is one of the most effective tools for editing an MP3 file. It is available on Windows and Mac, allowing you to edit audio like AAC, MP3, FLAC, and more. In terms of the learning curve, this solution is designed with an intuitive interface so that anyone can understand its navigation at first glance. You can get started with AVAide Video Converter with the provided steps below:
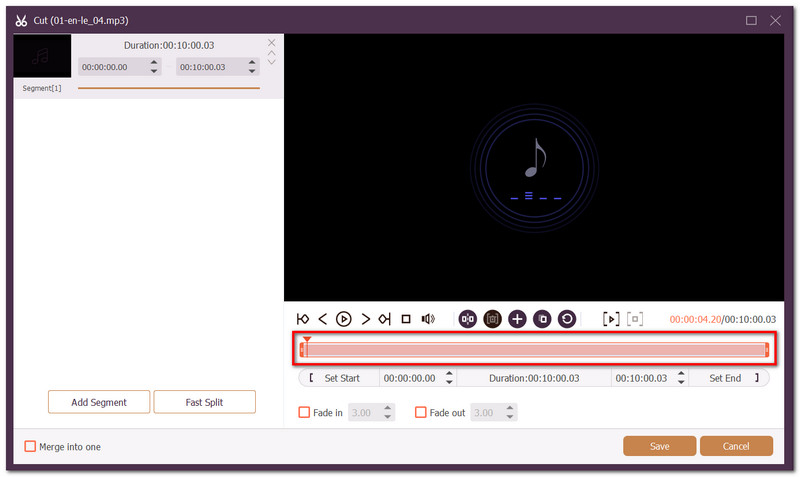
Step 1Download and install AVAide Video Converter. Upload MP3 by clicking the Add Files button. Click the Cut button to proceed.

FREE DOWNLOAD For Windows 7 or later
 Secure Download

FREE DOWNLOAD For Mac OS X 10.13 or later
Secure DownloadStep 2Move the starting and ending parts in the timeline to cut audio. Alternatively, use the Fast Split for multiple cuts.
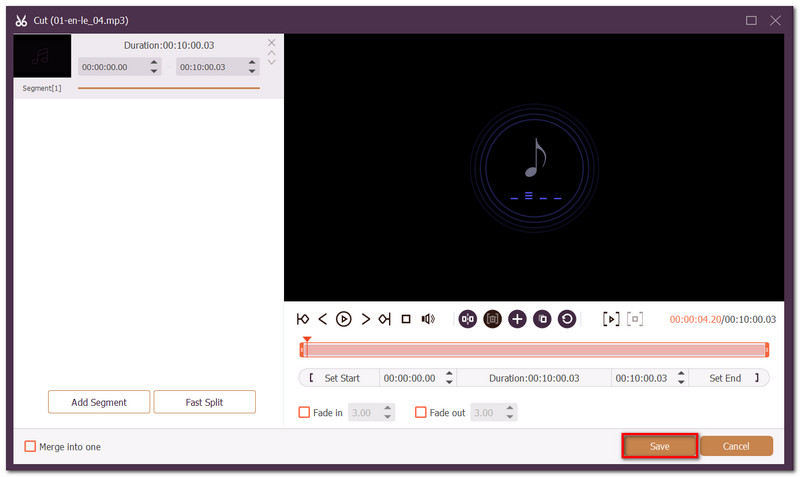
Step 3Preview your work, then click Save. To export, click the Convert All button.
Part 3. How to Change MP3 Speed (Slow Down or Speed Up)
You can edit MP3 speed with the following two excellent tools.
1. Audacity (Free, Cross-Platform) - Best for Speed Changes with Pitch Preservation
Audacity records computer audio for free. It also allows you to edit MP3s on Mac, Windows, and Linux. You can easily change the audio speed with the following steps:
Step 1Import the file to Audacity, go to Effect to choose Pitch and Tempo, then Change Tempo.
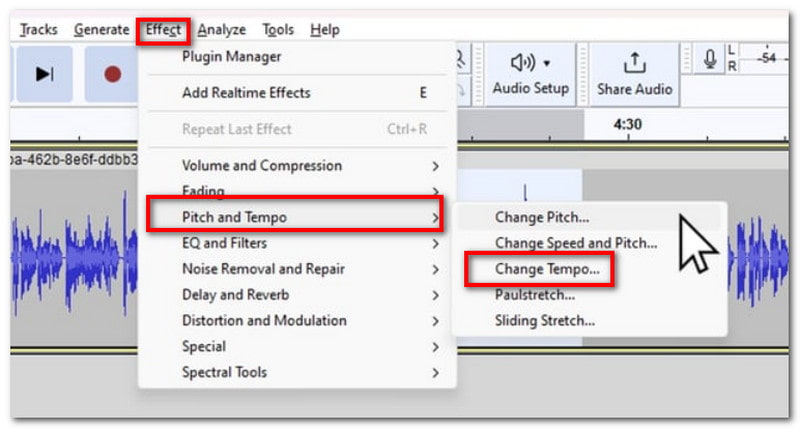
Step 2Apply the change by entering a positive number to speed up, or a negative number to slow down. Preview and save the changes.
2. AVAide Video Converter - Simple Speed Changer
Since AVAide is a multifunctional tool, you can use it to change your MP3's speed. Here's how:
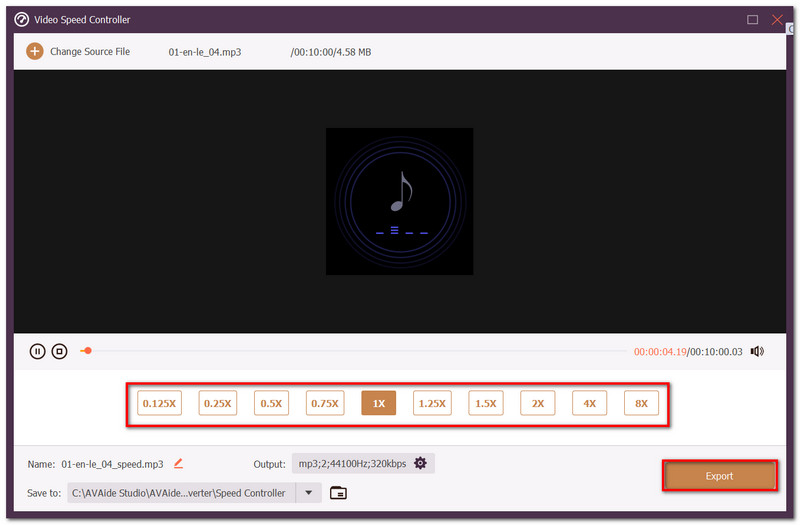
Step 1Open AVAide and go to the Toolbox. Click Video Speed Changer and upload an MP3.
Step 2Choose a speed, slower from the left, faster to the right. Preview and click Export to save.
Part 4. How to Adjust MP3 Volume (Fix Quiet or Loud Audio)
How to edit MP3 files by adjusting the volume? You can still use Audacity and AVAide for volume boosting on your computer.
1. Audacity - Best for Professional Volume Normalization
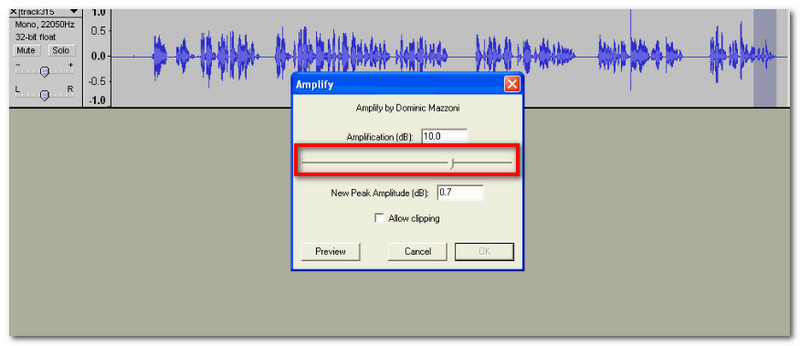
Step 1With the file uploaded, go to Effect and choose Amplify.
Step 2Glide the Amplification option to increase volume. Make sure that the Allow Clipping option is not ticked to avoid clipping the audio.
2. AVAide Video Converter - Quick Volume Boost
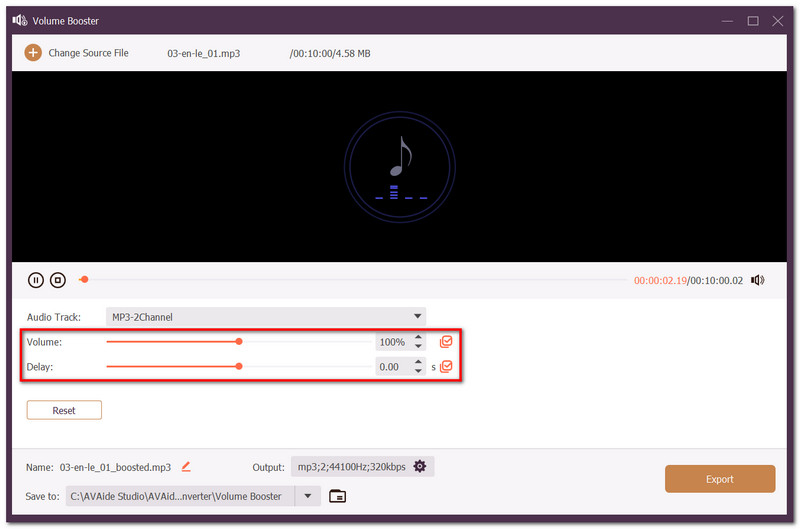
Step 1From the Toolbox of AVAide, click Volume Booster and import the MP3 file.
Step 2Move the slider for the Volume option to boost the sound. You can also put a delay on your audio. Once done, click Export.
Part 5. How to Merge Multiple MP3s Into One File
AVAide Video Converter and Audacity both offer a simple way to combine MP3 files into one. Check the steps on how to do it.
1. AVAide Video Converter - Simplest Merging Workflow
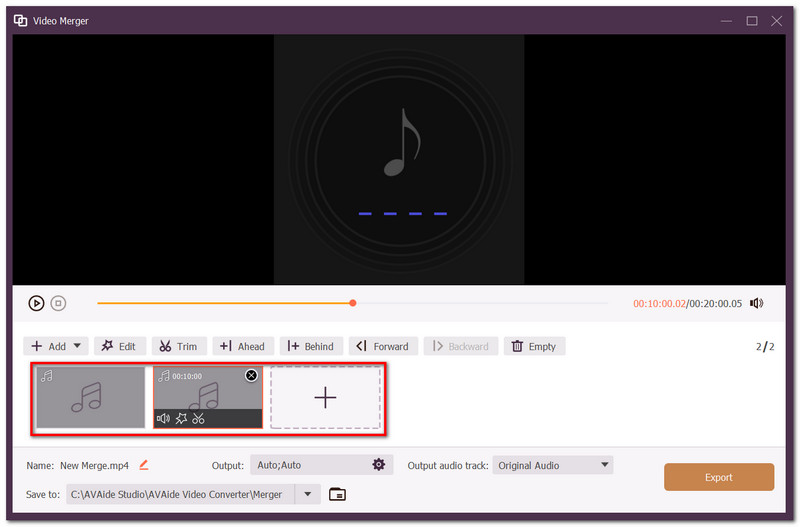
Step 1From the Toolbox menu, click Video Merger. Upload the first audio file.
Step 2Click the Plus button to upload more files. Rearrange the order by clicking and dragging an audio file. Click Export to merge.
2. Audacity - Free with Editing Capabilities
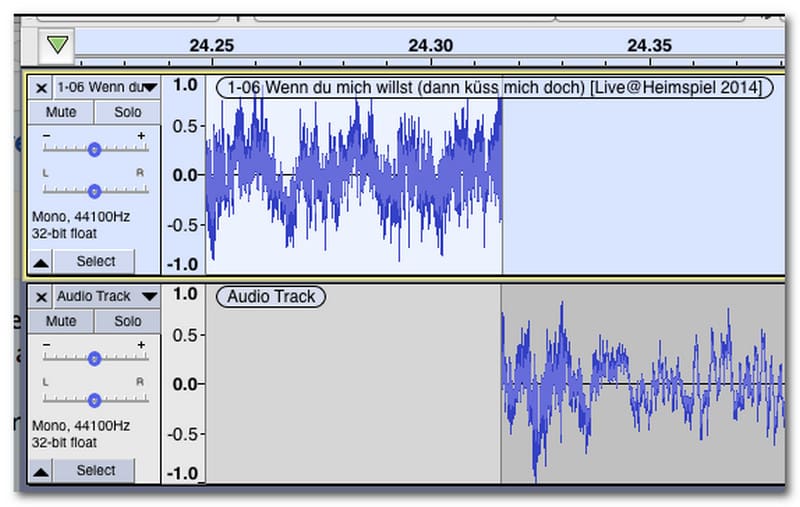
Step 1Drag and drop multiple files to Audacity.
Step 2Simply rearrange the sequence by clicking a file and moving it to the desired order. Hit Play and export the merged MP3.
Part 6. How to Remove Background Noise from MP3
It is possible to remove background noise on your audio file using Audacity and AVAide. Steps are provided below for each tool.
1. Audacity - Best Free Noise Reduction Tool
Step 1Open an MP3 file in the software and go to Effect to select Noise Reduction.
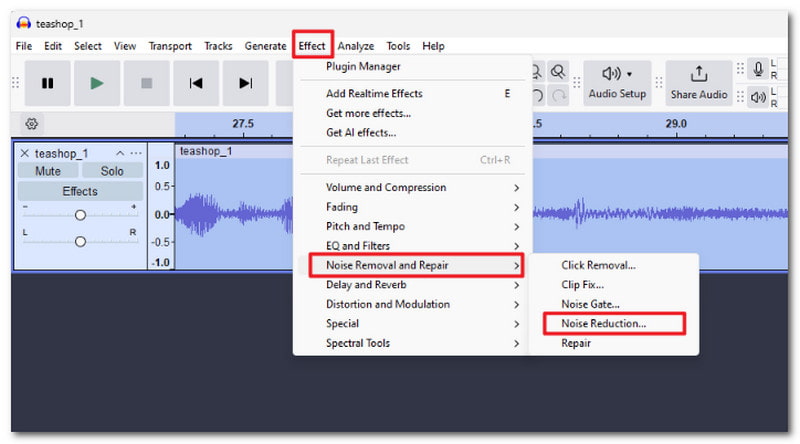
Step 2Click Get Noise Profile or use advanced settings. Click OK and save the audio file.
2. AVAide Video Converter - Basic Noise Reduction
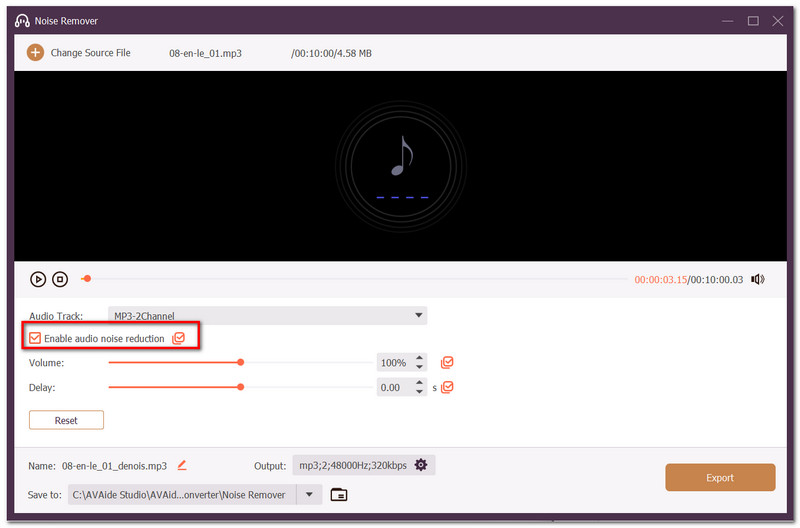
Step 1You can find the Noise Remover option in the Toolbox. Upload an MP3 with a noisy background.
Step 2Simply tick the checkbox for Enable Audio Noise Reduction. Click the Export button once done.
Part 7. How to Edit MP3 Metadata (Title, Artist, Album, etc.)
Did you know that you can also edit MP3 information? You can achieve it with AVAide Video Converter, Windows File Explorer on Windows, and Apple Music for Mac.
1. AVAide Video Converter - Best for Detailed Editing
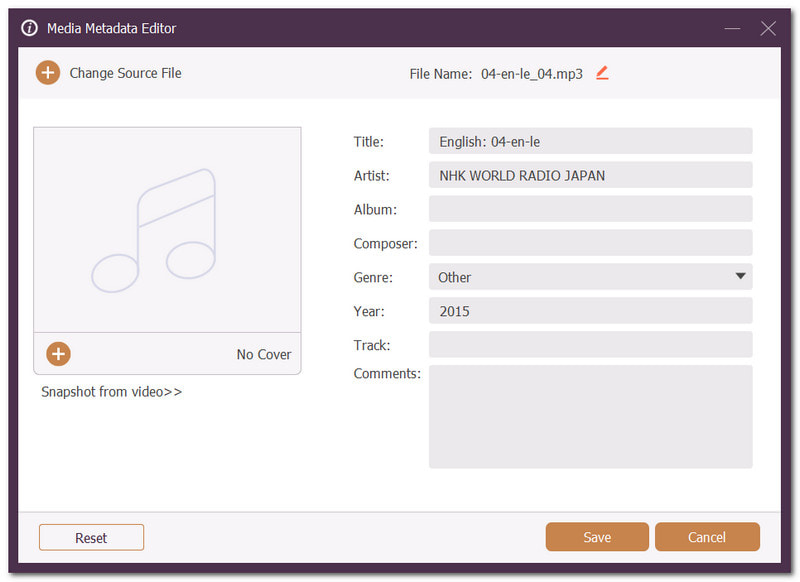
Step 1Go to Media Metadata Editor in Toolbox and add the MP3 file.
Step 2Change details like the title, artist, etc. Preview and save by clicking the Save button.
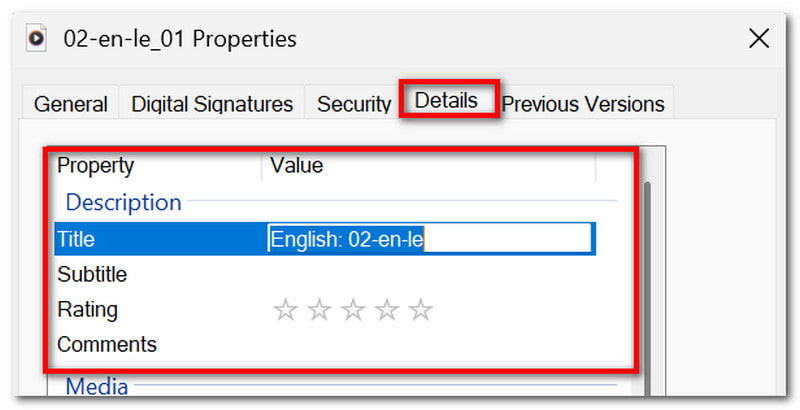
2. Windows File Explorer - Fastest for Single Files
Step 1Go to File Explorer and right-click an MP3 file to go to Properties.
Step 2Go to Details and edit the desired information of the file. Click OK to apply changes.
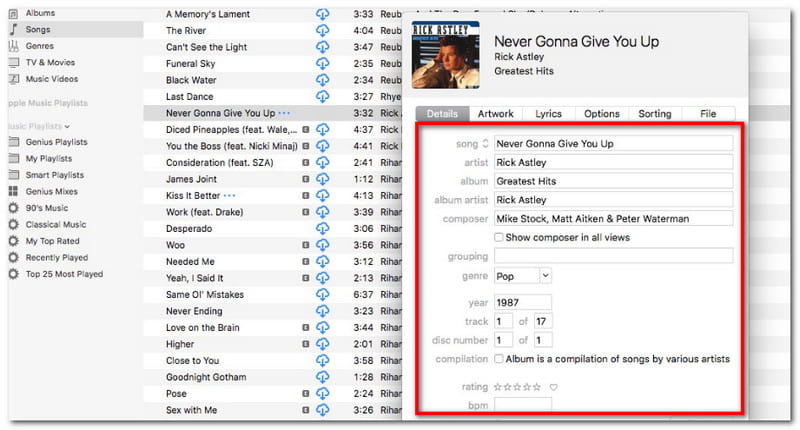
3. Apple Music / iTunes - Best for Mac Users
Step 1Open Apple Music and right-click the audio file. Then go to Get Info.
Step 2Edit details like the title, artist, etc. Click OK to save changes.
Part 8. FAQs About Editing MP3
Can I use HandBrake to edit MP3s?
Unfortunately, no. HandBrake only offers video transcoding and compression.
Does editing MP3 frequently lose quality?
Yes. Editing an MP3 file can ruin and lower the original quality of the audio.
Are there apps for editing MP3s on phones?
Yes. You can try Audio Editor on iOS, AudioLab for Androids, and some online tools for audio editing are accessible on phones, too.
The article showcases different ways to edit MP3s on Windows and Mac. To lessen the hassle of using different tools and guarantee excellent results, we encourage the use of AVAide Video Converter.
ABOUT THE AUTHOR

Your complete video toolbox that supports 350+ formats for conversion in lossless quality.