Do you want to record your screen and audio on your Windows computer? There are many reasons why you need to record your computer screen and audio. You can record your games, make a tutorial, review content or products, create content, and more. Clear and seamless visuals and audio can make your recordings excellent. You can follow the 5 methods in this post to effectively record screen and audio on Windows.
Part 1. Can Windows Record Screen with Audio
Yes, Windows lets you record the desktop screen with system audio and a microphone. Having the right screen and voice recorder is the key to seamless screen and audio capture. Whether you need a high-performance recorder for gaming or a crisp solution for tutorials, the perfect tool ensures your visuals and sound are perfectly synced. We've done the heavy lifting for you! Dive into the next section to explore the best methods and step-by-step insights for recording your Windows screen with audio like a pro.
Part 2. 3 Ways to Screen Record on Windows with Audio
1. Record Screen with Audio on Windows using AVAide Screen Recorder
One of the most effective screen recorders with mic and system audio you can use to record your screen with audio on Windows is AVAide Screen Recorder. This screen and audio recorder can help you achieve your objective more easily. Plus, this screen and audio recoder on Windows allows you to record your computer screen in two ways. You can instantly record the entire computer screen or a particular part of your screen. You can even record various content, such as video calls, videos, Zoom meetings, gameplay, instructional videos, and more. Plus, it can provide a trouble-free recording process. You can use this recorder easily and smoothly if you are a non-professional or skilled user.
Furthermore, you can enhance your file after the screen and audio recording process. You can compress, crop, trim, and change the video format. With that, you can get your desired outcome before saving the video on your computer. So, to learn how to screen record with audio on Windows, check the steps below.
Step 1Access AVAide Screen Recorder on your Windows computer. Hit the buttons below to download and install the software on your computer instantly.

FREE DOWNLOAD For Windows 7 or later
 Secure Download
FREE DOWNLOAD For Mac OS X 10.13 or later
Secure DownloadStep 2After that, select the way you want to record your screen. You can choose Full or Custom. Then, turn on the Sound System to record your screen with audio.

Step 3To start recording your screen with audio, click the REC button. After three seconds, the program will start the recording process. Then, click Stop to finish recording your screen.

Step 4Click the Import button from the bottom interface to save your recorded screen.

2. Use OBS to Record Screen with Audio on Windows
OBS is among the best open-source screen recorders for recording your screen with audio. It is among the popular programs you can rely on for your preferred outcome. Plus, it is capable of recording various media files on your screen. You can even record different tabs, windows, games, and more. If you want to record your computer screen with voice perfectly while getting excellent quality, use OBS immediately. The only drawback here is that the interface could be clearer. If you are a beginner, you'd better take time to learn to use this screen recorder with voice. If you want to learn how to screen record on Windows 10 with audio, follow the procedure below.
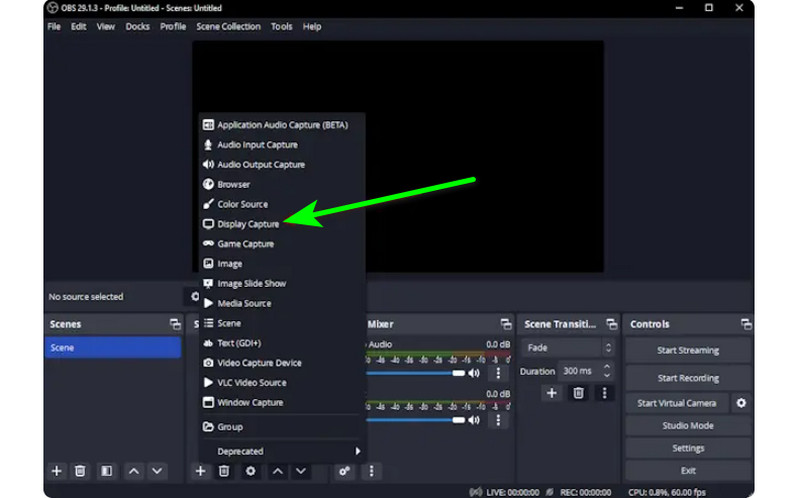
Step 1Launch the OBS program after the installation process. Afterward, go to the Plus symbol below and select the Display Capture option. You can choose what content you want to record on your screen.
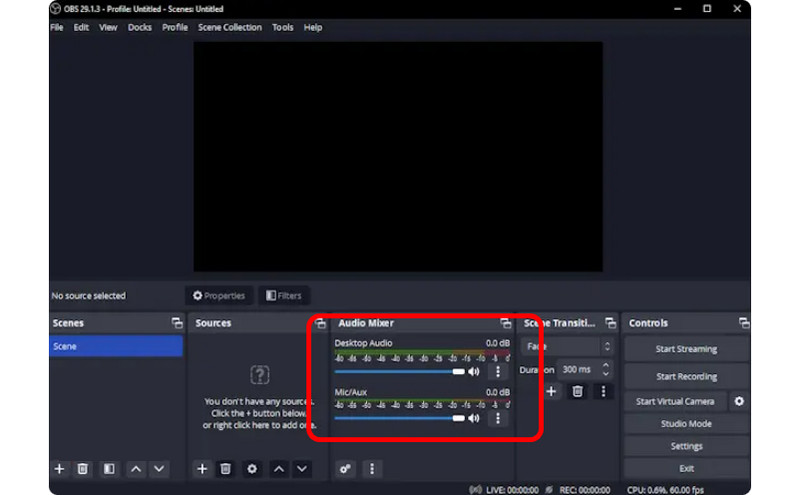
Step 2Then, go to the Audio Mixer and turn on the Audio so that you can record the screen with sound.
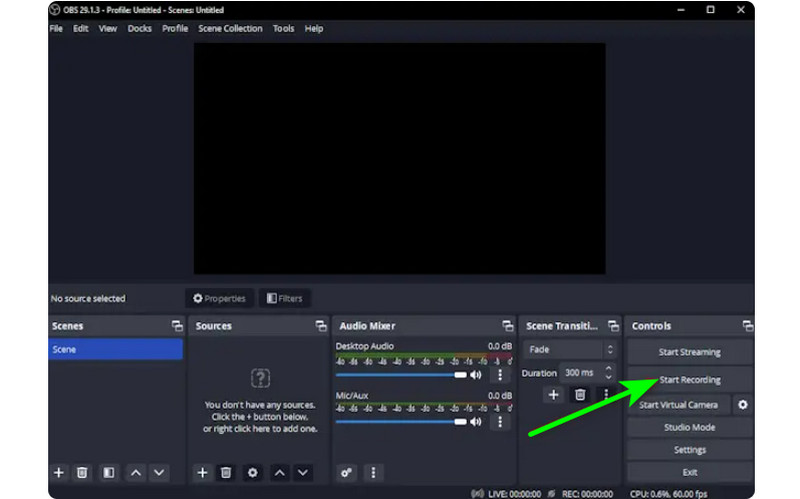
Step 3Click the Start Recording option on the right interface to start recording your screen. If you want to stop the recording process, click the Stop Recording button.
3. Use Clipchamp to Record Screen with Audio on Windows
Do you want to learn how to record screens on Windows 11 with audio? Then, use Clipchamp as your excellent screen recorder. This useful software allows you to record your screen with audio smoothly since it has a simple process you might enjoy. You can even turn on your webcam if you want. It is perfect for commenting on specific content or creating instructional videos. So, to start learning how to screen record on Windows, see the methods below.
Step 1From the main interface of Clipchamp, navigate to the Home section and click the Screen option. Then, another web page will appear on your screen.
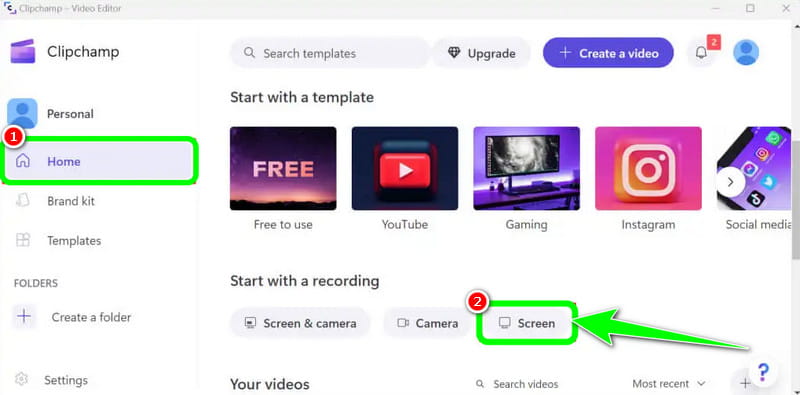
Step 2After that, click the Red button from the left interface. Then, you will see all your content on your screen, such as tabs, windows, and more.
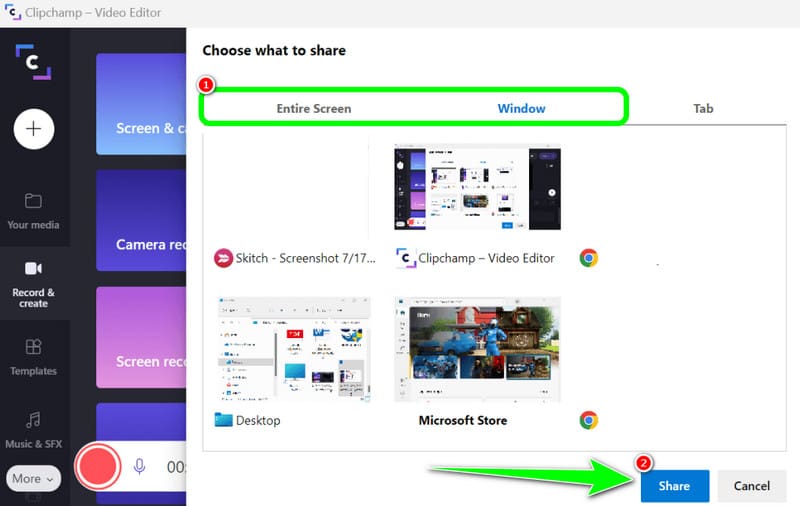
Step 3Click the screen you want to record, such as Entire screen, Window, and Tab. To start recording, click the Share button. Then, after the process, click Stop Recording to save the recorded screen on your computer.
Part 3. 2 Ways to Record Audio on Windows 10 and 11
1. Record Audio on Windows using Audacity
Do you want to learn how to record audio on Windows 10? If so, use Audacity. This offline software can help you record any sound from your computer. Plus, you won't find it challenging since the software can offer an easy process, making it an ideal audio recorder for all users. So, to start recording your audio, see the steps we have provided below.
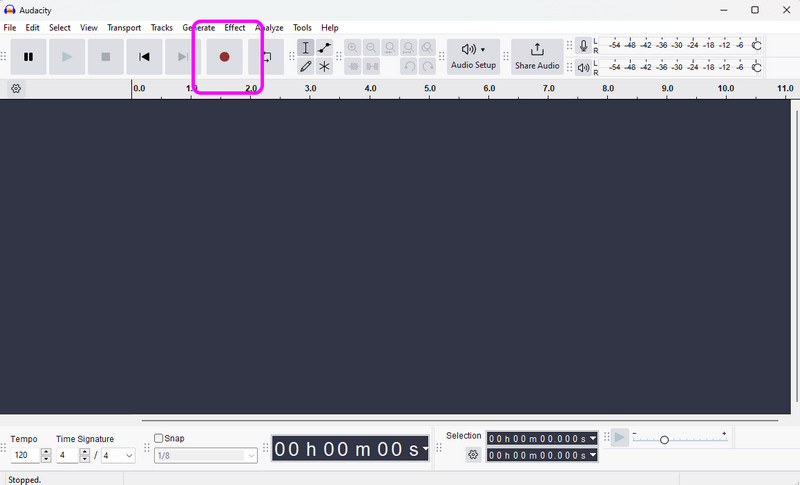
Step 1Install and run Audacity on your Windows. Then, from the main interface, click the Record button from the top interface. With that, the audio-recording process will start.
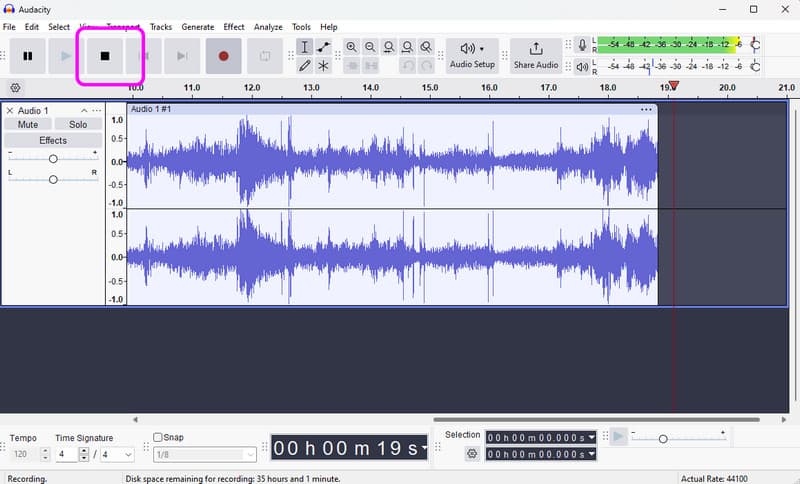
Step 2After that, if you are done recording, click the Stop button. Then, you can proceed to the saving procedure.
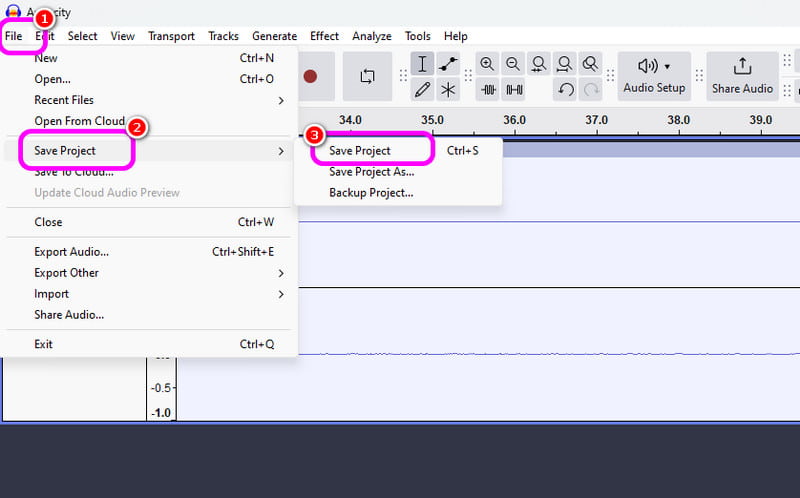
Step 3To save the recorded audio, go to the File > Save Project section to save the final audio file on your device.
2. Record Audio on Windows using Windows Voice Recorder
Another software that can give you a smooth Windows audio-recording process is Windows Voice Recorder. After you access this audio recorder, you can start recording any audio content from your device. What we like here is that the interface is simple so you can record audio easily and quickly. The only drawback is that it doesn't offer editing tools to enhance your recorded audio.
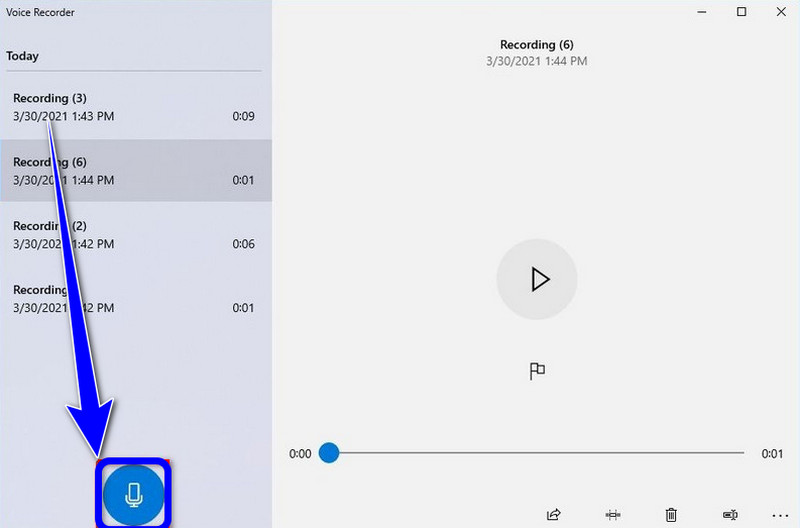
Step 1Download the Windows Voice Recorder on your device. After that, launch it to start the process.
Step 2From the main interface, click the Microphone symbol to start the recording process.
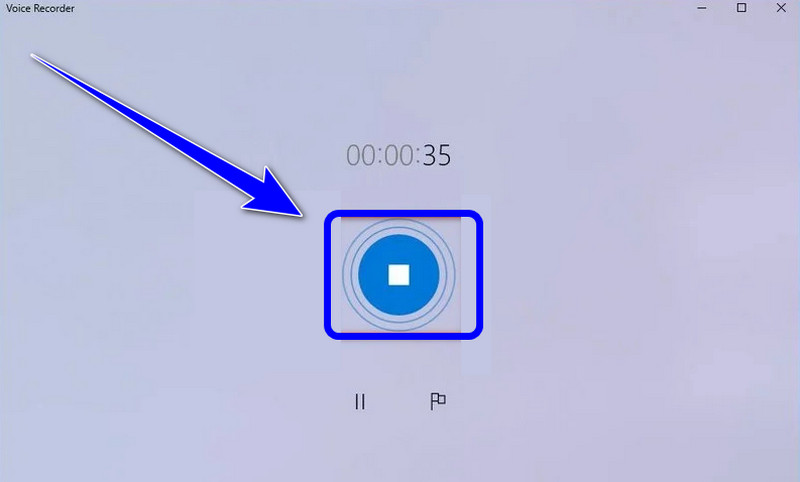
Step 3To stop the audio-recording process, click the Stop button. Then, you can already listen to the audio you have recorded.
Part 4. Comparison of the 5 Screen and Audio Recorders
| Feature | AVAide Screen Recorder | OBS Studio | Clipchamp | Audacity | Windows Voice Recorder |
| Primary Category | All-in-One Capture Suite | Professional Broadcast | Basic Browser Editor | Professional Audio Editor | Basic Voice Memo |
| Video Recording | Supported (Up to 4K/60fps) | Supported (Advanced) | Supported (Basic) | Not Supported | Not Supported |
| Audio Recording | System & Mic Simultaneous | Multi-track Support | Basic Input Only | Advanced Audio Capture | Microphone Only |
| User Interface | Intuitive & User-Friendly | Steep Learning Curve | Simple Browser-based | Technical/Traditional | Extremely Minimalist |
| Built-in Editing | Real-time Annotation/Trim | None (External required) | Full Timeline Editor | Advanced Audio Editing | Basic Trimming Only |
| Unique Selling Point | Dedicated Game & Phone Modes | Unlimited Scene Layers | Stock Media Integration | Noise Reduction/Mixing | Native System Utility |
| Overall Value | Best for Efficiency & Quality | Best for Advanced Techs | Best for Quick Social Clips | Best for Pure Audio Work | Best for Simple Notes |
Part 5: FAQs of Recording Screen and Audio on Windows
Why is Windows Alt+R not working?
If the Alt + R shortcut (the standard keybind for Windows Xbox Game Bar) isn't working, it’s usually due to a software conflict, a disabled setting, or hardware limitations. You should exit other programs that have screen recording features.
Why is there no sound when I screen record on Windows?
The most common reason for silent recordings is incorrect audio input settings. To fix this, ensure that your system audio (internal sound) and microphone are both enabled in your recording software. On Windows 11, check your Privacy & Security settings to ensure the app has permission to access the microphone. Additionally, verify that your playback device is set as the 'Default Device' in the Windows Sound Control Panel, as many recorders cannot capture audio from 'Virtual' or 'Bluetooth' outputs unless specifically configured.
How can I record internal audio on Windows without a microphone?
To record internal system audio without picking up background noise from a microphone, you should turn off the 'System Sound' or 'Internal Audio' option on your screen and audio recorder program.
If you want to learn how to screen record on Windows with audio, you can get all the details from this post. So, see all the information and try the process to have an effective screen and audio-recording process. Also, if you want the most reliable software to help you record a screen with audio perfectly, there is no doubt that AVAide Screen Recorder is the best program you can access. Thus, run the software on your Windows and enjoy its overall capabilities.
ABOUT THE AUTHOR

Record screen, audio, webcam, gameplay, online meetings, as well as iPhone/Android screen on your computer.