Playing Minecraft is a fun experience. It is a game about survival, creativity, adventure, and teamwork, which is no doubt why many users love to play with it, whether you are a kid or a grown-up. Well. Whoever you are, you can also record Minecraft from Windows, Mac, iOS, and Android to upload it to YouTube or any other social media platform. Are you ready to be a content creator for Minecraft? We shall now show you these guides.
- Part 1. Pre-Game Configuration for Smooth Recording
- Part 2. How to Record Minecraft on Windows PC
- Part 3. How to Record Minecraft on Mac
- Part 4. How to Record Minecraft on Phone (iPhone & Android)
- Part 5. How to Record Minecraft Videos to Be Uploaded on YouTube
- Part 6. How to Record Minecraft in 3rd Person (Cinematic Angles)
- Part 7. Troubleshooting Issues in Recording
Part 1. Pre-Game Configuration for Smooth Recording
Why This Matters
When you are recording in Minecraft, expect an intensive resource. This can bring you blurry, laggy, or unsupported output. Thus, adjusting and optimizing your Minecraft settings is a great way to prevent all of these issues that can happen while recording. Take a look at the tips you can follow below:
Key Optimization Tips
- Lower Render Distance. You can have balanced visuals and performance by setting up between 8 and 12 chunks.
- Disable Graphics Extras. Remove any extra graphics in Minecraft. This element can give you a frame drop experience,
- Close Background Apps. Get rid of any applications running in the background so that Minecraft can freely use all of the storage and RAM power of your computer.
Minimum PC for Recording Minecraft
- CPU: Intel Core i5 / AMD Ryzen 5 (recommended)
- RAM: 8GB minimum, 16GB recommended for 1080p 60fps recording
- GPU: Dedicated graphics card (NVIDIA GTX 1060+ or AMD equivalent) recommended for GPU-accelerated encoding
- Storage: SSD with 20-50GB free space for long recordings
Part 2. How to Record Minecraft on Windows PC
Here are three methods for you on how to record Minecraft gameplay on PC using three great tools:
Method 1: OBS Studio - The Gold Standard (Free & Open-Source)
Many of you are asking what the best open-source recording tool is. OBS is one of the greatest examples. And now we will see how to record Minecraft with OBS Studio. But remember that it is most likely not recommended for novice users due to its complicated process. Nonetheless, it is still good to use for professionals.
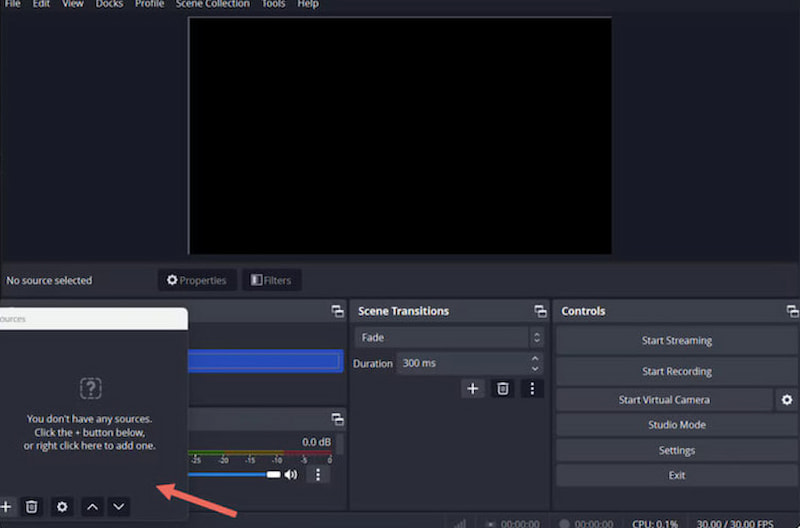
Step 1Download and install OBS Studio on your computer. Then immediately launch the tool. From the interface, you can now add a new Game Capture source for Minecraft.
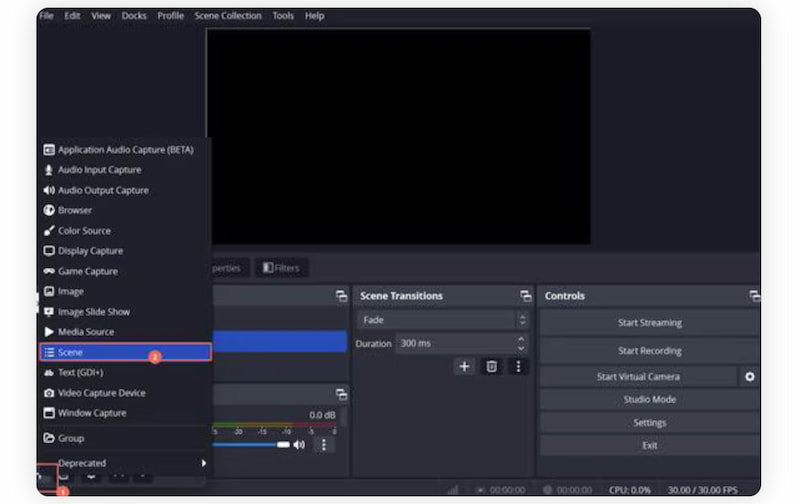
Step 2After that, please proceed with configuring the resolution, frame rate, and audio in Settings. These are great to modify or lessen the issue that might happen during recording.
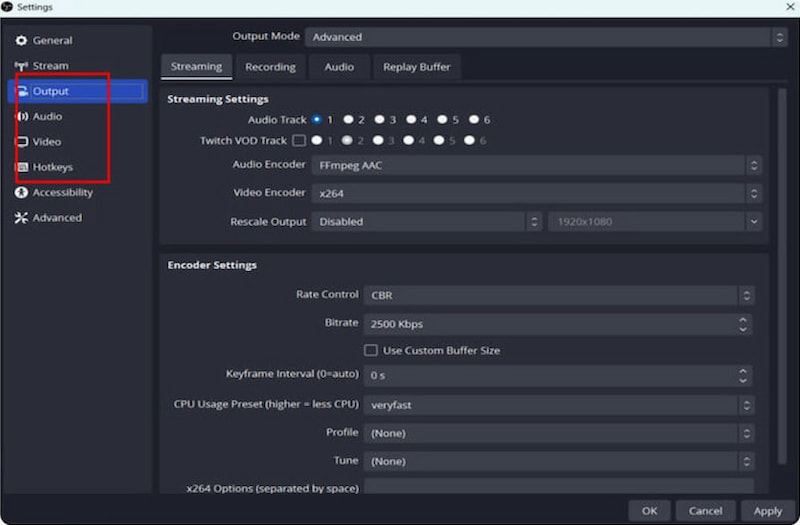
Step 3You can now click the Start Recording button and begin playing Minecraft. Press Stop Recording when finished.
Method 2: Windows Game Bar - The Built-in Quick Method
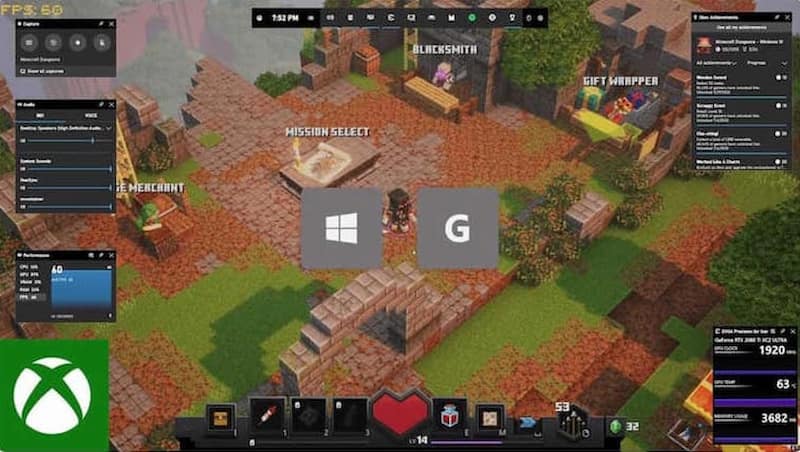
The next method will need you to use the Xbox Game Bar. It is a built-in recording tool on Windows 10 and 11. The tool is really a convenient option for recording Minecraft without extra software for many. Many users call it one of the best game screen recorders nowadays. Let us see how we can use it.
Step 1Click Windows + G so that you will access the Xbox Windows Game Bar.
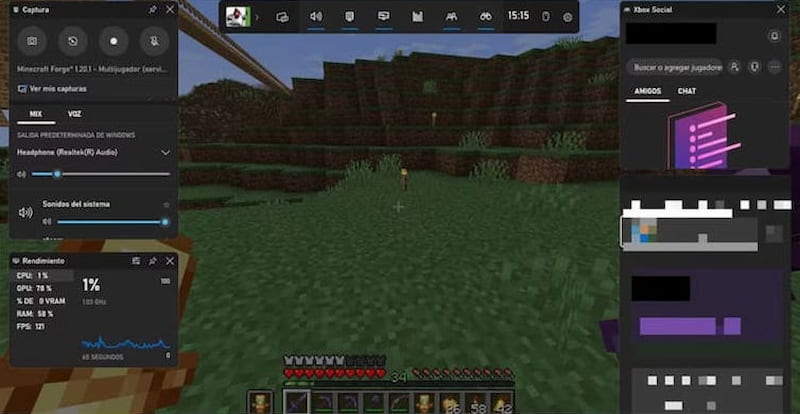
Step 2On the interface, click the Capture to start recording your Minecraft while you are playing.
Step 3Click the Stop button once you are done.
Method 3: AVAide Screen Recorder - The Lightweight Alternative
The third method is a great screen recording tool for Windows and Mac. This tool is more advanced but easy to use. In this tool, you can have everything you need to record your gameplay with quality output and with the ability to edit it afterward. In line with that, here is a guide on how to screen record Minecraft using AVAide Screen Recorder.
Step 1Install the great tool of AVAide Screen Recorder for free from their official website.

FREE DOWNLOAD For Windows 7 or later
 Secure Download
FREE DOWNLOAD For Mac OS X 10.13 or later
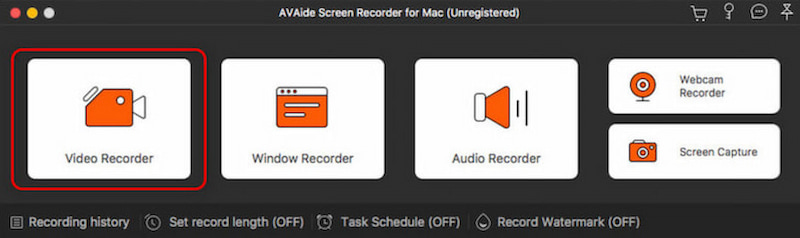
Secure DownloadStep 2From the interface of the tool, access the Video Recorder button.
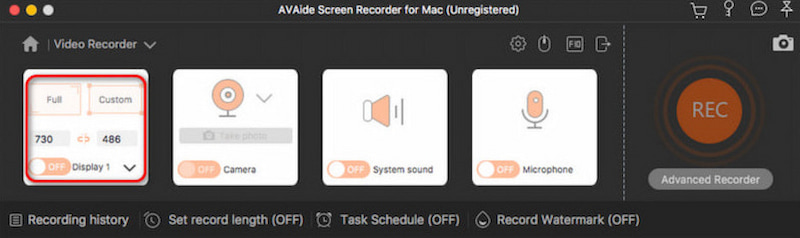
Step 3You can now choose between a Full or Custom screen for the recording.
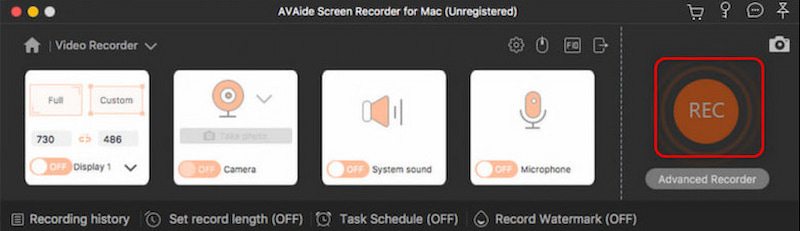
Step 4After those steps, start the recording by clicking the Record button. You can continue
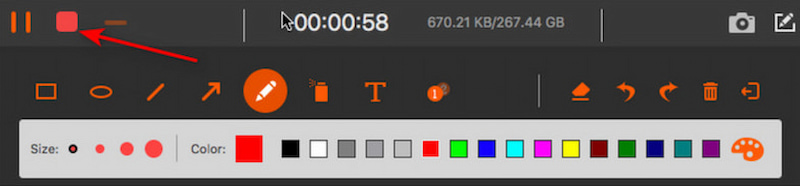
Step 5Once you are done, click the Stop button and save the video you recorded.
Part 3. How to Record Minecraft on Mac
Method 1: QuickTime Player - The Built-in Option
QuickTime Player is popular among users of Apple's ecosystem. It is their built-in screen recorder that they can use anytime without installing extra tools. Now, see the steps to follow in order to use it in recording your Minecraft gameplay.
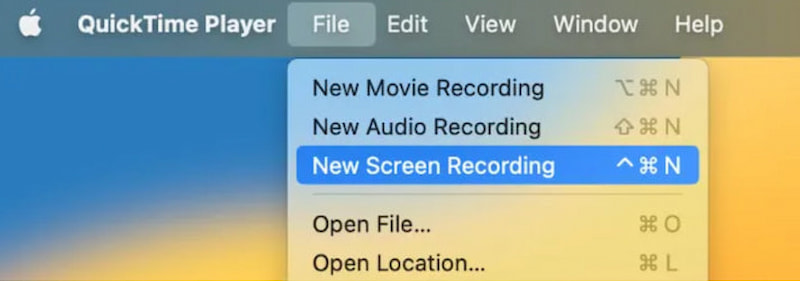
Step 1Launch the app on your Mac and click the File. Among the options, click New Screen Recording.
Step 2Press the Record button to start the recording process. This is also the time when you proceed to play while the tool is capturing your screen.
Step 3Once you are done, click the button for Stop and save your video to your desired folder.
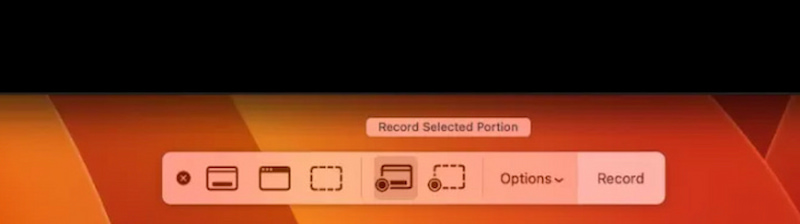
Important: QuickTime Player cannot record internal system audio - it only captures microphone input. For game sound, you'll need third-party tools or audio routing software like Soundflower or BlackHole.
Method 2: Bandicam for Mac
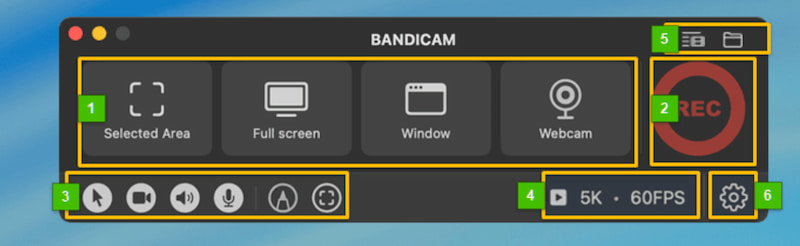
For the second method, we will use Bandicam, which also has the features to capture your gameplay. See how we can use it below:
Step 1On your computer, access Bandicam. From its interface, click the Screen Recording mode.
Step 2The Resolution, frame rate, and audio settings should be adjusted to give you a smooth recording process.
Step 3Click the Record button, and you can now proceed to play Minecraft while Bandicam is recording your screen. Then, press Stop when finished and export your video file.
Part 4. How to Record Minecraft on Phone (iPhone & Android)
Method 1: Mobile Phone's Built-in Screen Recorder
We can use the built-in screen recorder of your mobile device. Follow these steps below:
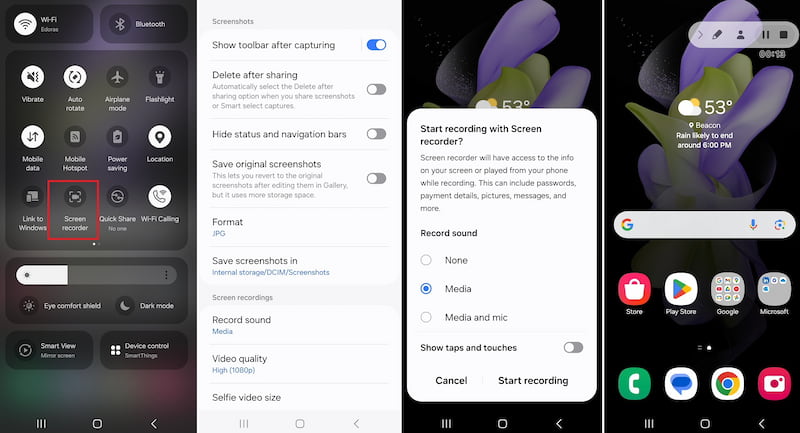
Step 1See the Control Center of your phone and click the Screen Recorder button. If you cannot find the feature, please go to Settings and enable the feature first.
Step 2Open Minecraft and play it. The phone will now record your screen.
Step 3Click the Stop button to record once you are done and ready to save your video.
- 10 minutes of 1080p 60fps screen recording can use 1-2GB of storage. Ensure your phone has enough free space before starting.
Method 2: Third-Party Applications with Advanced Features
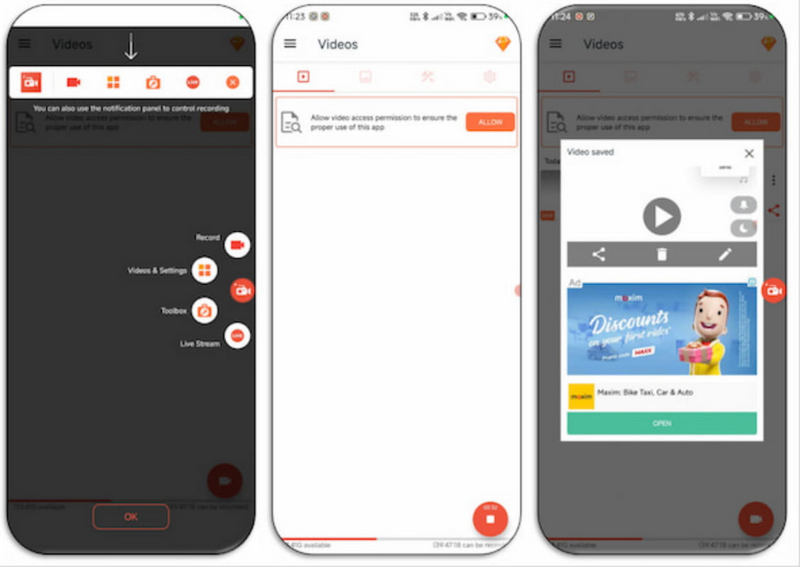
Another method can be done with the use of the AZ Screen Recorder app that we can get from the App Store or the Play Store.
Step 1Install the app on the Play Store or Apple Store on your mobile phone.
Step 2You can adjust the audio setting before you begin. After that, click the Record button to start.
Step 3Please play Minecraft and let the application record your gameplay. After the play, you can click the Stop button and save your recording immediately.
Part 5. How to Record Minecraft Videos to Be Uploaded on YouTube
YouTube Recommended Upload Settings:
- Resolution: 1920×1080
- Frame Rate: 30 or 60 FPS
- Bitrate: 8-15 Mbps for 1080p
- Format: MP4 with H.264 codec
Part 6. How to Record Minecraft in 3rd Person (Cinematic Angles)
Replay Mod is not a screen recorder - it records game data (player positions, block changes, etc.) instead of video. A 1-hour session takes only ~10MB. After recording, you can freely reposition the camera, change the time of day, and add shaders in the replay viewer. No second account needed.
To use Replay Mod:
Step 1Install Fabric Loader for your Minecraft version.
Step 2Download Fabric API and place it in the /mods folder.
Step 3Download Replay Mod and place it in the /mods folder.
Step 4Install FFmpeg for video rendering.
Step 5Launch Minecraft with the Fabric profile and start recording.
Step 6Edit camera paths in the Replay Viewer.
Step 7Render and export your cinematic video.
Part 7. Troubleshooting Issues in Recording
Issue 1: Black Screen on OBS Studio
Step 1Set it as an Administration when you open it on your computer.
Step 2Choose Game Capture mode among the options
Step 3Then, press the Minecraft window on your computer. Play it and start recording again.
Issue 2: Laggy Video Recording
- Minecraft graphics settings must be lowered.
- Limit FPS from 30 to 60 to reduce GPU overload.
- A RAM upgrade for better gameplay can also be a good choice.
Issue 3. Missing Audio Recording
Step 1Open OBS Studio and go to the Audio Settings. From there, ensure that you set up the correct input and output settings.
Step 2After that, you can now unmute the Desktop Audio and Mic.
Step 3Lastly, it is important to match the sample rates and proceed with updating audio drivers.
There are multiple ways to record Minecraft gameplay for PC and mobile devices. We can see various easy steps to do it as long as you have the right recording tool for it. Good thing, we provided you with all the possible tools you can use, whether you are using your computer or mobile phone. In line with that, many people are recommending you to use AVAide Screen Recorder because of its versatile features, plus easy-to-use tools.
ABOUT THE AUTHOR

Capture the best moment with AVAide Screen Recorder. Screencast, customize, and share in seconds.