Mac is a favorite for creatives because it handles tasks like video editing, tutorials, and presentations smoothly. If you want to capture your work or create how-to videos, gameplay clips, or lessons, this write-up will show you how to screen record on a Mac using different tools. Ready to get started? Let us dive in!
Part 1: Best Solution to Screen Record with Audio on Mac
If you want to learn how to screen record with audio on Mac, you can rely on AVAide Screen Recorder. It lets you capture your full screen or just a custom area, with your microphone and system audio perfectly synced. You can save in high-quality 4K, use its simple editing features, and enjoy an intuitive interface that makes recording easy even for beginners.
Start capturing your screen clearly and smoothly below!
Step 1To start, download, install, and open AVAide Screen Recorder on your Mac.

FREE DOWNLOAD For Windows 7 or later
 Secure Download
FREE DOWNLOAD For Mac OS X 10.13 or later
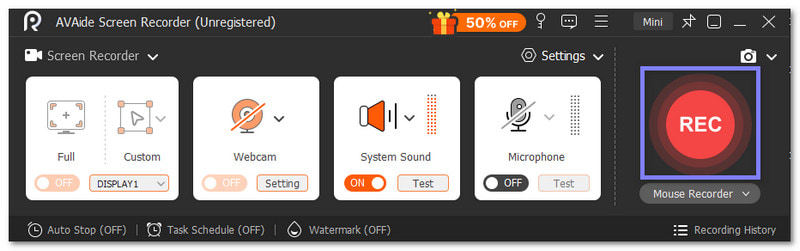
Secure DownloadStep 2Once opened, proceed to pick the area you want to record. You can choose Full Screen if you want to capture the whole display, or click Custom to drag and fit the frame over a small display.
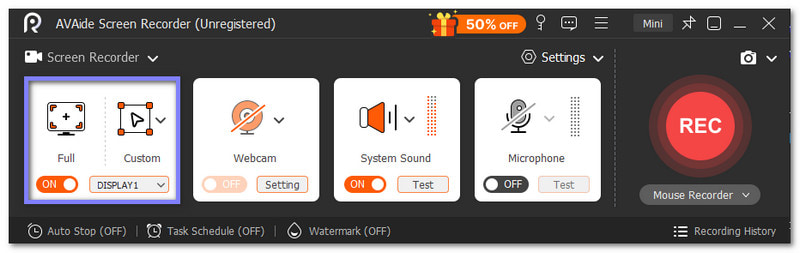
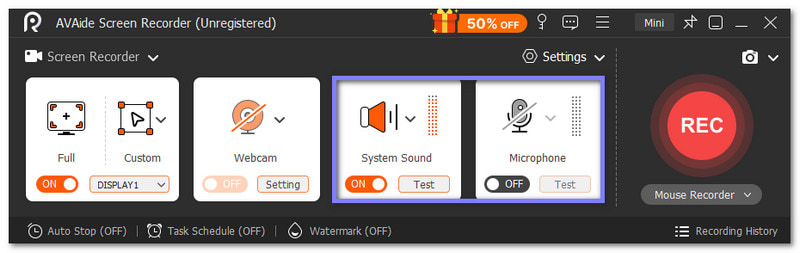
Step 3To screen record with audio, please turn on the System Sound to capture the sounds coming from your Mac and Microphone if you want your voice in the recording.
Step 4Press the REC button to begin. The recorder will count down and then capture everything inside the selected frame, including your audio.
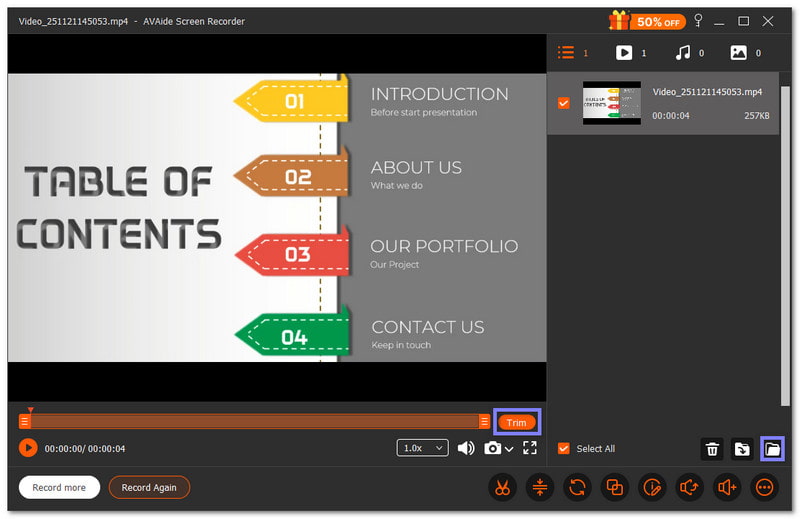
Step 5Once you finish, press the Stop button. A new display will open, where you can watch your recorded video with audio.
You can use the Trim button if there are unnecessary starting and ending parts you do not need. Once satisfied, proceed to save it on your Mac.
Why You Might Like Using AVAide Screen Recorder:
AVAide Screen Recorder lets you set when to start or stop recording easily. It is perfect if you need to record webinars, meetings, etc. You can also add texts, images, whiteboard notes, or focus highlights while recording to emphasize important points.
Why You Might Skip AVAide Screen Recorder:
It requires a subscription, but it comes with a 30-day money-back guarantee and is affordable for most users.
Part 2: Record Mac Screen Using Screenshot Toolbar
Screenshot Toolbar provides the simplest approach to recording your screen on a Mac because it is already built into the system. You only need a keyboard shortcut, and it will automatically pop up at the lower part of the screen with clear choices. It manages basic tasks well so that you can capture small demos, short lessons, or clips.
Learn how to do screen recording on Mac with internal audio below:
Step 1Press Command + Shift + 5 on your keyboard. It opens the screenshot toolbar, and it pops up at the bottom of your screen so you can choose what type of recording you want.
Step 2Move your mouse over the icons in the toolbar. You will see two choices for screen recording. One lets you record the entire screen, and the other lets you record a selected portion. Pick the one that fits what you need.
Step 3Click the Options button. A small menu will show up. Here, you can pick your microphone, set a timer, choose where the file will save, and even turn on show mouse clicks if you want the clicks to appear in the video.
Step 4Once ready, press Record. The toolbar will fade, and your Mac will start recording right away. Once done, click the Stop button at the top-right corner of your screen.
Why You Might Like Using Screenshot Toolbar:
It opens with one shortcut so that you can start right away. It does not slow your Mac down because it is lightweight. You can pick your audio input, change the frame size, and show mouse clicks.
Why You Might Skip Screenshot Toolbar:
It cannot add effects, captions, or notes to your recordings. It also cannot capture system audio without a plugin. You cannot schedule your recording, and every saved file uses the .mov format unless you convert it.
Part 3: Screen Record on Mac Using QuickTime Player
QuickTime Player gives you another built-in approach to record your screen, but it feels a bit different from the above. You open it like a normal application, yet it still provides simple features for recording everyday tasks. It works well for users who want clean videos without distractions. You can also trim clips, choose your microphone, and record your whole screen or one display.
Check out the tutorial to learn how to do screen recording on a Mac using it:
Step 1Open the Applications folder on your Mac and launch QuickTime Player. It is already built into all Macs, so you do not need to download anything.
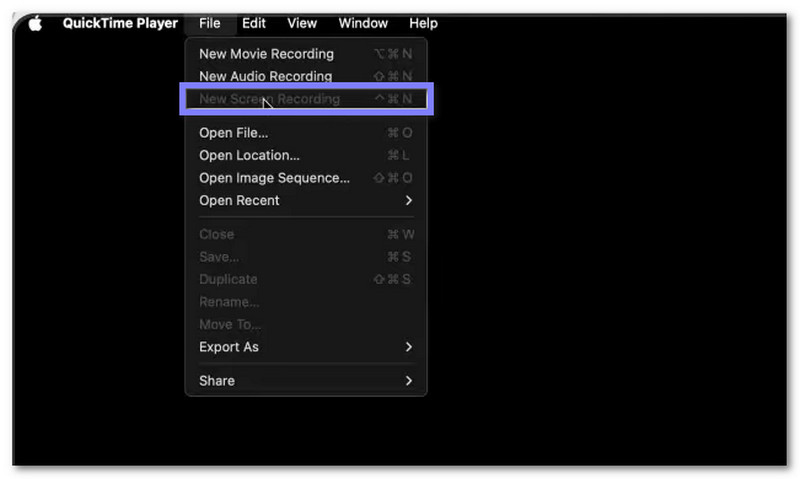
Step 2Head to the menu bar and press File > New Screen Recording. It brings up the same recording toolbar you saw in the second method.
Step 3Press Options to fine-tune the settings. You can choose QuickTime Player as the save location, set your Microphone, turn on Mouse clicks, and use a Timer if you need it.
Step 4Click Record to begin. Once you want to stop the recording, select the Stop button at the top-right of your screen.
Step 5After you stop, QuickTime will show your video. You can type a title for your recording and pick the folder where you want to save it.
Why You Might Like Using QuickTime Player:
It enables you to trim or split clips without leaving the application. You can also pick from different audio sources. In addition, it works well on older Mac operating systems.
Why You Might Skip QuickTime Player:
It cannot record only a small portion of your screen, and cannot record system audio unless you install another plugin.
Part 4: Other Software to Do Screen Recording on Mac
1. OBS Studio
OBS Studio is a strong choice when you need a screen recorder that can do more than the basic tools on a Mac. It manages different audio and video sources at the same time, which makes it useful for tutorials or gaming clips.
Check the guide below to discover how to screen record on a MacBook using it:
Step 1You will see a clean display with panels for scenes and sources once you open OBS Studio.
Step 2Go to the Scenes panel and click the Add button. It creates a new scene for your Mac recording.
Step 3In the Sources panel, click the Add button. Then, pick macOS Screen Capture, press OK, and choose what you want to record from the Method drop-down.
Step 4If you need audio, open the Sources panel again. Click Add, choose Audio Input Capture, press OK, and select your audio device.
Step 5Hit Start Recording to begin. Once done, click Stop Recording. OBS Studio will store your videos in the Movies folder by default.

Why You Might Like Using OBS Studio:
It works as a free open-source program, and lets you record several inputs at once. You can also send your recordings to many platforms.
Why You Might Skip OBS Studio:
The layout can be tricky to understand, and it does not include video editing. It needs a lot of system power, and older Macs may struggle during long recordings.
2. Loom
It is for sure that there are users out there looking for a fast tool that records and saves everything online. If you are one of them, Loom is recommended for you. It keeps your videos in the cloud, which saves space on your Mac. Loom also loads quickly and makes recording simple for school tasks, teamwork, or short messages.
Here is how to take a screen recording on a Mac using Loom:
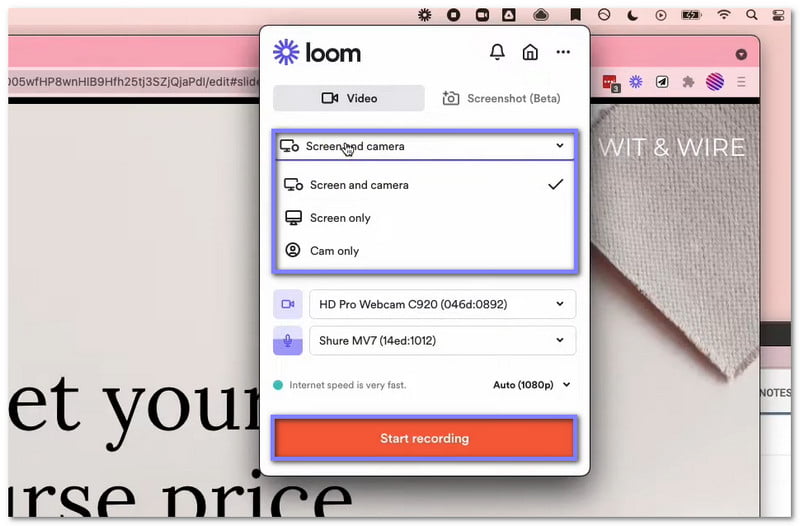
Step 1First and foremost, launch the program. It will load with simple recording choices on the main screen.
Step 2Pick your recording mode. You can choose Screen + Cam, Screen Only, or Cam Only if you plan to use your webcam.
Step 3Choose what part of your Mac you want to record. You may record the full screen, a window, or a browser tab.
Step 4Click Start Recording, and Loom will capture your screen with audio. Once you finish, click Stop Recording on the screen to save or upload the video.
Why You Might Like Using Loom:
It has a simple interface, stores videos online to save space, offers strong editing tools, and works on many operating systems.
Why You Might Skip Loom:
It can crash when recording system audio, and you need an internet connection because it is cloud-based. The trial version also limits some features.
3. Snagit
Snagit focuses on making screen recording feel easy. It has a clean design and gives you simple tools to capture your screen without confusion. It also includes templates that help you plan your clips, which is helpful for school lessons, work guides, or quick walk-through videos.
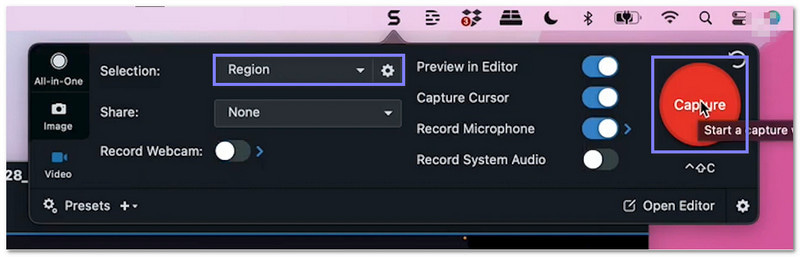
Step 1When you open Snagit, it will show a simple capture box so you can choose what you want to record.
Step 2Press the Capture button and select Video to switch from screenshot mode to screen recording mode.
Step 3Under Selection, pick Fullscreen or Region. After choosing, click Capture to prepare the recording area.
Step 4Pick Audio Recording if you want sound, then click the red Record button. Once finished, click the blue Stop button to save the clip.
Why You Might Like Using Snagit:
It has a friendly interface, ready-made templates, and overlay choices to personalize recordings, perfect for making tutorial videos. It also works on different platforms, so that you can use it on more than one device.
Why You Might Skip Snagit:
It cannot stream live video, and the trial edition places limits on what you can do until you buy the full version.
4. ScreenRec
Another lightweight program for users who want to record fast and share fast is Snagit. It creates an instant link after you stop the recording, which helps when you need to send clips to friends or teammates. Snagit really works well for quick notes or short lessons.
Refer to the steps to find out how to record the screen on a MacBook Air:
Step 1Just like any other tool, you must download, install, and run ScreenRec.
Step 2Press Alt + S to create a capture window. Please drag to set the size you want, then click Record to start.
Step 3Once done, click Stop. After that, ScreenRec will make an encrypted link you can share, or you can save the video directly to your device.

Why You Might Like Using ScreenRec:
It creates a shareable URL right away, lets you record and download videos for free, and includes an annotation tool.
Why You Might Skip ScreenRec:
It does not include video editing features, and without a ScreenRec account, your recordings stop at five minutes.
We provided the easiest ways you can follow to learn how to record a screen on a Mac. Our question now is, have you decided which tool you will use?
If you are still undecided, why not try AVAide Screen Recorder? It can capture both screen and audio, export in 4K, and supports many video formats. It ensures everything on your Mac is recorded clearly!
ABOUT THE AUTHOR

Record screen, audio, webcam, gameplay, online meetings, as well as iPhone/Android screen on your computer.