Want to explore how to record a Zoom meeting? Recording a meeting can give you various benefits. You can save important presentations, conversations, discussions, and more. Plus, the Zoom platform can even offer its built-in recorder feature, allowing you to capture both audio and video. With that, if you want the most effective methods to record everything in Zoom, check this guide, as we offer all the methods you can use.
- Part 1. Recording Prerequisites – What You Need to Know First
- Part 2. Two Ways to Record – Local vs. Cloud
- Part 3. How to Record a Zoom Meeting
- Part 4. How to Record on Different Devices
- Part 5. Where Do Zoom Recordings Go
- Part 6. How to Download Zoom Recordings
- Part 7. How to Edit a Zoom Recording
- Part 8. How to Extract Transcripts from Zoom Recordings
- Part 9. How to Capture a Video on Zoom Without a Meeting
- Part 10. Sharing Zoom Recordings
- Part 11. Troubleshooting Common Problems
Part 1. Recording Prerequisites - What You Need to Know First
First, you must be aware of the requirements to record a Zoom meeting. Participants require express consent, while hosts and co-hosts are the only ones with default recording permissions. In addition, the capabilities available for recording vary depending on the sort of Zoom account you have. The subscription accounts provide cloud recording and more advanced management tools. On the other hand, free accounts simply permit local recordings.
Recording Permission: Hosts vs. Participants
Hosts:
If you are the host, you can automatically have the full recording rights. You can start, pause, and stop recordings during the meeting. Plus, you can even decide whether recordings are saved in the cloud or on your computer, depending on the account type.
Co-Hosts:
If you are assigned by the host as a co-host, you can also record a Zoom meeting. You can even get the same recording privileges. It is ideal for large meetings or webinars where multiple organizers or groups are present.
Participants:
By default, participants cannot record a meeting from Zoom. They must get permission from the host to enjoy the recorder feature.
Part 2. Two Ways to Record - Local vs. Cloud
When using Zoom for a meeting, there are two ways you can record. These are:
Local Recording
The first method is to record the meeting locally. This way is ideal if you want to record and save the recording on your computer. This option is also available to all Zoom users (including those with a free account). It is perfect for a personal user or when you want immediate access to the recording without relying on cloud storage.
Cloud Recording
Another way to record a Zoom meeting is via cloud recording. With this method, you can save and store the recording on the Zoom server (through the Zoom web portal). Note that this feature is only available to paid accounts, such as Pro, Business, and Enterprise. The best part here is that it can easily share the recordings with other users or platforms. Plus, this feature is helpful if you want other professionals to get access to the recordings smoothly.
Part 3. How to Record a Zoom Meeting
Want to start learning how to record on Zoom? In that case, you can follow all the methods in this section. With that, you will know how to record a meeting in Zoom as a host and a participant.
Method 1: Record a Zoom Meeting as a Host
If you are the host, recording a Zoom meeting is a simple task to do. To begin the process, you can use the simple steps below.
Step 1After you have downloaded the Zoom platform, open it and proceed to the My Account > Settings section.
Step 2After that, proceed to the Recording section and turn on the Record to computer files or Cloud recording options.
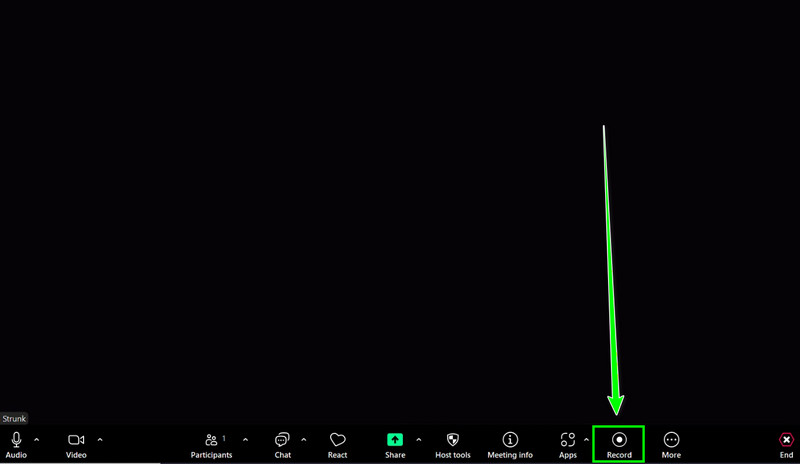
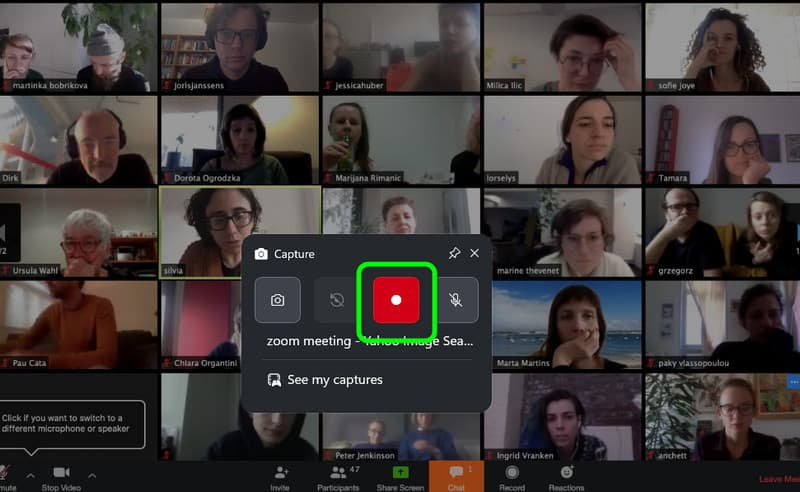
Step 3You can now click the Host option to start a new meeting. Then, tap the Record button below to begin the recording process.
Method 2: Record Zoom Meeting as a Participant
As a participant, you can't record a Zoom meeting without the permission of the host. So, always ask for permission for an effective recording process.
Step 1After you launch the Zoom software, you can start joining the meeting by clicking the Join button.
Step 2Then, ask the host to grant you permission to record the meeting.
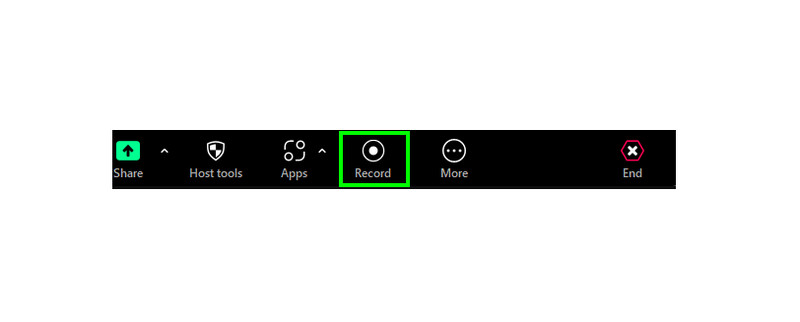
Step 3Once approved, you will see the Record button below during the meeting. Click it to start the recording process. Tap End to finish recording the meeting.
Method 3: Record Zoom Meeting Automatically
When using the Zoom Recorder feature, you must know that you can also record a meeting automatically. So, to learn how to set up your settings for an automatic recording process, you can rely on the instructions below.
Step 1Launch the Zoom program and proceed to the Recording section.
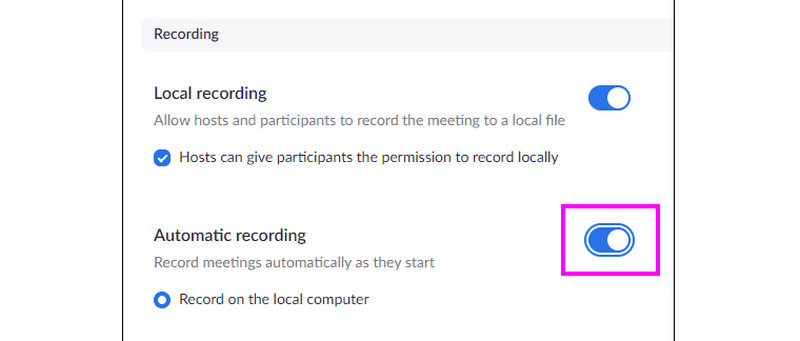
Step 2 After that, enable the Automatic Recording option. You can also choose where you want to save the recordings.
Step 3Then, every time you start a meeting, Zoom will begin the recording automatically. After the process, click End to stop and save the recorded meeting.
Method 4: Record Zoom Using AVAide Screen Recorder
Are you a host or a participant who wants to record a Zoom meeting without accessing the paid version or asking for permission? In that case, it is perfect to use AVAide Screen Recorder. With this program, you can instantly and easily record a meeting from Zoom since it has a straightforward user interface. What we like here is that you can even record both video and audio with the best quality, resulting in a better playback.
Additionally, during the recording process, you can access various annotation tools, making the recording engaging. Lastly, you can access basic editing features, allowing you to improve your recordings. You can crop the video, trim, add filters, insert captions, and more. You can also save the recording to various formats, like MP4, MOV, AVI, MKV, WMV, FLV, etc. Thus, if you want a perfect recorder, consider using AVAide Screen Recorder.
Step 1Access AVAide Screen Recorder on your computer. You can tap the buttons below to install it on your Windows or Mac.

FREE DOWNLOAD For Windows 7 or later
 Secure Download
FREE DOWNLOAD For Mac OS X 10.13 or later
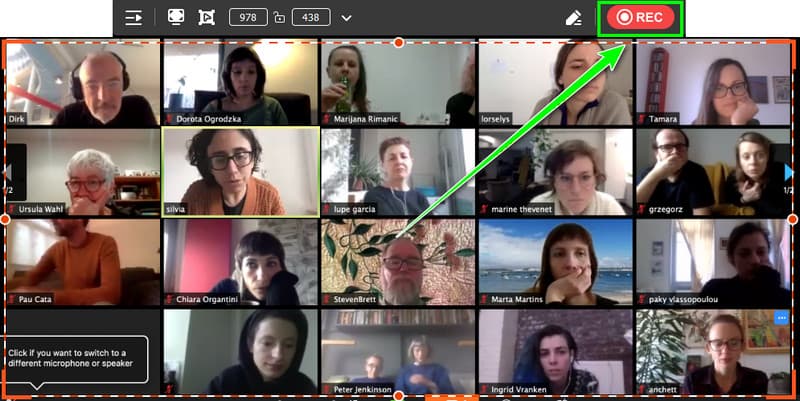
Secure DownloadStep 2Launch the interface and click Full if you want to record your entire screen and Custom to record a specific screen area.
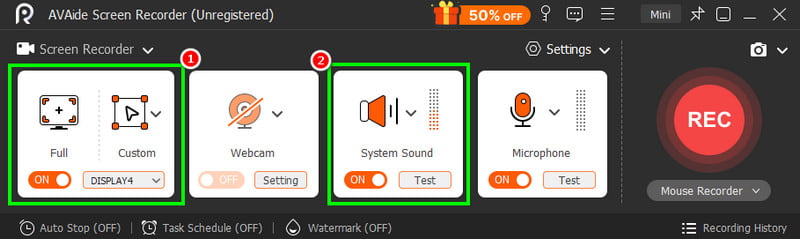
You also must turn on the System Sound to record the audio from the meeting.
Step 3Hit the REC option to start recording the meeting from Zoom. Once done, just tap the Stop function.
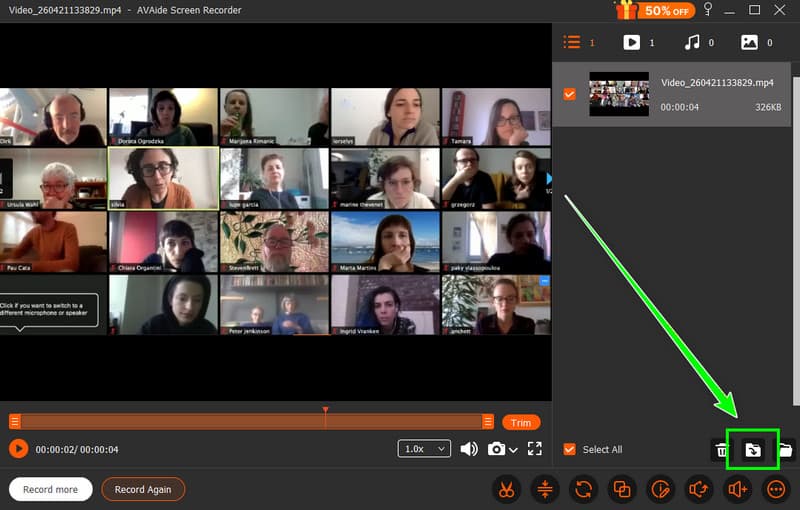
Step 4After the recording process, go to the bottom interface and hit Export to save it on your computer.
Part 4. How to Record on Different Devices
Can you record a Zoom meeting on different devices? The answer is yes. No matter what device you use, recording a meeting from Zoom is possible. To learn the process, you can follow all the methods in this section.
Method 1. Record Zoom Meetings on Windows
If you want to screen record on Windows, especially when recording a Zoom meeting, you can use the Xbox Game Bar. This tool is built in, so there is no need for you to download any third-party recorder. Plus, it ensures that you get the best quality for better playback.
Step 1On your Windows, launch the Xbox Game Bar by pressing the Windows + G keys on your keyboard.
Step 2Then, open the Zoom meeting and prepare everything. To start the process, go back to the Xbox Game Bar and tick the Record button.
Step 3Click Stop if you want to finish the recording.
Method 2. Record Zoom Meetings on Mac
For an effective Zoom recording process on a Mac, you can use QuickTime Player. With its Screen Recorder feature, you can capture any content from Zoom. The recording process is also simple, making it suitable for all Mac users.
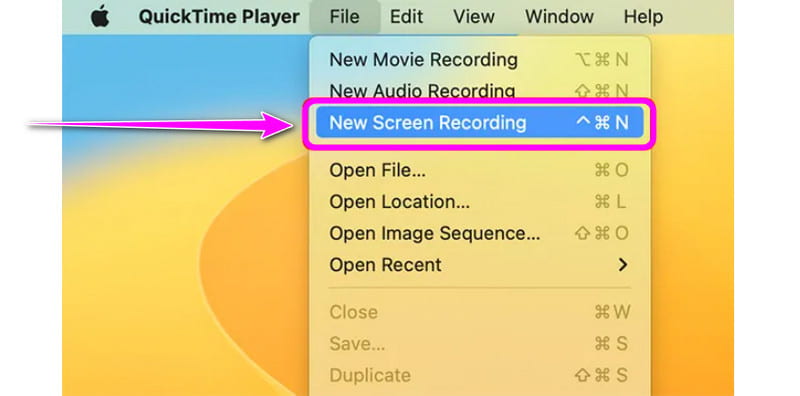
Step 1Launch the QuickTime Player. After that, proceed to the File section above and tap the New Screen Recording feature.
Step 2 Then, select the microphone input to record the audio.
Step 3You can now select the Zoom windows to begin the recording process. Hit Stop to finish recording the meeting.
Method 3. Record Zoom Meetings on iPad or iPhone
If you are using your iPad or iPhone device, you can access its Screen Recorder feature to record a Zoom meeting. To screen record on iPhone and iPad, use the steps below.
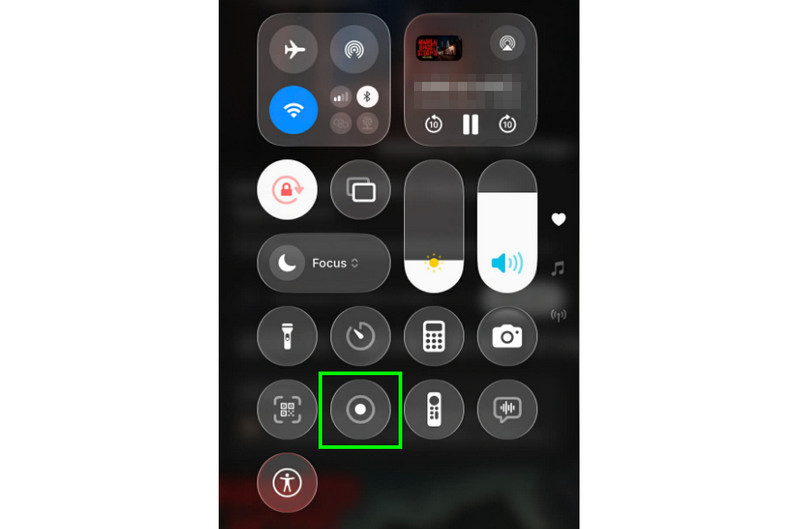
Step 1Open your device and press the Assistive Touch feature.
Step 2Then, tap the Control Center option to see all the features of your device.
Step 3Press the Screen Recorder feature to begin the recording process. To finish the recording, press the same button.
Method 4. Record Zoom Meetings on Android
For Android, there is no need for you to download any screen recorder since it has its own Screen Recorder feature. This feature is perfect if you want to effectively record a meeting on Zoom. The process is also simple, making it an ideal method for participants who don't have permission to record a meeting.
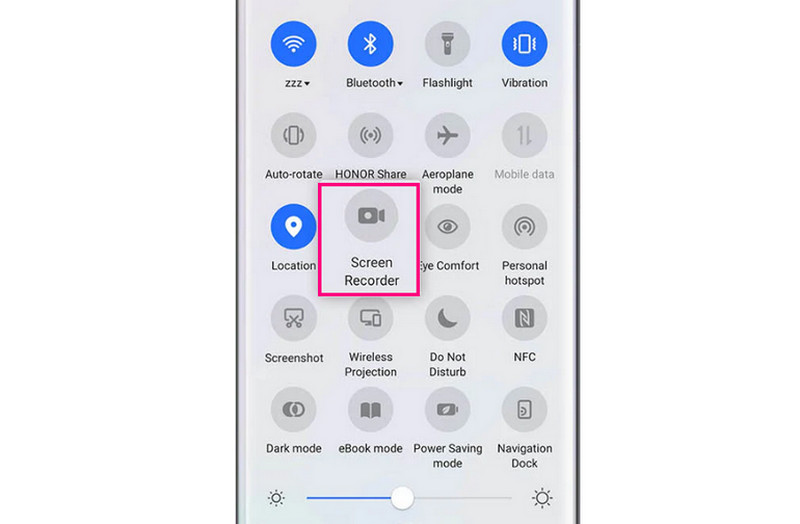
Step 1After you open your Android, slide down to proceed to the Notification panel.
Step 2Then, locate and press the Screen Recorder button. You also have to enable the microphone to record the audio from the meeting.
Step 3Press the Stop function to finish recording the meeting on your device.
Part 5. Where Do Zoom Recordings Go
Wondering where Zoom recordings go? Well, if you record the meeting locally, you can find the recordings in the Documents > Zoom folder. If you recorded the meeting on the cloud, proceed to Zoom's server and access the Zoom web portal > Recordings tab.
Part 6. How to Download Zoom Recordings
Want to learn how to download Zoom recordings?. If so, use the steps below.
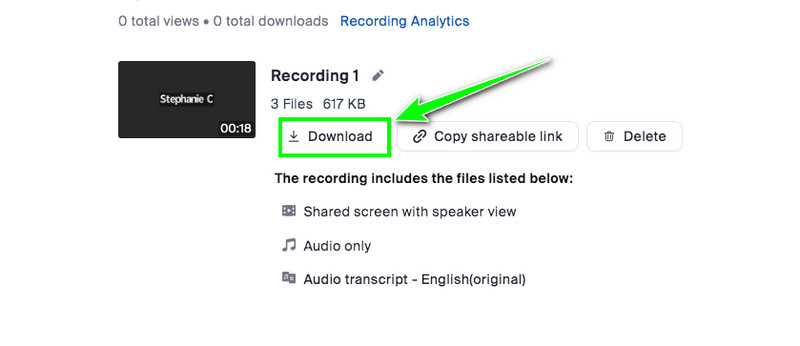
Step 1Proceed to the Zoom web portal and navigate to the Recordings section.
Step 2Then, browse the recordings and hit the Download button to start the recording.
Step 3Once done, you can check the recordings on your computer.
Part 7. How to Edit a Zoom Recording
If you are using Zoom, you can edit the recording by trimming it. To do that, open Zoom and play the recording from the Recording section. Then, you can already use the Trimmer function to trim and cut the video. Take note that Zoom is only capable of trimming the recordings. To add effects, crop, and enhance your recordings, it is suggested to use a better video editor.
Part 8. How to Extract Transcripts from Zoom Recordings
For cloud recording, you can extract a transcript from a Zoom recording by enabling it in the Settings. To extract the transcript from Zoom recordings, you have to:
Step 1Sign in to the Zoom web portal and proceed to the Settings > Recording options.
Step 2Then, turn on the Audio Transcript feature. Then, start the recording.
Step 3After the meeting, go back to the Zoom web portal and access your recording to download the .vtt transcript file. With that, you can open it in a text editor or transcode it to plain text.
Part 9. How to Capture a Video on Zoom Without a Meeting
Want to learn how to record a video on Zoom without a meeting? Use the steps we have provided below.
Step 1Open Zoom and click the New Meeting button. There is no need for you to invite anyone.
Step 2You can now turn on your camera or insert a video that you want to play and record.
Step 3Then, tap Record to begin the video recording process. After the recording, you can access the video in the Document > Zoom folder.
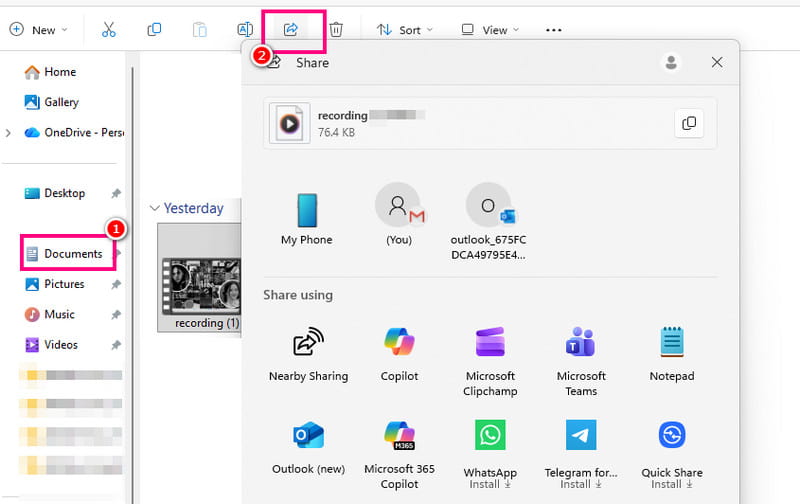
Part 10. Sharing Zoom Recordings
If you are done downloading or saving the recordings, sharing them is a simple task. All you need is to access the recordings on the Document > Zoom folder and select the recording. After that, hit the Share button. Then, you can now share the file with other platforms.
Part 11. Troubleshooting Common Problems
There are times when you encounter some problems when recording. Check here and explore the best troubleshooting method you can use.
Recording Button not Visible
If you are not the host or co-host, you won't see the Record button. The best solution is to ask permission from the host for an effective recording process.
Recording Fails to Start
If you don't have enough storage space, you can't record a meeting. Thus, always ensure that you have enough storage space. You can remove/delete unnecessary files to free up your space.
No Audio in Recording
If the microphone or audio is muted, you won't hear what from the meeting. Ensure that it is in unmute mode. Plus, the Record audio option must be enabled.
Now you have learned how to record a meeting on Zoom. With that, if you want to save an important meeting or conversation, feel free to use all the methods provided in this tutorial. You even learned how to record Zoom meetings using various devices. Plus, if you want to record a meeting for free and without asking for permission, you can use AVAide Screen Recorder. With this recorder, you can record a Zoom meeting and save it with the best video and audio quality. You can even improve the recordings by using the basic editing tools from the software, making it a powerful recorder and editor.
ABOUT THE AUTHOR

Record screen, audio, webcam, gameplay, online meetings, as well as iPhone/Android screen on your computer.