Microsoft Teams is an excellent software for collaboration. It helps you communicate with your co-leagues with Cam, making the conversation engaging. The good part about this software is that you can access its Recorder feature. This feature is perfect if you want to record your meeting and save it for various purposes. Do you want to learn how to record your meeting on Microsoft Teams? Worry no more! We are here to give you all the best information you need. Check this tutorial and learn how to record a Teams meeting successfully.
Part 1. Who Can Record on Teams Meeting
Microsoft Teams is an amazing tool perfect for meetings and other collaboration tasks. You can even access its recording feature for a smooth recording procedure. However, you must be aware that not everyone can use the recording feature. This feature can only be used by some users who have the permission set by an IT admin from the company. With that, external guests or any anonymous users cannot record a meeting on Teams. In addition to that, there are more requirements you must have, especially the licenses. It would be better to have the Premium version of Teams for an effective recording process.
Part 2. How to Record Teams Meeting Using a Built-in Recorder
As mentioned above, there are various requirements you need to have an effective recording process. But if you are qualified, then the recording process will be smooth. What we like about the recording feature is that you can record the meeting as long as you need. Plus, it ensures to give you get the best quality, leading to a better viewing experience. So, if you want to start learning how to record a meeting in Teams, use the instructions below.
Step 1Step 1. Download and open Microsoft Teams on your computer. After that, launch it to start the process.
Step 2Step 2. Now, you can join or start the meeting. Ensure that everything is already prepared, such as your mic, camera, and more.
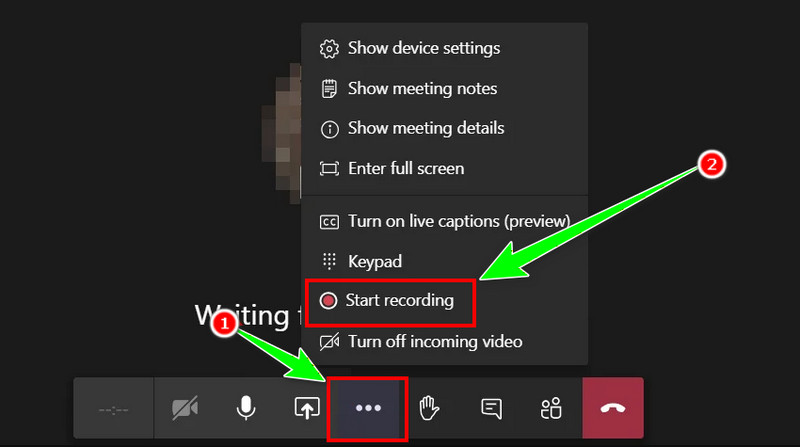
Step 3Step 3. Once the meeting starts, you can now click the three-dot option below and select the Start Recording option. Hit Stop to finish the recording process.
Part 3. Best Software to Record a Teams Meeting on Windows and Mac
When using the Microsoft Teams program, there are lots of restrictions when recording a meeting. So, if you are looking for an excellent replacement for the software for a better recording process, we recommend using AVAide Screen Recorder. This software is more reliable since you can record your meetings in Teams without encountering any problems. The best part here is that you can record without people knowing. Plus, the recording process is simple. You can even select your desired screen areas before the procedure. What we like here is that you can get an excellent video and audio quality after the recording process. You can even schedule the recording if you want to. It also lets you edit the recorded meeting, like cropping, trimming, inserting a filter, and more. Thus, if you want an amazing screen recorder, consider using AVAide Screen Recorder.
To learn how to record a Microsoft Teams meeting using this program, you can follow the detailed procedure below.
Step 1Download and install AVAide Screen Recorder on your Mac or Windows computer. For instant access, use the clickable Free Download buttons below.

FREE DOWNLOAD For Windows 7 or later
 Secure Download
FREE DOWNLOAD For Mac OS X 10.13 or later
Secure DownloadStep 2Then, from the interface, you can choose between the Full or Custom options. Choose Full to record your entire screen. Select Custom to record your preferred area from the screen.
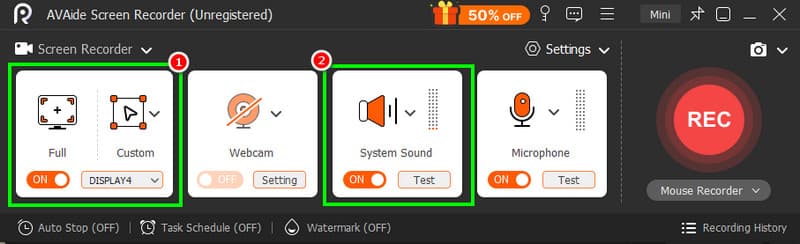
Ensure that the System Sound function is turned on to record the audio from your device.
Step 3Click the REC button from the right interface to start recording the meeting in Teams. The screen recording will begin after the three-second countdown.
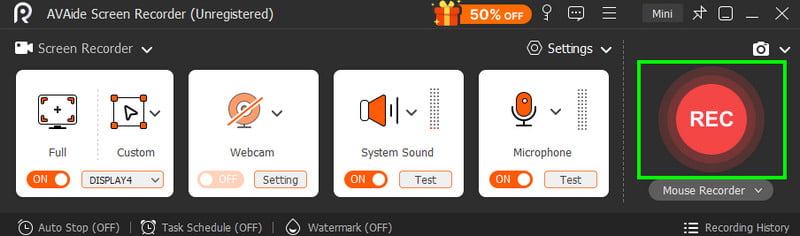
Hit Stop to finish the recording process.
Step 4Once the preview shows up, you can tap Play to check the recorded meeting. To save your meeting, tap the Export feature.

Thanks to this software, you can effectively record your meeting on Teams. What we like here is that you can rely on this program for recording various content. Thus, if you want to screen record on Windows and Mac, feel free to access AVAide Screen Recorder.
Part 4. Record a Meeting via Microsoft Stream
Microsoft Stream is an integrated video service for Teams that automatically stores meeting recordings. It also includes a built-in screen recorder, enabling you to capture meetings directly from the Stream application. To start the recording, see the methods below.
Step 1Launch Stream and hit the New Video Recording button.
Step 2Then, select the New Screen Recording. After you open the camera, proceed to the Settings from Options and turn on the audio and camera.
Step 3After that, begin recording by clicking the Start Recording button.
Part 5. How to Record a Teams Meeting from your Phone
Can you record a meeting from your phone? Well, the answer is yes. After joining the meeting in Teams, you can use your phone's recording feature to record the meeting. Use the methods below for an effective recording feature.
Record Meetings on iOS
An iOS device can offer its built-in screen recorder. With this feature, you can record the meetings in Teams without any restrictions. Use the steps below and learn how to screen record on iPhone.
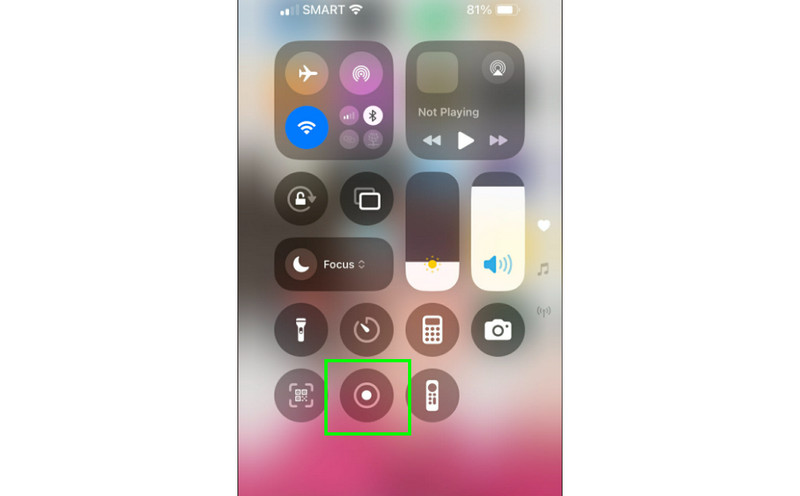
Step 1Open your iPhone and press the Assistive Touch feature.
Step 2After that, tap the Screen Recorder symbol. After clicking it, the three-second countdown will start.
Step 3Finish the recording process by clicking the Stop function.
Record Meetings on Android
Nowadays, Android has a pre-built recorder that can help you capture any meetings. To check its capability, see the provided steps.
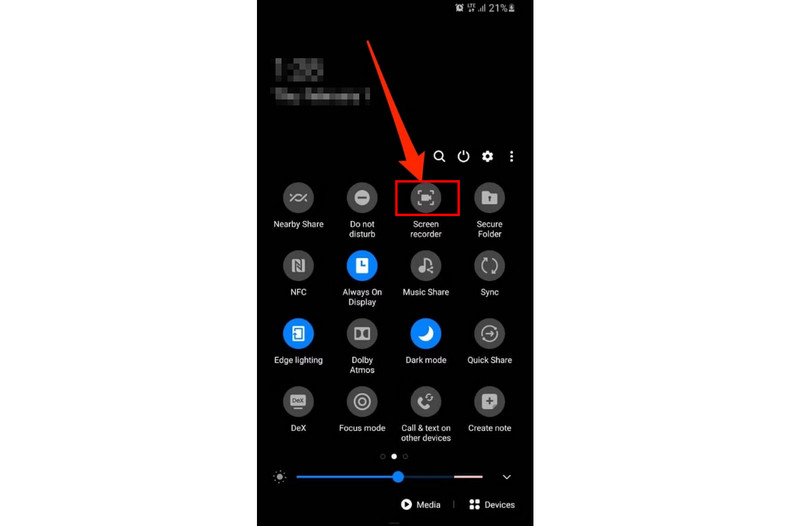
Step 1On your Android, you can start joining a meeting in Microsoft Teams. After that, go to the notification, and you will see various features.
Step 2Hit the Screen Recorder feature to start the recording procedure. To finish the recording, tap the Stop button.
Step 3You can now watch the recorded meeting on the Gallery application.
With the methods above, you can tell that recording a meeting on your phone is a possible task. Thus, follow the steps for a smooth recording process.
There you have it! You've learned how to capture a Microsoft Teams Meeting effectively. However, you must take note that not everyone can record on the software. Thus, if you want a better and accessible screen recorder, feel free to use AVAide Screen Recorder. This screen recorder can record any content from your computer, including meetings, making it the most powerful program for all users.
ABOUT THE AUTHOR

Record screen, audio, webcam, gameplay, online meetings, as well as iPhone/Android screen on your computer.