Come registrare lo schermo su un laptop Lenovo Dipende dallo strumento che scegli, dalle funzionalità integrate di Windows ai software più avanzati. Questa guida mostra metodi semplici, chiari ed efficaci per acquisire lo schermo sui dispositivi Lenovo, sia per tutorial, riunioni, giochi o per le normali registrazioni quotidiane.
Metodo 1. Utilizzo della Xbox Game Bar
La funzione di registrazione integrata nella Xbox Game Bar è di proprietà di Microsoft, si integra perfettamente con Windows ed è la soluzione di registrazione più comoda per gli utenti Lenovo. È stata creata per il gaming, ma funge anche da registratore di applicazioni standard, creatore di tutorial e registratore di browser. Il vantaggio principale è che non richiede alcuna configurazione: è pronta all'uso immediatamente.
Ci sono però degli svantaggi. Non registra il desktop né Esplora file e la personalizzazione è limitata agli strumenti professionali. Tuttavia, rimane una delle opzioni integrate più comode per sessioni informali in cui la qualità e l'impegno non sono così importanti.
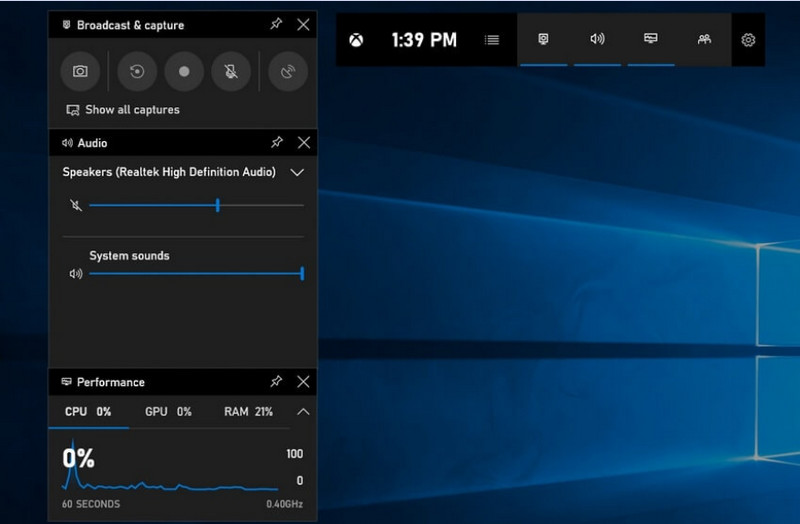
Passo 1Per aprire la Xbox Game Bar, premi Windows + G sulla tua tastiera.
Passo 2Trovare la Catturare pannello o fai clic su di esso dal Widget menù.
Passaggio 3Clicca il Registra (●) pulsante o premere Tasto Windows + Alt + R.
Passaggio 4Se desideri registrare la voce, abilita l'opzione Microfono.
Passaggio 5Premere Tasto Windows + Alt + R di nuovo oppure fai clic Fermare) da completare.
Passaggio 6Troverai la tua registrazione in Video > Cattura.
Metodo 2. Utilizzo di Lenovo Vantage
Lenovo Vantage non è un programma per la registrazione dello schermo; è una suite per la gestione e l'ottimizzazione del sistema. Il suo ruolo nella registrazione è più indiretto, con poche funzionalità che agevolano il processo di registrazione, a seconda del modello del dispositivo utilizzato, o anche con alcuni dispositivi che offrono scorciatoie o strumenti per la fotocamera/schermo che possono essere d'aiuto.
Si tratta di una vasta gamma di prestazioni e disponibilità. Le funzioni di registrazione di base potrebbero essere supportate su alcuni dispositivi Lenovo, ma altri potrebbero non averle affatto. È limitato e alquanto incoerente in ciò che può fare per i registratori a schermo intero, ma potrebbe essere utile per gli utenti che desiderano rimanere all'interno dell'ecosistema Lenovo o registrare podcast contenuti con strumenti di base.
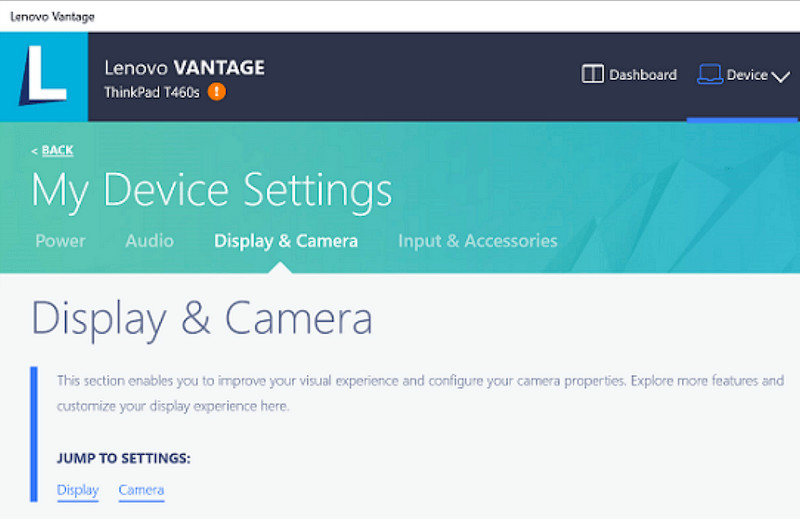
Passo 1Vai al Inizio menu e fai clic su Lenovo Vantage.
Passo 2Rubinetto Impostazioni del mio dispositivo > Display e fotocamera.
Passaggio 3Verifica la presenza di registrazioni o altre funzioni disponibili.
Passaggio 4Rendi disponibili tutte le opzioni o scorciatoie necessarie.
Passaggio 5Registra la musica utilizzando la funzione apposita (se possibile).
Passaggio 6Trova le registrazioni che hai salvato nella cartella Video.
Metodo 3. Utilizzo di Legion Zone / Lenovo Nerve Center
Lenovo Nerve Center (o Legion Nerve Center: i nuovi strumenti di Legion hanno sostituito Nerve Sense) è ottimizzato per i dispositivi Lenovo, in particolare per i laptop Lenovo Legion, ed è pensato per i giocatori. È inoltre strettamente integrato con gli strumenti per l'ottimizzazione delle prestazioni di gioco, consentendo agli utenti di acquisire screenshot delle proprie partite monitorando e ottimizzando al contempo le risorse di sistema.
Si tratta, tuttavia, di un registratore piuttosto basilare. È più orientato alla praticità che alla personalizzazione e offre solo opzioni di registrazione di base con un controllo limitato su risoluzione, bitrate e impostazioni avanzate. Inoltre, è disponibile solo su alcuni sistemi più recenti, mentre altri lo hanno sostituito o rimosso dai loro sistemi, quindi non è più affidabile come un tempo.
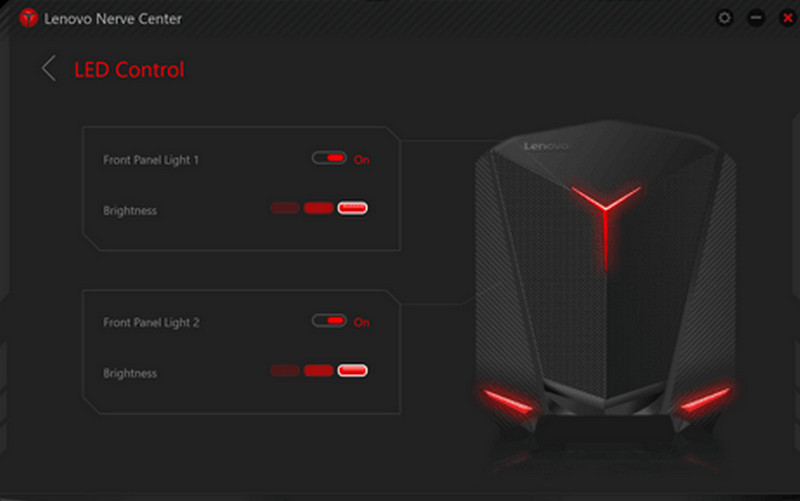
Passo 1Accedi al Centro di controllo Lenovo o Zona della Legione dal dispositivo.
Passo 2Accedi agli strumenti di registrazione e/o di gioco.
Passaggio 3Se possibile, modifica le impostazioni di registrazione, come la risoluzione o la qualità audio.
Passaggio 4Avvia il gioco o l'applicazione.
Passaggio 5Registra utilizzando la scorciatoia o il pulsante predefinito.
Passaggio 6Interrompi la registrazione e guarda nel tuo Video nella cartella per verificare se il file è stato registrato.
Metodo 4. Utilizzo di AVAide Screen Recorder
AVAide Screen Recorder Si tratta di un registratore schermo più sofisticato e versatile per Lenovo rispetto a quello integrato. È pensato per chi desidera una qualità video superiore, un funzionamento più fluido e un maggiore controllo sulla registrazione. È lo strumento perfetto per creare tutorial, registrare riunioni o catturare sessioni di gioco, senza bisogno di configurazioni complicate, il tutto a livello professionale.
Oltre a catturare l'audio di sistema, l'input del microfono, la webcam e porzioni dello schermo, supporta anche la registrazione in Full HD e persino in 4K con un ritardo minimo rispetto ai registratori di base. Questo la rende un'applicazione completa per la cattura dello schermo, ideale sia per il lavoro che per il tempo libero.
- Registra video in 1080p o 4K con prestazioni fluide e senza ritardi.
- Registra in modalità schermo intero o personalizzata a seconda delle tue esigenze.
- Registra simultaneamente suoni interni e voce con un'uscita nitida.
- Aggiungi la registrazione Facecam per tutorial, presentazioni o video di gameplay.
- Ritaglia, comprimi e migliora le registrazioni dopo l'acquisizione.

 Download sicuro
Passo 1Scarica e installa il software
Visita il sito web ufficiale di AVAide Screen Recorder. Scarica il programma di installazione per Windows, installalo sul tuo laptop Lenovo ed eseguilo.
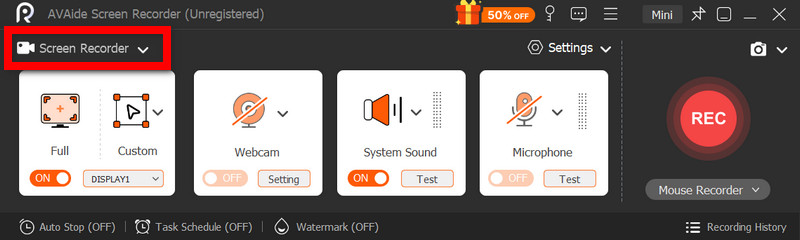
Passo 2Seleziona la modalità di registrazione
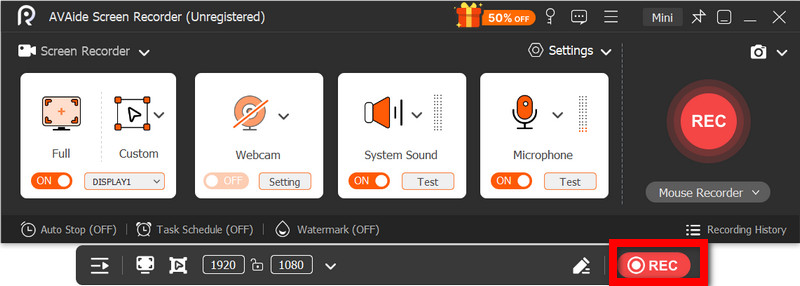
Apri il software, quindi fai clic Registratore dello schermo. Registra l'intero schermo con Completo o una parte dello schermo con Costume.
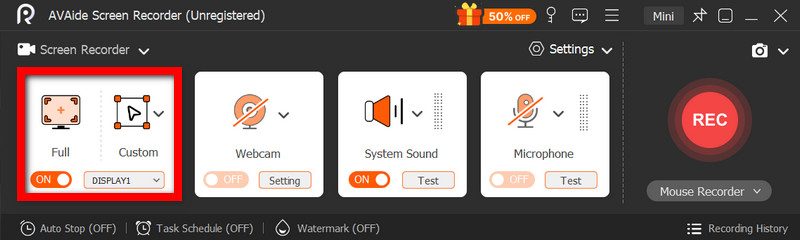
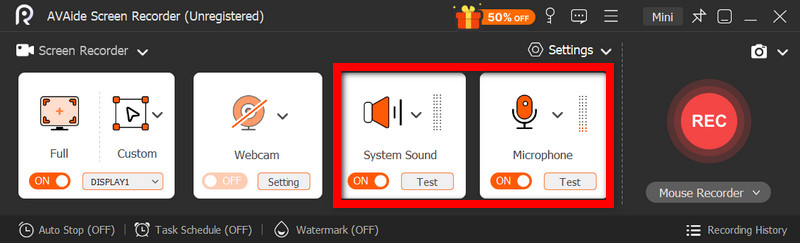
Passaggio 3Configura le impostazioni audio
Per registrare qualsiasi suono prodotto dal computer, attivare Suono di sistemaPer includere la tua voce, attiva l'opzione MicrofonoLa webcam può essere attivata all'occorrenza.
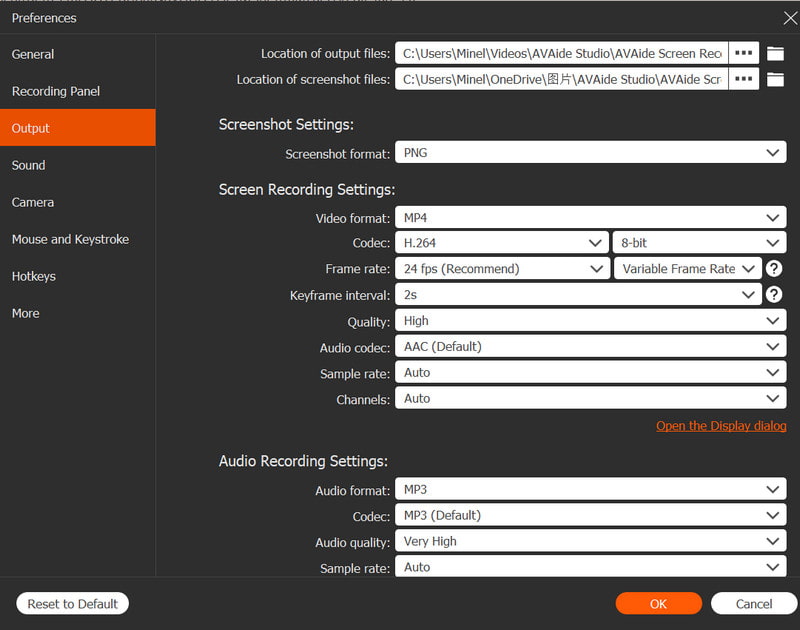
Passaggio 4Regola le impostazioni di registrazione
Usa il Impostazioni pulsante per configurare la qualità video, la risoluzione, la frequenza dei fotogrammi e il formato di output per ottenere prestazioni di registrazione ottimali.
Passaggio 5Inizia a registrare
premi il REC Pulsante per avviare la registrazione. Registrazioni di Google Meet, tutorial, sessioni di gioco o qualsiasi attività sullo schermo possono essere registrate senza problemi.
Passaggio 6Interrompi e salva la registrazione
Quando hai finito, fai clic su Fermare pulsante. Visualizza in anteprima la registrazione, modificala rapidamente se necessario e salvala immediatamente sul tuo computer.
Metodo 5. Utilizzo delle Impostazioni rapide
Sui tablet Android Lenovo è presente un'opzione integrata per la registrazione dello schermo nelle impostazioni rapide. Il modo migliore per registrare tutorial, sessioni di gioco o attività delle app sul tablet è senza dover scaricare app di terze parti. Facile, veloce e ottimizzato per l'uso mobile, è ideale per registrazioni rapide in movimento.
Non offre le funzionalità avanzate di modifica e personalizzazione presenti in altri strumenti di acquisizione schermo, ma è sufficiente per semplici acquisizioni dello schermo con audio.
Passo 1Scorri verso l'alto dalla parte inferiore dello schermo per aprire il Impostazioni rapide.
Passo 2Cerca il Registrazione dello schermo o Registratore dello schermo pulsante. Se non è presente, fai clic sul Modificare pulsante e aggiungilo al tuo pannello.
Passaggio 3Clic Registratore dello schermo, quindi seleziona le impostazioni desiderate.
Passaggio 4Rubinetto Inizio per avviare la registrazione. Ci sarà un conto alla rovescia prima dell'inizio della registrazione.
Passaggio 5Tocca la barra degli strumenti mobile o la barra delle notifiche, quindi premi Fermare per terminare la registrazione.
Risoluzione dei problemi comuni di registrazione dello schermo su Lenovo
Puoi trovare suggerimenti per risolvere i problemi più comuni che si presentano durante la registrazione dello schermo su un dispositivo Lenovo.
Sebbene in genere non si riscontrino problemi significativi con la registrazione dello schermo sui dispositivi Lenovo, è sempre possibile che si presentino delle difficoltà a seconda del programma o del dispositivo di registrazione utilizzato. Di seguito sono elencati i problemi più comuni e le relative soluzioni.
- Il programma di registrazione dello schermo non funziona: Riavvia il dispositivo e riprova. Per gli strumenti integrati come Xbox Game Bar, assicurati che siano abilitati nelle Impostazioni di Windows, nella sezione Giochi.
- Nessun audio nella registrazione: Prima di registrare, verifica che l'audio di sistema o il microfono siano attivati. Assicurati inoltre che il volume di sistema non sia disattivato.
- Video lento o di bassa qualità: Riduci la qualità video o chiudi le applicazioni in background. Anche l'aggiornamento dei driver della scheda grafica può migliorare le prestazioni.
- Impossibile registrare il desktop o Esplora file: Questa è una delle limitazioni comuni della Xbox Game Bar. Se vuoi registrare lo schermo e catturare tutto, usa un programma avanzato come AVAide Screen Recorder, uno dei i migliori registratori dello schermo per Mac e Windows.
- La registrazione non viene salvata: Assicurati che lo spazio di archiviazione non sia pieno e verifica la posizione di salvataggio predefinita. Nelle impostazioni, cambia la cartella di output e riprova.
Pulsante di registrazione schermo Lenovo Le opzioni variano a seconda del dispositivo e dello strumento utilizzato. In generale, le funzionalità integrate e le app di terze parti semplificano la registrazione, offrendo modalità flessibili per acquisire, salvare e gestire in modo efficiente l'attività dello schermo sui dispositivi Lenovo.
INFORMAZIONI SULL'AUTORE

Cattura le attività sullo schermo con audio, riunioni online, video di gioco, musica, webcam, ecc.
Registrazione dello schermo
- Registrazione schermo su Windows
- Registra Instagram Live
- Copia video da Tubi
- Converti i video di YouTube in MP3
- Scarica video da Fansly
- Scaricare i video di JW Player
- Scarica i video di Bilibili
- Scarica i video di Patreon
- Scarica i video di SpankBang
- Scarica i video di Discord
- Scarica il video di DoodSream